Exploring Shopware: Languages in Shopware 6 Settings

The ability to expand your business to foreign markets is always a benefit. When we talk about e-commerce platforms, it is usually based on two pillars. Firstly, it is support for multiple currencies. Secondly, it is support for multiple languages. However, in some cases, you need to translate not only the frontend appearance of your e-commerce website but also its backend part. If you have an international team of administrators, you’ve come to the right place. Below, we explore the Languages screen situated in the Shopware 6 administration. This section of Settings lets you manage the existing languages available in the backend as well as add new ones. In the following article, we explore these processes. It sheds light on how to find the section in the administration, what its purpose is, how to manage the existing grid records. Also, you will find recommendations on the related import/export processes as well as an FAQ section for those who want to explore the topic briefly.

Note that we provide Shopware integration with external platforms. Contact our support for further information or try our Improved Import & Export Extension for Shopware.
Table of contents
- 1 Languages Screen in Shopware 6 Admin
- 2 Adding New Languages in Shopware 6 Admin
- 3 How to Import Languages to Shopware 6
- 4 Shopware 6 Languages FAQ
- 5 Shopware 6 Essentials FAQ
- 5.1 How to create a Shopware ID?
- 5.2 How to create a Shopware account?
- 5.3 What is Shopware master data?
- 5.4 How to add a shop in Shopware?
- 5.5 How to add a payment method to your Shopware account?
- 5.6 How to create a deposit in Shopware?
- 5.7 How to purchase Shopware extensions?
- 5.8 How to get support in Shopware?
- 5.9 How to migrate to Shopware 6?
- 5.10 How to automate import and export processes in Shopware 6?
- 5.11 How to integrate Shopware 6 with external systems?
Languages Screen in Shopware 6 Admin
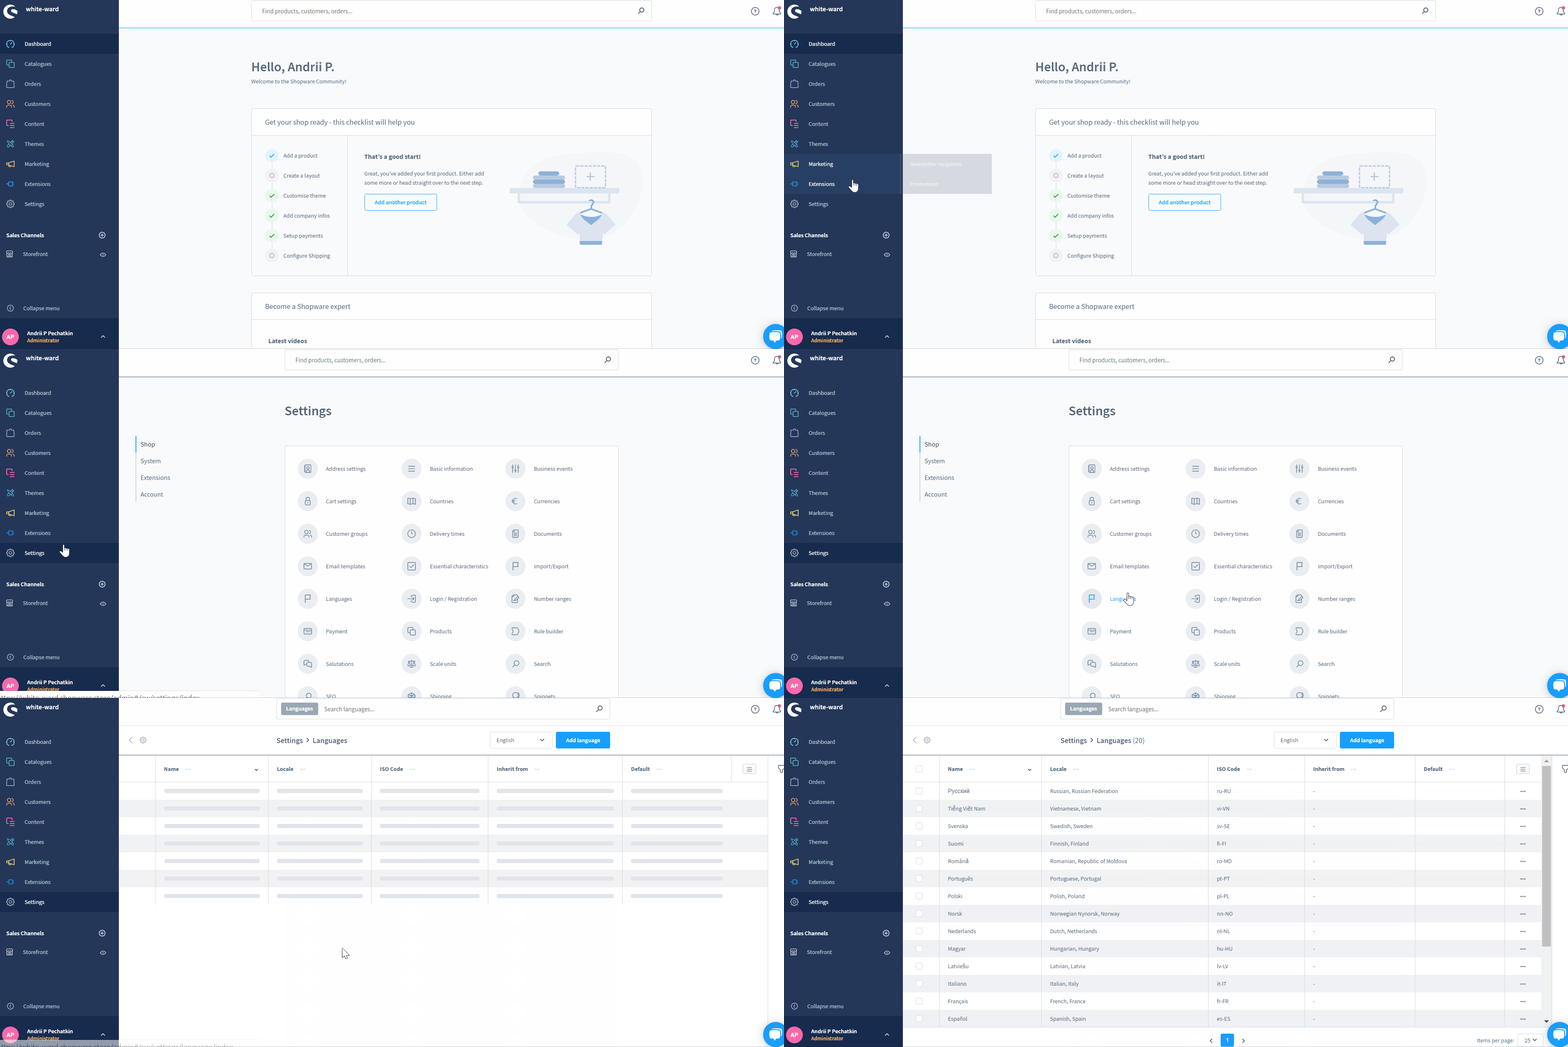
Let’s see how to find the Languages screen in your administration. The corresponding page is situated in the primary settings section of your Shopware 6 backend:
- Go to your Shopware 6 administration;
- Open its main menu;
- Proceed to the Settings section;
- Open the Shop subsection;
- Hit the Languages button.

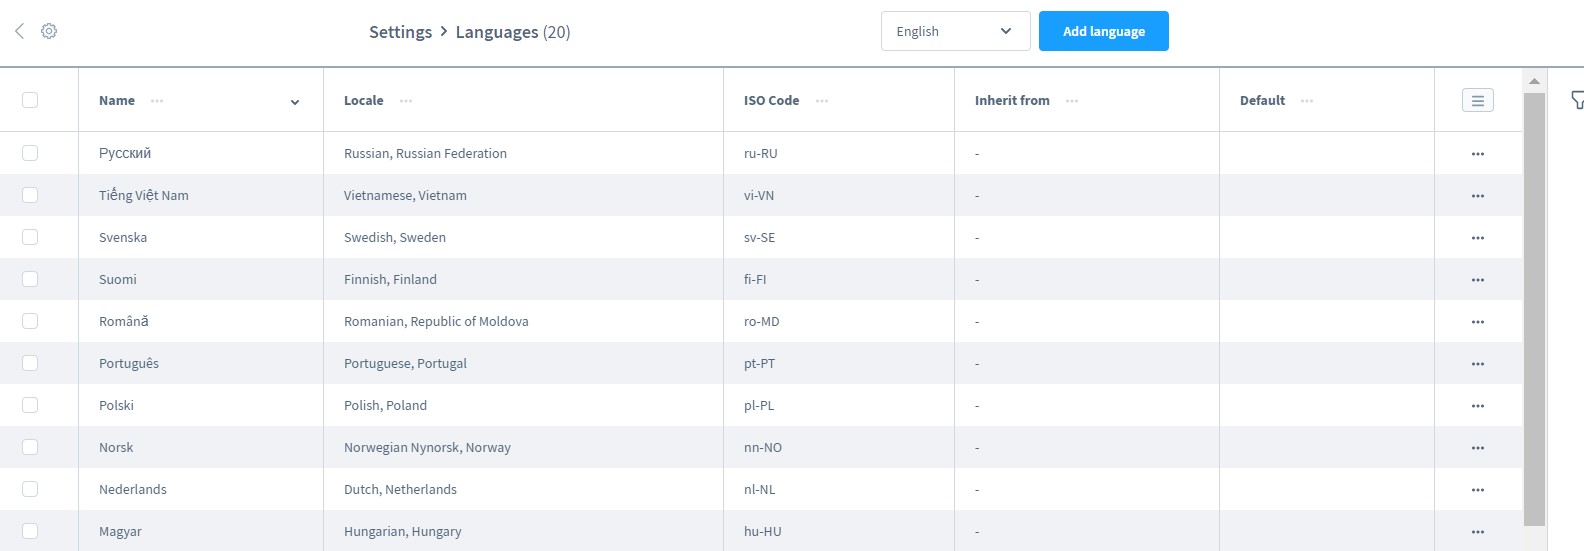
Here, you can see all the currently configured languages of your administration. They are used within your backend and let you store translations for various features in the corresponding language. The corresponding grid displays language name, localization, ISO code, inheritance, as well as the marker which indicates the default admin language.

Shopware 6 lets you edit or delete the existing languages with the help of the context menu.

The filter icon lets you narrow down the selection of records in the grid. Various filters help you get a more detailed overview:
- Show only “root” languages – this option displays languages that do not inherit from other languages;
- Show only inherited languages – this option displays languages derived from one of the root languages.

Adding New Languages in Shopware 6 Admin
Click the Add language button above the grid to add a new language in the Shopware 6 administration.

The system transfers you to the following screen:

- Name – specify the name of your new language;
- ISO code – type its official ISO code;
- Inherit from – indicate an existing language your new language should inherit from. If there are no translations available for the new language, the system leverages the translations from the inherited language;
- Locale – set the region or country associated with the language.
Now, when your new language is created, you can apply it to sales channels.
How to Import Languages to Shopware 6
If you need to move data to Shopware 6, we have something that should impress you. With our team, you can eliminate the necessity to recreate multiple entities manually. We will help you simplify and automate all the related processes. Contact our support for more details and try our . You can use it to import any entity to Shopware 6. Create schedules to automate all import and export processes. The extension will launch them with no interaction on the admin side. Also, you can create schemes that map all the external data to the corresponding places within your database. Any unsupported entity or attribute is replaced with the appropriate designation. Please, consult our specialists regarding languages as an import entity.
Shopware 6 Languages FAQ
How to find Languages in Shopware 6?
You can find the Languages configuration screen under Settings -> Shop -> Languages.
How to add new languages in Shopware 6?
Hit the Add language button under Settings -> Shop -> Languages to create a new language in Shopware 6. Next, provide the necessary information as shown above.
How to edit languages in Shopware 6?
Go to Settings -> Shop -> Languages and use the context menu to edit a language.
How to delete languages in Shopware 6?
Use the same approach: go to Settings -> Shop -> Languages and use the context menu.
How to assign languages to sales channels in Shopware 6?
You can assign a language to a sales channel while creating the latter. Find the corresponding option in the configuration and apply the necessary language to it.
Shopware 6 Essentials FAQ
How to create a Shopware ID?
Your Shopware ID is provided automatically while you create a Shopware account.
How to create a Shopware account?
Visit the registration page, click the Register Now link, and fill in the form to create a Shopware account. It is only the first part of the procedure. Next, you will receive a confirmation email. Follow the instructions provided there to complete the registration.
What is Shopware master data?
Under master data, we assume all the information about your company that is stored in Shopware. It usually consists of such company details as physical addresses, phone numbers, email addresses, etc.
How to add a shop in Shopware?
You can add a new Shopware shop in your merchant area. There is a link situated on the start screen’s right part that initiates this process. Click it, choose a type of your new shop (a cloud storefront or an on-premise installation), and provide additional information.
How to add a payment method to your Shopware account?
It is possible to add a payment method under Basic Information -> Accounting. You can choose between PayPal, credit card, or direct debit. Add one and use it to place a deposit for purchasing extensions and themes.
How to create a deposit in Shopware?
You can add a deposit to your Shopware shop under Merchant Area -> Shops. Choose a shop to provide funds to and click Open Account Details. Create a deposit that is big enough to cover your future purchase.
How to purchase Shopware extensions?
You can purchase extensions on the Shopware Marketplace. Also, you can do that in the Plugin Manager. Create a deposit, choose the necessary tools, and proceed to the checkout.
How to get support in Shopware?
You can get support with inquiries about accounting and financial services at financial.services@shopware.com and +49 2555 9288 510. If you have questions regarding account or license issues, contact Shopware at info@shopware.com and +49 2555 9288 50.
How to migrate to Shopware 6?
You can use the Improved Import & Export module to manage the migration from your existing e-commerce website to Shopware 6. The extension lets you create schedules and mapping schemes to transfer core entities from any external system. Also, it is possible to use the plugin to migrate from Shopware’s previous versions. Note that we offer export solutions for other e-commerce platforms, so you can easily transfer data from Magento, Shopify, and others to Shopware 6. Contact our team for more information.
How to automate import and export processes in Shopware 6?
With the help of the Improved Import & Export extension for Shopware 6, you can automate recurring data transfers. The module provides the ability to leverage schedules for regular data updates. It launches the corresponding import and export processes according to the specified time frames without interaction on the admin side.
How to integrate Shopware 6 with external systems?
It is possible to integrate Shopware 6 with ERPs, CRMs, accounting tools, and other external systems. You need a third-party connector, such as the Improved Import & Export extension. The module automates repetitive import and export processes as well as modifies data with the help of mapping presets. As a result, the two systems can be tightly connected. The extension follows the requirements of Shopware during import and the connected destination during export.


