Magento 2 URL Rewrites Guide: How to Import, Export & Manage SEO-Friendly URLs Like a Pro

Struggling to manage SEO-friendly URLs in Magento 2? That’s where the Magento 2 URL rewrites come into play. While the platform handles automatic URL generation for products, categories, and CMS pages, it falls short when it comes to importing or exporting those rewrites in bulk — a major roadblock during migrations or Magento SEO updates.
By default, Magento 2 doesn’t offer native tools to import or export URL rewrites, making tasks like moving a product catalog, updating the structure after a rebrand, or syncing data between environments time-consuming and error-prone. You’re left with manual editing or risky database changes — neither of which scale well.
That’s why we created this guide. Below, we explore how URL rewrites work in Magento 2, how the url_rewrite table is structured, and most importantly, how to import and export Magento 2 URL rewrites properly using the Improved Import & Export extension. Whether you’re migrating from Magento 1, syncing multiple store views, or cleaning up old redirect chains, the extension gives you full control over your URL rewrite data, directly from the admin panel.
You’ll also find a breakdown of the Magento 2 URL rewrite import table, complete with attribute descriptions and sample values to help you avoid common pitfalls. Let’s dive in and turn a frustrating manual process into a clean, automated workflow.

Table of contents
- What Are URL Rewrites in Magento 2?
- How Magento 2 Handles URL Rewrites Internally
- How to Enable Magento 2 URL Rewrites
- Limitations of Default URL Rewrite Management in Magento 2
- Magento 2 URL Rewrite Sample CSV Format
- How to Import URL Rewrites to Magento 2
- Exporting URL Rewrites from Magento 2 in Bulk
- Use Cases & Advanced Tips
- Final Words: Take Control of Magento’s URL Rewrites
- FAQ: Magento 2 URL Rewrites
What Are URL Rewrites in Magento 2?
Magento 2 URL rewrites are a core part of the platform’s SEO capabilities, allowing merchants to control how URLs appear in the storefront. With URL rewriting, you can transform auto-generated, system-based URLs into clean, keyword-rich links that are easier for both users and search engines to understand.
What Is a URL Rewrite?
A URL rewrite in Magento 2 is a modification of the default system URL to make it shorter, more descriptive, and more SEO-friendly. It doesn’t change the underlying structure or performance of the page — it simply maps a more readable path to the same content.
Example:
Without rewrite:
https://www.yourstore.com/index.php/catalog/product/view/id/123
With rewrite:
https://www.yourstore.com/blue-running-shoes.html
This makes the page easier to find, improves SEO indexing, and creates a more trustworthy experience for customers.
Magento URL Rewrites vs Redirects: What’s the Difference?
The terms “rewrite” and “redirect” are often used interchangeably — but in Magento 2, they serve different purposes.
- Magento URL Rewrite changes how a URL is displayed to the user without changing the destination.
- Magento Redirect tells the browser to go to a new address, either permanently (301) or temporarily (302).
Magento 2 can automatically generate redirects when you change a product or category URL, ensuring old links still lead users to the correct destination.
Why Magento 2 URL Rewrites Matter
Magento 2 URL rewrites aren’t just a cosmetic upgrade — they’re critical for SEO, user trust, and long-term store performance.
1. Boost SEO with Keyword-Rich URLs
Search engines give ranking preference to URLs that include relevant keywords. By customizing your Magento 2 URL rewrites, you can make product and category pages easier to crawl and rank.
Example:
https://www.yourstore.com/product/view/id/101 → ❌
https://www.yourstore.com/organic-green-tea.html → ✅
This makes it clear to search engines what the page is about — and improves the chance of ranking for “organic green tea.”
2. Enhance UX with Cleaner Links
Shorter, human-readable URLs make your store look more professional and are easier to share on social media or in email campaigns.
3. Support Seasonal and Temporary Campaigns
Magento 2 URL rewrites let you create additional URLs for special campaigns or landing pages without changing the original product or category paths.
Example:
https://www.yourstore.com/valentines-sale/gift-box.html
This rewritten URL can point to the same product as the standard one — perfect for seasonal promotions.
How Magento 2 Handles URL Rewrites Internally
Even though URLs appear clean and keyword-optimized in the storefront, Magento 2 continues to operate using internal entity IDs behind the scenes. Every URL rewrite maps a human-friendly request_path to a system-based target_path, allowing flexibility in how URLs are displayed, without breaking the underlying routing logic.
URL Rewrite: From System Path to SEO URL
When you create or update a URL rewrite, Magento doesn’t delete or modify the original system URL. Instead, it creates a new record in the url_rewrite table that links the readable path (what your customers see) to the technical path (what Magento uses internally).
Example:
Original system URL:
https://www.yourstore.com/catalog/product/view/id/25
Rewritten SEO-friendly URL:
https://www.yourstore.com/best-selling-laptop-2025.html
Magento maps this new request_path (best-selling-laptop-2025.html) to the original target_path (catalog/product/view/id/25) and resolves the correct page when a user visits the site.
Auto vs Custom Rewrites
Magento creates system-generated URL rewrites automatically when products or categories are created. These are updated whenever you change a product name, category path, or URL key.
However, you can also create custom rewrites manually or through import, giving you full control over landing pages, redirects, and seasonal campaigns.
Custom rewrites are especially useful for:
- Redirecting old product URLs after renaming or removing items
- Creating vanity URLs for marketing campaigns
- Improving search engine indexation by adding keyword-rich URLs
Store Scope: One Rewrite Doesn’t Rule Them All
The same URL key can exist across different store views. That’s why store_id is a required field in the url_rewrite table. When importing Magento 2 URL rewrites, make sure each rewrite is mapped to the correct store ID to prevent collisions and broken links.
How to Enable Magento 2 URL Rewrites
Before you can start managing or importing Magento 2 URL rewrites, make sure that the rewrite functionality is enabled. This feature removes unnecessary elements like index.php from your store’s URLs, making them more readable, SEO-friendly, and easier for search engines to crawl.
Step 1: Activate Web Server Rewrites
To enable URL rewrites in Magento 2:
- Go to Admin → Stores → Settings → Configuration.
- In the left-hand panel, expand the General section and click Web.
- Scroll to the Search Engine Optimization section.
- Set Use Web Server Rewrites to Yes.
- Click Save Config to apply your changes.
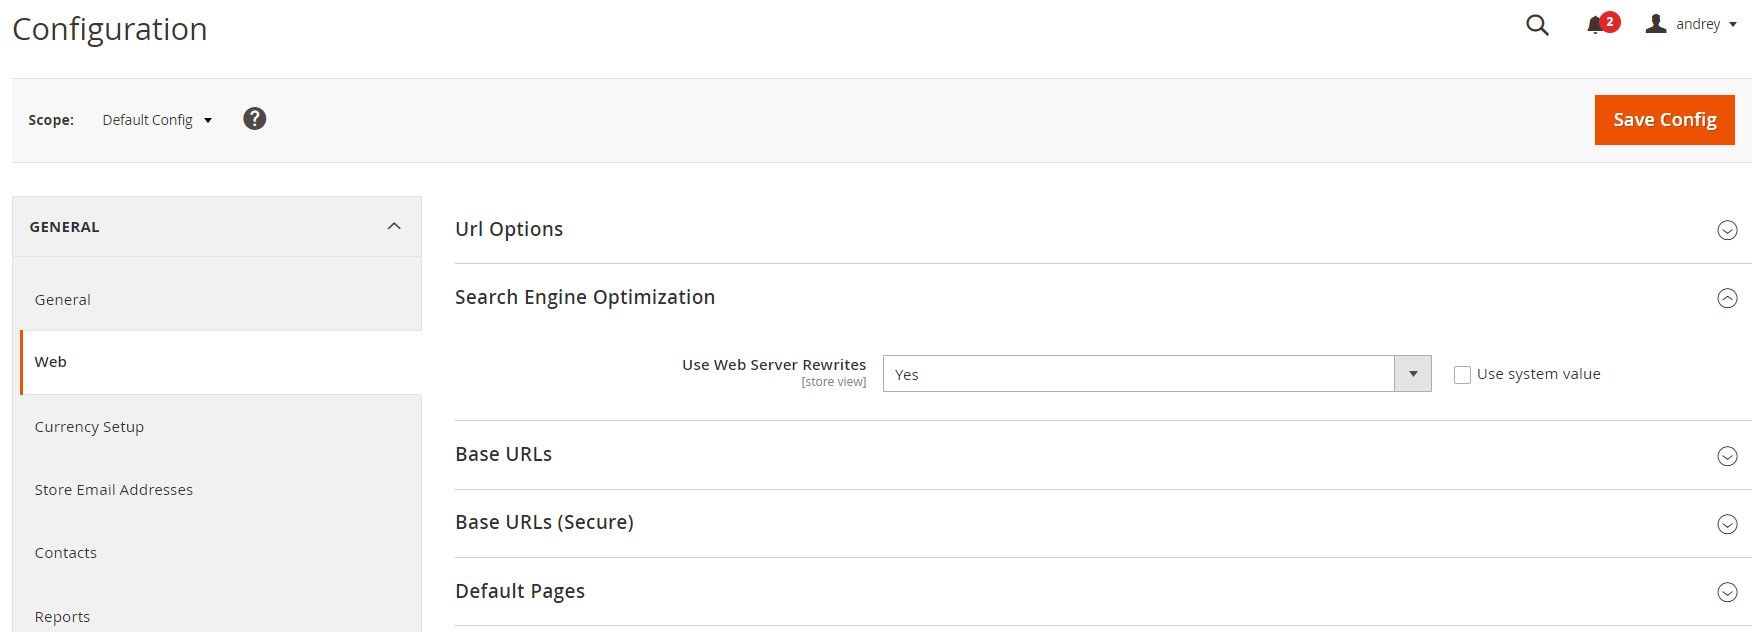
This setting ensures Magento generates clean URLs without the index.php segment — a best practice for SEO and user experience.
Step 2: Regenerate URL Rewrites for Multiple Products
If you’ve made changes to product names, URL keys, or website assignments, you may need to regenerate Magento 2 URL rewrites to reflect the new structure.
To do this:
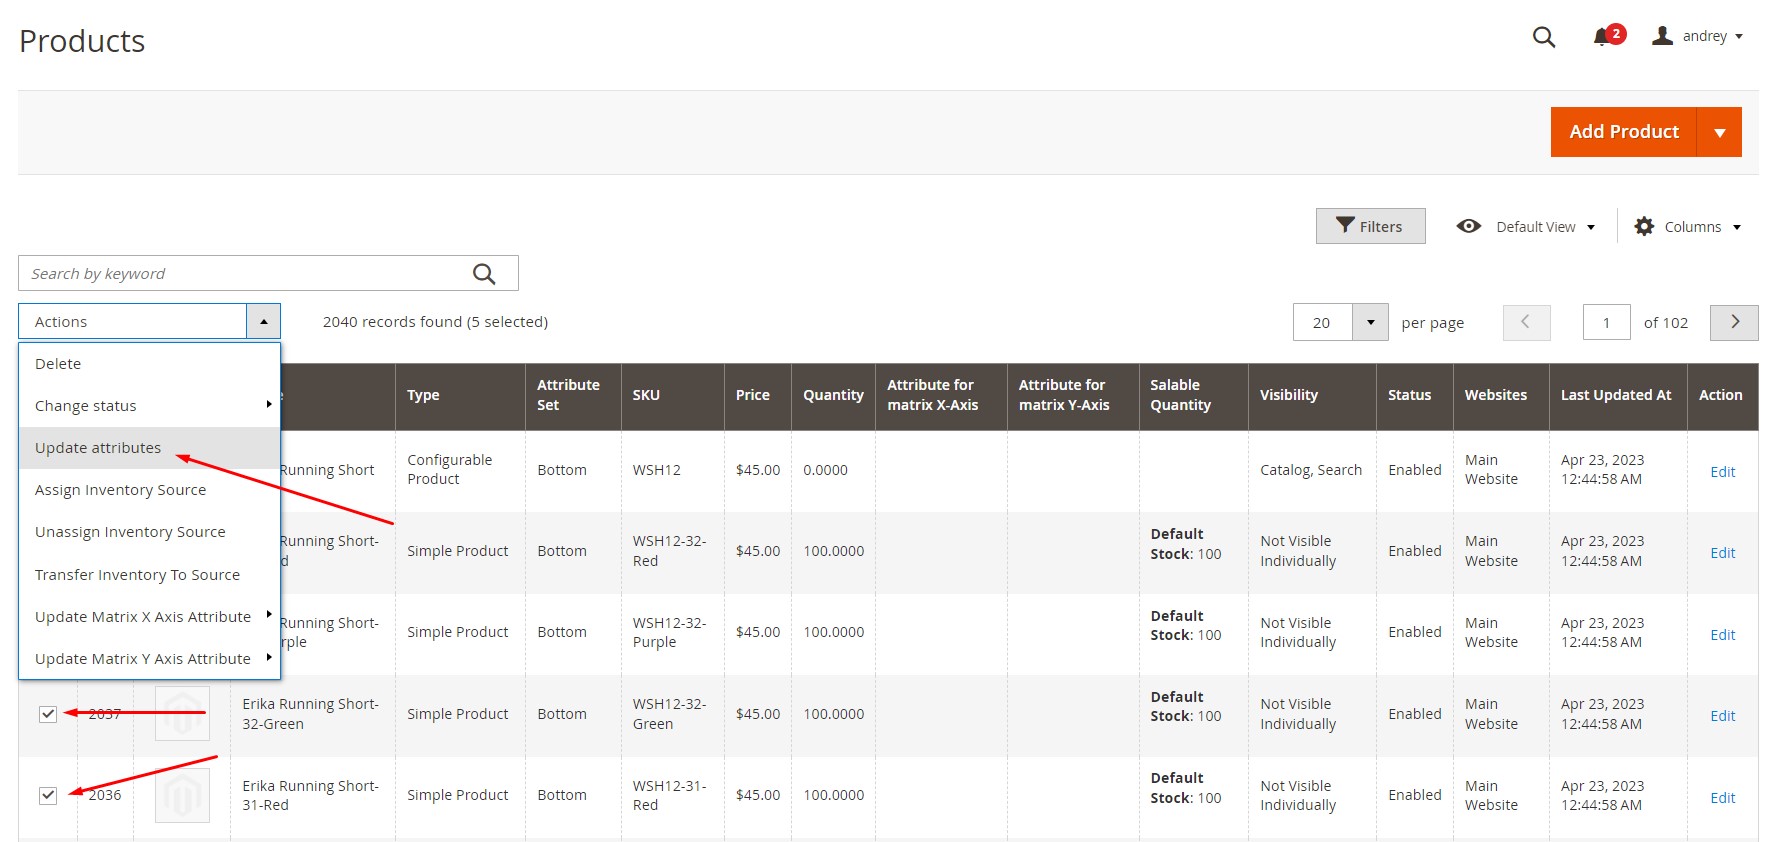
- Go to Admin → Catalog → Products.
- Use the checkboxes to select the products you want to update.
- In the Actions dropdown, choose Update Attributes.
- On the Product Information screen, click the Websites tab.
- In the Add Product to Websites section, select all relevant websites.
- Click Save to regenerate product URLs and apply updated rewrites across the selected store views.
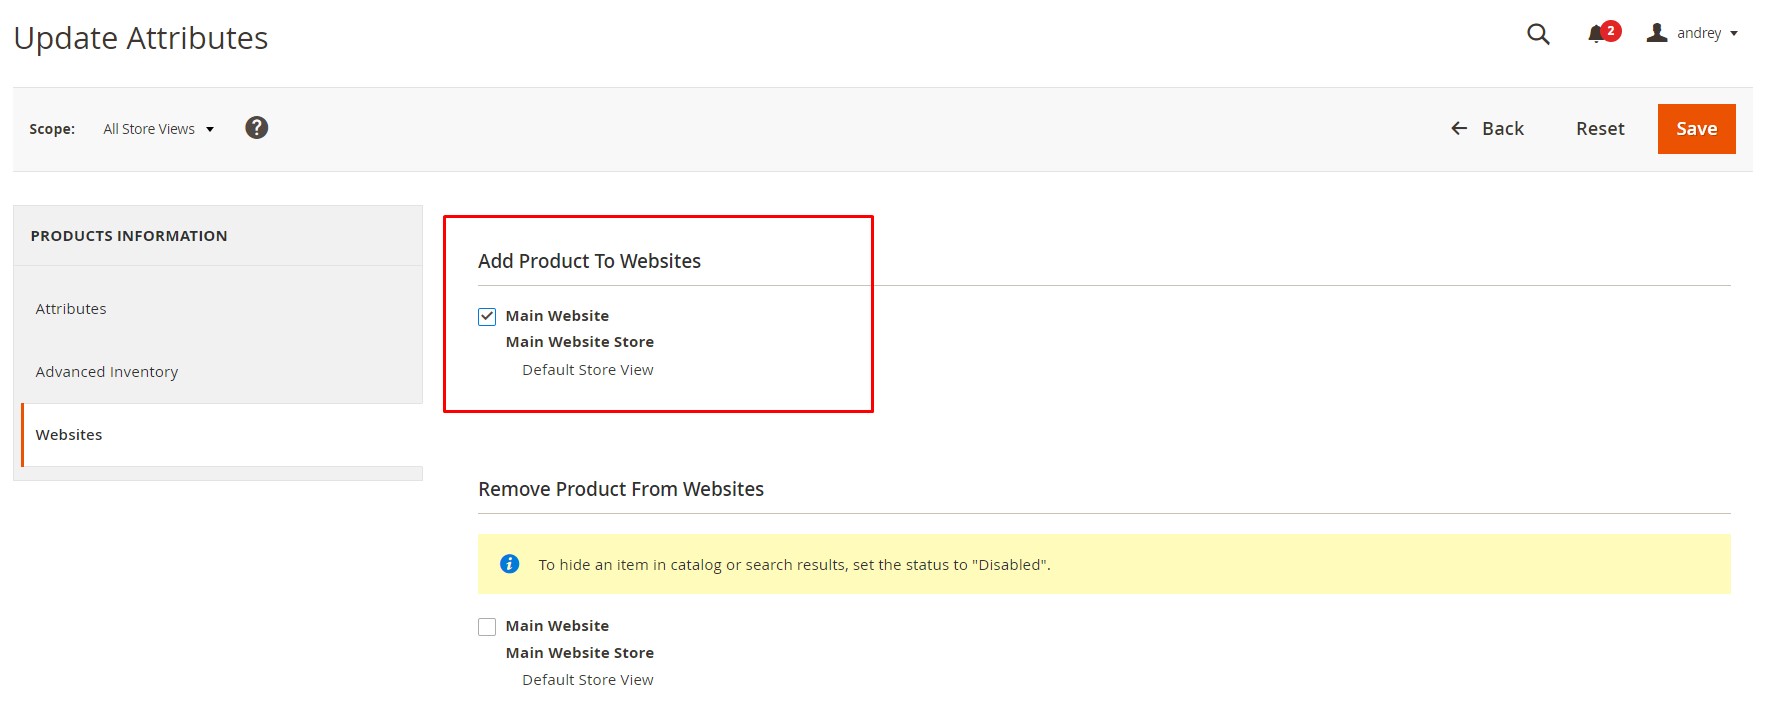
Magento will now recreate SEO-friendly product URLs for each selected item, applying store-specific rewrite logic based on your configuration.
Why This Matters
Keeping your Magento 2 URL rewrites up to date ensures consistent storefront behavior, preserves valuable backlinks, and helps search engines properly index your catalog. Whether you’re launching new store views, adjusting product names, or preparing for a migration, enabling and maintaining URL rewrites is a foundational step in any SEO optimization strategy. However, Magento’s default functionality is a little bit constrained.
Limitations of Default URL Rewrite Management in Magento 2
Although Magento 2 provides robust support for SEO-friendly URLs through its rewrite system, the platform falls short when it comes to importing or exporting those URL rewrites in bulk.
No Built-In Support for Magento 2 Import URL Rewrites
By default, Magento 2 does not allow merchants to import URL rewrites via CSV, XML, or other file formats. You can’t export existing rewrites either — whether for backup, migration, or SEO audits.
This limitation introduces several risks:
- ❌ Time-Consuming Manual Edits. You have to manually create or update each Magento URL rewrite in the admin, one by one — an impractical approach for stores with hundreds or thousands of products.
- ⚠️ Broken SEO After Catalog Updates. When product names or categories change, outdated rewrites can lead to broken links and 404 errors — especially if you’re unable to update them in bulk.
- 🔁 Migration Headaches. Moving from one Magento instance to another means recreating all rewrites manually unless you have a custom solution in place — increasing the chance of inconsistency and lost traffic.
A Common SEO Bottleneck
Let’s say you’ve rebranded a product line and want to replace outdated URLs with new keyword-optimized paths. Or perhaps you’re replicating a staging environment to production. Without a way to bulk import Magento 2 URL rewrites, you’re forced to:
- Manually map each new request path to its corresponding target
- Reapply store view and redirect settings
- Double-check that all links remain functional
This level of micromanagement not only slows down your workflow but puts your SEO performance and user experience at risk.
The Solution: Import & Export Magento URL Rewrites Automatically
That’s where the Improved Import & Export extension comes in. Designed to bridge the gaps left by native Magento functionality, the extension gives you full control over Magento 2 import URL rewrites — letting you manage them at scale using CSV, XML, XLSX, ODS, or even Google Sheets.
With it, you can:
- Import SEO-friendly URL rewrites for products, categories, and CMS pages
- Set custom request paths and map them to internal target paths
- Define redirect types (301/302), store scopes, and metadata
- Export existing Magento URL rewrites for migration, backup, or SEO analysis
Magento 2 URL Rewrite Sample CSV Format
Whether you’re importing fresh redirects for a seasonal campaign or updating existing product URLs across multiple store views, our extension lets you manage Magento 2 URL rewrites efficiently, without touching the database. All you need is a properly formatted CSV.
Sample Files for Magento 2 Import of URL Rewrites
To help you get started, Firebear provides fully-prepared templates with correct attribute values and examples. You can download them here:
- (All Formats): Includes sample files in CSV, XML, JSON, XLSX, and ODS formats.
- (Annotated): Contains column descriptions, sample values, and formatting rules.
Magento 2 URL Rewrite CSV Attribute Reference
The table below describes each column used in the Magento 2 import of URL rewrites. These attributes define how each rewrite functions in the storefront:
| Attribute Name | Reference | Values | Value Example |
| url_rewrite_id | ID of the URL rewrite. It can be found under Marketing > URL Rewrites, in the ID column. Use this if you want to update a particular rewrite. | Can only contain numerals | 321 |
| entity_type | Type of entity for the URL rewrite. Required. | category – For Category product – For Product cms-page – For CMS Page custom – For Custom |
category |
| entity_id | ID of the entity (e.g., product ID). Required. | Can only contain numerals | 123 |
| request_path | The visible path customers type or click on. Required. | Starts with /, no domain name | /about |
| target_path | The internal system path the request should resolve to. Required. | Starts with /, no domain name | /about-us |
| redirect_type | Redirect type for search engines. Required. | 0 – No redirect 301 – Permanent 302 – Temporary |
302 |
| store_id | Store view ID where the rewrite applies. Required. | Use code from Stores > All Stores > Code column | 1 |
| description | Optional description for the rewrite | Any text value | Test category redirect |
| is_autogenerated | Indicates if the rewrite was auto-generated | 0 – Manually created 1 – Auto-generated |
0 |
| metadata | Optional metadata field | JSON object | {“category_id”:”47”} |
📝 Note: Both request_path and target_path should include only the relative path, not the domain. For example: store.com/path1 → /path1
How to Import URL Rewrites to Magento 2
Once you install the Improved Import & Export extension, importing Magento 2 URL rewrites becomes a streamlined, admin-friendly process. The module eliminates the need for manual URL management or risky database edits, allowing you to bulk import clean, SEO-optimized URLs in just a few clicks.
This feature supports:
- All redirect types: No Redirect, 301 (Permanent), 302 (Temporary)
- Updating existing rewrites with new target paths
- Bulk deletion of outdated or broken URL rewrites
- Multi-store and multi-language rewrite imports
Step-by-Step Magento 2 URL Rewrite Import
To import Magento 2 URL rewrites using the Improved Import & Export extension:
- Go to: System → Improved Import / Export → Import Jobs
- Click Add New Job to create a new import profile.
- Under General Settings, enter a job name and optionally configure a schedule.
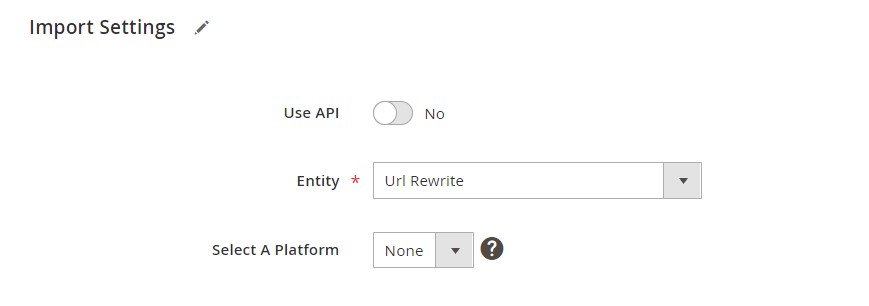
- In the Import Settings section, set Entity to URL Rewrites
- Continue to configure:
- Import Behavior (e.g., Add/Update, Replace, Delete)
- File Format (CSV, XML, XLSX, ODS)
- Data Source (upload file, Google Sheets, FTP, Dropbox, etc.)
- Save the job, then click Run to launch the import process.
Magento will process each row in your file, adding or updating the URL rewrites according to your import behavior. Once finished, the new SEO-friendly URLs will be live across the selected store views.
Additional Resources
For advanced import logic, troubleshooting tips, and supported file structures, refer to the full user guide:
👉 Improved Import & Export Extension Manual
Need help setting up your first import or fixing rewrite errors?
Exporting URL Rewrites from Magento 2 in Bulk
Whether you’re preparing for a site migration, auditing your SEO setup, or simply backing up your store configuration, exporting Magento 2 URL rewrites can save hours of manual work. With the Improved Import & Export extension, you can generate a clean, structured file containing all or specific URL rewrites from your Magento 2 store — filtered by store view, entity type, or redirect behavior.
This feature is ideal for:
- 🔄 Migrating stores between environments or staging to production
- 🧹 Cleaning up broken or outdated rewrites from legacy product structures
- 📦 Creating a URL rewrite backup before major catalog updates
- 🛠️ Debugging SEO issues by reviewing the rewrite mapping
Step-by-Step Magento 2 URL Rewrite Export
To export URL rewrites from your Magento 2 backend:
- Go to: System → Improved Import / Export → Export Jobs
- Click Add New Job to create an export profile.
- In the General Settings, name your job and define a schedule (optional).
- Under Export Settings, set Entity to URL Rewrite
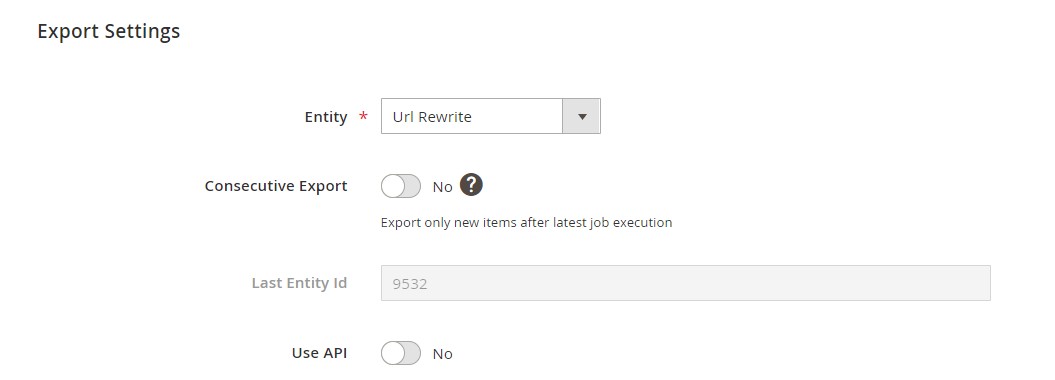
- Continue to configure:
- File Format (CSV, XML, XLSX, ODS, JSON)
- Export Destination (Choose from local file, FTP/SFTP, Dropbox, or Google Drive)
- Optional filters to narrow down results by store ID, entity type, or redirect type
- Save the job, then click Run to generate the export file.
Once completed, the file will be saved to your configured destination — ready for review, backup, or import into another Magento 2 instance.
Use Cases & Advanced Tips
Once you unlock Magento 2 URL rewrite import and export functionality with the Improved Import & Export extension, the benefits go far beyond saving time. Bulk URL rewrite management becomes a powerful tool for SEO optimization, site maintenance, and large-scale data operations — all without touching the database.
Here are several real-world use cases that show just how versatile this feature can be:
🔁 Migrating SEO-Friendly URLs from Magento 1 to Magento 2
When upgrading from Magento 1 to Magento 2, one of the biggest SEO risks is losing your existing URL structure. Magento 1 and Magento 2 handle URL rewrites differently, and without a proper migration, valuable inbound links and organic rankings can disappear overnight.
Solution: Use the Improved Import & Export module to recreate Magento 1 URL rewrites in your Magento 2 store. Simply export the rewrites from the old site, adjust formatting as needed, and import them directly, preserving traffic and SEO value.
🧱 Fixing Broken Links After Rebranding
Rebrands often involve updated product names, category structures, and new URL keys, which can quickly lead to broken links if legacy URLs aren’t handled properly.
Solution: Import a list of redirects using redirect_type 301 to permanently forward old request_paths to their updated equivalents. This ensures all outdated links (from Google results, backlinks, or customer bookmarks) are routed to the correct content without SEO penalties.
🛒 Batch Updating Product or Category URLs
Sometimes you need to update dozens or hundreds of URLs — for example, to add better keywords, localize URLs per store view, or optimize for new product strategies.
Solution: Create a structured CSV file with updated request_paths and target_paths, then import them in bulk. This lets you manage large-scale updates across all store views in a single job, without manually editing each product.
🌍 Improve Crawlability with Clean and Consistent URLs
Magento 2 URL rewrites aren’t just about aesthetics — they play a major role in how search engines index your site. Clean, keyword-rich URLs help Google better understand your store’s structure and content.
Best Practice: Avoid inconsistent or duplicate rewrites. Use the export feature to audit your current URL structure, identify weak or conflicting rewrites, and clean them up using import jobs, boosting both SEO clarity and internal linking.
⚡ Pro Tip: Use Google Sheets for Collaborative Rewrite Planning
Thanks to Google Sheets integration, you can manage URL rewrites collaboratively — with content teams, SEO specialists, and developers editing live rewrite tables without having to log into Magento.
Once finalized, just sync the sheet with the Improved Import & Export extension to push changes live.
Final Words: Take Control of Magento’s URL Rewrites
Magento 2 URL rewrites are more than just technical configurations — they’re foundational to your store’s SEO, user experience, and long-term growth. Clean, well-structured URLs help search engines crawl your site effectively, preserve traffic during catalog changes, and create a seamless navigation experience for your customers.
But Magento’s default tools fall short when it comes to managing URL rewrites at scale. Without built-in import or export features, even small updates can become tedious and risky, especially when migrating, rebranding, or localizing content.
That’s where the Improved Import & Export extension makes all the difference. With it, you gain full control over Magento 2 import and export of URL rewrites:
- Bulk update request paths, redirect types, and target destinations
- Migrate clean SEO URLs from Magento 1 to Magento 2
- Fix broken links and maintain rankings after structural changes
- Work across store views and file formats — from CSV to Google Sheets
No more manual rewrite creation. No more 404s after deployment. Just fast, automated, and reliable URL management — directly from your Magento admin.
👉 Download the Improved Import & Export Magento 2 Extension
👉 Contact Firebear Support for Setup Help
Take the next step in scaling your Magento store — with SEO-friendly URLs, cleaner workflows, and a tool that saves hours of manual work.
Want to master Magento 2 import from A to Z? Explore our complete guide and unlock step-by-step tutorials, tips, and expert tools.
👉 Go to the Full Magento 2 Import & Export Guide
FAQ: Magento 2 URL Rewrites
What is the Magento 2 URL rewrite table?
The url_rewrite table in Magento 2 stores all rewrite rules that map clean, SEO-friendly URLs (request_path) to internal system paths (target_path). It includes entity types, redirect types, store views, and metadata for managing URL visibility and redirects.
Can I bulk import Magento 2 URL rewrites via CSV?
Magento 2 does not support URL rewrite import by default. However, you can bulk import URL rewrites using the Improved Import & Export extension by uploading a CSV, XML, or Google Sheet containing all required rewrite attributes.
What’s the difference between request_path and target_path?
request_path is the visible, user-facing URL shown in the browser. target_path is the internal route Magento uses to find the correct product, category, or CMS page. The rewrite connects the two behind the scenes.
Can I import redirects (301, 302) in Magento 2?
Yes — with the Improved Import & Export extension, you can import both temporary (302) and permanent (301) redirects by specifying the redirect_type value in your import file.
How to fix broken Magento 2 URLs after product migration?
Export your Magento 1 or legacy URL structure, then import 301 redirects into Magento 2 using the Improved Import & Export module. This helps preserve search engine rankings and customer bookmarks.
Can I manage Magento URL rewrites via Google Sheets?
Yes. The Improved Import & Export extension lets you sync Magento 2 URL rewrites with Google Sheets for collaborative planning, live editing, and version control before pushing changes to your store.
How to export Magento 2 URL rewrites with products?
To export product-related URL rewrites, use the Improved Import & Export extension and apply filters to include only rewrites for the product entity type. You can export to CSV, XML, or Google Sheets.
Are URL rewrites store-view specific?
Yes. URL rewrites in Magento 2 are scoped per store view using the store_id value. This allows you to create localized or language-specific URLs across different storefronts.
How to prevent duplicate URL rewrites in Magento 2?
Avoid using the same request_path for different entities or store views. Always verify your import files, and use the export feature to audit existing rewrites before uploading new ones.
Does Magento auto-generate URL rewrites?
Yes. Magento automatically generates system URL rewrites when you create or update products, categories, or CMS pages. These rewrites are based on URL keys and store structure, but can be overridden by custom rewrites.

