
Magento 2 Backend Exploration: Batches
In the article below, we explore the Batches screen of the Magento 2 backend. Besides, we shed light on related processes, such as viewing and creating batches. You will also find out how to import and export batches in Magento 2.

Magento 2 Batches Explained
First of all, we’d like to mention that batches are available for Magento Shipping. You can combine orders that are ready to ship, processing multiple shipments as a batch. There is a detailed description of the package(s) to be included with additional instructions for the carrier in each shipment. As a Magento administrator, you can choose a shipping experience rule to process shipments. It is also possible to use automatically generated documentation that includes shipping labels.
Magento 2 introduces batch processing to simplify your daily duties related to shipping. The feature provides the ability to process a large number of shipments much faster than treating them in a traditional way. Another difference between the batch and standard process is that the batch process leverages the Temando API to create a shipment. Both systems are synchronized.
It is also necessary to mention that batch processing is currently available for domestic shipments only.
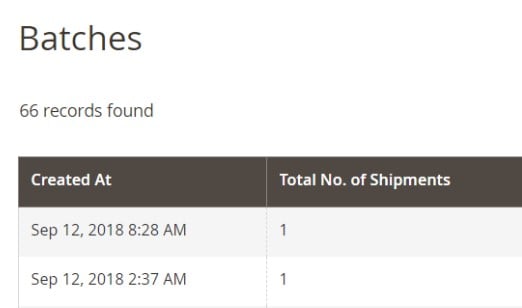
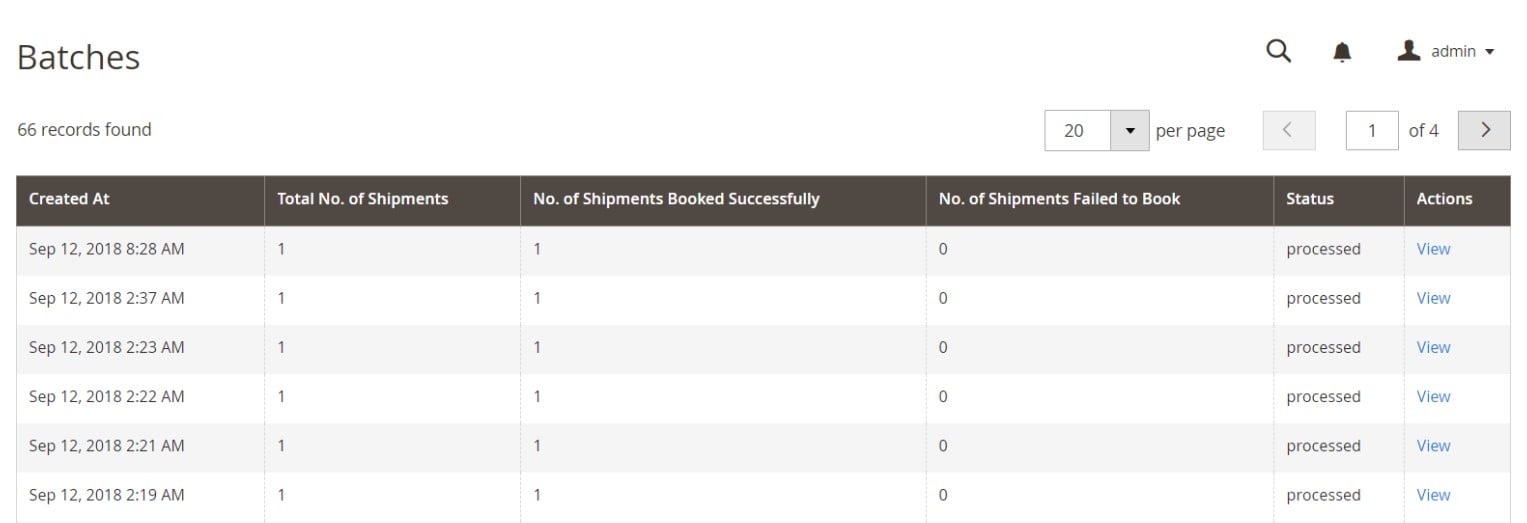
As for the Batches grid, it contains all the available Magento Shipping batches. You can view the number of shipments in each batch as well as corresponding statuses. Besides, the grid lets you details of every single batch as well as print packing slips/shipping labels. The following grid, which is situated at the bottom of the page, lists the shipments in the batch.
How to view batch details in Magento 2
You can view Magento 2 batch details under Sales-> Batches. It is only necessary to find a batch you want to see in the list and click View in the Actions column. You will see something like in the picture below:
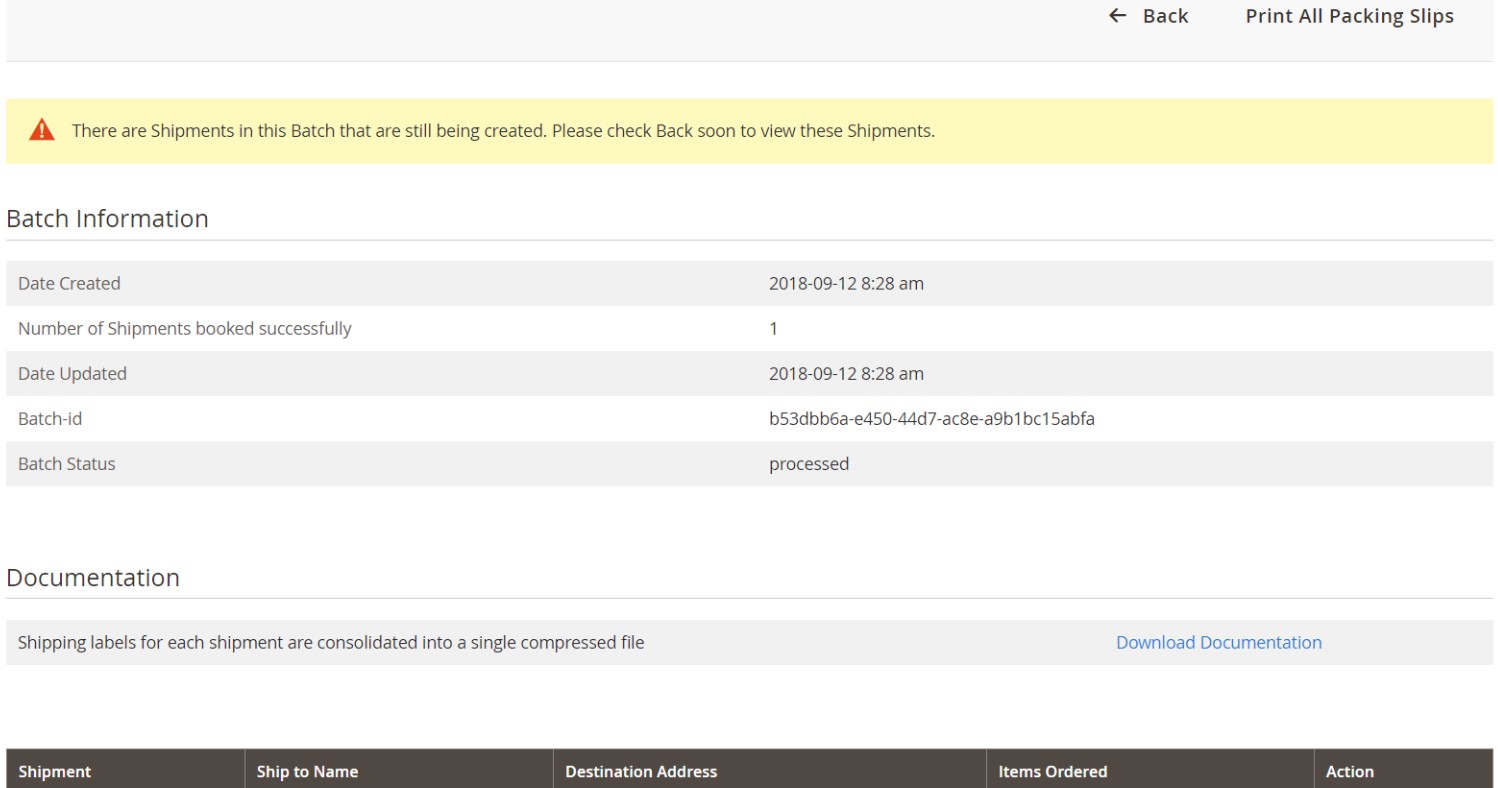
Next, you can print packing slips for each shipment in the batch. There is the Print All Packing Slips action on the top right corner of the screen.
It is also possible to print shipping labels:
- Scroll down to the Documentation section of the page.
- Click the Download Documentation link.
- Go to the downloads of your browser.
- Find a ZIP file with labels there, unpack it, print individual PNG files.
You can also view shipment details from this screen. Scroll down the bottom of the page and find a shipment you want to see in the grid. Use the View command from the Action column.
How to create batchs in Magento 2
You have to follow these four steps to create a batch in Magento 2:
- Create a shipping experience rule;
- Process a batch of orders;
- View the batch and print documentation;
- Dispatch.
Let’s describe each step in more detail.
How to create a shipping experience rule in Magento 2
Follow these steps to create a shipping experience (or a batch fulfillment) rule in Magento 2, automating the batch processing of shipments:
- Go to Stores, open the Shipping section, and choose Experiences.
- Click Create New Experience, enter its name (a descriptive one), and set its Status to Production.
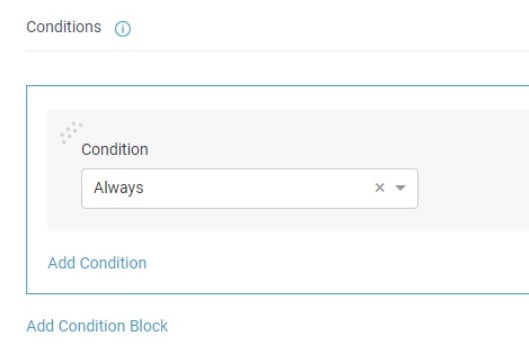
- Now, you can create a rule under the Batch Fulfillment Rules section: click Create Rule and, after that, add a description and set the default Condition value to Always.
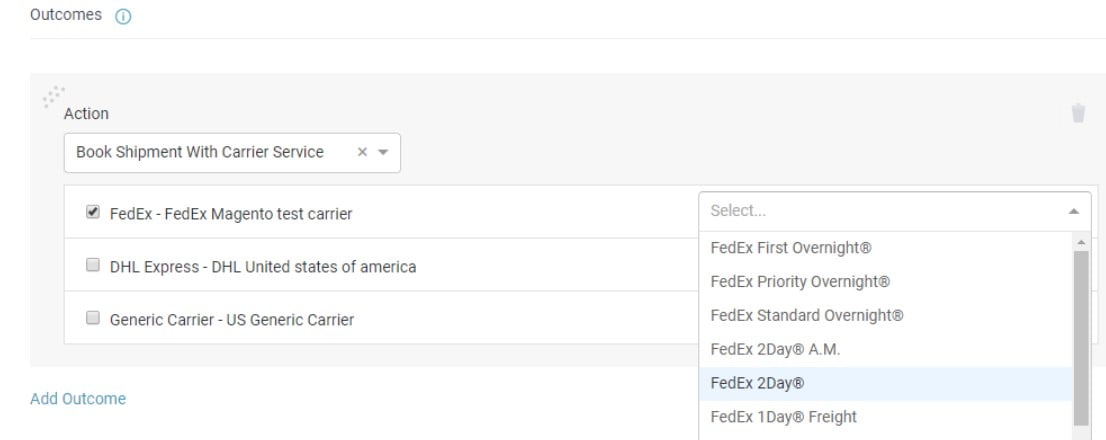
- Proceed to the Outcomes section to set an automated action. The Action section lets you book shipment with the cheapest carrier service.
- Next, select carriers to be uses for fulfilling the orders in the batch.
Save your new rule and proceed to the next step.
How to process a batch of orders in Magento 2
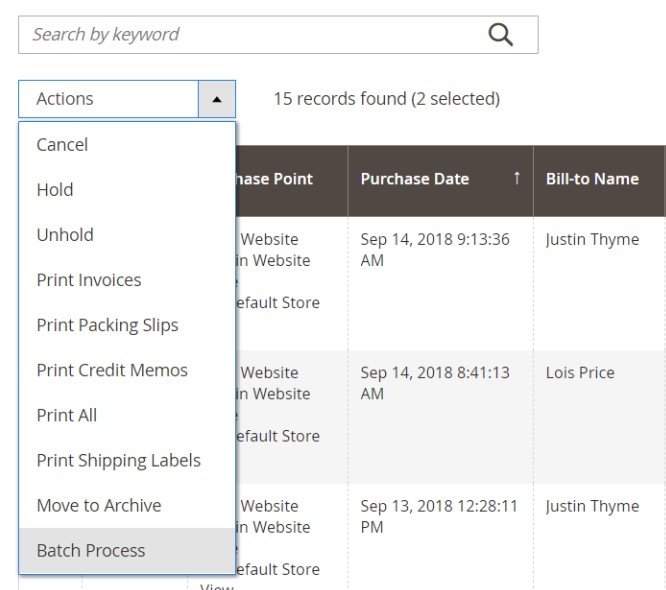
You can start preparing a batch of orders if there is at least one item that has the status of Pending in the Orders grid (Sales-> Orders).
- Select a checkbox of each order you want to include in the batch.
- Choose Batch Process in the Actions dropdown.
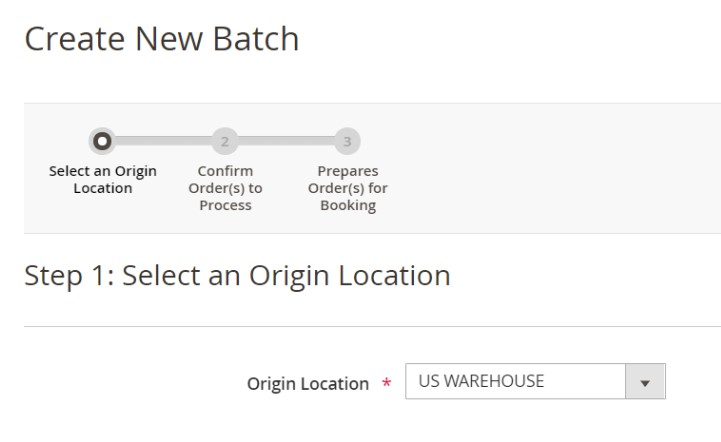
- Choose the Origin Location to establish where the orders ready for shipping are booked. Proceed to the next step.
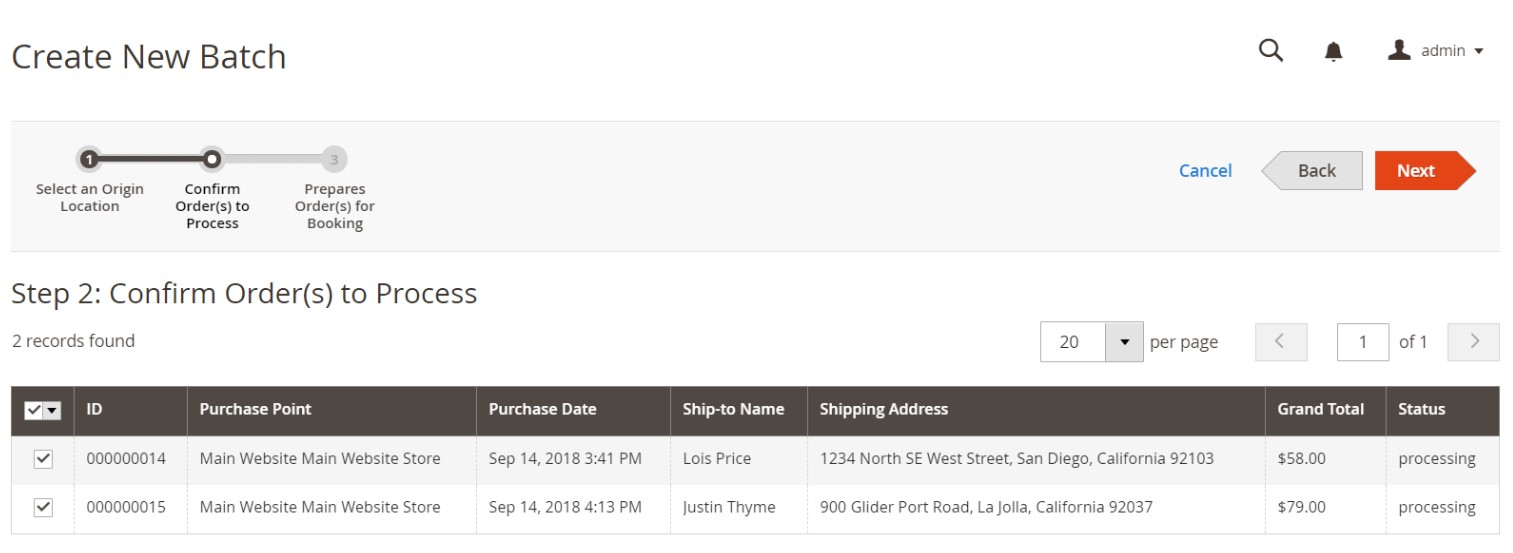
- Review the orders in the grid and clear the checkmark of any order you don’t want to include.
- To prepare orders for booking, specify details for each order in the batch. You have to describe each package in each order:
-
- Choose its type.
- Specify a total weight.
- Select a weight unit.
- Type a number of each in the package.
Note that you can ship the order in multiple packages (click Add Another Package), remove existing packages (its content isn’t transferred to the current package, so you need to update it manually), select a shipping experience, specify additional delivery options, etc.
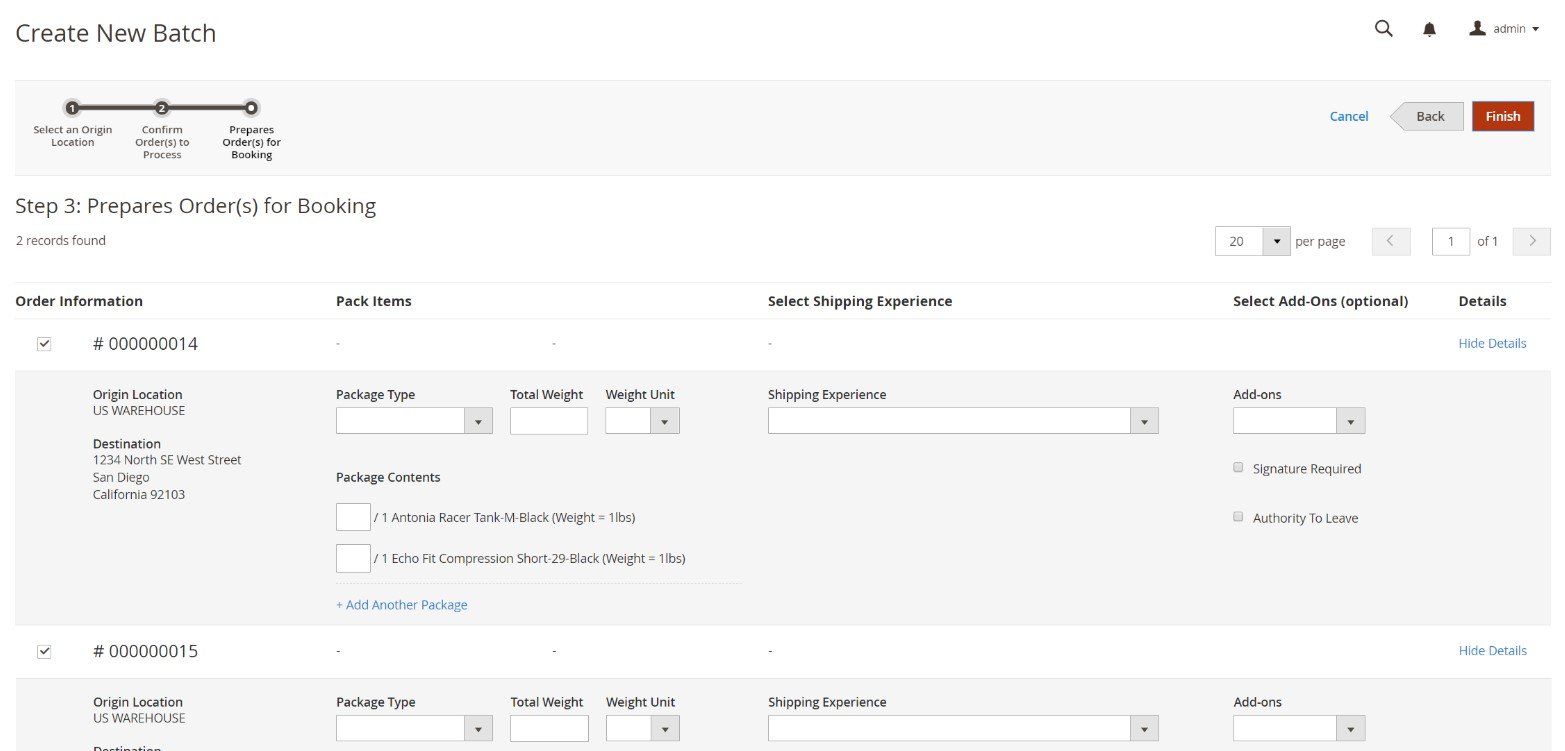
Click Finish when everything is ready. Now, you can see your new batch at the top of the Batches grid. Its status is Created.
In the case of unsuccessful booking, you can process the order again during the standard workflow.
How to view the batch and print documentation
If there are shipments failed to book in a batch, you can see it for further information from the Actions column. You can also print the documentation associated with the batch there, as we’ve already mentioned above.
Magento 2 dispatches
The final step of the fulfillment process is described in a separate article. We shed light on how to create a dispatch and printed manifest here: Magento 2 Dispatches.
How to Import & Export Magento 2 Batches
Now, when you know how to manage batches in Magento 2, we’d like to draw your attention to the corresponding import and export processes. If you want to migrate to a new Magento 2 website or need to transfer batches to a third-party system, you’ve come to the right place. Since the default import and export tools don’t support all the core Magento entities, some operations are impossible. You need a third-party solution to replace them, for instance, the Improved Import & Export Magento 2 extension. The module not only transfers all the core Magento 2 entities but also supports different connection types and file formats. Thus, it is possible to use our extension to integrate your Magento 2 website with any external system.
Another vital improvement associated with Improved Import & Export is its free migration add-on for Magento 1 to Magento 2 Migration. The tool works in combination with the extension, providing extra data transfer capabilities. Both solutions can import and export Magento 2 entities right from your admin or via CLI commands. They offer a selective approach to migration, allowing you to move entity after entity. This results in zero downtime. However, reindex is required when the data transfer is finished.
To import any Magento entity, you need to:
- Create a new import job;
- Enable it and specify details (General Settings);
- Choose an entity you are going to transfer (Import Settings);
- Configure setting in Import Behavior and Import Source.
- Save & Run the job.
Both import and export processes can be automated via cron schedules. Besides, our module lets you use API and Google Sheets to transfer data. It also supports different file formats and archives. Leverage its mapping presets to edit attributes automatically. The extension and its add-on are described here:
Get Improved Import & Export Magento 2 Extension
Get Free Magento 1 to Magento 2 Migration Add-On
Please, regarding the ability to import and export batches to and from Magento 2.
Related posts
 Shopify-EP Explained: Tracking Number, Package Origins, Common Concerns, and Why You May See It in 2025
 Shopify Gift Cards Explained: How to Set Up, Manage & Sell Them
 Shopify Inventory Management: A Comprehensive Guide to Tracking and Optimizing Your Stock
 Best Shopify Alternatives for Small Businesses and Growing Brands
 How to Import Metafields in Shopify: A Complete Guide
 Magento Inventory Management: A Complete Guide to Stock Optimization and Efficiency
 Shopify Metafields Explained: How to Add, Manage & Import Them
 Magento 2 B2B Company Explained: A Complete Guide to Setup, Structure, Management & Import