
How To Use Wishlists In Shopware 6
In this tutorial, we explain what Shopware 6 wishlists and their functionality are. You will learn how to add products to a wishlist in Shopware 6. Also, there is a brief guide on how to view/edit them. And you will discover how to import and export wishlists in Shopware 6. You can find more useful materials about the platform here.

Note that we provide Shopware integration with external platforms. Contact our support for further information or try our Improved Import, Export & Mass Actions.
Table of contents
- 1 What is the Shopware 6 wishlist?
- 2 How to add products to a wishlist in Shopware 6
- 3 How to view/edit a wishlist in Shopware 6
- 4 How to import/export wishlists in Shopware 6
- 5 Shopware 6 Essentials FAQ
- 5.1 How to create a Shopware account?
- 5.2 What about a Shopware ID?
- 5.3 What is Shopware master data?
- 5.4 How to add a new Shopware shop?
- 5.5 How to add a payment method to your Shopware account?
- 5.6 How to create a deposit in Shopware?
- 5.7 How to purchase Shopware extensions?
- 5.8 How to get support in Shopware?
- 5.9 How to automate import and export processes in Shopware 6?
- 5.10 How to migrate to Shopware 6?
- 5.11 How to integrate Shopware 6 with external systems?
What is the Shopware 6 wishlist?
A wishlist is an itemization of goods or services that a person desires. It may be a physical copy or a page available online.
From the e-commerce perspective, a wishlist is a website page where the desired products are saved. The author distributes copies of their list to other people who are likely to purchase the gifts with the help of links.
Wishlists in Shopware 6 fulfill the same function as in Magento 2. They provide registered customers with the ability to store products temporarily.
As for the cookie, it is listed in the comfort functions section of your storefront cookie manager. Shop visitors who are not logged in must accept the cookie for the wish list to use this functionality. But how to apply the basic wishlist functionality in Shopware 6?
How to add products to a wishlist in Shopware 6
As a customer, you can add products to your wishlist in Shopware 6 in a very common and intuitive way: just click the heart symbol on a category listing or a product detail page.
It looks as follows on a category page:
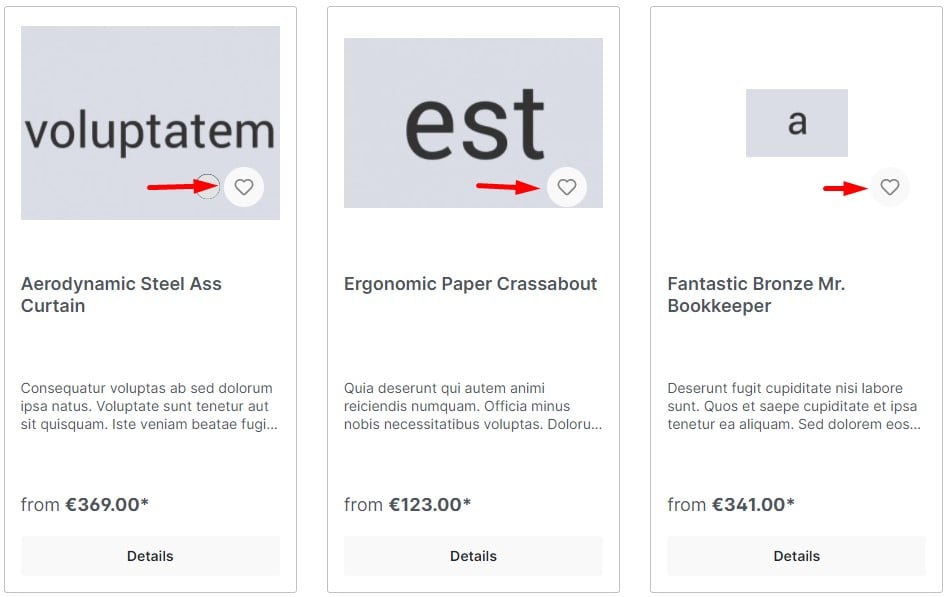
You will find the heart button right in the product image lower right corner on the listing page.
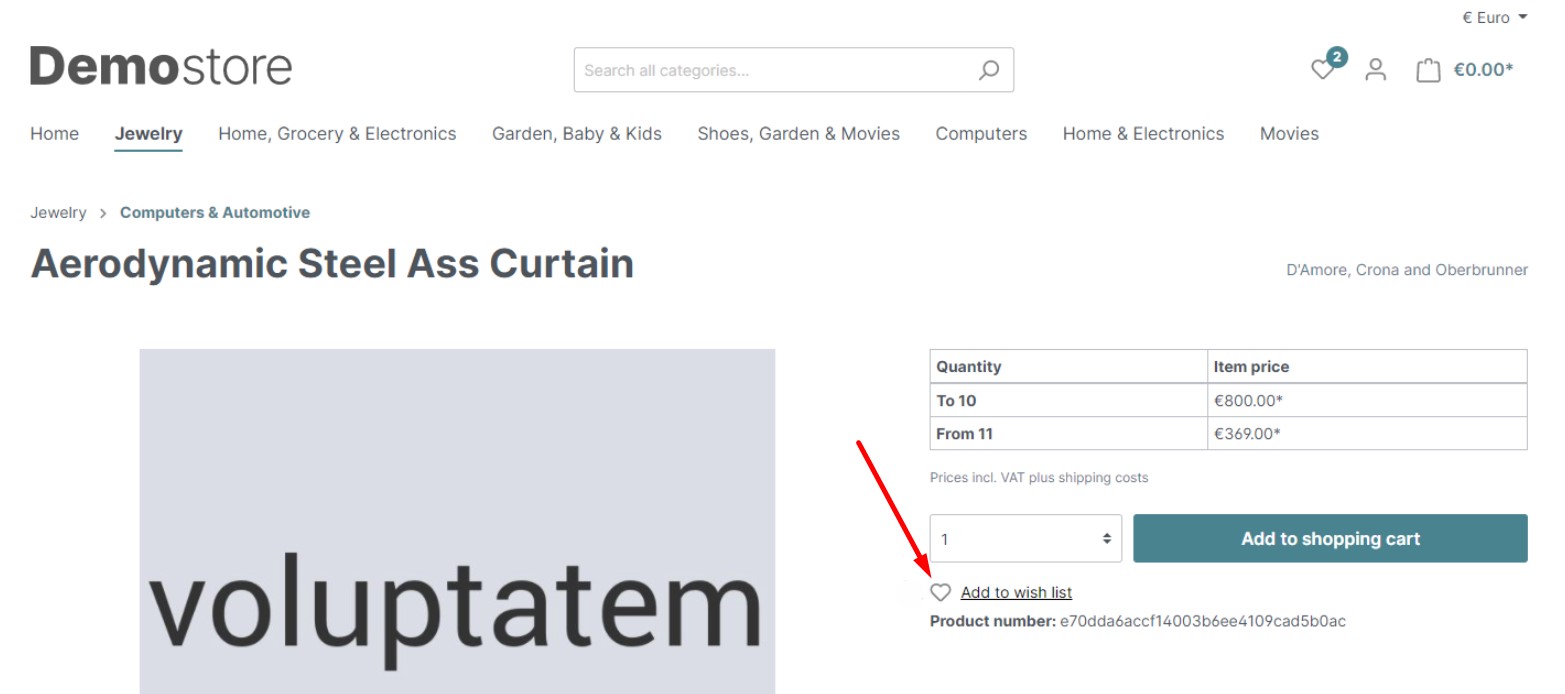
You can add a product to your Shopware 6 wishlist from a product page using the same icon on the right-hand side below the button to add the product to the cart.
How to view/edit a wishlist in Shopware 6
You can access your wishlist from the Shopware 6 storefront by clicking the heart symbol available next to the account menu. Note that it indicates the number of items on your wishlist.
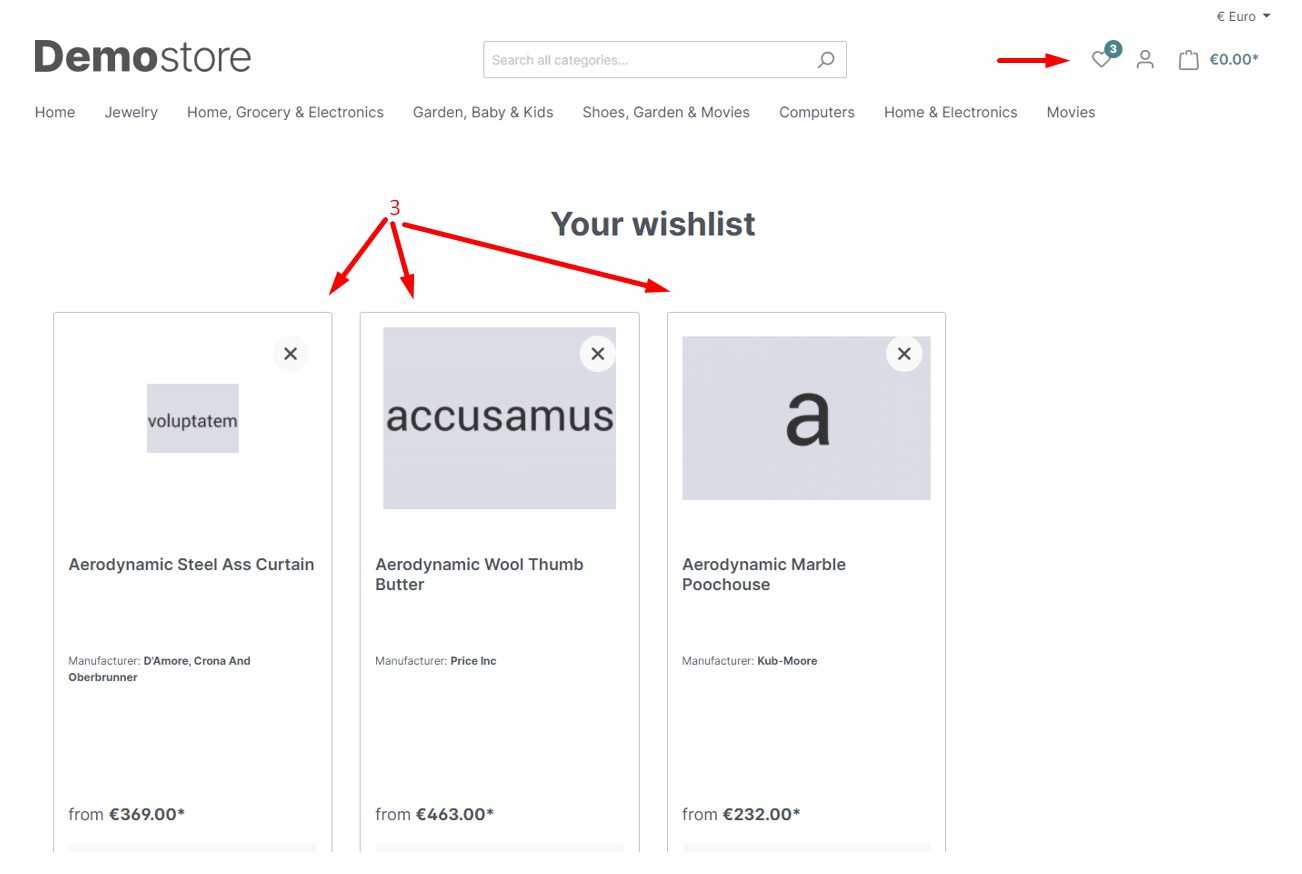
That’s how you view a wishlist in Shopware 6. The system transfers you to the corresponding page to find all the products available in the wishlist. You can remove them by clicking the X button in the product image. That’s how you edit a wishlist in Shopware 6.
How to import/export wishlists in Shopware 6
Suppose you need to migrate to Shopware 6 and transfer all the information associated with customer accounts, including wish lists. In that case, you need a third-party tool responsible for their import to your new website. Please pay attention to the Improved Import, Export & Mass Actions extension since we will add the corresponding functionality. The module will help you import and export wishlists between any e-commerce system and your Shopware 6 website. Contact our support for further information.
Shopware 6 Essentials FAQ
How to create a Shopware account?
You need to create a Shopware account before using wishlists in Shopware. Visit the registration page, hit the Register Now link, and fill in the form to create a new account. After receiving a confirmation email, follow the instructions provided in it.
What about a Shopware ID?
You will get it upon registration automatically. Next, you will need to create a storefront to leverage the wishlist functionality.
What is Shopware master data?
All the information about your company and business, including physical addresses, phone numbers, and emails, is master data. You provide it during the registration and while configuring your e-commerce website.
How to add a new Shopware shop?
You need to create a Shopware shop to leverage the wishlist functionality. It is possible to add it to your merchant area. Click the corresponding link, choose the type of your new shop (a cloud storefront or an on-premise installation), and provide all the requested information.
How to add a payment method to your Shopware account?
Add a payment method under Basic Information -> Accounting. Select PayPal, credit card, or direct debit as a way to transfer funds to your account. You will need this functionality for purchasing extensions and themes.
How to create a deposit in Shopware?
You need a deposit for purchasing extensions and themes. You can only create it with a working payment method. Go to your Merchant Area -> Shops, choose a shop to provide funds to, click Open Account Details, and transfer a deposit that covers the amount of your purchase.
How to purchase Shopware extensions?
Although you can purchase extensions and themes on the Shopware Marketplace, people often choose the Plugin Manager instead. Create a deposit in advance that equals the amount of your future purchase. Next, select a tool you want to buy and complete the checkout.
How to get support in Shopware?
You can send accounting and financial inquiries to financial.services@shopware.com and +49 2555 9288 510. Use these channels for license inquiries: info@shopware.com or call +49 2555 9288 50.
How to automate import and export processes in Shopware 6?
The Improved Import, Export & Mass Actions module is at your service when you need to automate recurring data transfers. The module will help you create schedules to launch the corresponding import and export processes automatically.
How to migrate to Shopware 6?
The Improved Import, Export & Mass Actions tool is also helpful for the migration to Shopware 6. It can help you transfer data from your existing website to the new platform. You can migrate from other e-commerce systems or Shopware’s previous versions. Note that we also offer export solutions for systems like Magento and Shopify so that you can simplify your data transfers between them and Shopware. for more information.
How to integrate Shopware 6 with external systems?
Shopware 6 integration with ERPs, CRMs, accounting tools, and other similar platforms is another strong point associated with the Improved Import, Export & Mass Actions plugin. As we’ve already mentioned, the module can help you automate repetitive import and export processes. Also, it introduces mapping presets for modifying data according to the requirements of your Shopware store during import, as well as the rules of the connected platform during export.
Related posts
 Shopware 6 Advanced Pricing Guide + Import Tutorial
 A Complete Guide to Shopify Customer Import
 How To Bulk Import Products In Shopify: CSV Description & Step-By-Step Guide
 Magento 2 B2B Company Guide: Revealing Company Structure & Import
 Reputon Amazon Importer Review: How to Connect Shopify to Amazon in a Few Clicks
 How to Import Customers & Customer Addresses to Magento 2
 Adobe (Magento 2) Commerce and Cloud (Enterprise Edition) Specific Features
 Magento Open Source and Adobe Commerce 2.4.7 Release Notes