

Magento 2 Scheduled Import Guide 2026: How to Automate Product Imports Daily, Weekly, Monthly & More
Welcome to our Magento 2 scheduled import guide for 2026. Below, we explain how to automate Magento 2 imports. Available options, however, depend on your platform. Adobe Commerce provides native scheduled import functionality, while Magento Open Source does not support automated imports out of the box. If you use Magento Open Source — or need more flexible scheduling and data transfer options in Adobe Commerce — you can automate import processes with Improved Import & Export.
The extension lets you create reusable import jobs, configure predefined or custom cron schedules, automate product and other entity updates, work with external data sources, and run import jobs from the command line.
So, let’s see how Magento 2 scheduled imports work in Adobe Commerce and Magento Open Source, how to configure automatic product imports, and how the CLI can be used to launch and manage import jobs. As a bonus, we compare the native Adobe Commerce functionality with the more advanced automation available through Improved Import & Export.

Table of contents
- What Is Magento 2 Scheduled Import?
- Magento Open Source vs. Adobe Commerce Scheduled Import
- How to Configure Scheduled Import in Adobe Commerce
- Magento 2 Scheduled Import for Open Source
- How to Create a Magento 2 Scheduled Import Job
- How to Run Product Import Daily in Magento 2: Cron Syntax Explained
- Magento 2 Scheduled Import via CLI
- Adobe Commerce Scheduled Import vs Improved Import & Export
- Common Magento 2 Scheduled Import Use Cases
- Final Words: Improve Your Magento 2 Scheduled Import Workflows
- Magento 2 Scheduled Import FAQ
What Is Magento 2 Scheduled Import?
Magento 2 scheduled import is an automated data transfer process that runs at a predefined time or frequency without requiring a store administrator to launch each import manually. It can be used to keep products, prices, inventory, customers, and other supported data synchronized with external systems or regularly updated source files.
A typical scheduled product import may run every hour, once a day, every week, or according to a custom cron schedule. For example, a Magento store can automatically retrieve a supplier file every night and update product prices and stock before customers visit the storefront the next morning.
How scheduled import works depends on the Magento edition.
Magento Open Source vs. Adobe Commerce Scheduled Import
The way you configure Magento 2 scheduled import depends on whether your store runs on Magento Open Source or Adobe Commerce. The two platforms share the same basic manual import functionality, but only Adobe Commerce provides a native interface for scheduling recurring imports. Here is the main difference between the two:
| Feature | Magento Open Source | Adobe Commerce |
| Manual data import | Yes | Yes |
| Native scheduled import | No | Yes |
|
|
|
| Custom import scheduling | No (Requires an extension) | No (Limited to native scheduling options) |
| Improved Import & Export support | Yes | Yes |
Magento Open Source Scheduled Import
As you can see, Magento Open Source does not include native scheduled import functionality by default. You can upload supported data manually through the standard import interface, but there is no built-in admin tool for creating recurring import jobs.
Therefore, if you want to update products, prices, inventory, customers, or other data automatically, you need either a custom cron-based integration or a third-party extension.
With Improved Import & Export, Magento Open Source gets a dedicated import job system. You can create reusable jobs, assign schedules, configure cron expressions, select external data sources, and automate recurring imports without manually uploading a file every time. We will focus on the extension later.
Adobe Commerce Scheduled Import
Adobe Commerce includes Scheduled Import/Export out of the box. You can access it in your Magento 2 Admin, where it is possible to create a scheduled import, select its entity type, specify a start time, and so on. Adobe Commerce then uses its cron scheduler to execute the job automatically.
The native feature is useful for relatively straightforward recurring transfers, but its scheduling and data transformation options are more limited than those available in the Improved Import & Export extension; let’s not rush it.
How to Configure Scheduled Import in Adobe Commerce
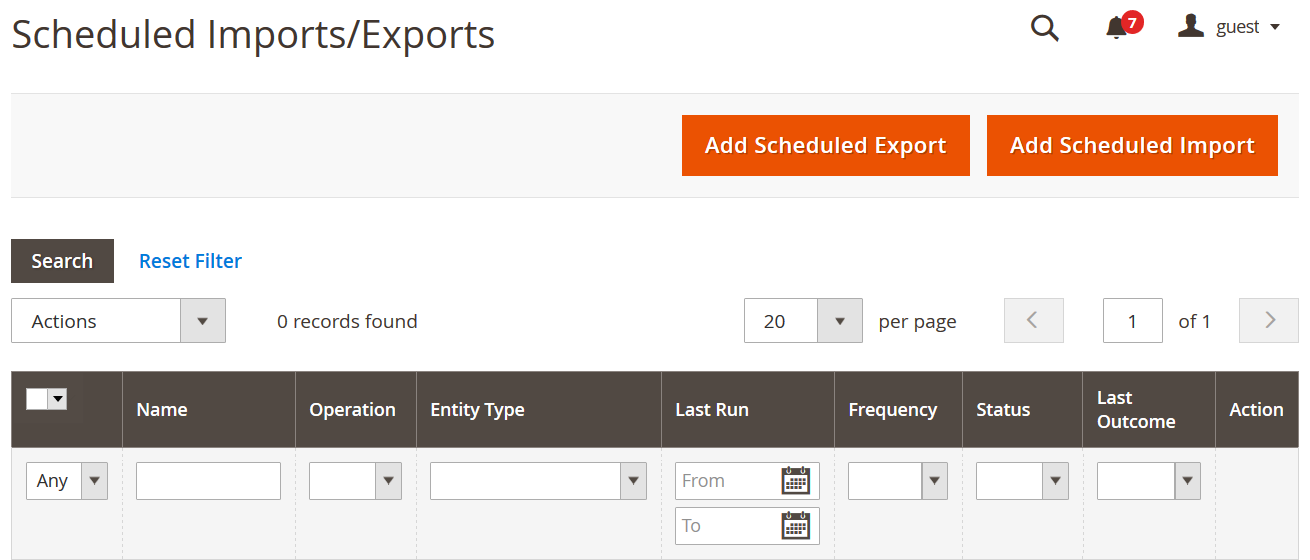
To configure an Adobe Commerce scheduled import, go to:
System → Data Transfer → Scheduled Imports/Exports
Then click Add Scheduled Import and complete the following steps.
1. Configure the Scheduled Import Settings
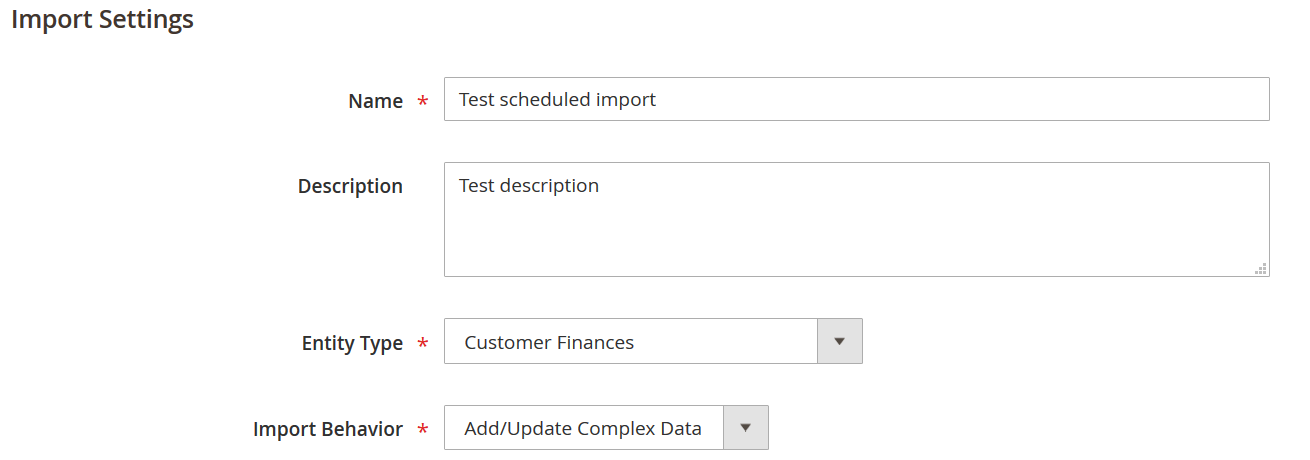
Start by entering a Name for the job and, optionally, a Description that explains what the import is used for.
Next, select the Entity Type. Adobe Commerce currently supports the following entities for scheduled imports:
- Products;
- Advanced Pricing;
- Customers and Addresses (single file);
- Customer Addresses;
- Customer Finances;
- Customers Main File;
- Stock Sources.
For a recurring catalog update, for example, select Products.
Then choose the appropriate Import Behavior. Depending on the selected entity, available options include Add/Update, Replace, Delete, and several behaviors designed for complex customer data.
For most recurring product imports, Add/Update is the typical choice because it lets you add new products and update existing records without replacing the entire catalog.
2. Set the Magento 2 Scheduled Import Frequency
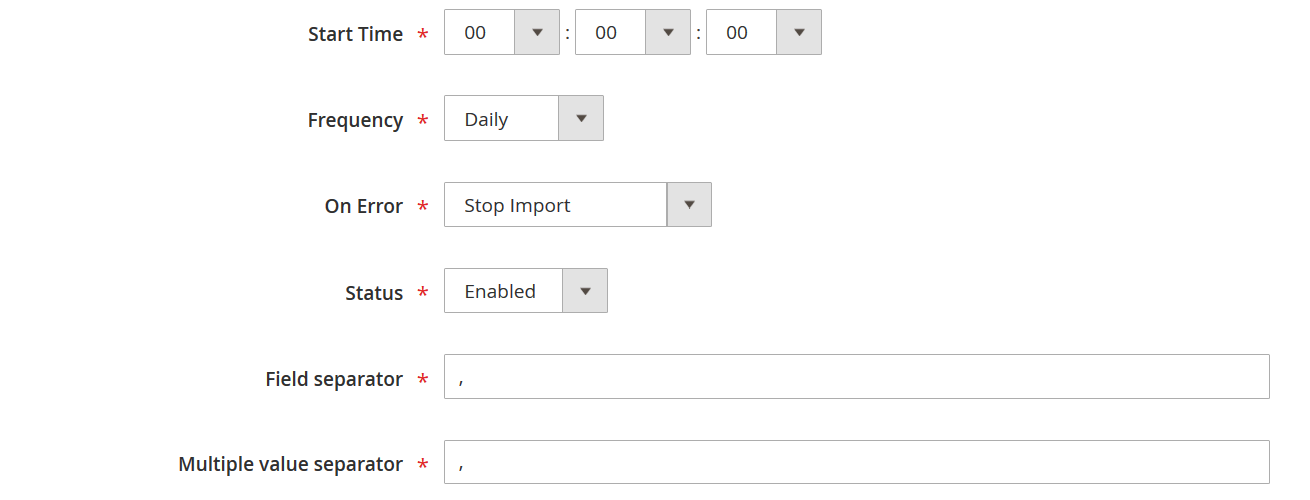
Use Start Time to specify the hour, minute, and second when Adobe Commerce should start processing the import.
Next, select a Frequency:
- Daily — runs the import once every day;
- Weekly — runs it once per week;
- Monthly — runs it once per month.
For example, if a supplier places an updated product file on your server every night, you can configure the Magento 2 scheduled import to run daily after the new file becomes available.
Note that the native Adobe Commerce scheduler provides these predefined frequencies. If you need a more specific schedule — such as every two hours, several times per day, or a custom cron expression — you will need a more flexible import solution, which we describe below.
Set Status to Enabled to activate the scheduled job.
You can also configure On Error behavior. Adobe Commerce lets you either stop the import when validation errors are detected or continue processing when the remaining data can still be imported.
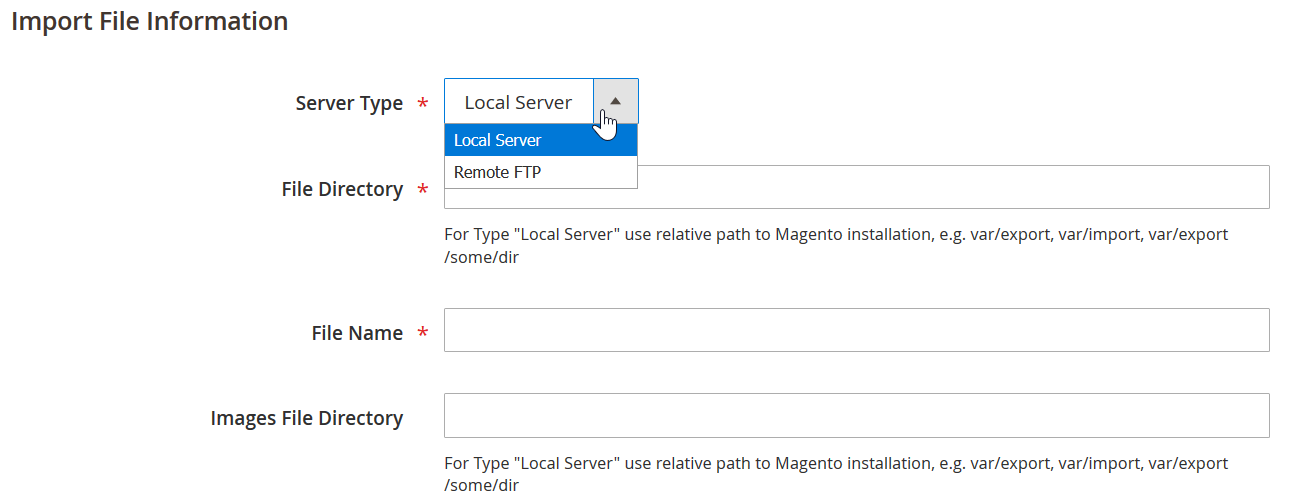
3. Configure the Import File Location
The next step is to tell Adobe Commerce where to retrieve the import file.
For Server Type, you can use:
- Local Server — retrieves the file from the server where Adobe Commerce is installed;
- Remote FTP — retrieves the file from a remote FTP server.
If Adobe Commerce remote storage is enabled, the Local Server option is replaced with Remote Storage.
Next, specify the File Directory and File Name.
For a local file, the directory should be relative to the Adobe Commerce installation, for example:
var/import
If you use remote storage, a directory such as the following can be used:
import_export/import
For product imports that include images, you can also specify an Images File Directory so Adobe Commerce knows where to find the associated product media.
4. Configure Import Failure Notifications
Automated imports should not require constant manual supervision, so Adobe Commerce lets you configure email notifications when a scheduled import fails.
You can specify:
- the failed import email receiver;
- the email sender;
- the notification template;
- additional recipients;
- whether copies are sent as BCC or separate emails.
This is particularly useful for daily product imports because an administrator can be notified when a supplier file is missing, invalid, or cannot be processed correctly.
Adobe Commerce does not provide a detailed log for every scheduled import operation in this interface. However, the Last Outcome column on the Scheduled Import/Export page displays the result of the latest job, while failed imports can trigger an email containing information about the error.
5. Save and Test the Scheduled Import
Click Save when the configuration is complete. The new job appears in the Scheduled Import/Export grid.
Before relying on the schedule in production, you can run the job manually from this page to test the configuration. Adobe Commerce validates the import file before each scheduled execution, helping prevent invalid data from being processed.
Once enabled, the job runs automatically according to the selected frequency. Therefore, a product file that is refreshed every night can be imported into Adobe Commerce every day without an administrator manually opening the standard Import page and uploading it again.
The native scheduler is sufficient for relatively straightforward recurring CSV-based workflows. However, its scheduling and source options are limited. If you need custom cron schedules, more frequent imports, additional file formats and sources, attribute mapping, data transformations, or more advanced job management, you can extend the Magento 2 scheduled import workflow with Improved Import & Export. And you’ll definitely need the extension if you need to automate data import processes on Magento Open Source.
Magento 2 Scheduled Import for Open Source
As we’ve just mentioned above, Magento Open Source does not provide native scheduled import functionality. Although the standard import tool lets you upload supported data manually, there is no built-in equivalent of the Adobe Commerce Scheduled Imports/Exports interface.
This means Magento Open Source cannot natively create a recurring import job that automatically retrieves a file and processes it every hour, day, or month.
At the same time, it is worth mentioning that Magento Open Source still relies on cron for many background operations, such as indexing, sitemap generation, newsletters, currency updates, and other scheduled tasks. But since the native import tool is not connected to a configurable scheduled import workflow, you need custom development or a third-party import solution to automate recurring data transfers.
Improved Import & Export as the Automation Layer
Improved Import & Export adds a dedicated scheduled import system to Magento Open Source. Instead of manually opening the Import page and uploading a new file whenever product data changes, you can create an import job once and let Magento execute it automatically.
The extension lets you:
- create reusable Magento 2 scheduled import jobs;
- assign predefined schedules or configure custom cron expressions;
- automate product, customer, pricing, category, inventory, and other supported entity imports;
- retrieve data from FTP/SFTP, URLs, Google Sheets, and other supported sources;
- work with CSV, XML, JSON, and other supported formats;
- map source fields to Magento attributes;
- transform incoming values before they are imported;
- execute import jobs through CLI;
- review job execution and troubleshoot automated transfers.
Let’s suppose your supplier uploads a fresh product feed every night. Instead of downloading the file and importing it manually each morning, you can configure an Improved Import & Export job to retrieve the feed automatically, map its columns to Magento product attributes, update the catalog, and repeat the same process according to the selected schedule.
This effectively adds an automation layer on top of Magento Open Source import functionality, allowing recurring data transfers to operate in much the same way as scheduled integration workflows in more complex ecommerce environments.
It can also be useful in Adobe Commerce when the native scheduler is not flexible enough to satisfy your unique data transfer demands. While Adobe Commerce offers daily, weekly, and monthly scheduled imports, Improved Import & Export supports more granular cron-based schedules, additional data sources and formats, mapping, transformations, and more advanced import job management.
In the next section, we explain how to create such a Magento 2 scheduled import job and configure it to run automatically with the help of the Improved Import & Export extension.
How to Create a Magento 2 Scheduled Import Job
To create a scheduled import job in Magento 2, go to:
System → Improved Import/Export → Import Jobs
Then click Add New Job.
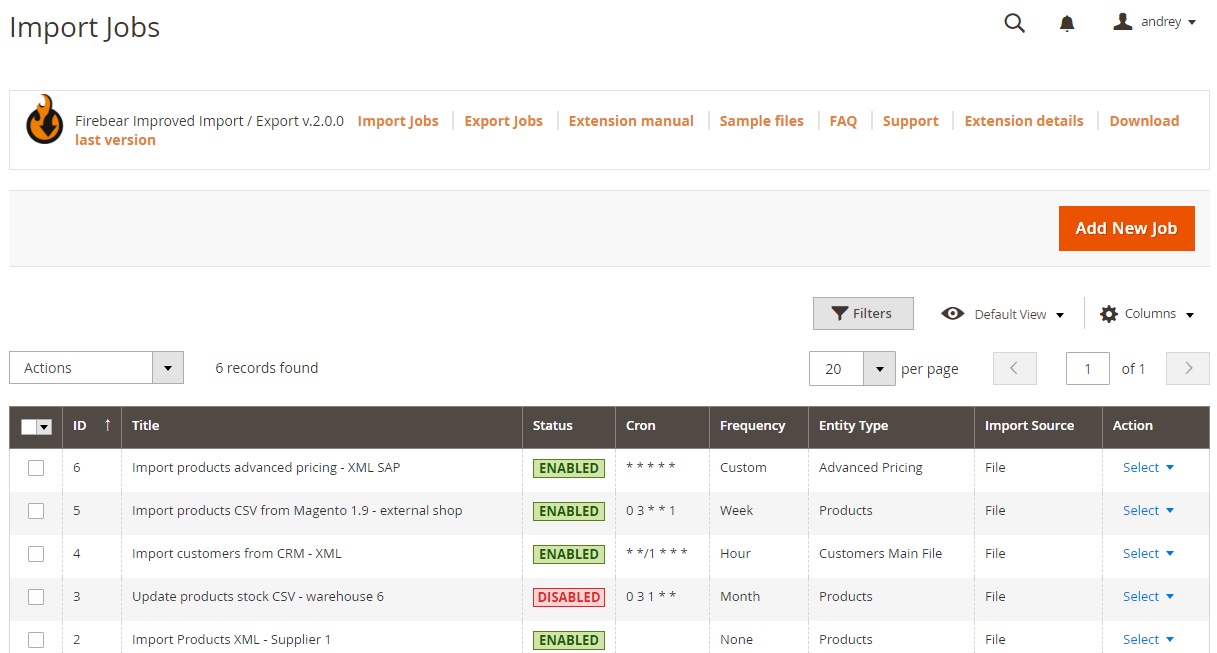
The job configuration is divided into four main sections: General Settings, Import Settings, Import Behavior, and Import Source. Let’s configure them for a Magento 2 scheduled import.
1. Create and Enable an Import Job
Start with General Settings.
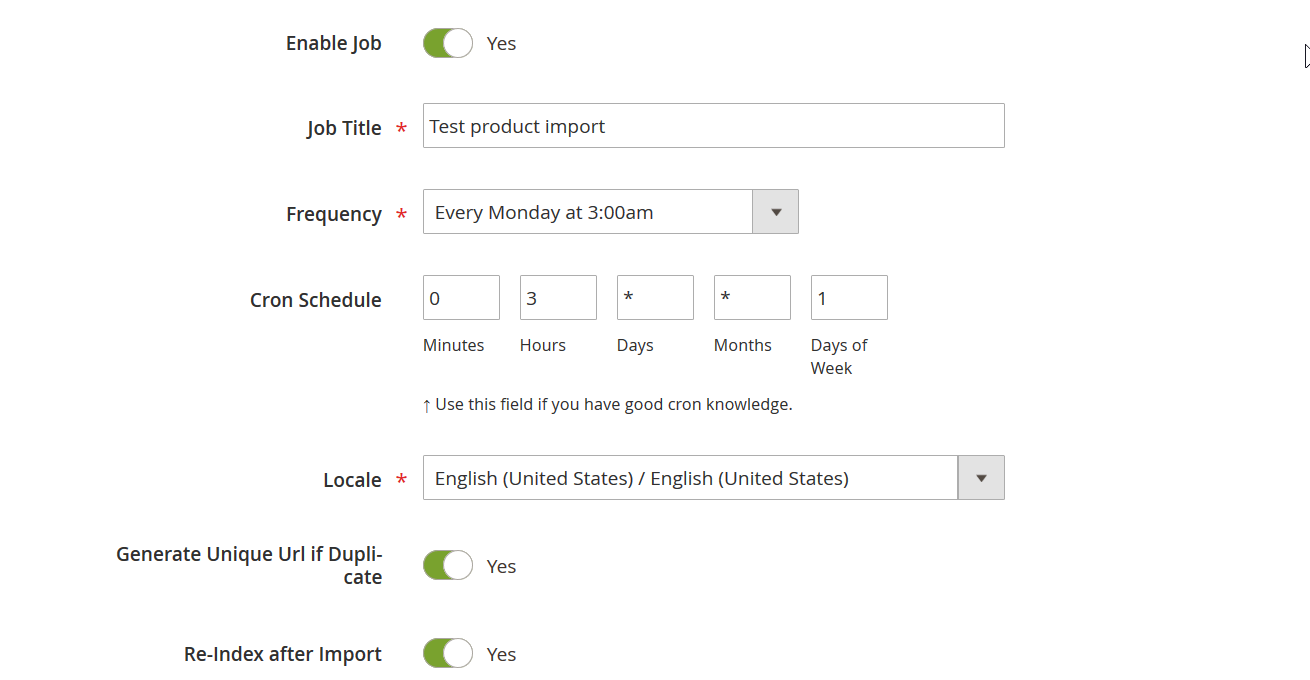
Enable the job if you want Magento to launch it automatically according to the configured schedule. Then enter a descriptive Job Title that makes the process easy to identify in the Import Jobs grid.
For example:
Test product import or Daily supplier product update
Using clear names becomes particularly useful when you operate several scheduled imports for products, prices, inventory, customers, or different suppliers.
You can also select the appropriate Locale and configure additional job options. Depending on your workflow, you may want to enable Re-index after Import so Magento updates the relevant indexes after new data is processed.
2. Set the Frequency or Configure a Custom Cron Schedule
Next, configure how often your Magento 2 scheduled import should run.
The Frequency field provides predefined scheduling options, making it easy to automate standard recurring imports. If the required interval is not available, select Custom and use the Cron Schedule field instead.
A cron expression gives you much more control over when the import runs. For example:
0 3 * * *
runs the import every day at 3:00 AM. We will return to this example below.
You can use custom cron scheduling for workflows such as:
- importing supplier product data every night;
- updating stock several times per day;
- synchronizing prices every few hours;
- running selected imports only on specific weekdays.
Before enabling an important production job, make sure the schedule is correct and test the import manually.
3. Select the Entity to Import
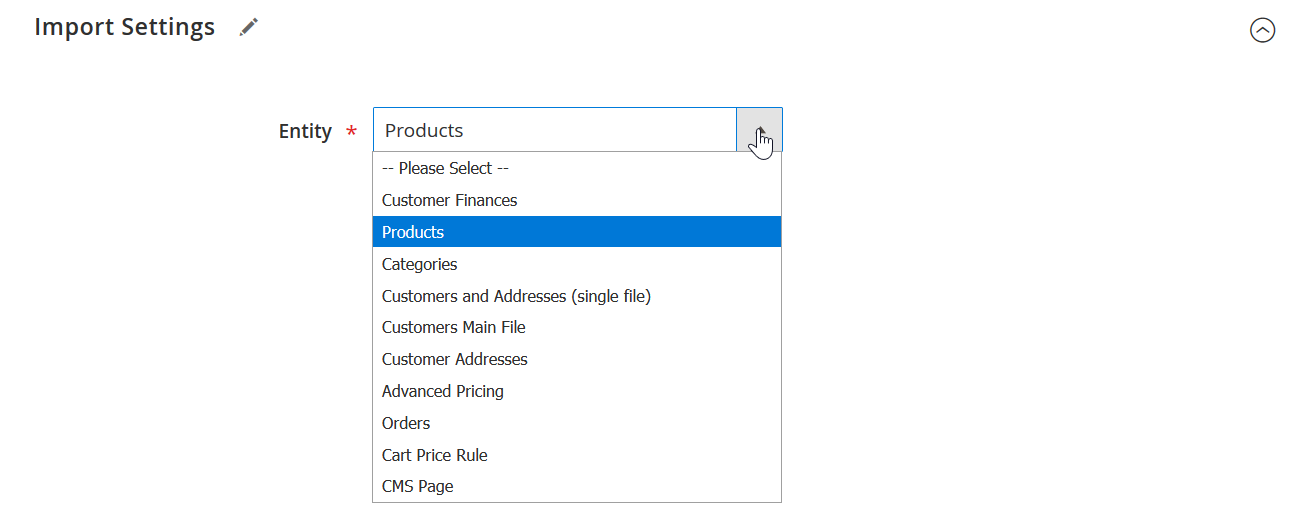
Next, proceed to Import Settings and select the Magento entity you want to transfer.
For a scheduled product update, choose Products.
Improved Import & Export supports many more entities as well, including:
- Categories;
- Customers and Addresses;
- Advanced Pricing;
- Attributes;
- URL Rewrites;
- Reviews;
- Cart Price Rules;
- Catalog Price Rules;
- Orders;
- CMS Pages and Blocks;
- Search Terms and Synonyms;
- Newsletter Subscribers;
- Adobe Commerce B2B entities such as Companies, Shared Catalogs, Quotes, and Requisition Lists.
Additional options appear depending on the selected entity.
For product imports, for example, you can control how existing attributes, category associations, images, related products, cross-sells, upsells, and products missing from the incoming file should be handled.
This makes a scheduled job more than a simple automatic file upload: you can determine exactly how recurring source data affects the existing Magento catalog.
4. Configure Import Behavior
After that, proceed to Import Behavior and specify what Magento should do with the incoming records.
The main behavior options include:
- Add/Update — adds new entities and updates existing ones;
- Only Add — adds new records without changing existing ones;
- Only Update — updates existing records without creating new ones;
- Replace — replaces matching existing entities with data from the import file;
- Delete — removes entities specified in the import file.
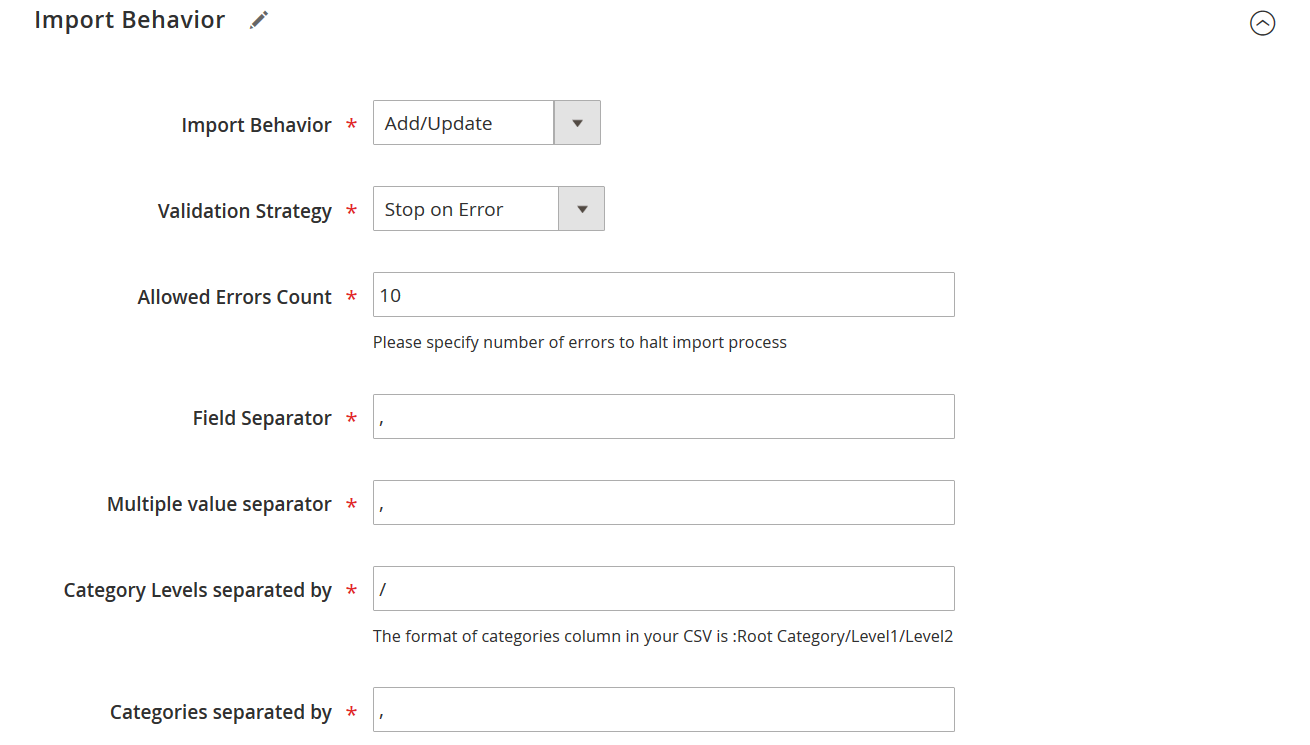
For usual daily product imports, Add/Update or Only Update is usually the most relevant behavior because supplier feeds commonly contain updated prices, inventory levels, descriptions, or other product attributes.
5. Choose the File Format and Import Source
Now, you can choose the source file format and its location for your Magento 2 scheduled import. Improved Import & Export supports CSV, XML, JSON, XLSX, and ODS, so recurring jobs are not limited to Magento-ready CSV files.
This is useful when scheduled data comes from suppliers, ERP systems, PIM platforms, or marketplaces. XML feeds can be transformed with XSLT, while JSON, Excel, and ODS files can be processed without manually converting every update into a standard Magento CSV first.
Improved Import & Export can also retrieve scheduled import data from multiple external sources, including FTP/SFTP, Google Sheets, Google Drive, Dropbox, OneDrive, direct URLs, REST API, and SOAP API.
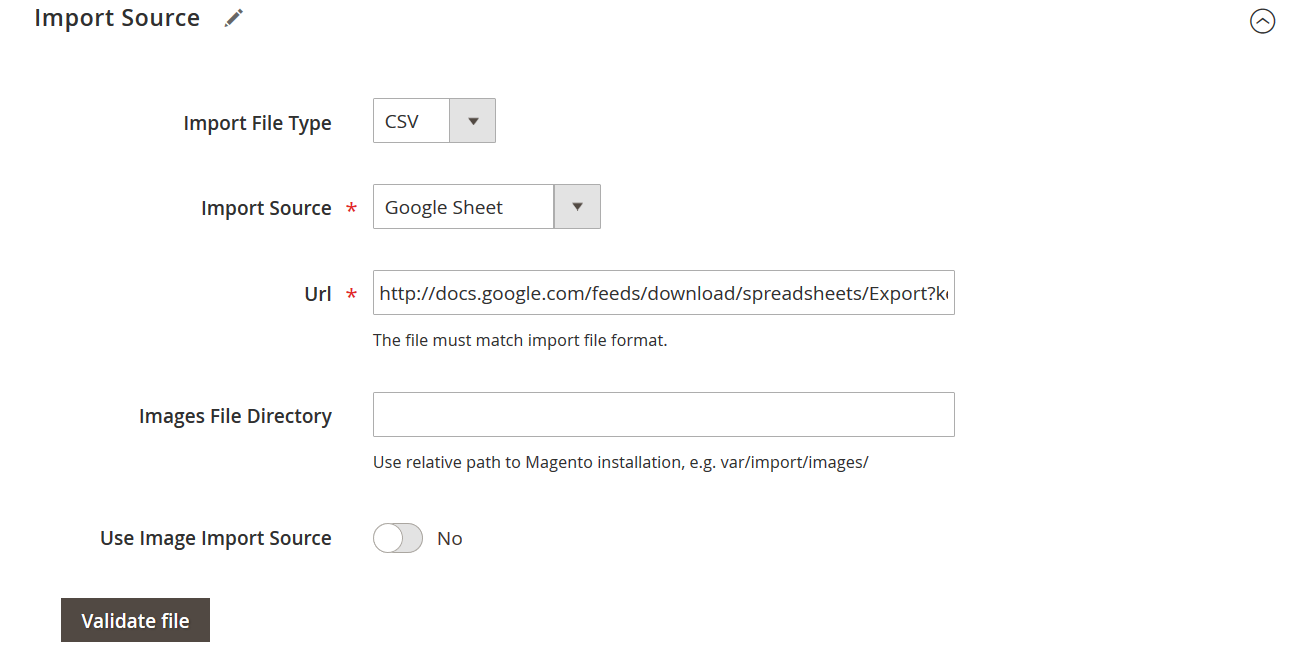
As a result, a recurring Magento 2 import job can connect directly to the source, retrieve the latest data, and process it according to the configured schedule. This removes the need to repeatedly download, prepare, and upload files by hand.
6. Configure Other Parameters, Save, and Test the Job
Note that after selecting an import entity, Improved Import & Export activates additional settings designed specifically for that data type. Product imports, for example, expose configurations for attributes, categories, images, related products, and other catalog-specific data, while customer, pricing, order, or B2B imports provide their own dedicated options.
You can also configure attribute mapping to connect source columns with the corresponding Magento fields. Additional tools let you apply value mapping, default or static values, filters, and find-and-replace rules without manually editing every source file.
Once the configuration is complete, save the job and run a test import before relying on the schedule. Check validation results, imported records, job history, and any reported errors to make sure the source, mapping, behavior, and entity-specific settings work as expected.
Only after the test succeeds should you leave the job enabled for automatic execution according to the selected Magento 2 scheduled import frequency.
How to Run Product Import Daily in Magento 2: Cron Syntax Explained
A common Magento 2 scheduled import scenario is a daily product update from a supplier, ERP, PIM, or another external system.
Suppose your supplier updates a product feed every night at 2:00 AM. You want Magento to retrieve the latest version automatically and process it one hour later.
In your Improved Import & Export job, configure the following settings:
- Entity: Products;
- Import Behavior: Add/Update or Only Update, depending on the workflow;
- Import Source: for example, SFTP, FTP, Google Sheets, or another supported source;
- Frequency: Custom;
- Cron Schedule: 0 3 * * *.
As we’ve mentioned earlier, the cron expression “0 3 * * *” means your import runs automatically every day at 3:00 AM.
A typical workflow therefore looks like this:
2:00 AM — the supplier updates the product feed.
3:00 AM — Improved Import & Export starts the scheduled job.
3:00 AM onward — Magento retrieves the latest file, validates the data, and updates the corresponding products.
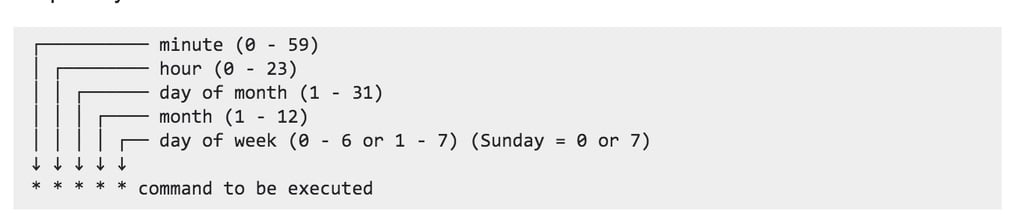
With the Improved Import & Export extension, it is possible to run imports every minute, every hour, daily at a specified time, every specific day of the week at a certain time, or every specific day of the month at a selected time. You only need to use the following cron syntax:
- Every minute (*/1 * * * *)
- Every hour (* */1 * * *)
- Every day at 3:00 am (0 3 * * *)
- Every Monday at 3:00 am (0 3 * * 1)
- Every 1st day of the month at 3:00 am (0 3 1 * *)
Depending on the job configuration, the import can update prices, stock values, descriptions, product attributes, images, categories, and other supported product data. Once the job is configured and enabled, the same daily Magento 2 product import runs automatically according to the cron schedule.
Magento 2 Scheduled Import via CLI
Improved Import & Export also lets you control import jobs through the Magento 2 command-line interface. This can be useful for testing a scheduled job, troubleshooting an import, launching a job manually without opening the Admin, or integrating import execution into other server-side processes.
Before using the CLI, create the corresponding import job in the Improved Import & Export interface. Each job has an ID that can be found in the Import Jobs grid.
To run a specific Magento 2 import job, go to the Magento root directory and execute:
php bin/magento import:job:run JOB_ID
Replace JOB_ID with the actual ID of the job.
For example, if the scheduled product import has ID 7, use:
php bin/magento import:job:run 7
You can also enable or disable an import job from CLI:
php bin/magento import:job:enable JOB_ID
php bin/magento import:job:disable JOB_ID
For example:
php bin/magento import:job:enable 7
enables job 7, while:
php bin/magento import:job:disable 7
disables it.
If you run:
php bin/magento import:job:run
without specifying a job ID, Improved Import & Export executes all enabled import jobs.

However, note that CLI does not replace the schedule configured for the job. For a recurring workflow such as the daily 3:00 AM product import described above, you normally configure the cron frequency in the Admin and let Magento launch the job automatically. CLI is particularly useful when you need to run the same job immediately, verify that it works correctly, or troubleshoot an automated import that has failed.
Adobe Commerce Scheduled Import vs Improved Import & Export
You may think that since Adobe Commerce already provides a native scheduled import feature, there is no need for an additional solution just to automate recurring data transfers. However, that’s only partly true. If your workflow consists of importing a properly structured CSV file from a local server or remote FTP location once per day, week, or month, the built-in functionality may be sufficient.
However, more complex integrations often require functionality beyond the native scheduler. And Improved Import & Export does the best job among other tools on the market. Here is how it compares to the native Magento 2 scheduled import functionality:
| Feature | Adobe Commerce Scheduled Import | Improved Import & Export |
| Platform availability | Adobe Commerce only | Magento Open Source and Adobe Commerce |
| Scheduled imports | Yes | Yes |
| Scheduling options | Daily, weekly, monthly | Daily, weekly, monthly and other predefined frequencies |
| Custom cron expressions | No | Yes |
| CSV import | Yes | Yes |
| XML import | No | Yes |
| JSON import | No | Yes |
| XLSX / ODS import | No | Yes |
| Local file import | Yes | Yes |
| FTP | Yes | Yes |
| SFTP | No | Yes |
| Direct URL | No | Yes |
| Google Drive | No | Yes |
| Google Sheets | No | Yes |
| REST / SOAP API as an import source | No | Yes |
| Attribute mapping | No (only native file structure expected) | Yes |
| Default values and value mapping | No | Yes |
| Dedicated import job CLI controls | No equivalent native Scheduled Import job commands | Yes |
| Detailed job logging | Limited | Yes |
Long story short: Adobe Commerce Scheduled Import is therefore a good fit when the incoming data already follows Magento requirements and the integration is relatively simple. For example, a merchant can place a CSV product file on an FTP server and configure Adobe Commerce to process it automatically every night.
The limitations become more noticeable when the source system does not produce Magento-ready data. A supplier may use product_code instead of sku, different category names, custom status values, or an XML/JSON structure that Magento cannot process directly. In such cases, the data normally has to be transformed before it reaches the native importer.
Improved Import & Export, however, moves much of this preparation into the Magento 2 scheduled import job itself. You can map incoming fields to Magento attributes, assign default values, map attribute values, and work with data structures that differ from the platform’s default import requirements.
The same applies to import sources. While Adobe Commerce Scheduled Import works with files stored locally or on remote FTP servers, Improved Import & Export expands this workflow to SFTP, direct URLs, Dropbox, Google Drive, Google Sheets, REST API, SOAP API, and other supported sources. It also supports CSV, XML, JSON, XLSX, and ODS files.
And, of course, scheduling is another important difference. Adobe Commerce provides Daily, Weekly, and Monthly frequencies. Improved Import & Export also lets you configure custom cron expressions, which is useful when data must be synchronized several times per day or at a very specific interval.
So, while the native Adobe Commerce scheduler remains suitable for straightforward recurring imports and Improved Import & Export is designed for workflows that require more flexible scheduling, non-standard data structures, additional sources and formats, mapping, transformations, and more granular job management, the distinction for Magento Open Source is even simpler: since native Scheduled Import/Export is an Adobe Commerce-exclusive feature, Improved Import & Export can provide the scheduled import layer that Open Source does not include out of the box.
Common Magento 2 Scheduled Import Use Cases
Common scenarios for Magento 2 scheduled import workflows include:
- Daily product catalog updates. Import new products and update existing SKUs, descriptions, attributes, categories, and other catalog data from a supplier, PIM, ERP, or another source.
- Inventory synchronization. Refresh product quantities several times per day to keep Magento stock levels aligned with warehouses, ERP systems, distributors, or supplier feeds.
- Price updates. Automatically import regular price, special price, cost, tier pricing, or advanced pricing data according to a predefined schedule.
- Supplier feed automation. Retrieve updated product files from FTP, SFTP, Google Sheets, URLs, or other supported sources without downloading and uploading them manually.
- ERP-to-Magento synchronization. Schedule recurring imports of products, inventory, pricing, customers, and other business data exported by an ERP system.
- PIM-to-Magento catalog updates. Automatically transfer enriched product information, attributes, descriptions, categories, and media-related data from a product information management system.
- Customer data imports. Synchronize customer accounts, addresses, and related information from external CRM, ERP, or legacy systems.
- Category updates. Import new categories or update existing category structures when catalog organization is managed outside Magento.
- Marketplace and multichannel synchronization. Import product, price, or inventory data generated by marketplaces, middleware platforms, or other sales channels.
- Recurring migration or staging workflows. Run repeated imports during phased migrations, testing, catalog preparation, or synchronization between development, staging, and production environments.
In each case, the goal is the same: replace repetitive manual data transfers with a predictable automated Magento 2 import workflow that runs according to the schedule required by your business.
Final Words: Improve Your Magento 2 Scheduled Import Workflows
A reliable Magento 2 scheduled import workflow can remove a large amount of repetitive catalog maintenance from everyday store management. Instead of uploading the same product, pricing, inventory, customer, or category files manually, you can configure recurring jobs and let Magento process incoming data automatically at the required time.
The exact setup depends on your platform. Adobe Commerce includes native Scheduled Import/Export functionality for relatively straightforward daily, weekly, and monthly jobs. Magento Open Source, however, does not provide a comparable scheduling interface out of the box. And even in Adobe Commerce, native scheduling can become restrictive when your workflow requires custom cron expressions, non-standard file formats, external data sources, mapping, transformations, or more granular job control.
That is where Improved Import & Export extends the standard Magento import process. It lets you create reusable import jobs, schedule them with predefined intervals or custom cron expressions, connect Magento to external sources, work with multiple file formats, map incoming data, transform values, and manage imports through the Admin or CLI.
Whether you need to run a daily Magento 2 product import, synchronize inventory every few hours, automate supplier feeds, or build a recurring ERP or PIM integration, the same principle applies: the more predictable the data flow becomes, the less manual work your team has to perform.
If you want to build a more flexible Magento 2 scheduled import workflow, download Improved Import & Export and configure automated import jobs around your actual data sources and update frequency. If your integration is more complex or you are not sure how to structure the workflow, contact Firebear Studio — we can help you choose the right setup for your Magento Open Source or Adobe Commerce store.
Magento 2 Scheduled Import FAQ
What is Magento 2 scheduled import?
Magento 2 scheduled import is an automated data transfer process that runs at a predefined time or frequency. Instead of manually uploading a file whenever products, prices, stock, customers, or other data changes, you configure an import job once and let Magento process subsequent updates automatically. Scheduled imports are typically managed through cron.
Does Magento Open Source support scheduled imports?
No. Magento Open Source does not include native Scheduled Import/Export functionality. Its standard import tool is primarily designed for manual data transfers. To automate recurring imports, you need custom development or a third-party solution such as Improved Import & Export, which adds scheduled import jobs and cron-based automation to Magento Open Source.
Does Adobe Commerce support scheduled imports?
Yes. Adobe Commerce includes native Scheduled Import/Export functionality under System → Data Transfer → Scheduled Imports/Exports. You can configure imports to run automatically on a daily, weekly, or monthly basis. Adobe Commerce uses its cron scheduler to execute these jobs.
How do I schedule a daily product import in Magento 2?
In Adobe Commerce, you can create a Scheduled Import and select Daily as its frequency. With Improved Import & Export, create an import job, select Products as the entity, configure the source and import behavior, and assign a predefined frequency or custom cron schedule.
For example, 0 3 * * * runs a product import every day at 3:00 AM.
How often can Magento 2 scheduled imports run?
Native Adobe Commerce Scheduled Import supports daily, weekly, and monthly frequencies. If you use Improved Import & Export, you can configure more granular schedules with cron expressions. This makes it possible to run an import every few hours, several times per day, on selected weekdays, or according to another custom interval.
Can I use cron for Magento 2 product imports?
Yes. Cron is the scheduling mechanism behind automated Magento operations, including scheduled imports. Adobe Commerce uses cron to execute its native Scheduled Import/Export jobs. Improved Import & Export also integrates import jobs with cron and lets you configure custom expressions for more precise scheduling.
Can Magento 2 scheduled imports use FTP, SFTP, Google Sheets, or an API?
It depends on the import solution. Native Adobe Commerce Scheduled Import can retrieve CSV files from a local server or remote FTP server. Improved Import & Export expands the available sources to options such as FTP, SFTP, direct URLs, Google Drive, Google Sheets, Dropbox, REST API, and SOAP API. It also supports formats including CSV, XML, JSON, XLSX, and ODS.
Can I run a Magento 2 import job from CLI?
Yes, with Improved Import & Export. You can launch an existing import job from the Magento command line using php bin/magento import:job:run JOB_ID
Replace JOB_ID with the ID of the required import job. You can also enable or disable import jobs through CLI. This is useful for testing, troubleshooting, or manually triggering a job outside its normal schedule.
What happens if a Magento 2 scheduled import fails?
Adobe Commerce can send a failed import email containing information about the error, and the result of the latest scheduled job is displayed in the Last Outcome column. Improved Import & Export provides job history and logging tools that can help identify problems with automated transfers. In either case, scheduled imports should be tested before they are enabled for critical production workflows.
Should I use Adobe Commerce Scheduled Import or Improved Import & Export?
Native Adobe Commerce Scheduled Import can be sufficient for straightforward recurring CSV imports that run daily, weekly, or monthly and use local or FTP-based files.
Improved Import & Export is more suitable when you need custom cron schedules, Magento Open Source support, XML or JSON imports, Google Sheets, SFTP, APIs, attribute mapping, value transformations, additional entities, CLI controls, or more advanced job management. The appropriate option depends on how frequently your data changes and how closely the source data matches Magento’s native import requirements.
Related posts
 Shopify Product Import Behavior Explained: Take Full Control of Your Product Data
 How to Import Customers & Customer Addresses to Magento 2 in 2026: Complete Tutorial & CSV Samples for Adobe Commerce & Magento Open Source
 How to Import Shopify Product Variants by EAN
 Magento to Shopify Product Migration: Complete 2026 Guide to Import & Export
 How the price_inherited Field Simplifies Variant Pricing Import in Shopware 6
 How to Change Product Handle During Shopify Import
 How to Import Advanced Pricing in Shopware 6 with Product Updates
 Shopware 6 Product Import Behavior Control Explained