
How to Run Product Import on Daily Basis in Magento 2

Welcome to our Magento 2 scheduled import guide. Below, we shed light on how to run Magento 2 import processes daily and automatically following a schedule. You can do that either in your admin interface or via CLI. While Magento 2 Open Source doesn’t let you automate data transfer processes and there is no way to use CLI to control imports and exports, you can enable the missing functionality with the help of third-party solutions. In the article below, we explain how to run scheduled imports in Magento 2 and use CLI to control them with the help of Improved Import & Export.
Also, we look for an alternative point of view on in the question by and the answer by . Since we leverage the advanced import functionality of the Improved Import & Export extension to address the issues mentioned in the discussion, you will also find a section that describes other possibilities the module provides.
So, how do we run product import in Magento 2 daily and automatically? And how do we use CLI in this process? The question has two answers since everything depends on your platform version. As we all know, the difference between Magento 2 Open Source and Adobe Commerce is huge, therefore, the same goals on both platforms can be achieved in a slightly different manner. Let’s see.

Table of contents
- 1 Scheduled Import on Adobe Commerce
- 2 Magento 2 Scheduled Import for Open Source Websites
- 3 Magento 2 Import & Export FAQ
- 3.1 How do I import products in Magento from CSV?
- 3.2 What file format does Magento accept in import?
- 3.3 How do I import Amazon listings to Magento?
- 3.4 How to bulk import images in Magento 2
- 3.5 How do I import up-sell and cross-sell products to Magento?
- 3.6 How to import and export customers in Magento 2 daily?
- 3.7 How to import and export products in Magento 2 daily?
- 3.8 How to import and export orders in Magento 2 daily?
- 3.9 How to import and export categories in Magento 2 daily?
- 3.10 How do I import and export prices in Magento 2 daily?
- 3.11 How do I import and export product attributes in Magento 2 daily?
- 3.12 How do I import and export newsletter subscribers in Magento 2 daily?
- 3.13 How do I import and export data between Magento 2 and other websites automatically?
- 3.14 How do I import data with third-party attributes to Magento 2 daily?
- 4 Final Words
Scheduled Import on Adobe Commerce
If you have a Commerce-based website, running product import automatically is quite simple, since it is a default feature. You can create import/export processes launched daily, weekly, or monthly via the cron job scheduler. Furthermore, the default capabilities allow you to import files from local and remote servers.
Check this step-by-step guide for a better understanding of the process:
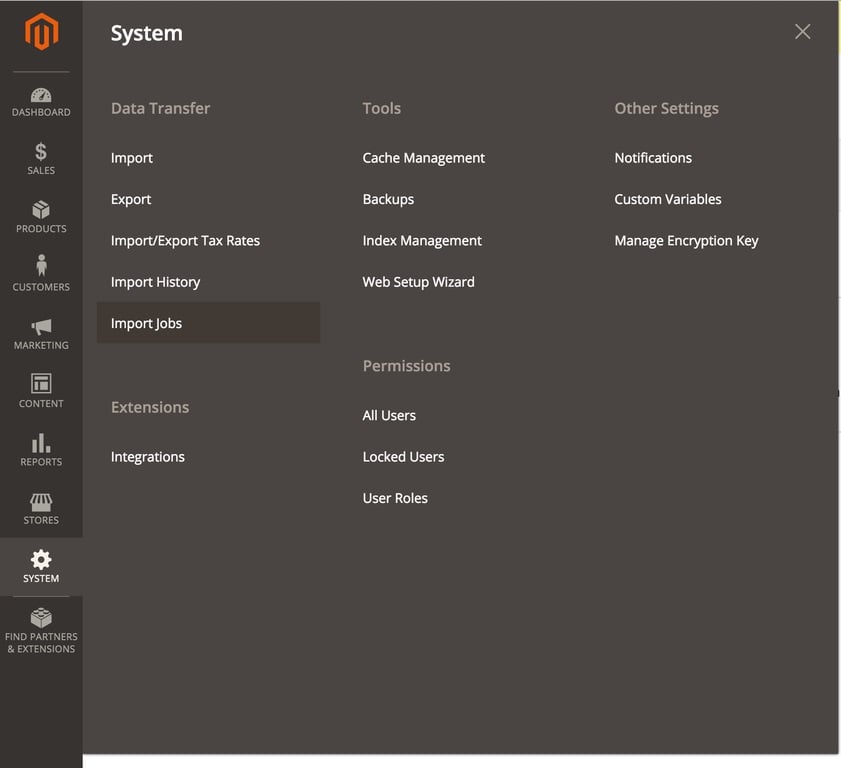
- Go to the Admin sidebar, tap System, find the Data Transfer section, and select Scheduled Imports/Exports: System > Data Transfer > Scheduled Imports/Exports.
- Create a new scheduled import job by tapping the appropriate button and following the instructions. You can learn more about scheduling import and export here: ; .
- Save the new job and it will appear in the Scheduled Import/Export grid.
- Note that a copy of each import/export file is stored in the var/log/import_export directory (your Magento local server), but details of each operation are not available in the log. At the same time, if an error occurs, you get a notification that describes it. For further information, check .
But what to do, if you work with Magento 2 Open Source?
Magento 2 Scheduled Import for Open Source Websites
By default, Magento 2 Open Source doesn’t provide the ability to run product import/export on a daily, weekly, or monthly basis automatically. However, it is always possible to solve this problem. Although you can build a custom importer, there is a tool that perfectly suits even the most complex data transfer requirements in Firebear’s portfolio. The Improved Import & Export extension simplifies import and export processes by introducing multiple new features not only to Magento 2 Open Source but also to Adobe Commerce. We want to introduce you to the core functionality of this Magento 2 module and then shed light on how it solves the problem discussed in this post.

The first thing that makes our product even better than the default import of Adobe Commerce is a wider selection of sources. In addition to local or remote FTP servers, Improved Import provides the ability to grab CSV from Dropbox or via a direct URL. Besides, the Magento 2 extension allows you to import products as well as dedicated simple categories (note that the default Magento 2 platform allows you to import categories only with assigned products).
Another great feature of our product is the ability to create new product attributes and their values on the fly during the import process.
The next huge improvement is the extension’s support for Magento 2 scheduled import and export processes for products, categories, customers, and other core entities. Below, we describe it in more detail.
Import Jobs with Schedules
With the help of the Import Jobs feature, you can easily leverage the cron job functionality for creating schedules. It supports all kinds of import processes and can be launched via CLI. Thus, running product import daily in Magento 2 CE via CLI becomes possible. The feature is available under Magento admin -> System -> Data Transfer -> Import Jobs.
Here, you can see a grid that contains all import cron jobs. The grid consists of the following columns:
- ID – job’s ID number;
- Checkbox – you can select jobs to apply mass action;
- Title – job’s title;
- Status – enabled or disabled;
- Cron – the frequency of jobs in a cron format;
- Frequency – how often import is run: daily, hourly, weekly, etc;
- Entity Type – data type to be imported: products, customers, categories, etc;
- Import Source – local file, Dropbox, FTP, or URL;
- Actions – delete or edit.
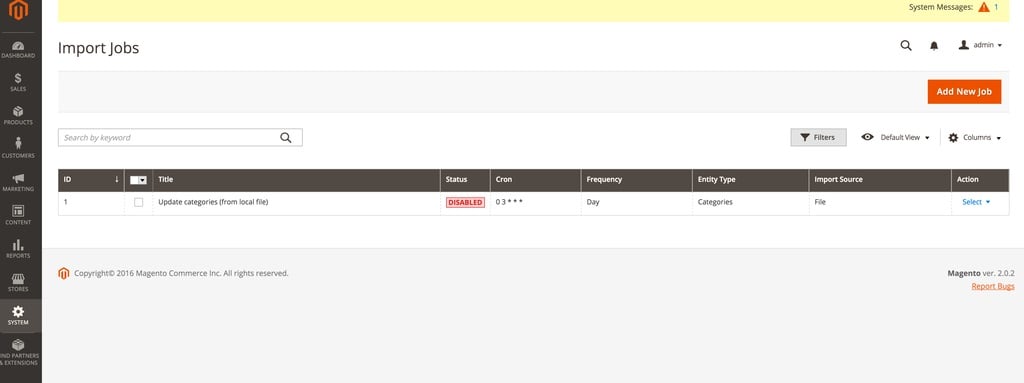
To create a new job that will run a scheduled import, click the “Add New Job” button. You will be redirected to the following screen:
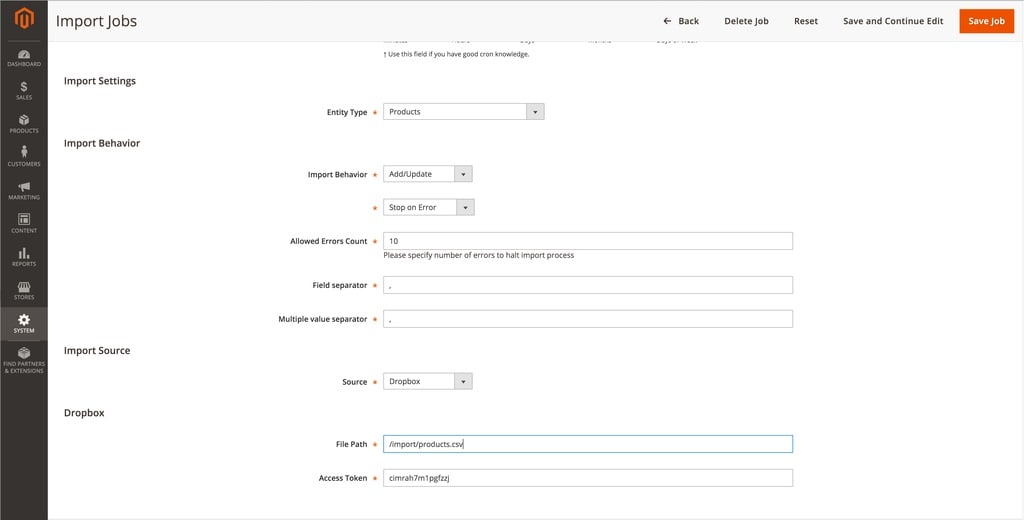
Now, let’s figure out how to configure a scheduled import in Magento 2.
Title of Import Job allows you to name your import job in a self-explanatory manner.
Next, you should select an import preset frequency. Note that it is possible to run import every minute or hour, daily at a specified time, every specific day of the week at a certain time, or every specific day of the month at a selected time.
- Every minute (*/1 * * * *)
- Every hour (* */1 * * *)
- Every day at 3:00 am (0 3 * * *)
- Every Monday at 3:00 am (0 3 * * 1)
- Every 1st day of the month at 3:00 am (0 3 1 * *)
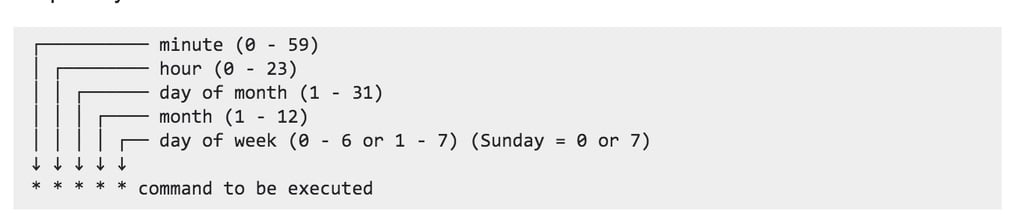
Alternatively, the module allows you to create a custom schedule, using the following standard Cron syntax:
Next, you should select import behavior. Our Magento 2 Improved Import module allows you to add new entities, as well as update, replace, or delete the existing ones with new items.
For further information about the standard Cron configuration in Magento 2, check our Magento 2 Cron Configuration Guide. Besides, there is the official documentation here: .
Now, let’s say a few words about CLI in import processes. Our extension lets you enable, disable, or start product import via CLI. Go to the Magento 2 root folder. Open the command line and run the following command:
|
1 |
php -f bin/magento import:job:COMMAND JOB_ID |
Next, you can use CLI, to disable, enable, and run cron jobs by adding the appropriate command to “import:job:”. These are three available commands:
- import:job:disable
- import:job:enable
- import:job:run

We hope this was a comprehensive answer, so now you know how to run product import daily and automatically in Magento 2 Open Source and Adobe Commerce via CLI. As for the Improved Import extension, you can get it here:
Get Firebear Improved Import Magento 2 Extension
More tips from Magento 2 Cookbook.
Magento 2 Import & Export FAQ
Below, we share several other nuances of importing and exporting data with Improved Import & Export.
How do I import products in Magento from CSV?
Magento 2 lets you import products via a CSV file by default. However, you need to use the standard attributes and follow other requirements for Magento 2 product import. As for the Improved Import & Export extension, it provides the ability to import any CSV file. And there is no need to edit it. Instead, you match third-party attributes to ones used in Magento 2, teaching the system how to replace the unsupported data.
What file format does Magento accept in import?
Magento 2 only lets you import CSV files. However, you can dramatically extend the platform’s default functionality with the help of the Improved Import & Export extension. The module provides the ability to import CSV, XML, XLSX, JSON, and ODS files.
How do I import Amazon listings to Magento?
You can import Amazon listings to Magento 2 as follows. Firstly, it is necessary to export data from Amazon. Secondly, you need to edit the output according to the Magento 2 requirements. Thirdly, import your Amazon listings to your e-commerce website. Alternatively, it is possible to use the Improved Import & Export Magento 2 module to establish a direct connection between the two systems. The plugin lets you create an API connection for moving product data and other entities between the two systems.
How to bulk import images in Magento 2
You need to upload product images to your server under the pub/media/import folder and then specify their addresses in a product data file that you are going to import. Enter each image file name to be imported on the correct row, by SKU, and in the correct column according to image type.
How do I import up-sell and cross-sell products to Magento?
To import up-sells, cross-sells, and related products, create a CSV file with the corresponding data. Specify related products, up-sells, and cross-sells via the following three columns in the table.
– related_skus – for related products
– crosssell_skus – for cross-sells
– upsell_skus – for up-sells
Note that all columns should have the same formatting. You can assign a product as related by specifying its SKU. To assign multiple related products, use commas to separate numerous SKUs.
How to import and export customers in Magento 2 daily?
To move customers between Magento 2 and other external systems and e-commerce websites, use Improved Import & Export to create import and export jobs. Next, choose Customers as your import or export entity in the corresponding settings section. Note that you can transfer all customer data.
How to import and export products in Magento 2 daily?
To move products between Magento 2 and other external systems and e-commerce websites, use Improved Import & Export to create import and export jobs. Next, choose Products as your import or export entity in the corresponding settings section. Our module works with all product types: simple, configurable, grouped, bundle, virtual, downloadable, and even gift cards!
How to import and export orders in Magento 2 daily?
To move orders between Magento 2 and other external systems and e-commerce websites, use Improved Import & Export to create import and export jobs. Next, choose Orders as your import or export entity in the corresponding settings section. You can transfer orders along with all the related documents.
How to import and export categories in Magento 2 daily?
To move categories between Magento 2 and other external systems and e-commerce websites, use Improved Import & Export to create import and export jobs. Next, choose Categories as your import or export entity in the corresponding settings section. Our module lets you map imported categories to ones that are already represented in your category tree.
How do I import and export prices in Magento 2 daily?
To move advanced pricing between Magento 2 and other external systems and e-commerce websites, use Improved Import & Export to create import and export jobs. Next, choose Products as your import or export entity in the corresponding settings section. Note that it is necessary to edit the product data table in a specific manner to enable the price update.
How do I import and export product attributes in Magento 2 daily?
To move product attributes between Magento 2 and other external systems and e-commerce websites, use Improved Import & Export to create import and export jobs. Next, choose Product Attributes as your import or export entity in the corresponding settings section. Note that the module provides the ability to move product attributes, attribute sets, and attribute groups as dedicated entities.
To move newsletter subscribers between Magento 2 and other external systems and e-commerce websites, use Improved Import & Export to create import and export jobs. Next, choose Newsletter Subscribers as your import or export entity in the corresponding settings section. Thus, you can subscribe the existing customers to your new newsletter and add new subscribers.
How do I import and export data between Magento 2 and other websites automatically?
The Improved Import & Export module lets you automate your data synchronization between Magento 2 and external systems. The plugin uses a cron scheduler, providing the ability to choose or create intervals for automated data transfers. Specify a period of updates, and the module will do everything for you.
How do I import data with third-party attributes to Magento 2 daily?
As we’ve already mentioned, importing third-party data to Magento 2 is impossible. However, you can use Improved Import & Export to carry this burden. The extension offers a mapping section where you match the unsupported attributes to ones used in Magento 2, teaching the system what designations to use instead of the unsupported data.
Final Words
Adding Magento 2 scheduled import and export processes to your daily routine may dramatically reduce the work associated with repetitive data transfers. While Adobe Commerce users can leverage this feature out of the box, Magento 2 Open Source users need to install the Improved Import & Export extension to get the missing functionality. At the same time, the module is also suitable for Adobe Commerce since it extends the list of supported file formats, sources, and entities and adds multiple new handy features. Follow this link and contact our support to get more information about the extension, scheduled Magento 2 imports, and other data transfer enhancements:
Get Firebear Improved Import Magento 2 Extension
Related posts
 How to Import Customers & Customer Addresses to Magento 2
 How To Bulk Import Products In Shopify: CSV Description & Step-By-Step Guide
 Magento 2 B2B Company Guide: Revealing Company Structure & Import
 A Complete Guide to Shopify Customer Import
 Shopware 6 Advanced Pricing Guide + Import Tutorial
 Shopify Metafield Guide: Definition, Types, Management & Import
 Magento 2 Release Notes
 Adobe (Magento 2) Commerce and Cloud (Enterprise Edition) Specific Features