Mirasvit RMA Extension for Magento 2 and 1
In this post, we’d like to draw your attention to the Mirasvit RMA extension. Although we’ve already described the most reliable RMA modules for both Magento 1 and Magento 2, and the Mirasvit’s solution is in both lists, we think it is necessary to create a separate overview to show how the tool works and looks from inside. So, if you are looking for a powerful tool designed to simplify your daily routine related to managing returns and exchanges of goods, you’ve come to the right place. Below, we explain why the Mirasvit RMA extension is a vital tool for merchants who look into creating strong relationships with customers and building loyalty to their brand.

Table of contents
Core Features of Mirasvit RMA
- Creation of return and exchange requests from the frontend and backend;
- RMA requests can be submitted for online and offline orders;
- Customizable look of RMAs in the backend;
- Flexible workflow rules based on advanced conditions;
- Ability to submit return requests for items from the offline orders;
- User-friendly RMA procedure on the frontend;
- Availability of return requests for both registered users and guest visitors;
- Custom RMA statuses, reasons, resolutions;
- Ability to add custom fields to the RMA form;
- Printable shipping labels;
- History of RMA-related communication between a customer and store admin;
- Reports with analytical data on product returns.
Mirasvit RMA for Magento 2 and 1 is a robust tool that enables ecommerce store owners to establish an optimized and mutually beneficial Return Merchandise Authorization procedure. Due to the increased convenience of returns and exchanges on your storefront, you can build better communication with your clients and gain their trust. The RMA module allows fine-tuning the returns and refunds policy to make it work in line with one’s business goals.
With the RMA module’s intuitive interface, both admins and buyers can leverage the return/exchange functionality and have a seamless user experience. So, we can already affirm that Mirasvit RMA is a must-have Magento tool as it takes care of both customers and administrators. Since the Mirasvit RMA extension for Magento 2 and 1 has two types of user interfaces, first, we will describe how its backend works and then take a look at the frontend part.
Mirasvit RMA Backend
RMA Screen
On the main RMA screen, there is the RMA grid that contains the following columns: checkbox, RMA ID and #, Customer Name, Order #, Owner, Status, Created, Updated, Last Replied, Last Reply At, Items, Resolved, and Action. The grid supports mass actions (you can delete items in bulk, as well as mark them as read/unread and change status) and offers advanced filtering options for each column.
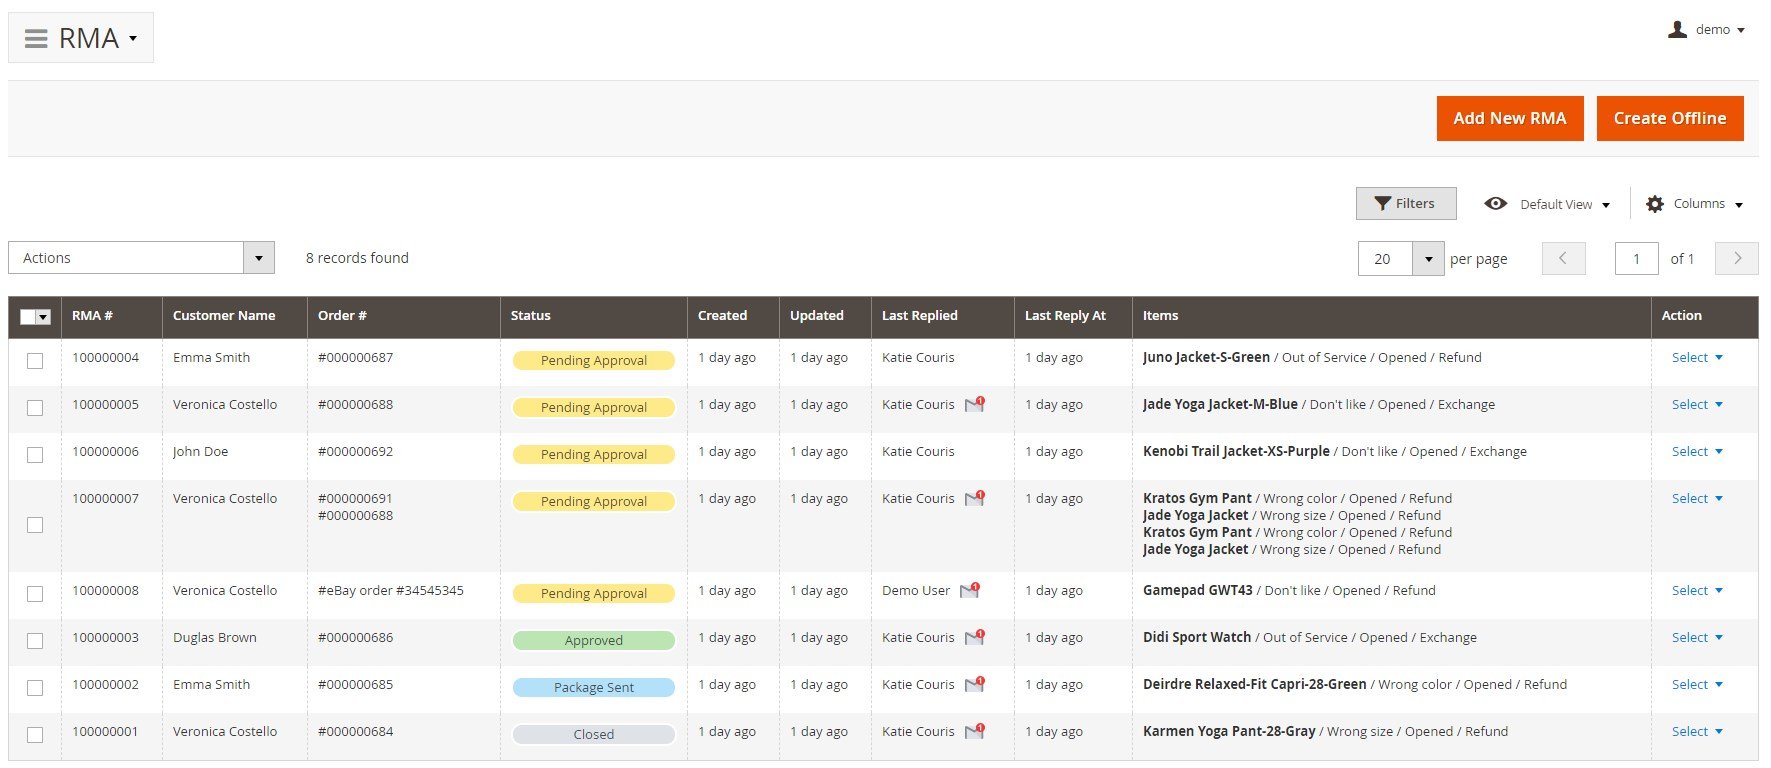
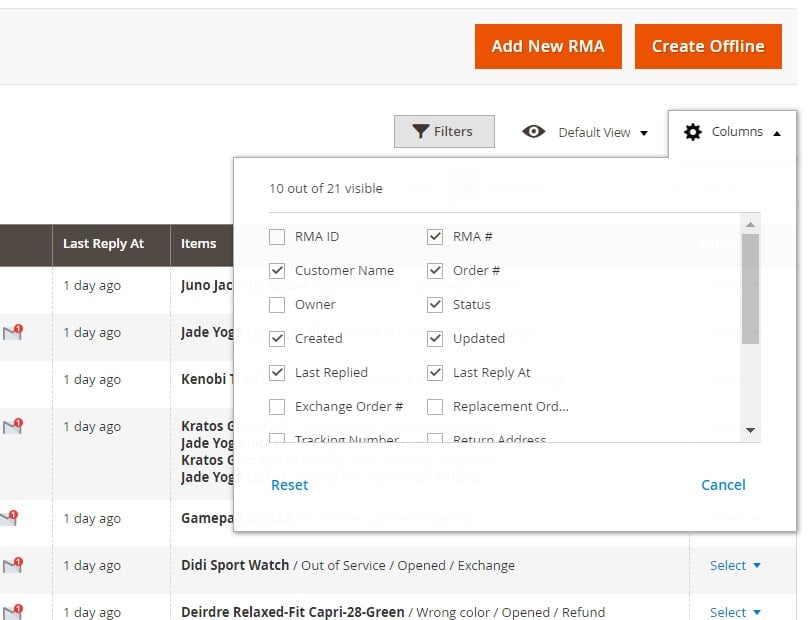
Besides, you can manage the visibility of the return requests’ information by hiding/showing particular columns. To add a new RMA, press the Add New RMA button.
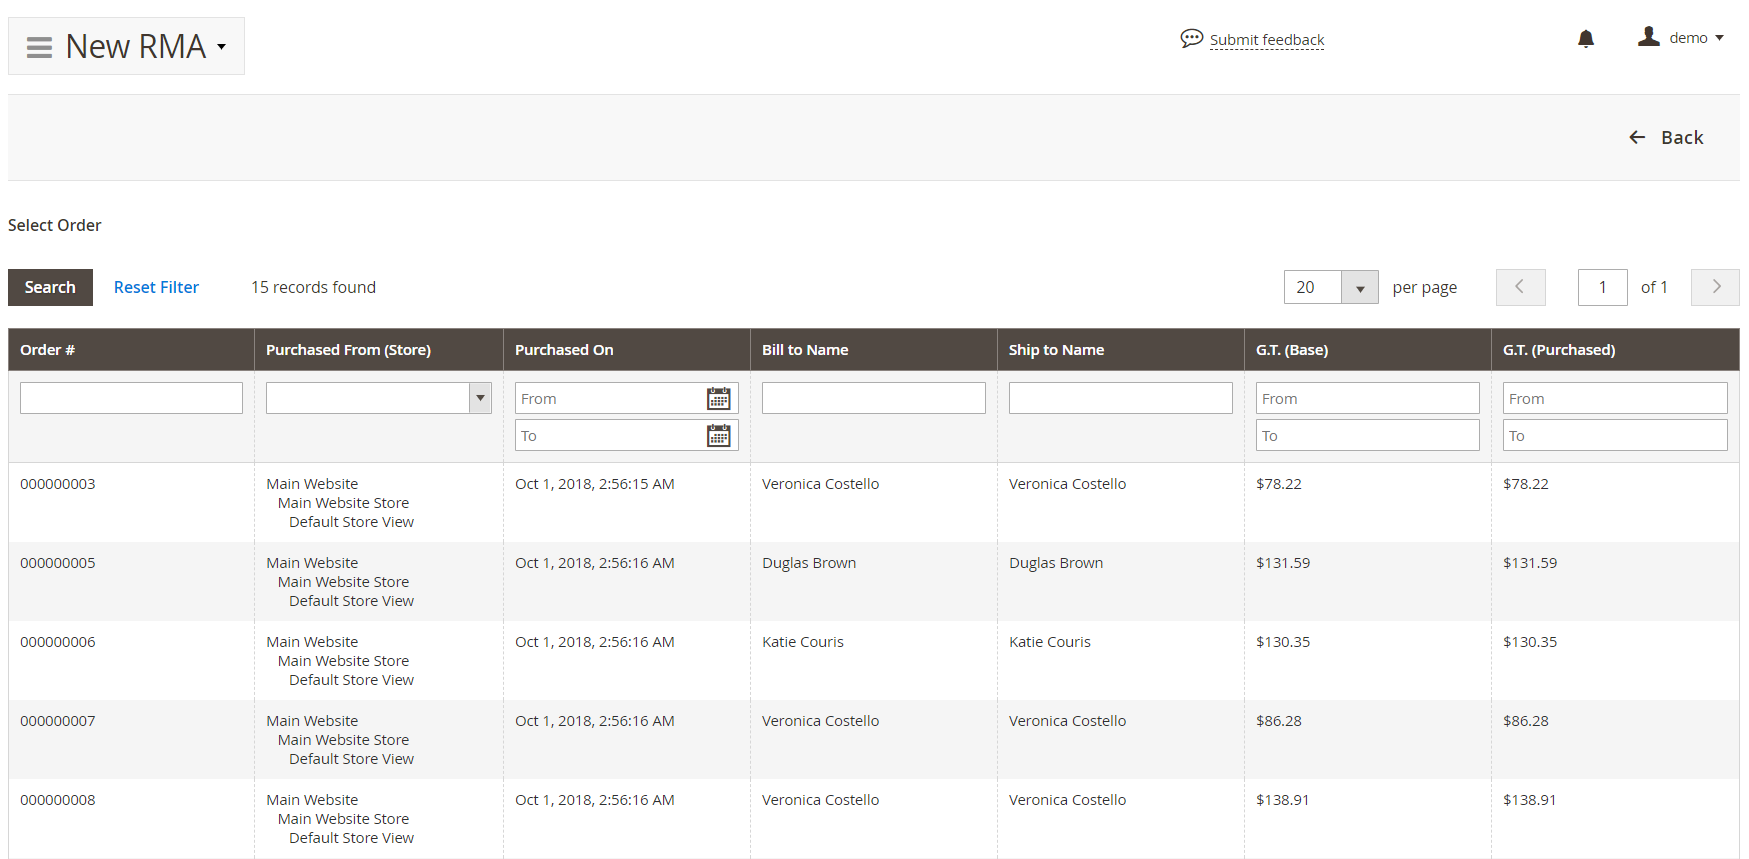
Having clicked on the button, you will proceed to the New RMA screen with a grid listing orders. You need to choose an order to create a new RMA.
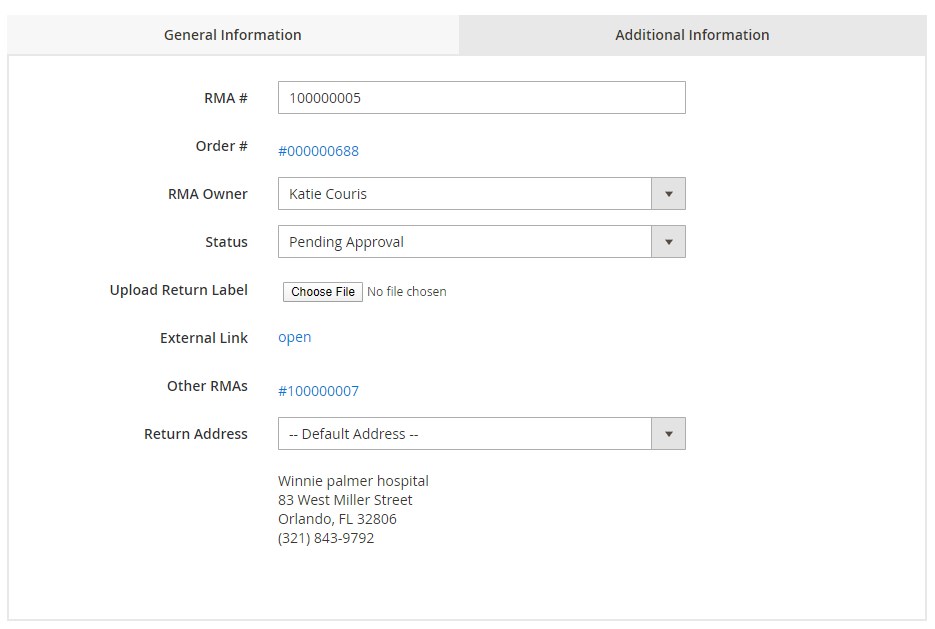
Next, you can specify all the necessary parameters for returning the order in the 4 sections: General Information, Additional Information, Contact Information, and Items. In General Information, you should set an RMA number (it will be generated automatically if you leave the field empty), select an RMA owner, status, and return address, and upload a return label. The section also illustrates the order number and other RMAs related to this order, so you can easily avoid duplicating your RMAs. It is also possible to open the relevant RMA request page on the frontend via the external link.
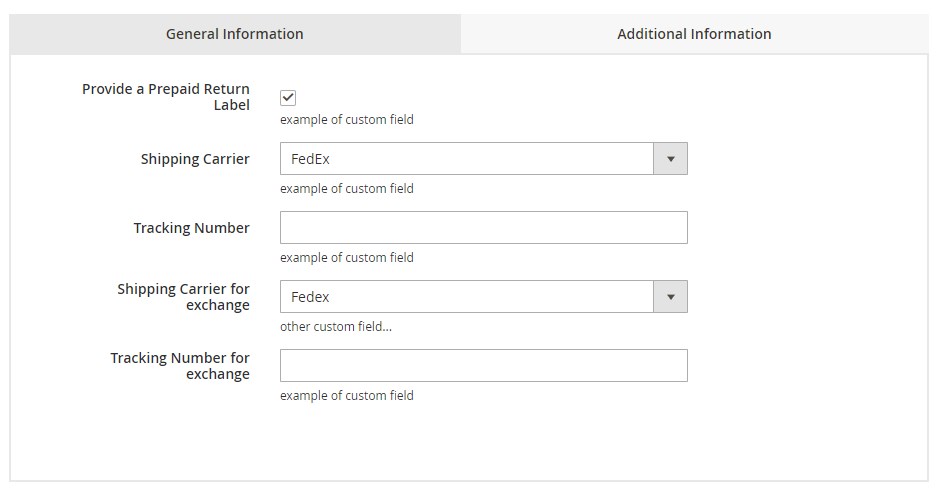
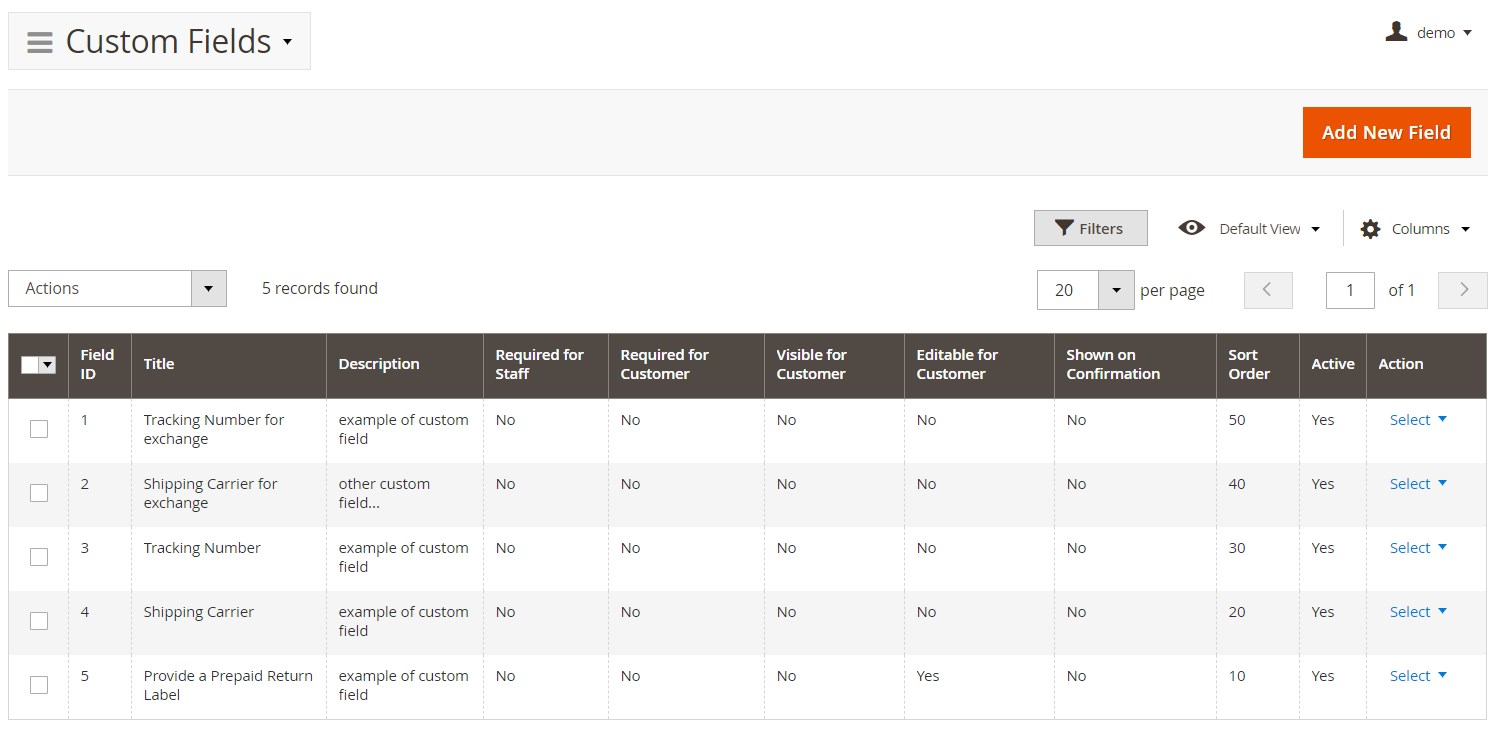
The Additional Information tab contains pre-configured custom fields which can be modified according to particular needs. In the example below, a store manager can decide whether to provide a prepaid return label or not, select a shipping carrier and shipping carrier for exchange, as well as specify the tracking number and exchange tracking number.
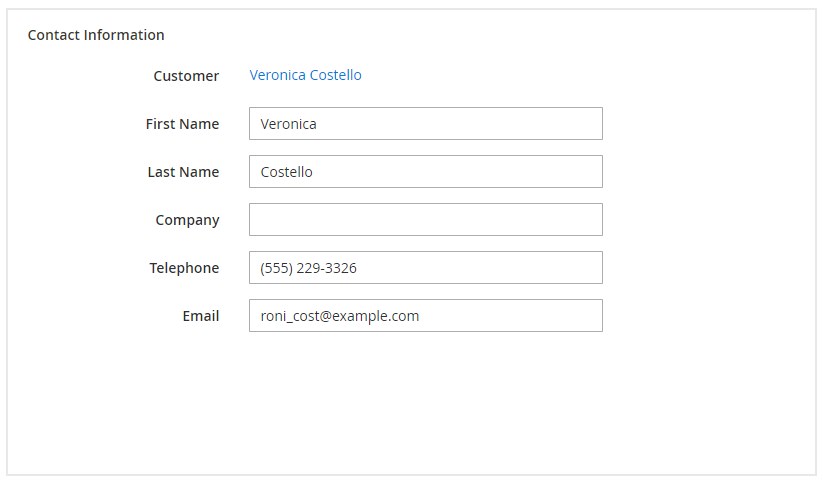
As for the Contact Information section, it consists of such fields as Customer, First Name, Last Name, Company, Telephone, and Email.
The last section of the new RMA screen contains products for return. It shows a product name, its SKU, price, and quantity, and an order ID. You can choose the number of items to return, select a reason, and specify item condition and resolution (e.g., Exchange, Refund, Store Credit).

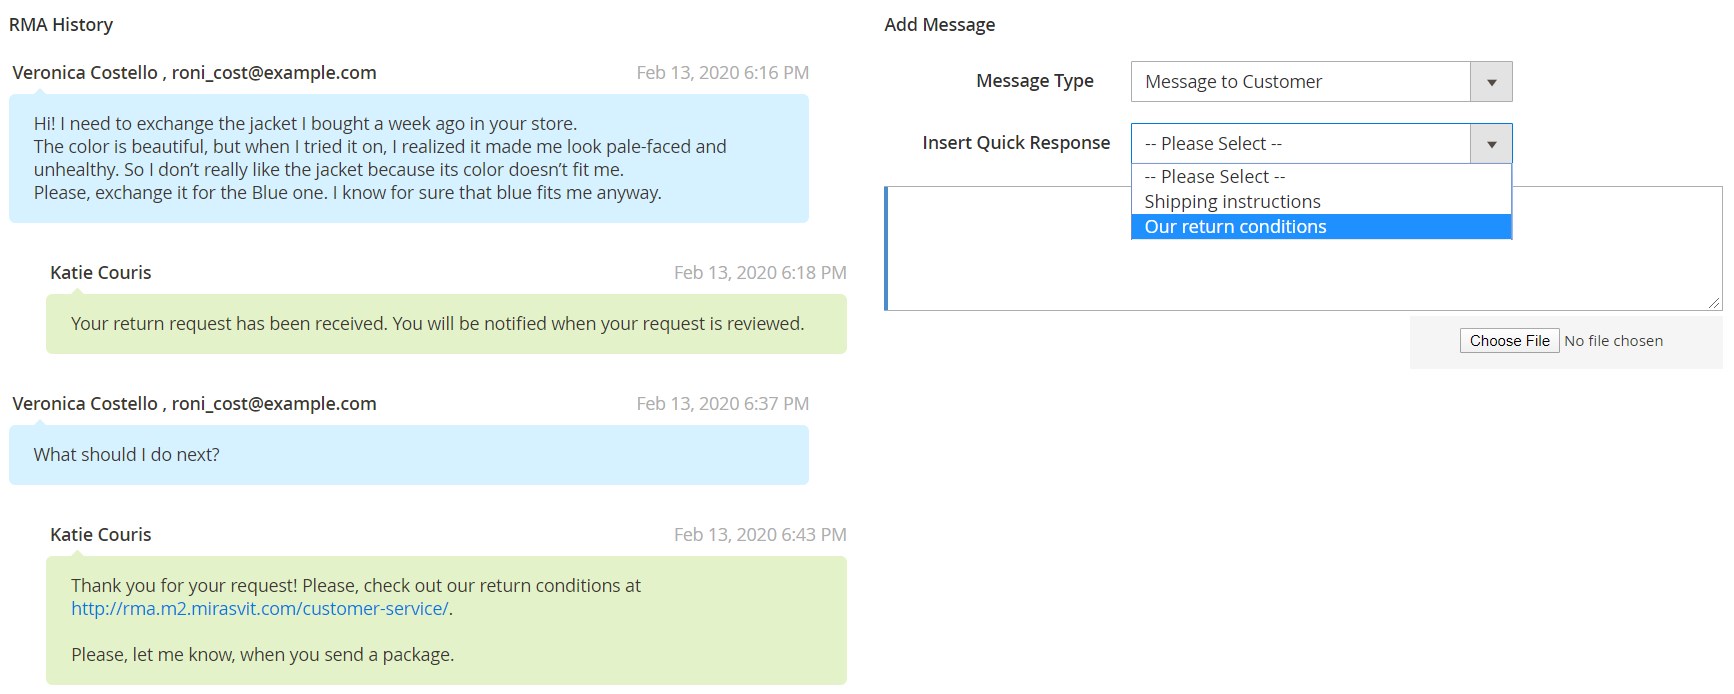
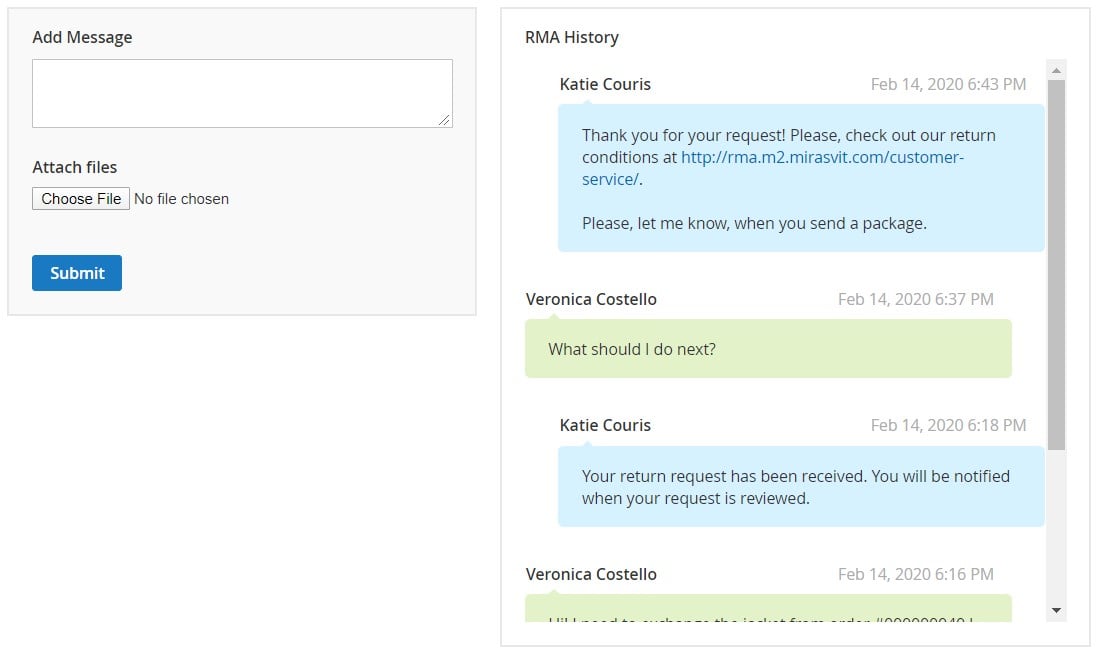
If you click on an already existing RMA, there will be two more sections: RMA History and Add Message. You can create both internal notes and messages sent to a customer, insert quick response, and attach files. Messages can be marked as unread.
After all the forms are filled in, don’t forget to hit Save. Also, for each RMA, the following options are available (if enabled in the Resolutions configuration): you can delete, reset, and print an RMA, as well as generate a credit memo, order exchange, or replacement.
Credit Memo
Each Credit Memo screen is divided into the following sections:
– Order & Account Information, which contains such order data as order date, status, and websites where it was made; and account information like customer name, email, and group;

– Address Information with billing and shipping addresses (you can edit both);
– Payment & Shipping Method with such details as order currency and total shipping charges;

– Items to Refund with a product name and SKU, price, quantity, subtotal, tax amount, discount amount, and row total;

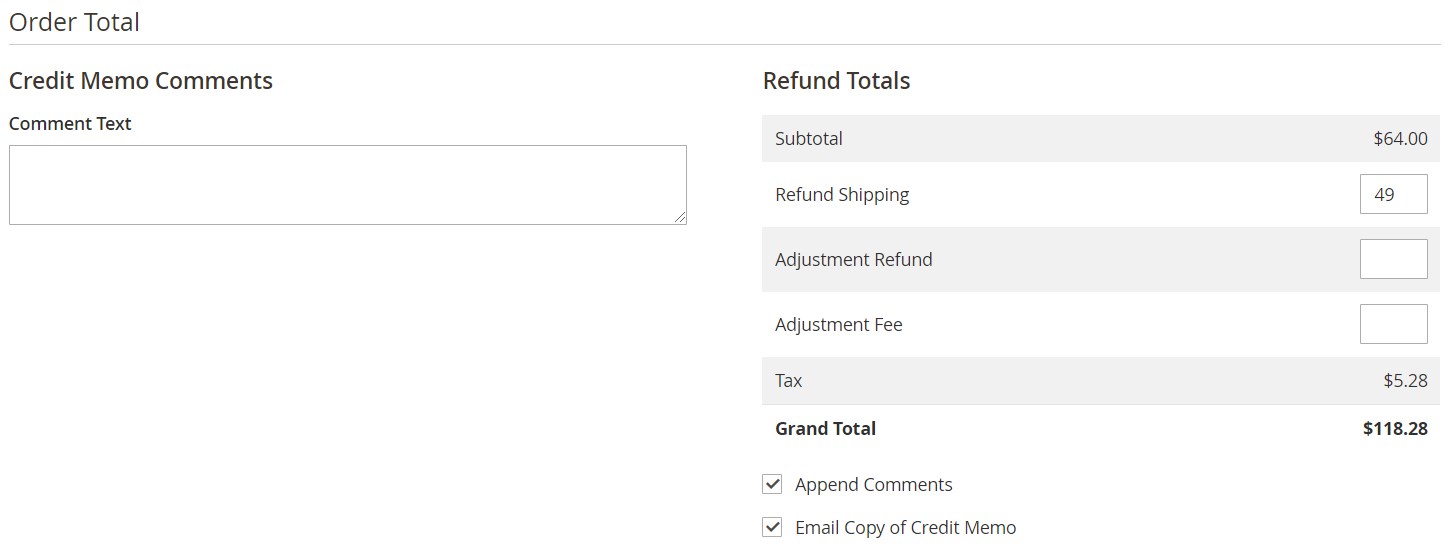
– Order Total where you can leave credit memo comments and view Refund Totals details.
Exchange Order
If you click on the Exchange Order link, a new screen appears where you can create a new order for the customer. Hit the Add Products button to choose new products for the exchange.
Each new item can be either removed or placed in the cart. Besides, you can set a custom price, change the quantity, and apply coupon codes.
Then, scroll down to the Account Information section. Here, you can change the existing customer group and specify a customer’s email.

Next, there is the Address Information section with billing and shipping addresses.
Here, you can Validate VAT numbers and save the filled in data in your address book.

There is also a section with payment and shipping information that shows selected payment and shipping methods:

The Order Total section consists of Order History (you can place order comments here) and Order Totals (you can see Grand Total here). Besides, there are Append Comments and Email Order Confirmation checkboxes available at the bottom of the page.
The left part of the page illustrates the customer’s activities:
Reasons
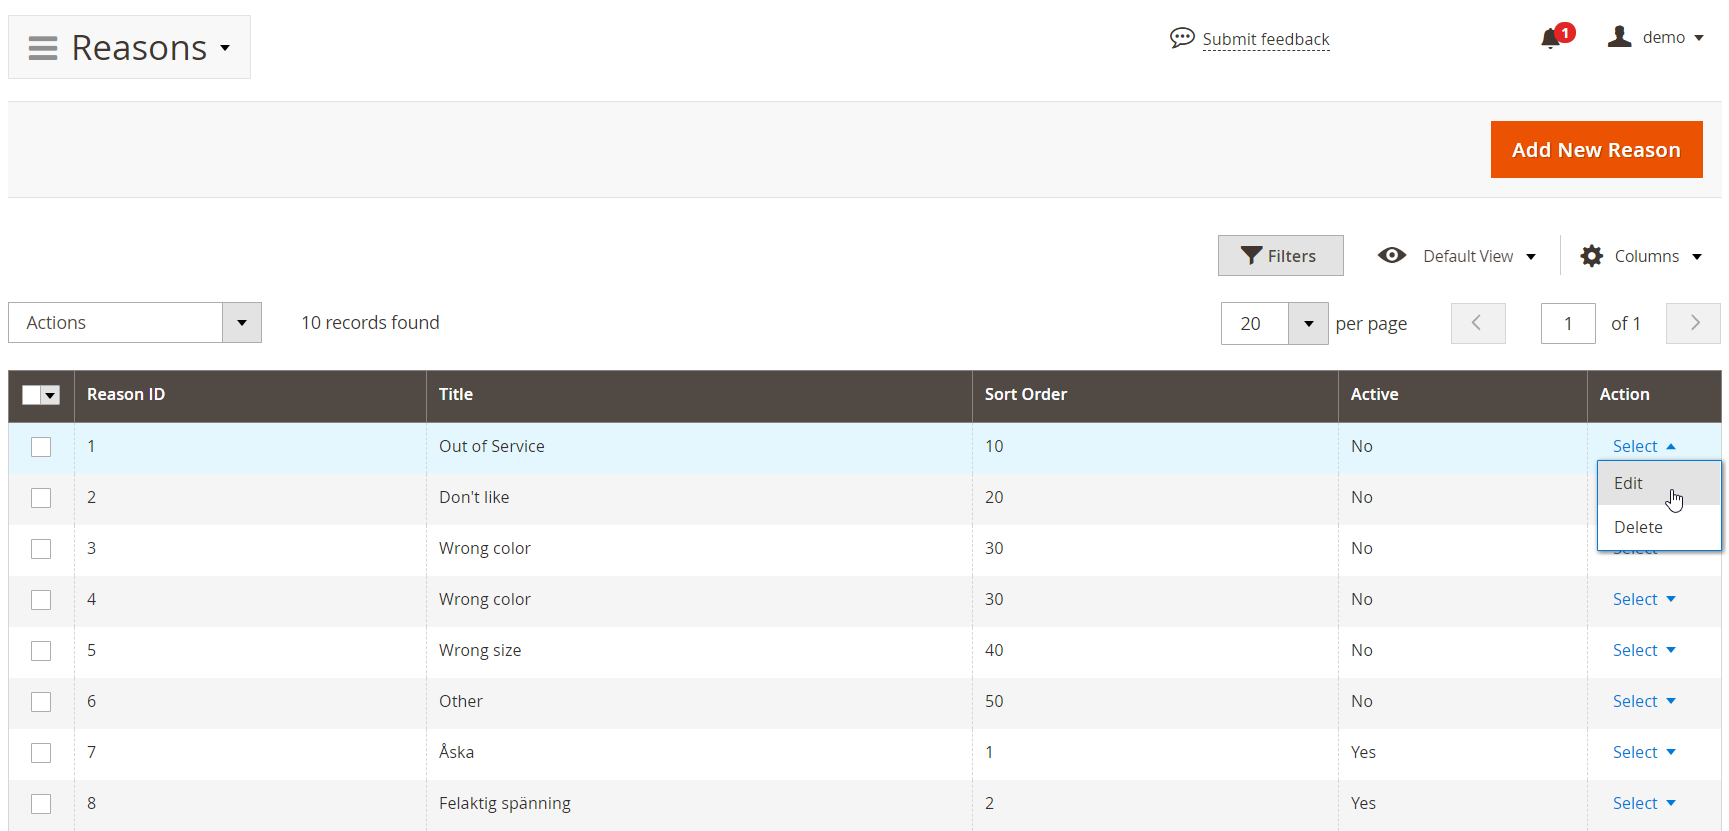
There is also a page that contains exchange reasons. You can apply mass actions in a grid to changing statuses or delete reasons in bulk. It is also possible to add new reasons from this screen.
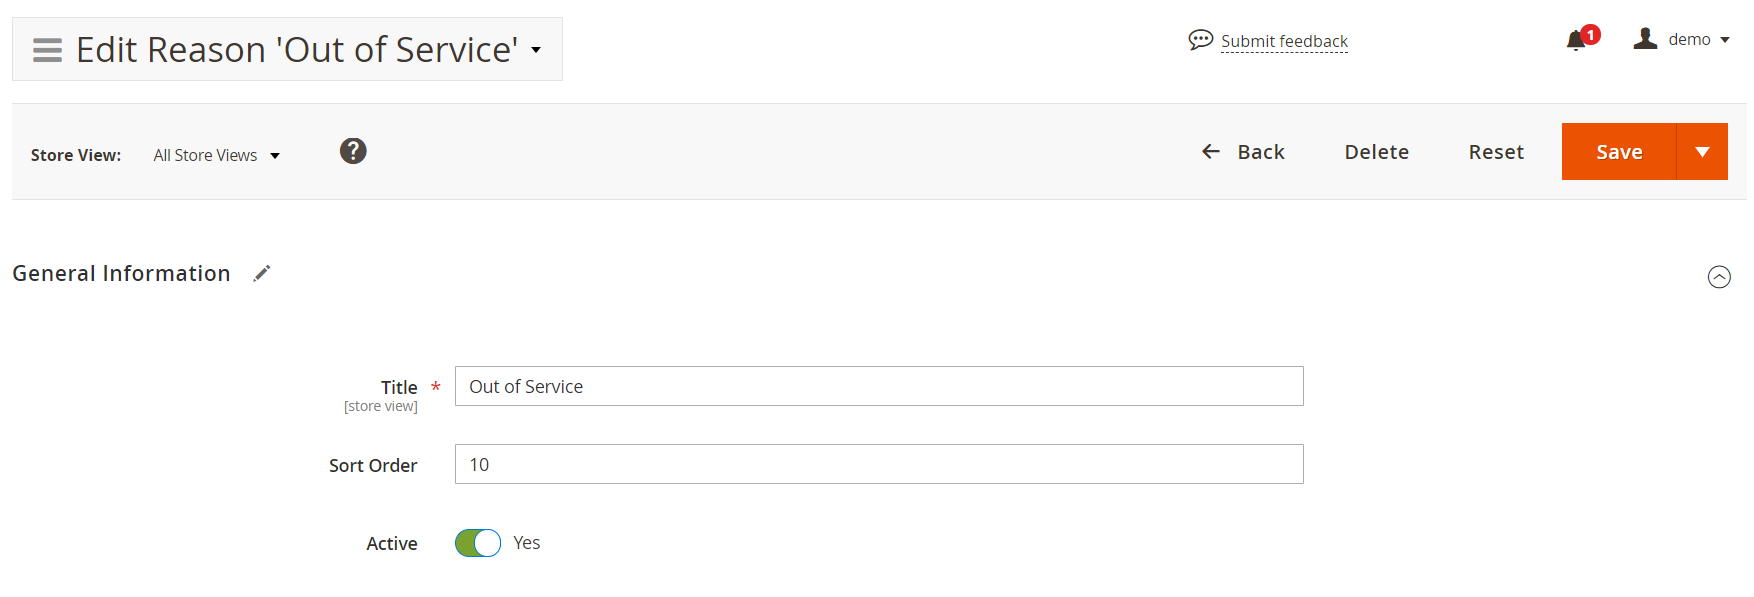
The edit reason screen has only three fields: Title, Sort Order, and Active (status).
Resolutions
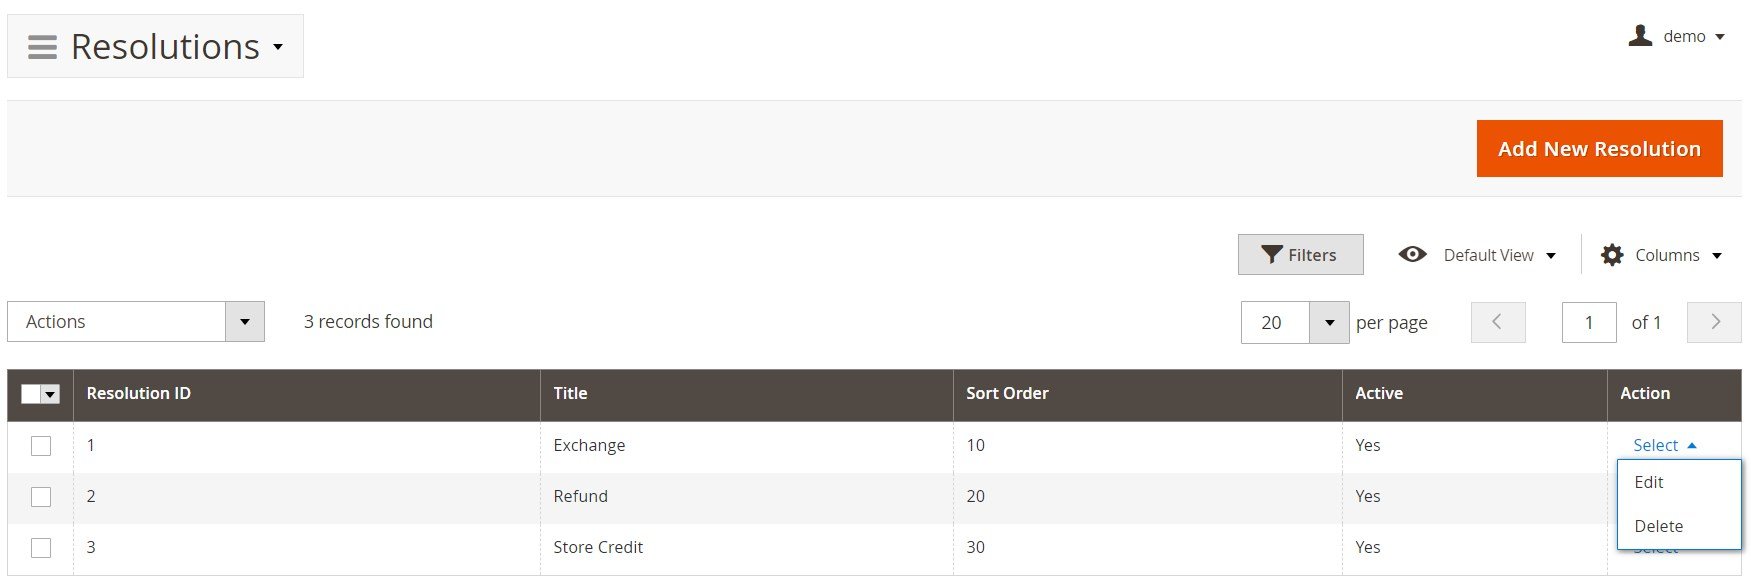
The same is about resolutions. By default, there is a grid with three resolutions. You can delete them or change their statuses in bulk, as well as add new ones.
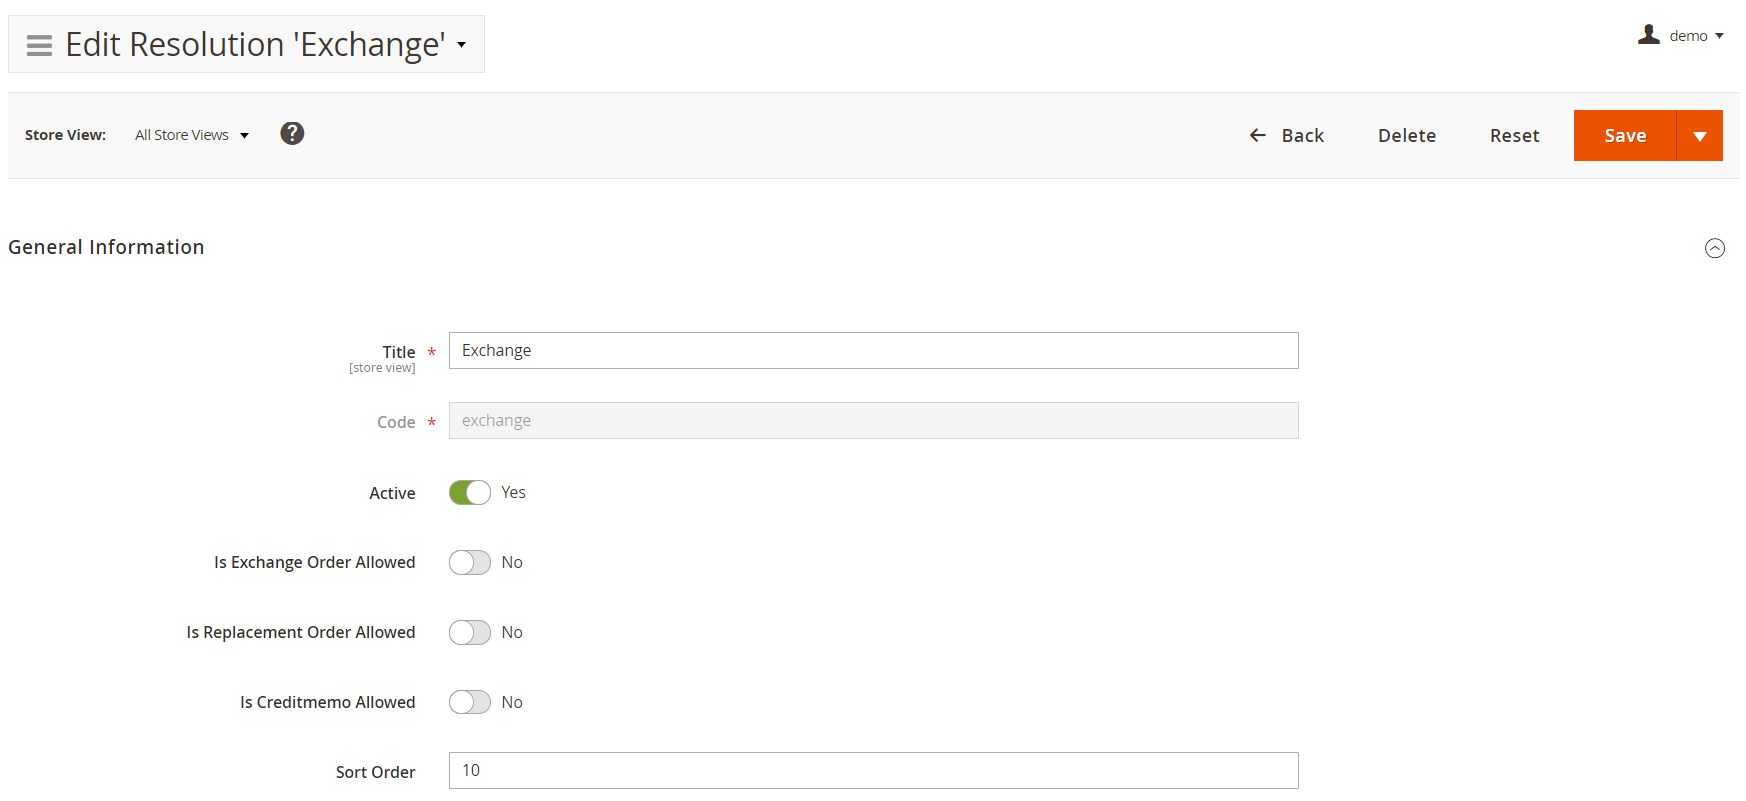
As for the resolution screen, it contains one more option – Code. Besides, you can decide whether a store admin will be able to create exchange or replacement orders, as well as credit memos from the backend.
Quick Responses
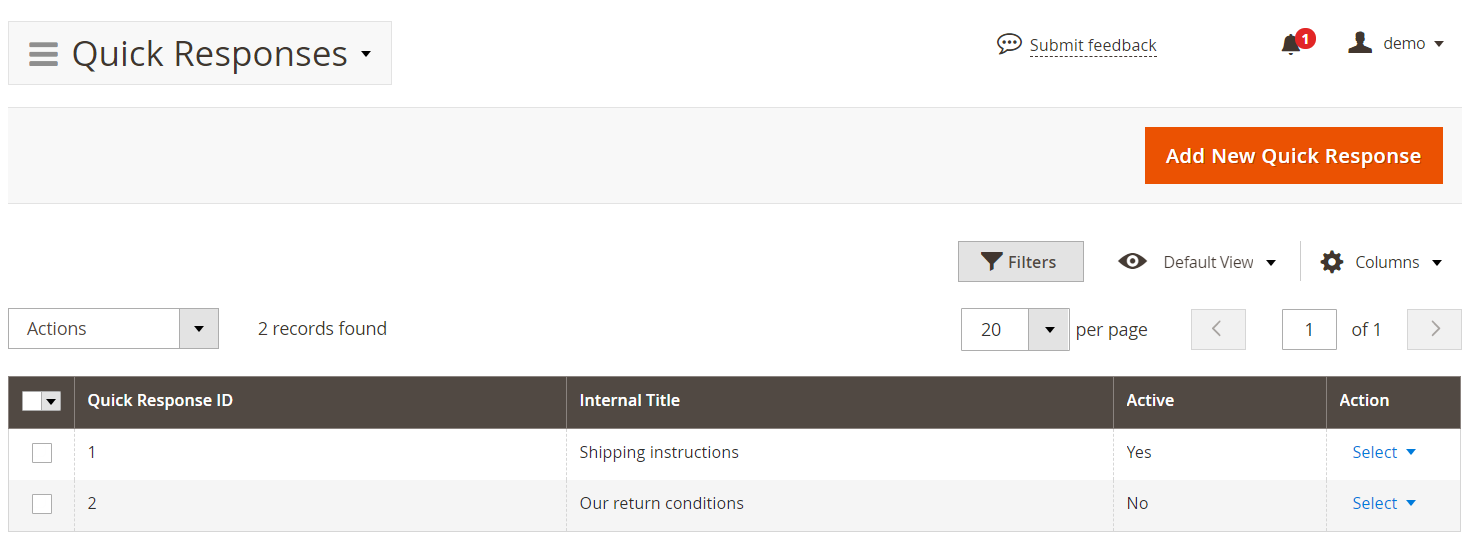
The Quick Responses page is based on the same principles and supports the same mass actions.
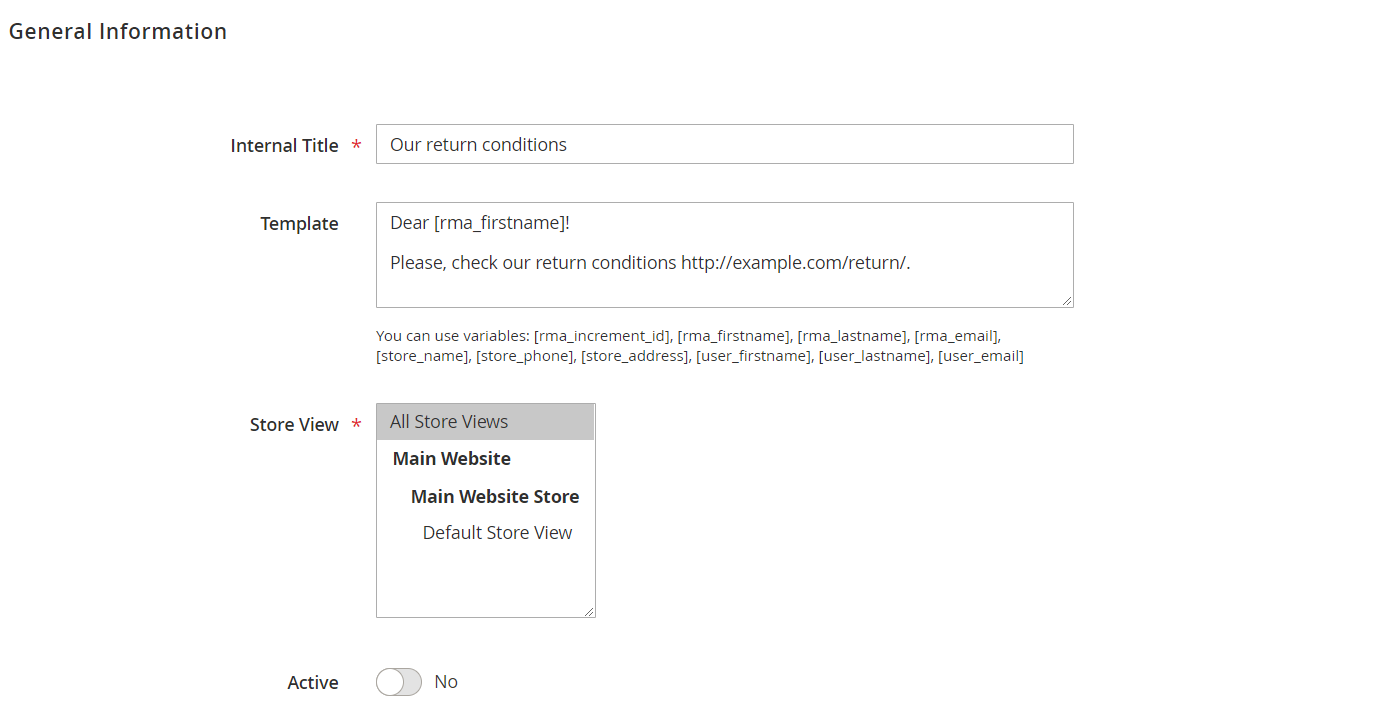
A new template requires the following data to be specified: internal title, template (you can use variables here), store views, and status.
Statuses
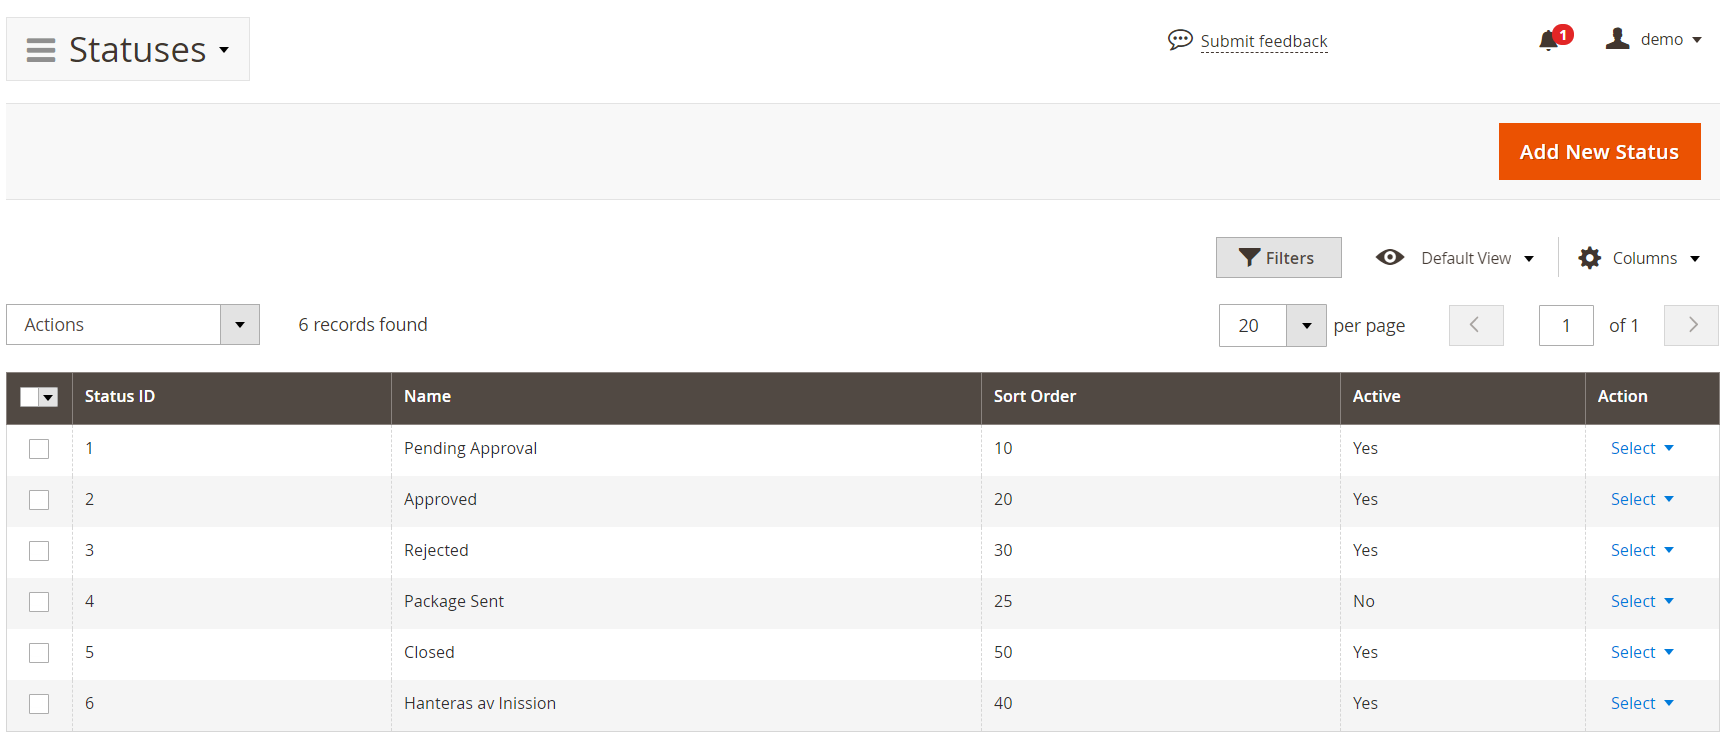
Statuses are also available on a separate grid:
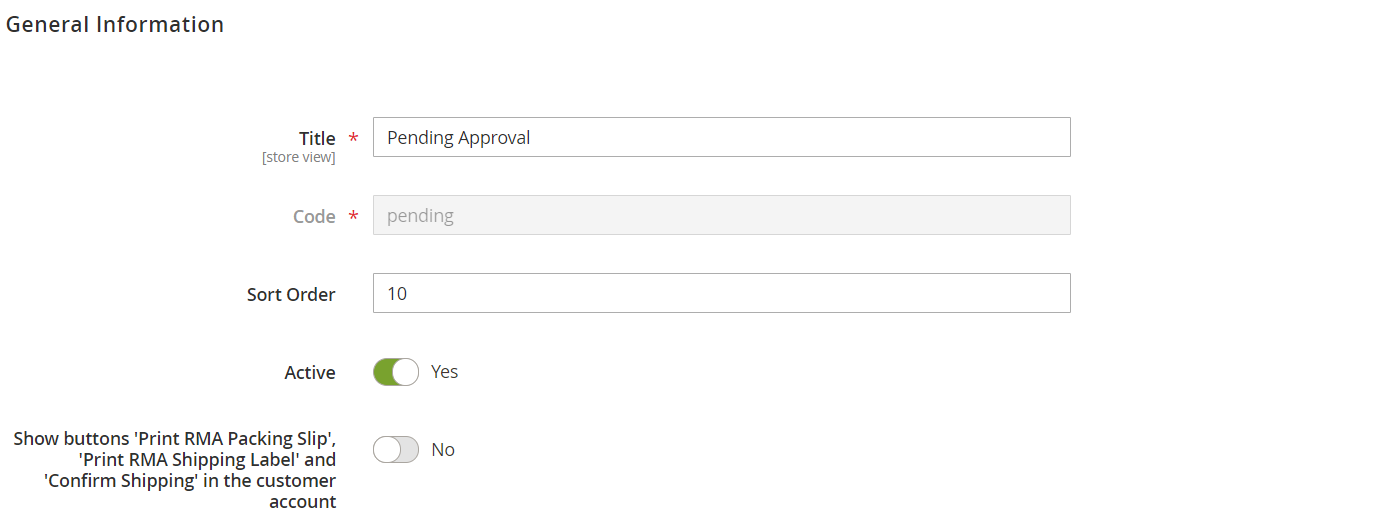
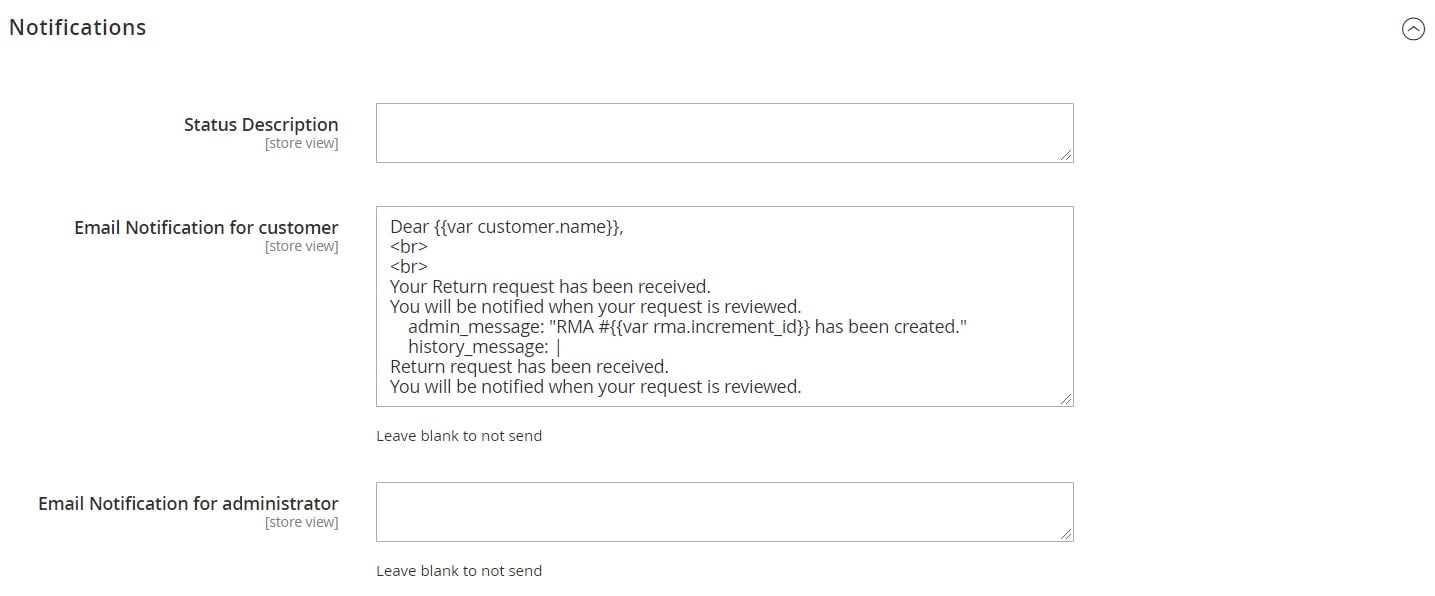
Each new status requires the following two sections of data to be filled in: General information and Notifications. In General Information, you should specify a title, code, sort order, status (active or inactive), and whether to show “Print RMA Packing Slip”, “Print RMA Shipping Label”, and “Confirm Shipping” buttons or not in the customer account.
As for the Notifications section, here, you can add a status description, type in a text for email notifications sent to customers and admins (can be left blank).
Conditions
Below is the Conditions screen (with the same opportunities):
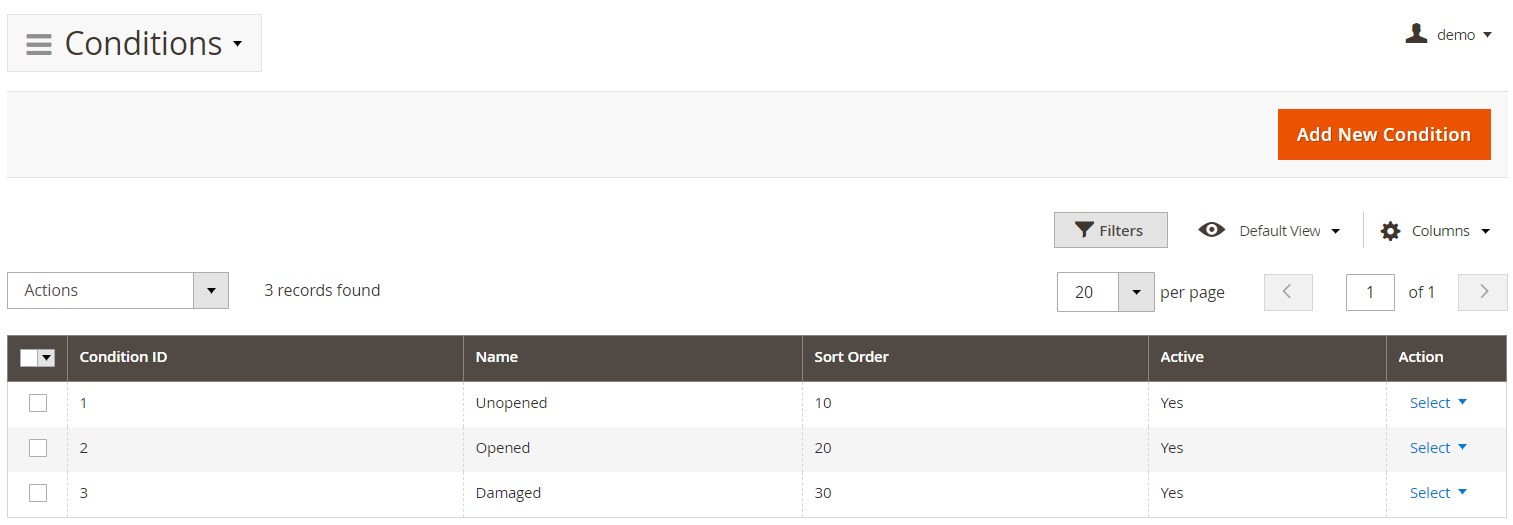
Each new condition requires a title, sort order, and status to be specified.

Custom Fields
All created custom fields are also gathered in a grid:
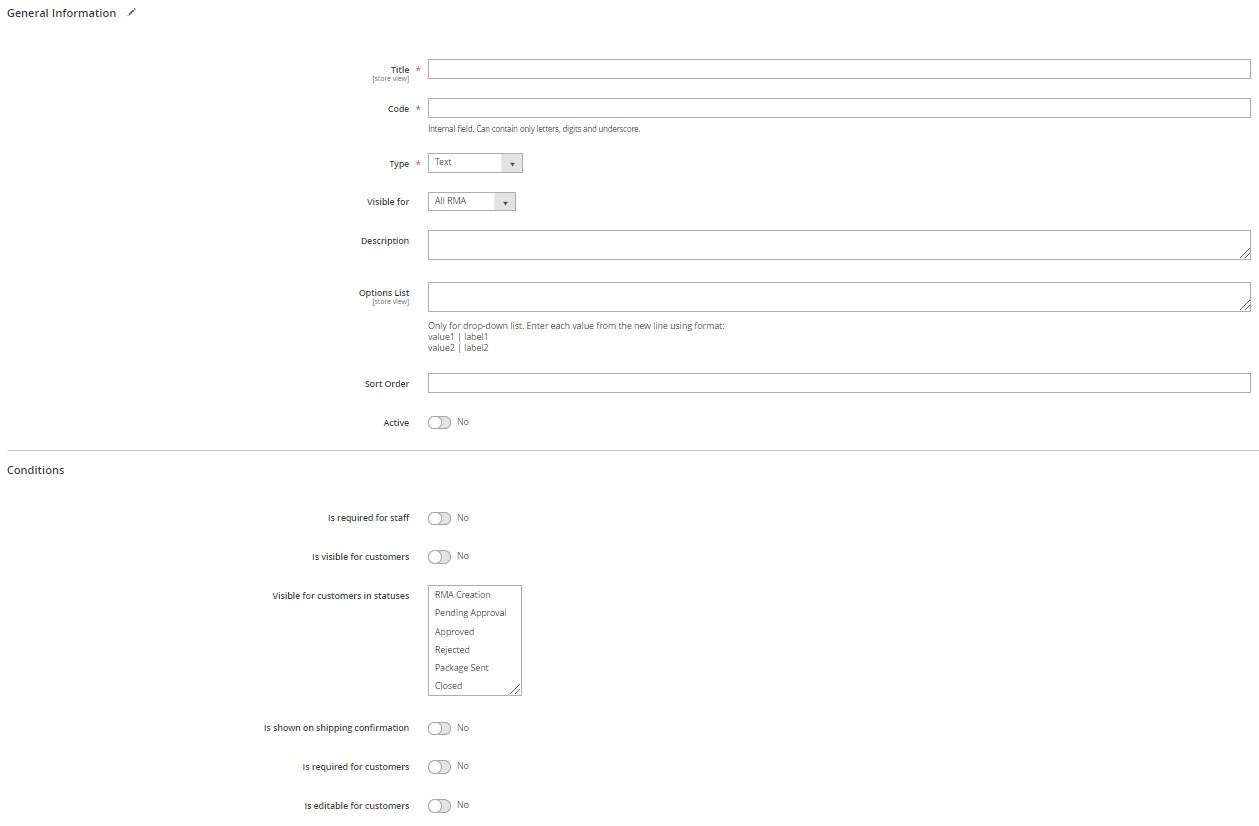
Below, you can see how a new field’s settings look from inside:
Workflow Rules
Furthermore, you can customize the way the Mirasvit RMA Magento extension works using workflow rules.
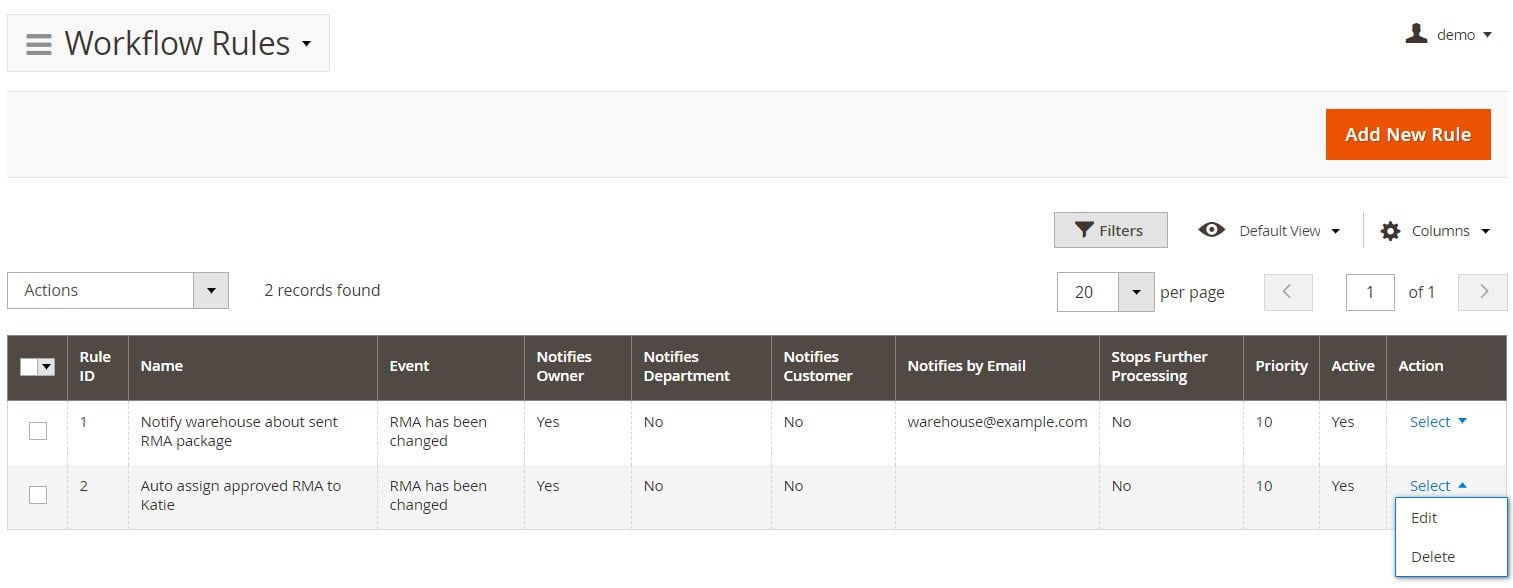
You can add more rules to automate your daily RMA routine. A new rule screen contains 4 tabs: General Information, Conditions, Actions, and Notifications.
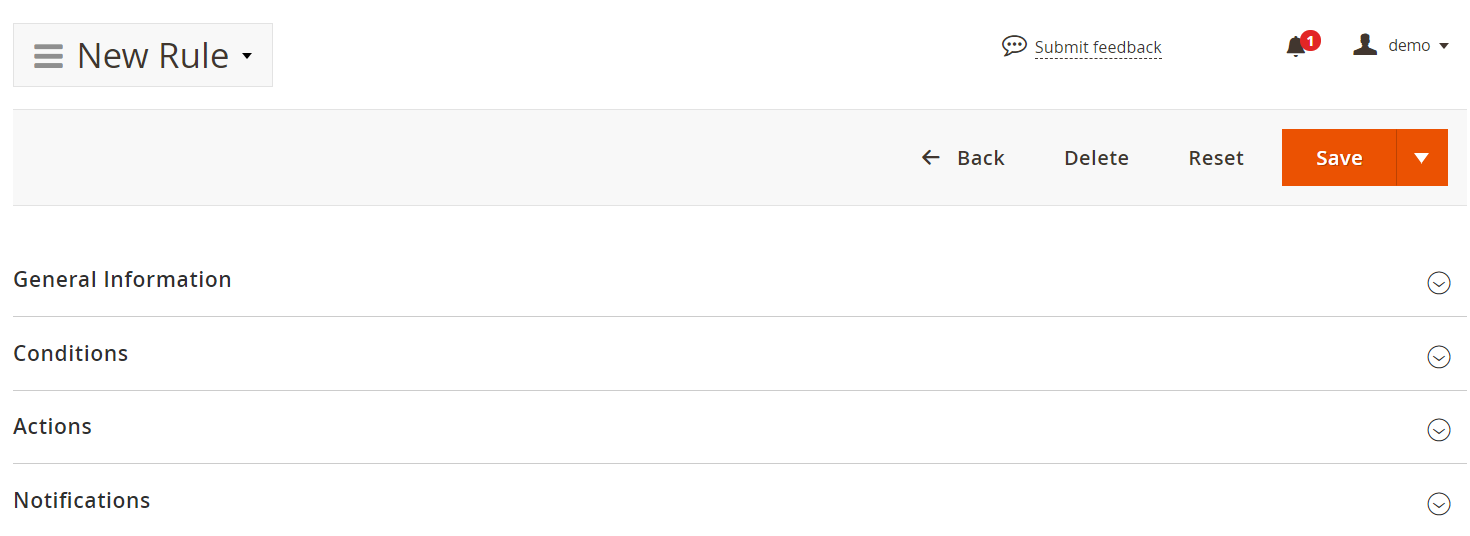
In the General Information tab, specify a rule name, priority, and status. Besides, choose whether further rule processing should be stopped.

On the Conditions tab, choose the event for the new rule to be applied and specify additional conditions to be met.

As for the Actions tab, you set status and an owner, as well as mark as resolved or unresolved here.

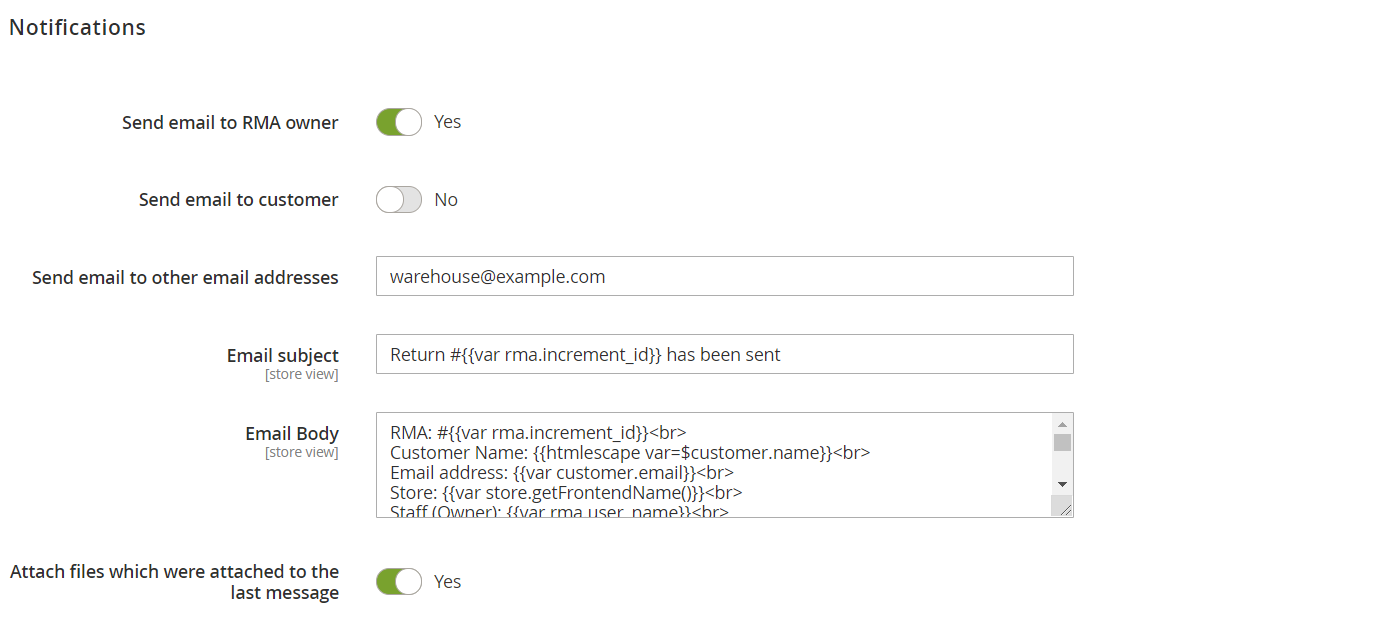
On the Notifications tab, you choose whether to send emails to an RMA owner and a customer or not, specify additional email addresses, subject, and body, as well as decide whether to include files that were attached to the last message or not.
Reports
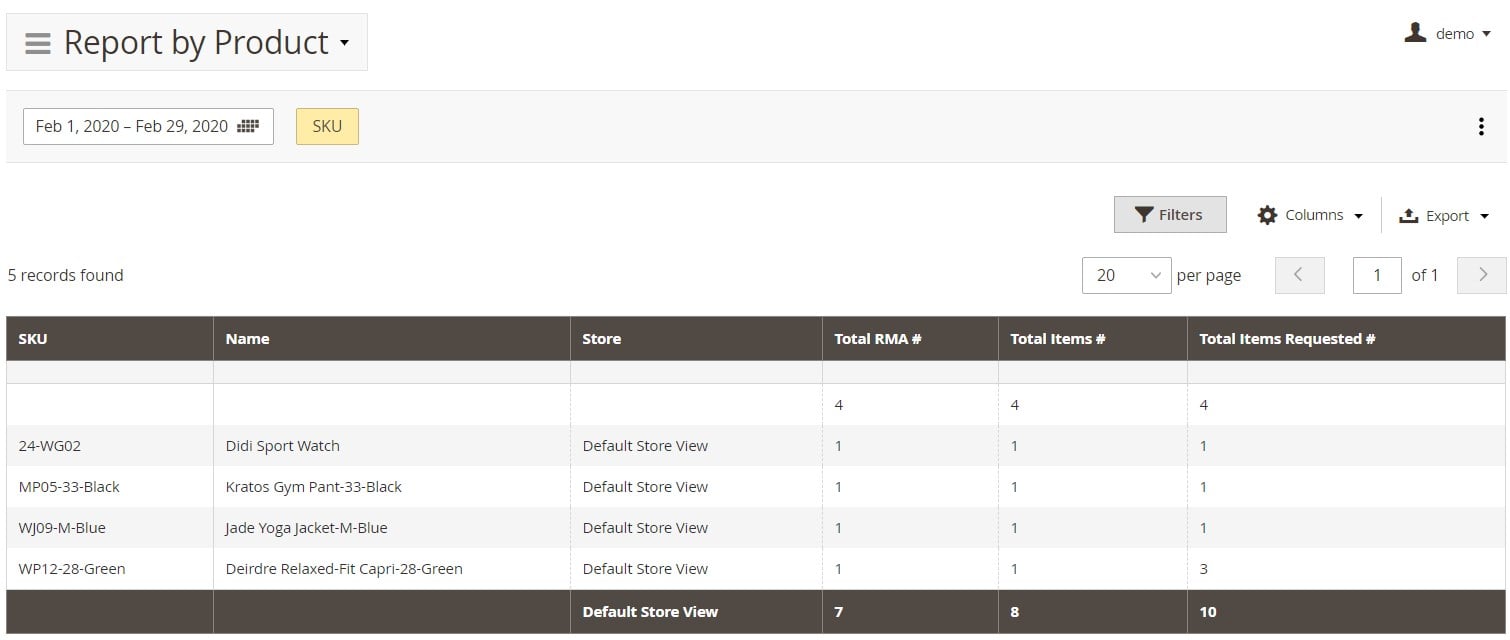
Now, let’s see which statistics are provided by the Magento 2 RMA module’s reports. The extension offers 4 types of reports:
- Report by Product – allows checking return statistics for every product during a specified time interval.
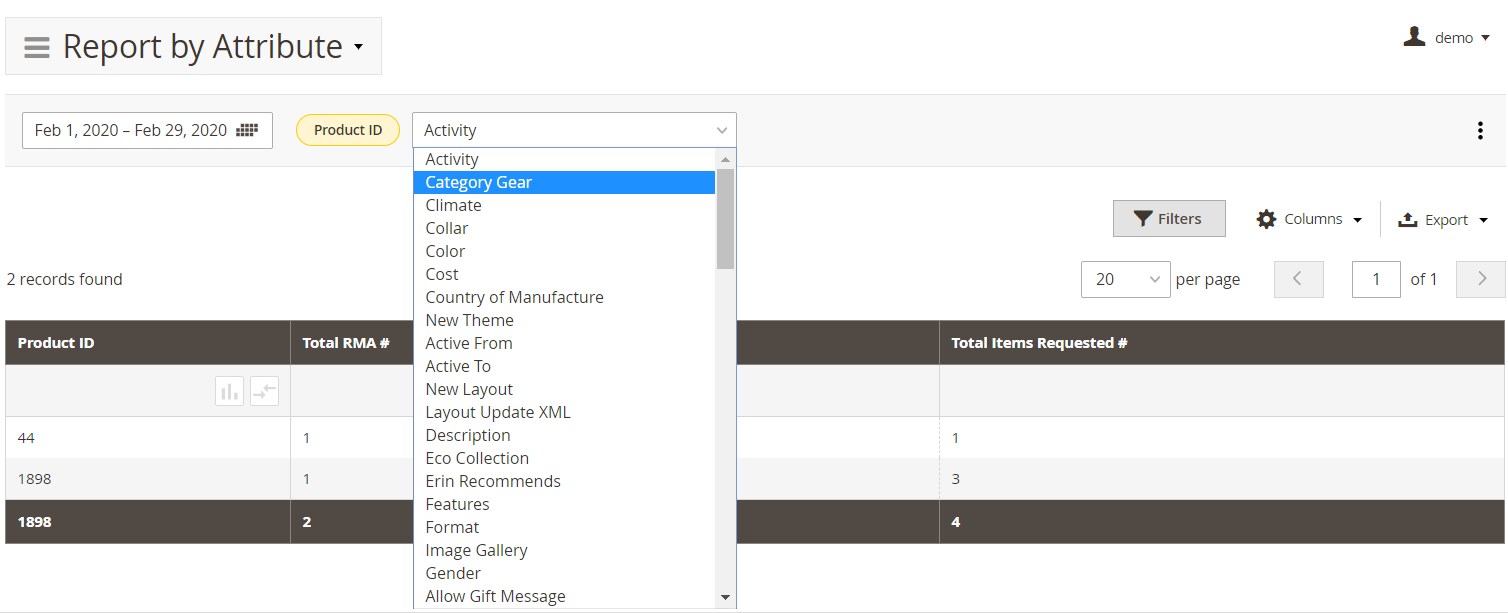
- Report by Attribute – here, you can view return statistics per product based on a specific product attribute.
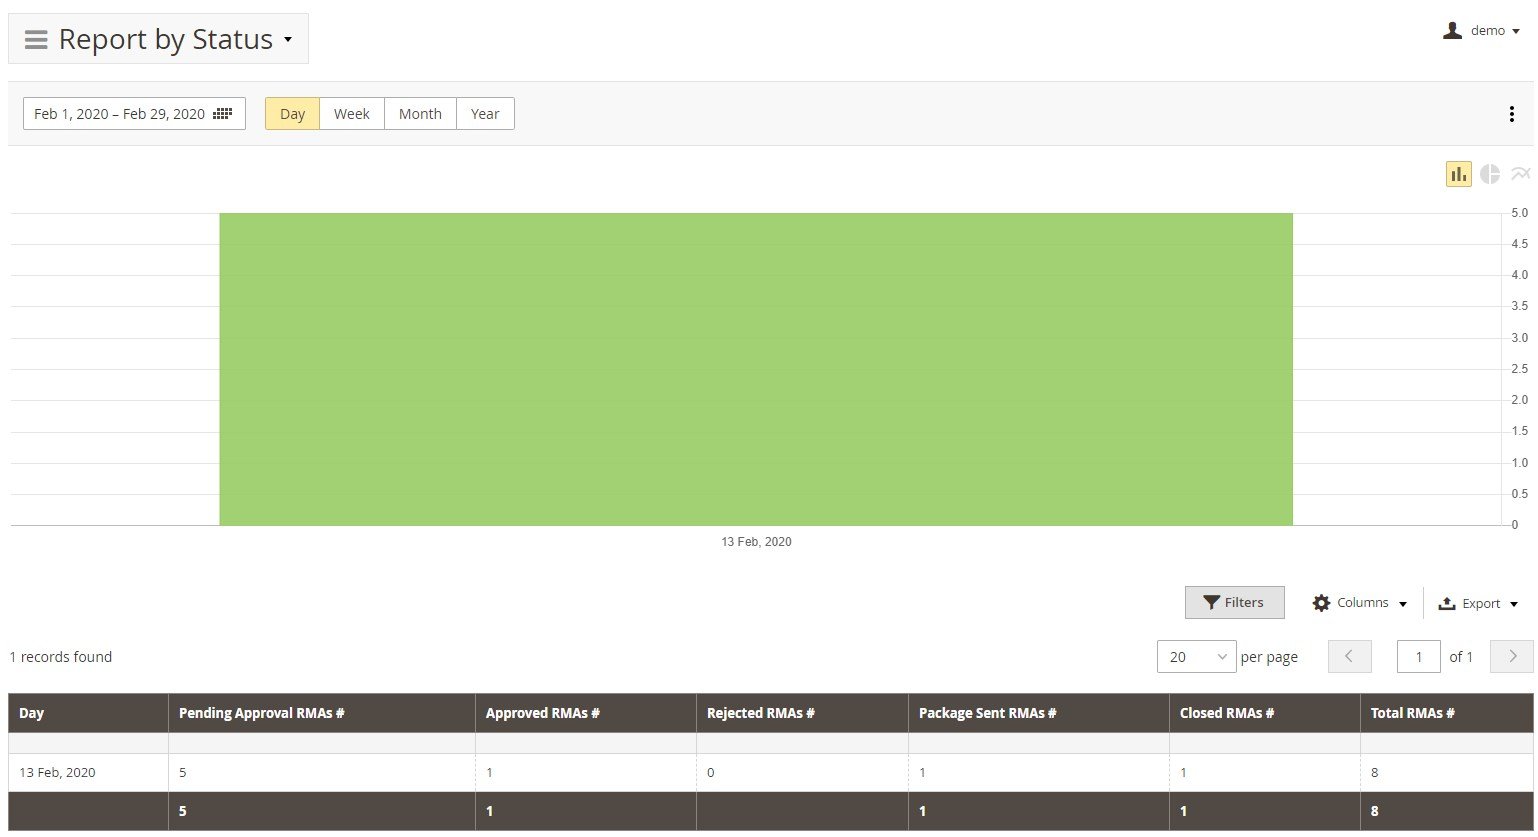
- Report by Status – shows statistics based on the RMA status.
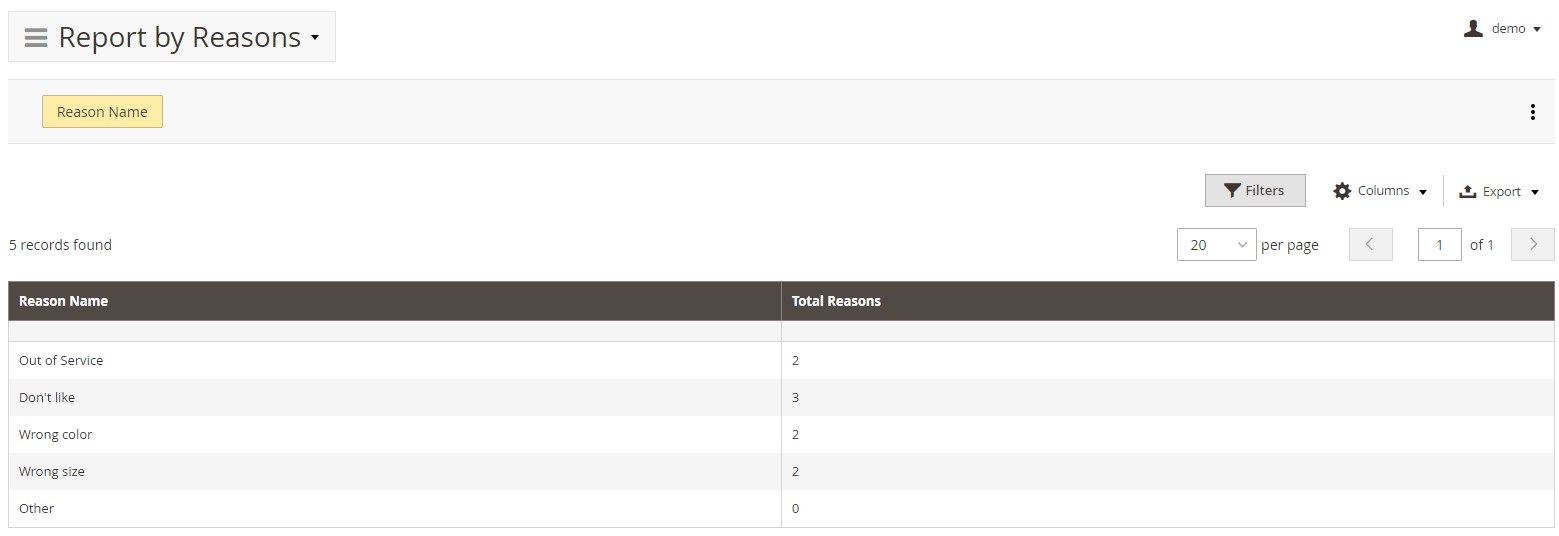
- Report by Reasons – statistics according to the RMA reason selected by a customer.
Configuration
It is also necessary to pay extra attention to the options available on the configuration screen. Here, you can fine-tune the Mirasvit RMA Magento extension with the help of the following categories of settings: General Settings, Customer Account, RMA Policy, RMA Number, Email Notification Settings, and Advanced Settings.
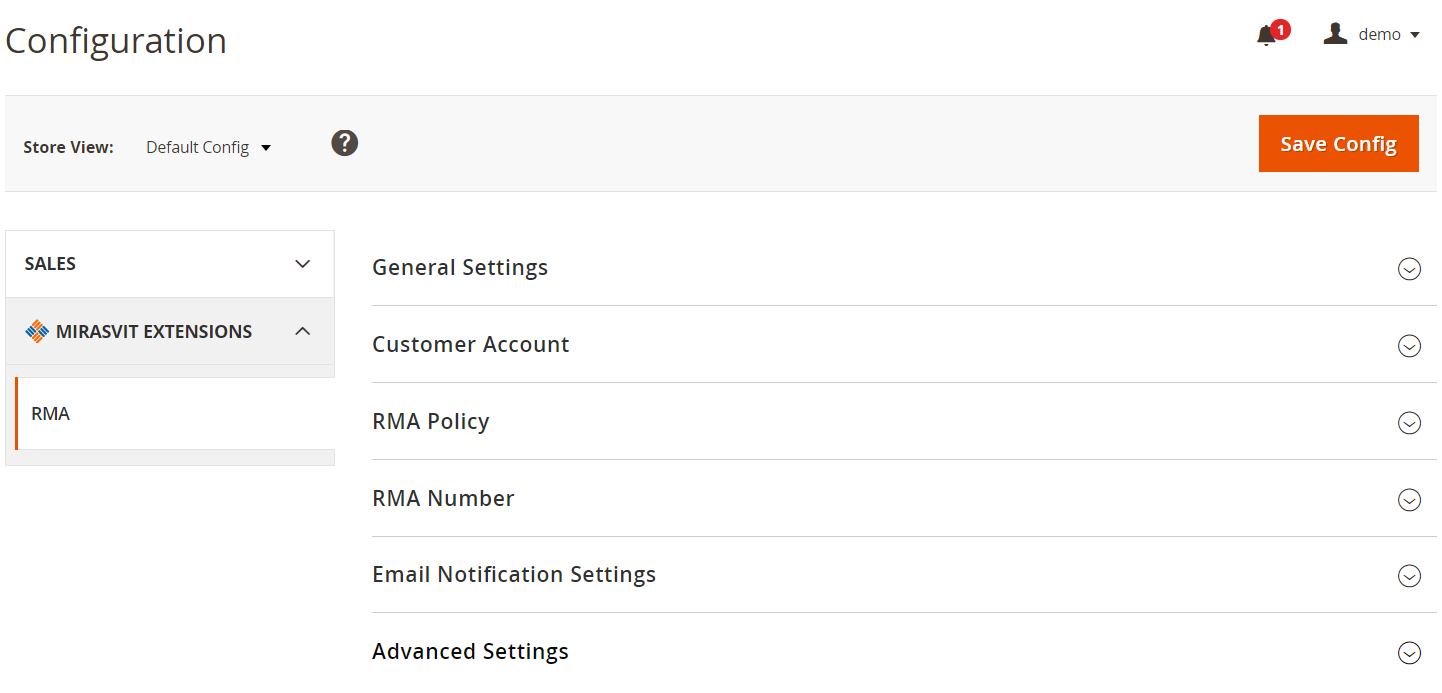
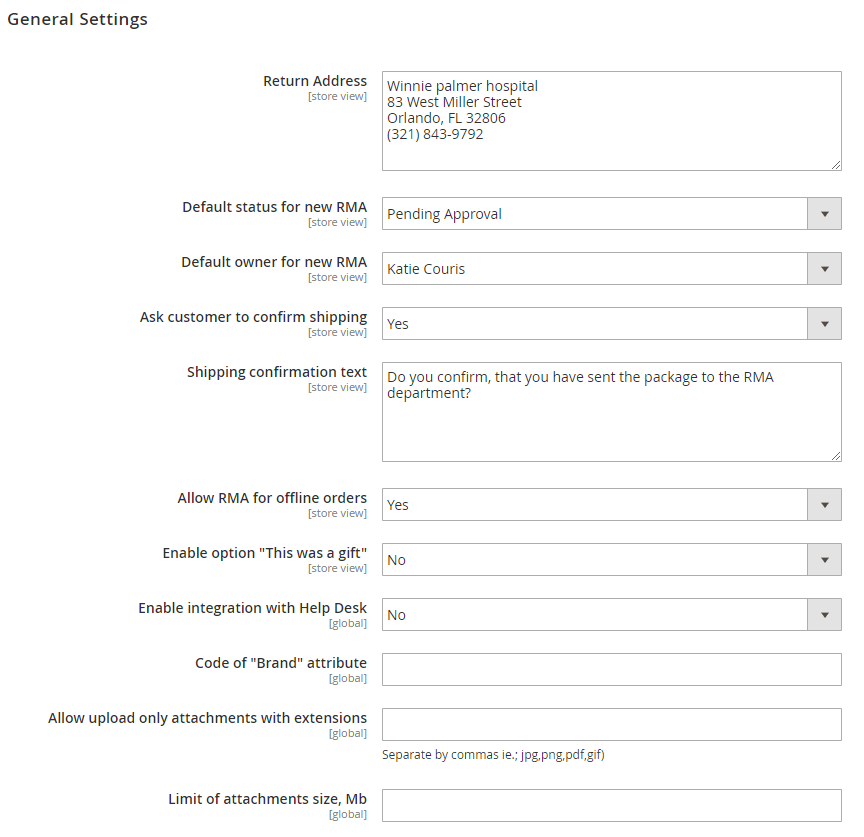
In case of General Settings, you specify your return address, default status and owner for new RMA; decide whether to ask customer to confirm shipping; leave a shipping confirmation text; enable or disable RMA for offline orders, the gift option and Help Desk integration; choose a code of a brand attribute; allow upload attachments with extensions, and limit the size of attachments.
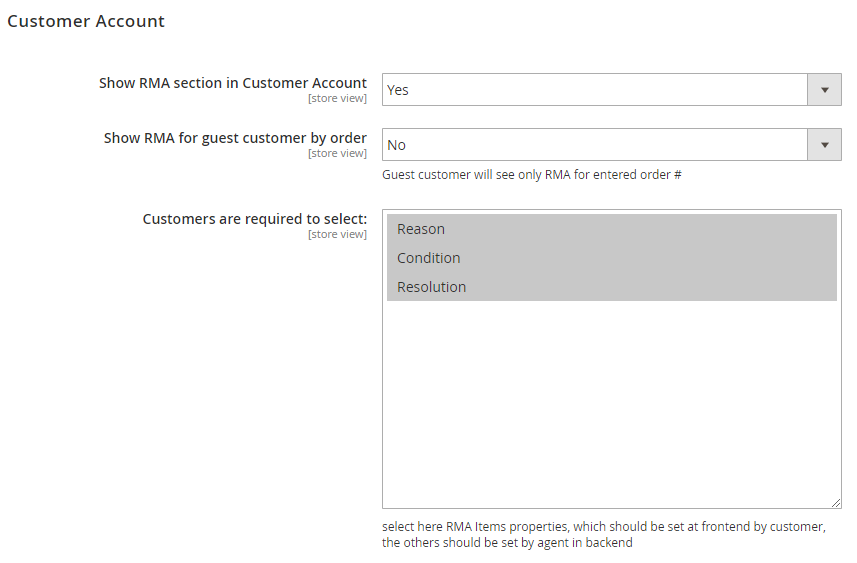
Customer Account settings let you show or hide the RMA section from a customer account, as well as display RMA to guest visitors when they enter an order number. Besides, here you select RMA parameters that customers are required to submit.
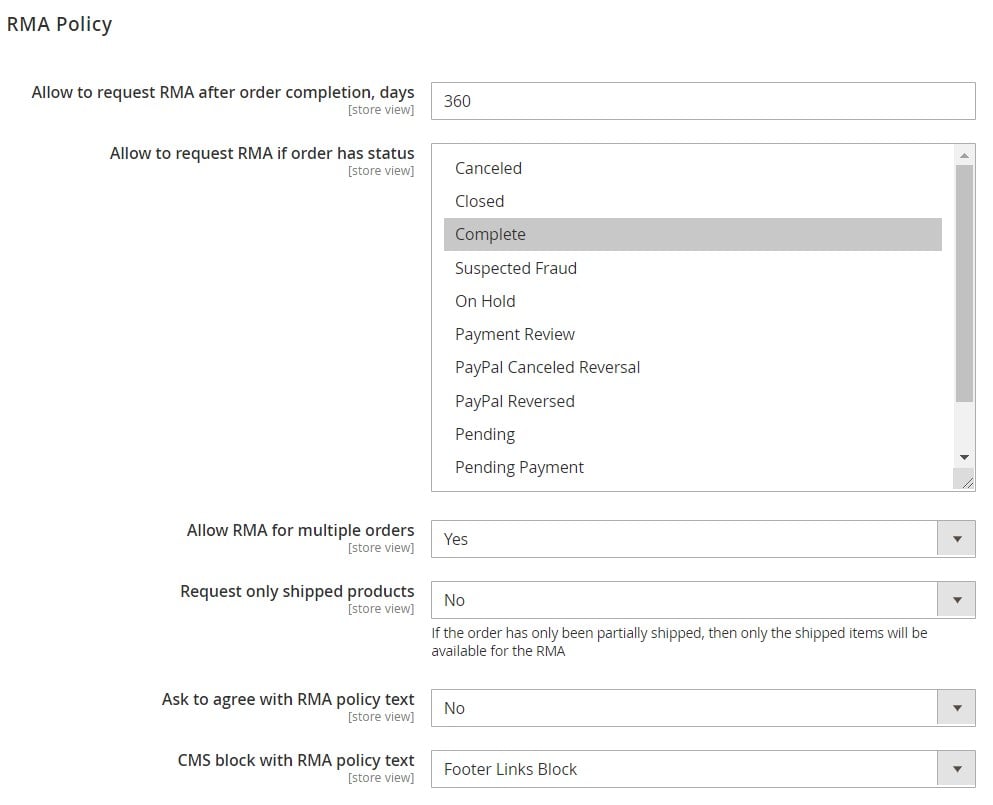
As for the RMA policy, you can specify the period after order completion when a customer can request the exchange. It is also possible to enable RMA for orders with selected statuses, multiple orders, and shipped products only. Another option provides the ability to ask customers to agree with your RMA policy. Next, you can choose a CMS block with the RMA policy text.
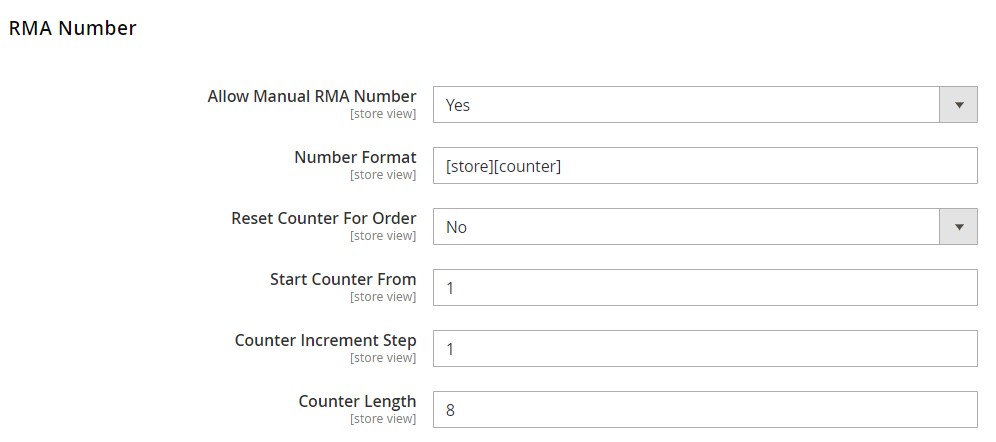
In RMA Number, you can allow entering RMA numbers manually, specify a number format, and enable/disable resetting the counter for order. Here, you can also insert values for the first number, counter increment step, and counter length.
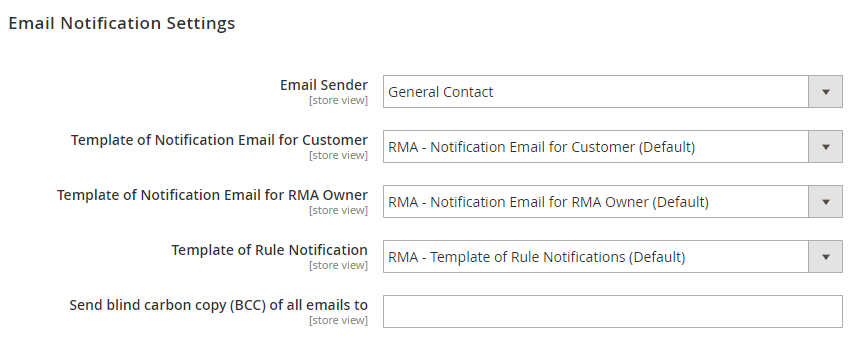
Email Notification Settings let you choose an email sender and templates to be used for customers, RMA owners, and rule notifications. Besides, you can decide where to send the blind carbon copy of all emails.
In the last tab of the Mirasvit RMA extension’s configuration, you can force the module to apply its styles to the page.

As you can see, the Mirasvit RMA extension for Magento 2 and 1 offers extremely flexible configuration so that you can deploy the module according to the needs of your ecommerce business. The tool even enables file attachments and customization of RMA appearance in a grid!
Due to the advanced workflow rules, the extension easily fits in any store business model. Mirasvit RMA lets you create rules that will help you control every step of returns and exchanges. As a result, this process becomes comfortable for both customers and admins.
As for email notifications, they allow you to clarify and simplify your communication process. So, don’t hesitate to utilize highly customizable templates! For preventing frauds, the Mirasvit RMA extension offers Shipping Labels. You can upload and print PDF shipping labels of various carriers for both customers and admins.
As for Reasons, Conditions, and Resolutions for customers’ RMA, they significantly simplify the customer experience. The extension provides buyers with an option to choose among different conditions, reasons, and resolutions for product returns.
Quick Responses are also among the most prominent features of the Mirasvit RMA extension for Magento 2 and 1. The module lets you reply to your clients rapidly. Consequently, buyers become more satisfied. Besides, with the Quick Responses templates, this boring routine turns into a piece of cake.
Powerful reports are also among the competitive advantages of Mirasvit RMA for Magento 2 and 1. The extension provides an excellent opportunity to analyze results at a glance. With such data as RMAs by status numbers, reasons, or attributes, total RMAs number, or total products returned number, you can easily understand what’s going on with your RMA routine.
Mirasvit RMA Frontend
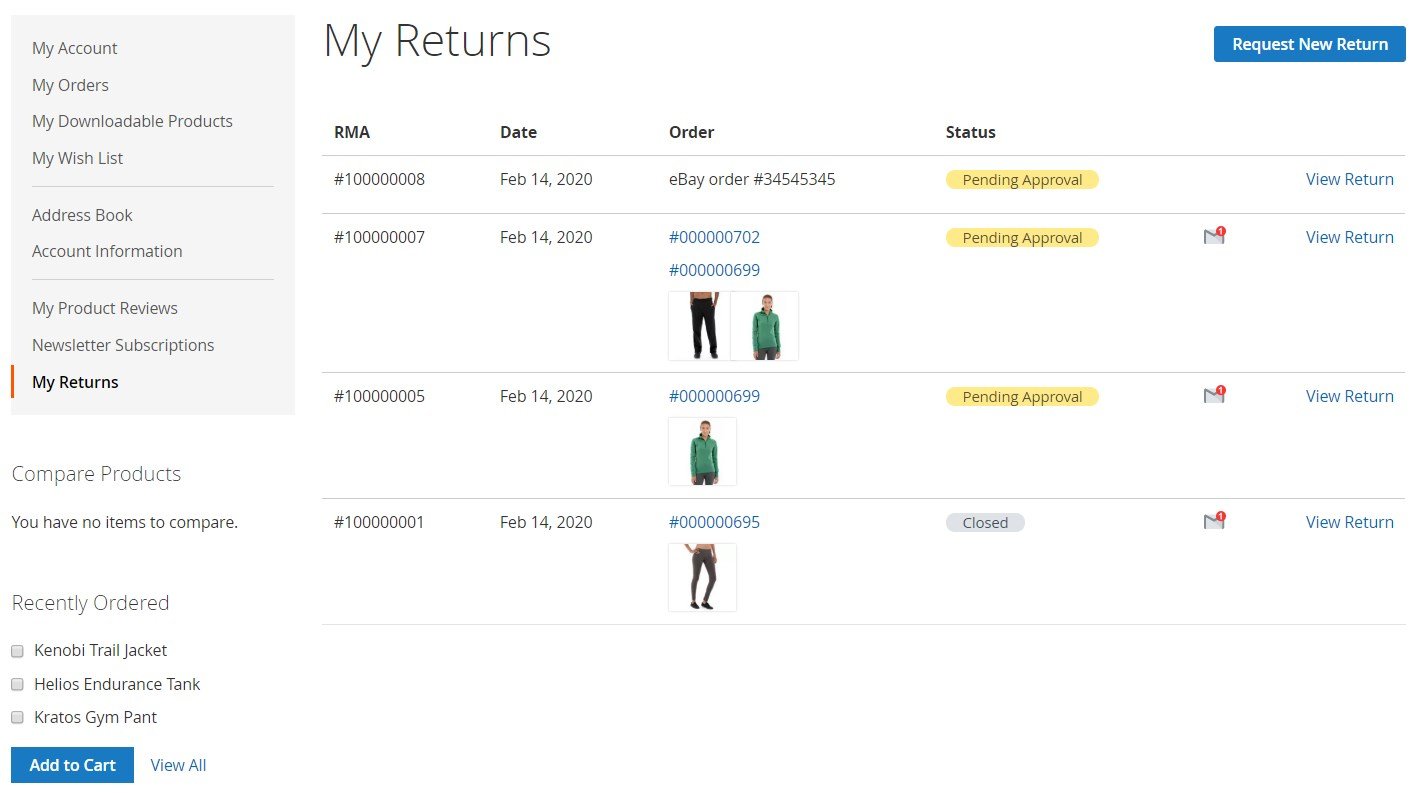
From the perspective of a customer, Mirasvit RMA looks as follows. On a customer account page, there is a My Returns tab with all RMA requests. As a customer, you can view orders and relevant returns.
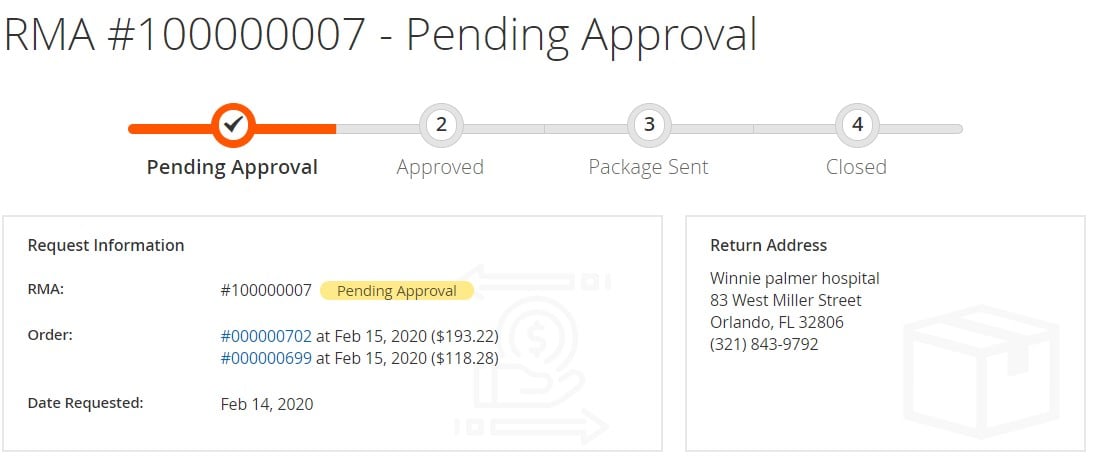
Each RMA page contains all the necessary data divided into the following blocks: a progress bar with status, Request Information, RMA Items, messages, and RMA History. The Request Information section provides such data as an RMA number and status; order numbers, date, and price; date of the request; and return address.
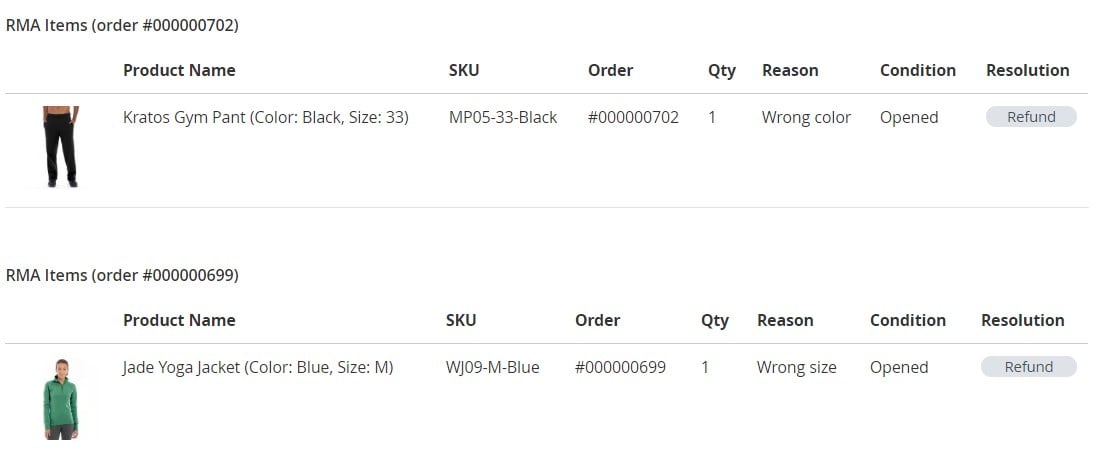
The following section contains data related to the returned products (name, color, size, SKU, and quantity), relevant order number, as well as RMA reason, condition, and resolution.
Next, a customer can leave a message and attach files to it and check sent messages in the RMA History section.
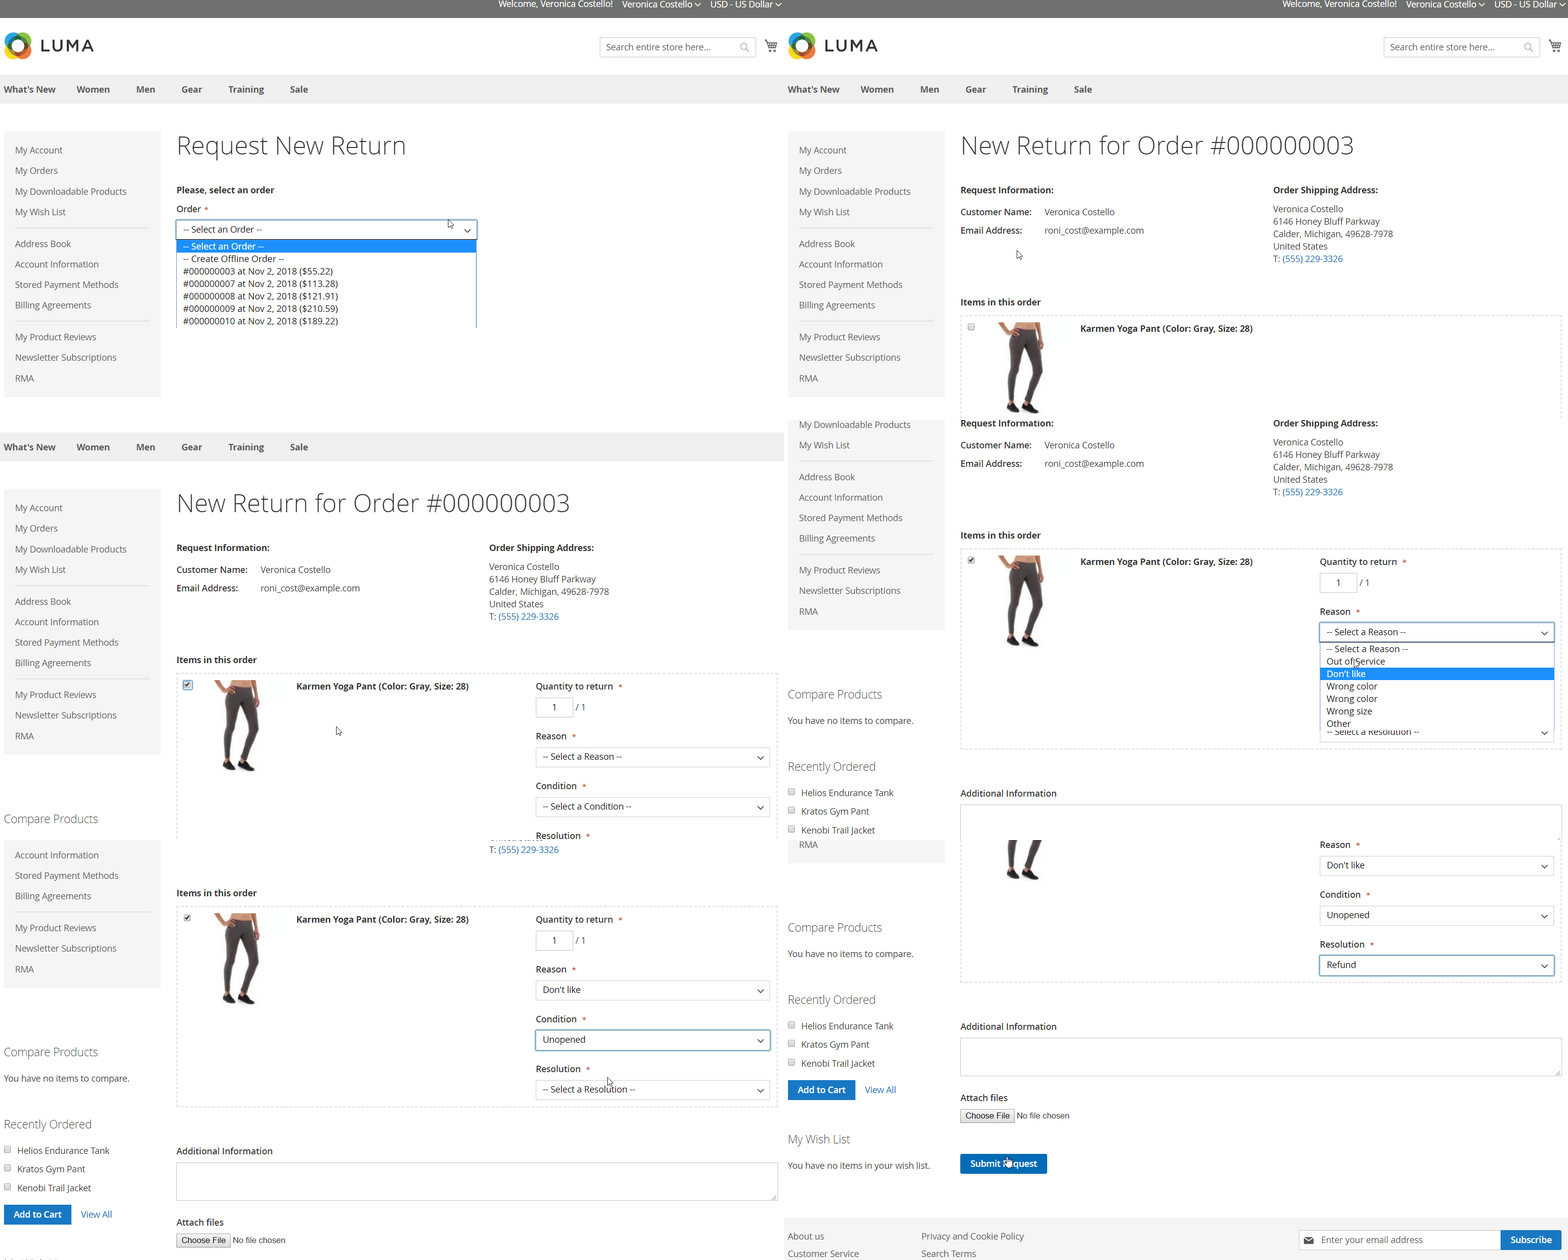
In the image below, you can see the process of creation of a new return request by a registered user:
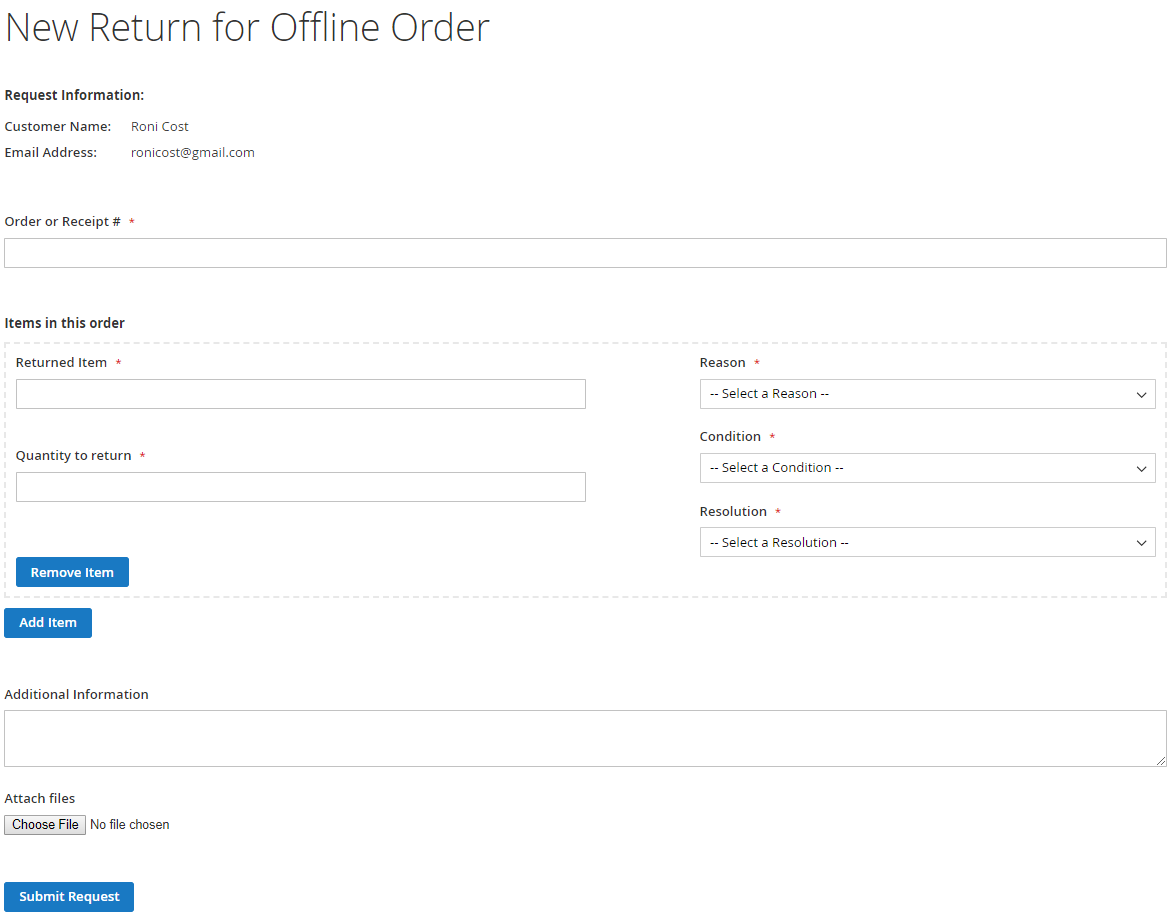
Request RMA screen for guest users:
Above, we’ve shown how Mirasvit RMA looks for customers. The interface is intuitive and very convenient, so submitting RMA requests will not require much time and effort from your buyers.
Advantages of Mirasvit RMA
If you are wondering why this RMA module is better than other similar extensions, Mirasvit describes 10 advantages of the tool (and we absolutely agree with them):
- Integration with helpdesk and RMA management features for customers (your buyers have an excellent opportunity to manage their returns, as well as discuss exchange/replacement with the help desk).
- Availability for guest users (even guest users can discuss and add comments to their requests).
- A customizable number of items to be returned (there is no need to return all purchased items; instead, it is possible to return only required ones).
- Refund (your customers can request a refund).
- Shipping labels (benefits from using shipping labels have been described above).
- Administrators can participate in creating RMA orders (if a customer doesn’t know how to create an RMA order, admins can always help).
- Customizable messages to clients (a great feature for providing better customer experience).
- Quick responses (described above as well).
- Custom fields for RMA orders (this feature also helps to create a better experience).
- RMA reports (you will always know how your RMA routine flows).
Final Words
There is no need to worry about managing RMA processes if you install the Mirasvit RMA extension for Magento 2 and 1. The tool offers lots of advanced options and significantly improves both backend and frontend experience. Since the extension is available for both Magento 2 and 1, you can use it with any version of the platform. Mirasvit RMA costs $119, and you can purchase it here:


