
How To Set Up & Configure Server For Magento 2 & 1

The following guide teaches how to set up and configure server for both Magento 2 and 1.X. Below, you will find a list of providers that offer cheap but quite powerful and reliable dedicated server solutions, discover how to install all-in-one web stack required by your Magento website (including Nginx, Apache, MariaDB, PHP 5.6, OPCache, and Redis), get a deep insight on the usage of Composer, Git, IonCube, XDebug & PHPUnit, Solr, Varnish, as well as Grunt and RabbitMQ on a server. Magento server configuration is a piece of cake!

Table of contents
- 1 Magento Server Configuration: Server Providers
- 2 Magento Server Configuration: All-In-One Web Stack
- 3 Magento Server Configuration: Composer
- 4 Magento Server Configuration: Git
- 5 Magento Server Configuration: IonCube
- 6 Magento Server Configuration: XDebug and PHPUnit
- 7 Magento Server Configuration: Solr
- 8 Magento Server Configuration: Varnish
- 9 Magento Server Configuration: Special Magento 2 Requirements
- 10 Magento Server Configuration: Software Versions And Prerequisites
Magento Server Configuration: Server Providers
There are a lot of providers that offer cheap and reliable server options optimized for Magento. Some companies already have dedicated servers which support Magento 2 requirements, while others are going to provide optimized solutions in the nearest future. Below, you can see the most prominent dedicated server options divided into regions.
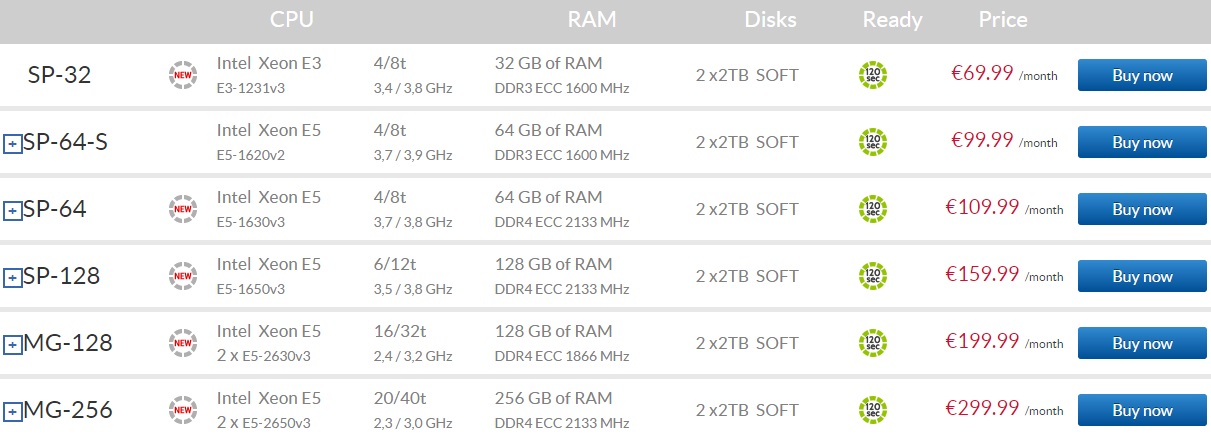
- USA. OVH provides dedicated enterprise servers for your Magento store starting from €69.99 per month. You can see a list of other available countries on the official website here:
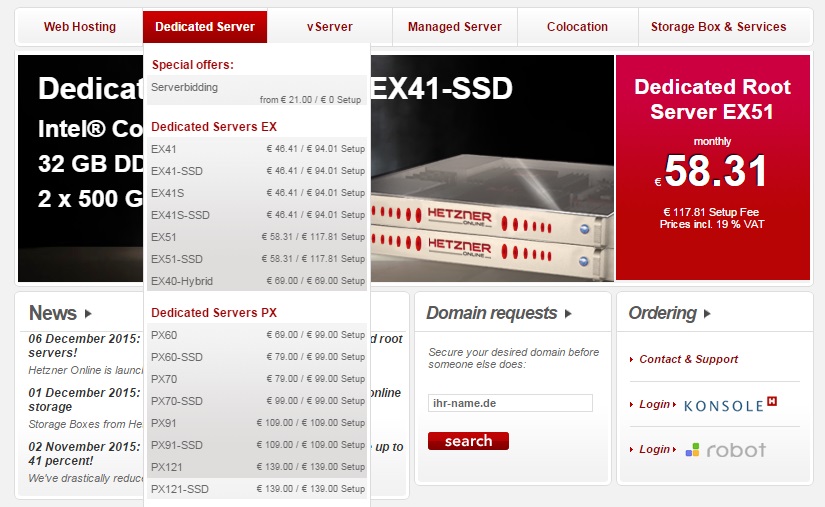
- Germany (EU). Hetzner offers Dedicated Root Server for your Magento 2 and 1.X at € 46.41 a month. For further information, visit the official website: .
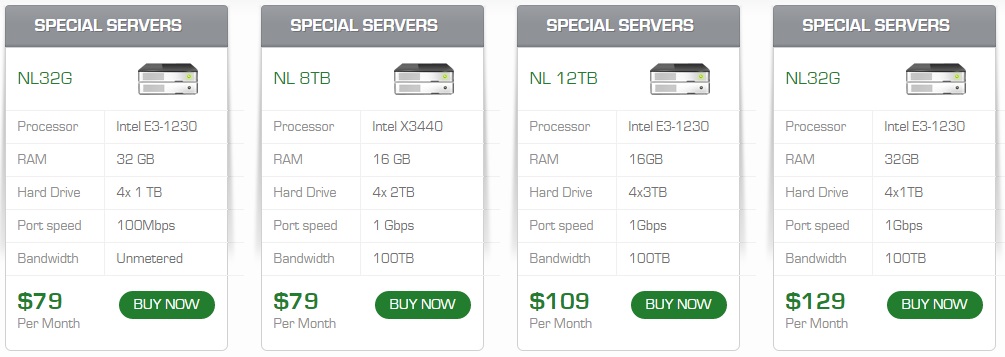
- Netherlands (EU) & USA. EqServers has dedicated servers for your ecommerce store available in both USA and Netherlands starting from $79 per month. For further information, ask specialists from .
These are the cheapest and at the same time powerful and reliable server options suitable for Magento. If you know other similar solutions, leave your thoughts in a comment field below the post. As for Magento server configuration at this stage, you should ask your provider to install a recent stable version of Debian or do it via server administration on your own.
Magento Server Configuration: All-In-One Web Stack
Now, it is necessary to install all-in-one web stack to set up and configure server for your Magento 2 or 1.X website. Pay attention to LEMP, LAMP, LNMP, and LNMPA stack installation script, which significantly improves the installation procedure. By using the script, you will enhance your Magento server with the help of PHP, Linux, MySQL, Apache, Nginx/Tengine, MariaDB/Percona, etc. It is highly recommended to use Nginx instead of Apache, since it provides better performance for your Magento website. To install all-in-one web stack on your Magento server, follow this link:
Alternatively, you can run several separate installations for all the aforementioned components, but it is more convenient to install everything as a single software block.
MariaDB Magento Configuration

After installing the aforementioned technology stack, it is necessary to tune some of its components. Let’s start with MariaDB – an enhanced replacement for MySQL.
Use the latest stable version of MariaDB and keep in mind that its configuration is among the most essential aspects of server side performance optimizations of your Magento 2 or 1.x website. Properly configured MariaDB provides performance bump up to 65%. Besides, MariaDB utilizes less resources than the average hardware provides. Thus, recommended settings for innodb_buffer_pool_size on a dedicated database server look as follows:
- For 6 GB RAM – 5 GB;
- For 12 GB RAM – 10 GB;
- For 24 GB RAM – 18 GB.
In case of combined web and database servers, don’t use more that 50% or RAM. For instance, if there are 6 GB available, use 2-3 GB. For a dedicated database server it is recommended to utilize approximately 80%. Other vital MariaDB are listed in the following code field:
|
1 2 3 4 5 6 7 8 9 10 11 12 13 14 15 16 17 18 19 20 |
innodb_thread_concurrency = 2 * [numberofCPUs] + 2 innodb_flush_log_at_trx_commit = 2 thread_concurrency = [number of CPUs] * 3 thread_cache_size = 32 table_cache = 1024 query_cache_size = 64M query_cache_limit = 2M join_buffer_size = 8M tmp_table_size = 256M key_buffer = 32M innodb_autoextend_increment=512 max_allowed_packet = 16M max_heap_table_size = 256M read_buffer_size = 2M read_rnd_buffer_size = 16M bulk_insert_buffer_size = 64M myisam_sort_buffer_size = 128M myisam_max_sort_file_size = 10G myisam_max_extra_sort_file_size = 10G myisam_repair_threads = 1 |
You can also configure your Magento server and its MariaDB parameters according to this Magento MySQL settings: . Change variables according to the available amount of RAM.
PHP Magento Configuration

As for PHP and server configuration for Magento 2 and 1.X, it is extremely important to install the newest PHP version. In case of Magento 1.x, it is PHP 5.6, in case of Magento 2 it can be the same version of the language or its next generation PHP 7. Everything depends on your project, skills, and available resources. Below, you can see what parameters to use with your php.ini file:
|
1 2 3 4 5 6 7 8 |
realpath_cache_size = 32k realpath_cache_ttl = 7200 max_execution_time = 90 max_input_time = 90 memory_limit = 256M default_socket_timeout = 90 pdo_mysql.cache_size = 2000 output_buffering = 4096 |
Besides, you should always check system requirements of Magento (; ), because some vital PHP extensions are listed there.
Redis Magento Configuration

To configure Redis on a server for your Magento 2 of 1.x website, use the repository. You only have to install a single package and import the GPG key of the EPEL repository. Chances are, the repository is already added to your server, so it’s highly recommended to use the yum repolist command to avoid unnecessary steps in your Redis Magento configuration.
Download a package that adds the aforementioned repository to the yum package manager. For the i386 kernel and an environment utilize this line of code:
|
1 |
wget http://dl.fedoraproject.org/pub/epel/6/i386/epel-release-6-8.noarch.rpm |
In case of the x86_64 kernel, execute the following one from the shell:
|
1 |
wget http://dl.fedoraproject.org/pub/epel/6/x86_64/epel-release-6-8.noarch.rpm |
Now, install the repository pac kage and import GPG key. The last one is used by yum for authenticating packages. Note that for this procedure root access is required:
|
1 2 |
rpm -Uvh epel-release-6*.rpm rpm --import http://dl.fedoraproject.org/pub/epel/RPM-GPG-KEY-EPEL-6 |
The system is ready for further actions, so you can easily install the Redis server and the PhpRedis extension via yum. Please note that it is necessary to enable the Redis server to be run at boot, as well as start the Redis service and restart the Apache service:
|
1 2 3 4 5 |
su yum install redis php-pecl-redis chkconfig redis on service redis start service httpd restart |
As for the workstation configuration, it is briefly described below. Since Debian already includes Redis server, you do not have to add any new repository to the Ubuntu system. But you should take care of the PhpRedis package. Use the following code:
|
1 2 |
sudo -i apt-get install redis-server php5-dev php5-cli php-pear |
Now, it’s time to install the PhpRedis extension via . Besides, you should:
- inform PHP about your improvements;
- enable the new PHP extension;
- restart the Apache service.
Utilize the following commands to perform all these actions:
|
1 2 3 4 |
pecl install redis echo "extension=redis.so" > /etc/php5/mods-available/redis.ini php5enmod redis service apache2 restart |
After the extension is installed, the system is informed, and the Apache server is restarted, test Redis server by pinging it:
|
1 |
redis-cli ping |
Note that you should receive PONG to go any further.
To see if everything is fine with the Redis extension (PHP loads it), run the following code:
|
1 |
php -m | grep redis |
String redis is a result you should get.
While configuring Redis as a cache, don’t forget that each key has its expire set. Use maxmemory to set a maximum memory limit:
|
1 2 |
maxmemory 2mb maxmemory-policy allkeys-lru |
In the aforementioned example, it is 2 megabytes; consequently, there is no need for the app to use a time to live for keys with the help of the command. With the following configuration, all the keys are evicted via an approximated LRU algorithm when the 2 megabyte limit is achieved. As a result, Redis acts as memcached.
For further information check these posts:
Magento Server Configuration: Composer

Another important aspect of configuring server for Magento, especially for Magento 2, is the installation of Composer. To make it available on Debian, run the following command:
|
1 2 3 |
$ cd /usr/src $ sudo apt-get install curl php5-cli $ curl -sS https://getcomposer.org/installer | sudo php -- --install-dir=/usr/local/bin --filename=composer |
Now, you should verify the installation:
|
1 2 |
$ composer --version Composer version 4ecdbf89c4a3d1e5dfe73c57e3202a5e2a18c87e 2014-07-28 20:12:27 |
Don’t forget to set your exact version.
Magento Server Configuration: Git

To set up Git on your Magento server, you need a Droplet with Debian 8 and a sudo user. First of all, you should find out whether your package lists are updated or not. Execute the following command:
|
1 |
sudo apt-get update |
Now, install Git:
|
1 |
sudo apt-get install git-core |
The next step requires setting your Git username and email:
|
1 |
git config --global user.name "yourusername" |
and
|
1 |
git config --global user.email youremail@example.com |
To view your Git settings, go to the git config utility and run the following command there:
|
1 |
git config --list |
For further information, check this tutorial: .
Magento Server Configuration: IonCube

Some Magento extensions require IonCube to be installed on your server. If you are going to use such modules, install the loader. IonCube requires the PHP programming language to be installed on the server. the following tutorial is based on Nano and Wget, since they are often installed on most servers. If not, you can easily install them.
For CentOS, use the following command:
|
1 |
yum install nano wget |
In case of Ubuntu and Debian, use this one:
|
1 |
apt-get install nano wget |
Now, you should download the IonCube Loader and unpack it. For 64Bit x86_64, utilize the following command:
|
1 2 3 |
cd /tmp wget http://downloads3.ioncube.com/loader_downloads/ioncube_loaders_lin_x86-64.tar.gz tar xfz ioncube_loaders_lin_x86-64.tar.gz |
For 32Bit i386, use this one:
|
1 2 3 |
cd /tmp wget http://downloads3.ioncube.com/loader_downloads/ioncube_loaders_lin_x86.tar.gz tar xfz ioncube_loaders_lin_x86.tar.gz |
Note that all files are unpacked into the “ioncube” folder.
Now, it is necessary to copy the loader for your current PHP version (in our case it is 5.6) to the PHP extension directory (in our case it is /usr/lib/php5/20141216):
|
1 |
cp /tmp/ioncube/ioncube_loader_lin_5.6.so /usr/lib/php5/20141216/ |
Don’t forget to perlace our PHP version and the extension directory of our PHP version with your data.
To configure the IonCube loader on Debian, you have to change several php.ini files (Apache2, PHP CLI, CGI, and FPM). Depending on our needs, some files will not need ioncube loader support, so you can leave them untouchable. You can see, where are all these files situated:
|
1 2 3 4 |
nano /etc/php5/apache2/php.ini nano /etc/php5/cli/php.ini nano /etc/php5/cgi/php.ini nano /etc/php5/fpm/php.ini |
Add the following line of code to files necessary for your Magento server configuration:
|
1 |
zend_extension = /usr/lib/php5/20141216/ioncube_loader_lin_5.6.so |
Don’t forget to set your PHP version and directory and restart both the apache webserver and php-fpm after saving the files:
|
1 2 |
service apache2 restart service php5-fpm restart |
For further information, follow this link: .
Magento Server Configuration: XDebug and PHPUnit

XDebug & PHPUnit are must have tools for Magento 2 development, so install them on your server, if you are going to tinker your Magento website.
XDebug PECL Installation
You can install Xdebug on your Magento server with the aid of PEAR/PECL. Just run the following command:
|
1 |
# pecl install xdebug |
Besides, you should add a new line to your php.ini file:
|
1 |
zend_extension="/usr/local/php/modules/xdebug.so" |
Please note that it is necessary to replace the path and filename from the code with your exact data. Use the full path only. For further information and other ways of Xdebug installation on the server optimized for Magento, check this tutorial: .
PHPUnit
The most simple way to install PHPUnit on your Magento server requires downloading a . The required extensions are and . Allow the execution of PHARs in the php.ini file, in case is enabled:
|
1 |
suhosin.executor.include.whitelist = phar |
The following command will install PHAR globally:
|
1 2 3 4 5 |
$ wget https://phar.phpunit.de/phpunit.phar $ chmod +x phpunit.phar $ sudo mv phpunit.phar /usr/local/bin/phpunit $ phpunit --version PHPUnit x.y.z by Sebastian Bergmann and contributors. |
Alternatively, you can utilize the PHAR file directly:
|
1 2 3 |
$ wget https://phar.phpunit.de/phpunit.phar $ php phpunit.phar --version PHPUnit x.y.z by Sebastian Bergmann and contributors. |
For further information, check this tutorial:
Magento Server Configuration: Solr

You can also enhance your Magento search with Solr. The engine is supported by both Magento 2 and 1.X. To install Solr on your Magento server, choose between either solr-tomcat or solr-jetty:
|
1 |
apt-get install solr-tomcat |
or
|
1 |
apt-get install solr-jetty |
You can find more information here:
Magento Server Configuration: Varnish

Although Varnish is available in Debian package repositories, its version might be old. Therefore, it is necessary to use packages from official sources. To install Varnish on your Magento server, run the following commands as as a root user:
|
1 2 3 4 5 |
apt-get install apt-transport-https curl https://repo.varnish-cache.org/GPG-key.txt | apt-key add - echo "deb https://repo.varnish-cache.org/debian/ jessie varnish-4.1" >> /etc/apt/sources.list.d/varnish-cache.list apt-get update apt-get install varnish |
For further information check this guides:
Magento Server Configuration: Special Magento 2 Requirements
Below, we shed light on server requirements of Magento 2. Although Grunt and RabbitMQ are not mandatory, but they essentially simplify your daily routine with Magento 2.
Grunt

To install Grunt on your Magento server, run the following command:
|
1 |
npm install grunt@VERSION --save-dev |
Replace “VERSION” with the version you need.
More information is available here:
RabbitMQ

Both Debian and Ubuntu includes rabbitmq-server out-of-the-box, but its version is often outdated. Therefore, we recommend you to download the latest available package from RabbiMQ’s website. For further information, check these posts:
Magento Server Configuration: Software Versions And Prerequisites
It is very important to check prerequisites before installing Magento on your server. Note that required software versions are often renewed, so you should be attentive to prerequisites before installing any software on your server, since it might be outdated. Check the official Dev Doc for further information: .
_______
That was our guide to Magento server configuration. We hope it will help you set up and configure server for your Magento 2 and 1.X projects. You are welcome to share your thoughts regarding Magento server configurations in the following comment field:
Related posts
 Amasty ChatGPT AI Content Generator for Magento 2
 Adobe (Magento 2) Commerce and Cloud (Enterprise Edition) Specific Features
 Magento 2 B2B Company Guide: Revealing Company Structure & Import
 How to Import Customers & Customer Addresses to Magento 2
 Magento 2 Release Notes
 A Complete Guide to Shopify Customer Import
 Shopware 6 Advanced Pricing Guide + Import Tutorial
 How To Bulk Import Products In Shopify: CSV Description & Step-By-Step Guide