
How to Use Grunt in Magento 2

is a contemporary JavaScript task runner which essentially simplifies repetitive tasks by automating compilation, minification, linting, unit testing, etc. It can do most of the aforementioned routine processes with zero effort, you only have to configure the task runner through a Gruntfile. And while the purpose of the tool looks quite intriguing, its versatility is even more promising, since you can easily utilize it within all possible platforms and projects. Below, we will explain how to use Grunt with Magento 2.

Although the ecosystem around Grunt is huge, it continues to grow every day. Hundreds of plugins are already available, so you can use the task runner to automate just about anything on your Magento website. Furthermore, if you cannot find what you need, it is extremely easy to publish your own Grunt plugin. Alternatively, you can hire someone to create missing functionality for you. By following the link below, you will discover all Grunt plugins:
Table of contents
UPD (July 2019)
In the following update, we provide official tips on how to use Grunt with Magento 2. The initial article is available below.
How to compile LESS in Magento 2 with Grunt
The following chapter is dedicated to several important processes. Firstly, it sheds light on how to install . Secondly, you will find out what Grunt’s configuration is the most suitable. Thirdly, the chapter describes how to compile .less files in Magento 2 using the JS task runner. But let’s take a look at the most important prerequisites before going any further.
Prerequisites
Actually, there are only two major requirements. First of all, you have to your Magento 2 to the developer or default . Note that with the default mode, you set the Less compilation mode to Server-side Less compilation, which is required for our final goal.
Next, install and configure Grunt as follows:
- have to be installed in any location on your machine.
- Now, you can install the Grunt CLI tool globally, using the following command:
1npm install -g grunt-cli - Go to the <Magento_root> directory to copy and paste the contents of the following sample files:
- package.json.sample into package.json
- Gruntfile.js.sample into Gruntfile.js
- grunt-config.json.sample into grunt-config.json
- In a command prompt, run the following commands to install (or refresh) the node.js project dependency, including Grunt:
123cd your_Magento_instance_directorynpm installnpm update
There is also an optional step related to the Grunt’s opportunity for “watching” changes automatically with no page reloads in a browser. To implement this feature, you have to install the .
Adding themes to Grunt configuration
Now, when Grunt is installed and configured, let’s see how the process of adding themes to its configuration looks. You have three options while compiling .less files: Magento 2 lets you add your theme to:
- module.exports in the Grunt configuration,
- the default dev/tools/grunt/configs/themes.js
- the .
The official documentation describes the following example:
- As mentioned above, you have to install Node.js to any location on your machine.
- Next, it is necessary to install the Grunt CLI globally with the help of the command below:
1npm install -g grunt-cli - Now, you have to rename a few files in the Magento root directory:
- Change package.json.sample to package.json
- Replace Gruntfile.js.sample with Gruntfile.js
- Now, like in the prerequisites section above, you have to refresh or install the node.js project dependency, including Grunt. Run the following commands:
123cd <your_Magento_instance_directory>npm installnpm update - Finally, you can add your theme to Grunt configuration. Go to the dev/tools/grunt/configs/themes.js file and add your theme to module.exports like shown below:
|
1 2 3 4 5 6 7 8 9 10 11 12 |
module.exports = { <theme>: { area: 'frontend', name: '<Vendor>/<theme>', locale: '<language>', files: [ '<path_to_file1>', //path to root source file '<path_to_file2>' ], dsl: 'less' }, |
Let’s describe the notation used above:
-
- <theme> is your theme code that corresponds to the theme directory name.
- <language> is a language of your theme specified in the code_subtag format (en_US). It is possible to specify just one locale here. Thus, you have to create one more theme declaration to debug the theme with another locale, where you specify another value for language.
- <path_to_file> is a path to the root source file, relative to the app/design/frontend/<Vendor>/<theme>/web directory. Magento 2 Grunt rules require specifying all . How to solve the issue when your theme from a certain theme and does not contain its own root source files? The solution is quite straightforward: specify the root source files of the parent theme instead.
The optional step mentioned above is also the same: install the in your browser to avoid page reloads when using Grunt for “watching” changes automatically.
Grunt commands
Below, you will find grunt commands designed to perform different customization tasks. Note that it is necessary to run all commands from the Magento installation directory.
- grunt clean – use this command to remove the theme related static files in the following directories: pub/static and var.
- grunt exec – use this command to republish symlinks to the source files to pub/static/frontend/. If you want to republish symlinks for a specific theme, use a more specific command: grunt exec:<theme>.
- grunt less – use this command to compile CSS files with the help of the symlinks published in pub/static/frontend/. If you want to use symlinks published for a specific theme, utilize a more specific variation of the command: grunt less:<theme>.
- grunt watch – use this command to track changes in source files, recompile .css files, and reload pages in a browser.
Use cases
Below, we shed light on how to use Grunt in Magento 2 to track changes. The following examples display which Grunt tasks can be used and when:
- Run the exec command after you switch to the compilation mode from client-side to server-side.
- Run the less command and reload the page after customizations are applied to the content of any .less file. Note that the only exceptions are root source files.
- Run the exec command and reload the page after customizations are applied to the root source files or files included to the root files are removed.
- Run exec command after php bin/magento setup:upgrade.
- Run the exec command and then apply the clear command to clear the Magento cache and utilize the watch command. Thus, any custom jQuery attributes are loaded correctly. Don’t change the order of commands. As for custom attributes, they include product sliders, banners, etc.
Now, let’s return to the optional step mentioned above. If you installed LiveReload installed, the official documentation recommends running the grunt watch command to simplify the flow:
- After the content of any .less file is customized, changes are applied automatically, so are the page reloads.
- If you customize the root source files or move files from the root files, it is necessary to run the following commands: clean and exec. They will reload the page in a browser.
CSS source maps
Now, let’s take a look at how to use Grunt in Magento 2 for styles preprocessing. According to the official documentation, it is possible to enable the CSS source maps generation in your browser to enhance the process simplifying the theme styles debugging.
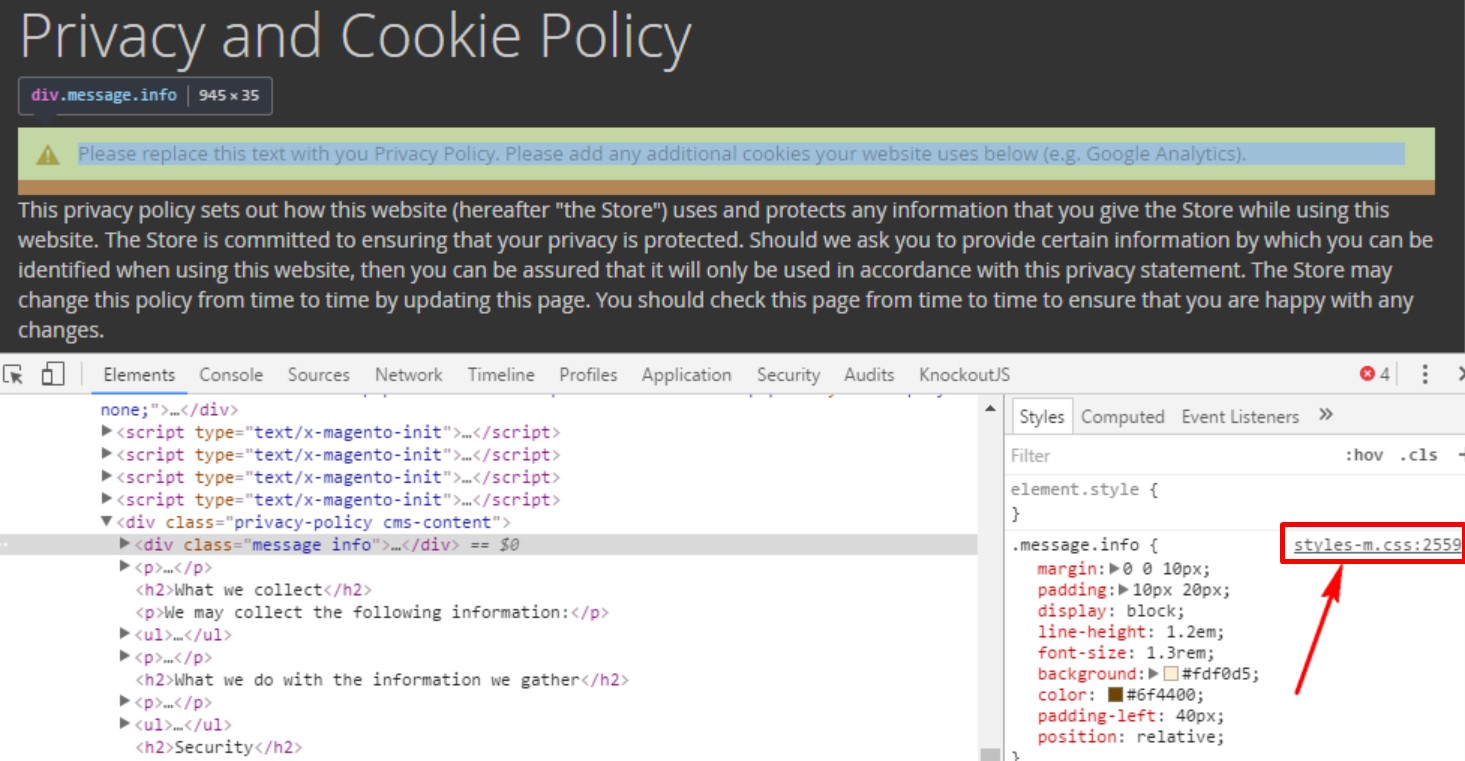
Magento compiles all theme’s .less files into two CSS files for each theme: styles-m.css and styles-l.css. As a result, your browser sees styles-m.css when you debug a theme. Therefore, it might be difficult to define which .css or .less file requires corrections. The official documentation provides the following example:
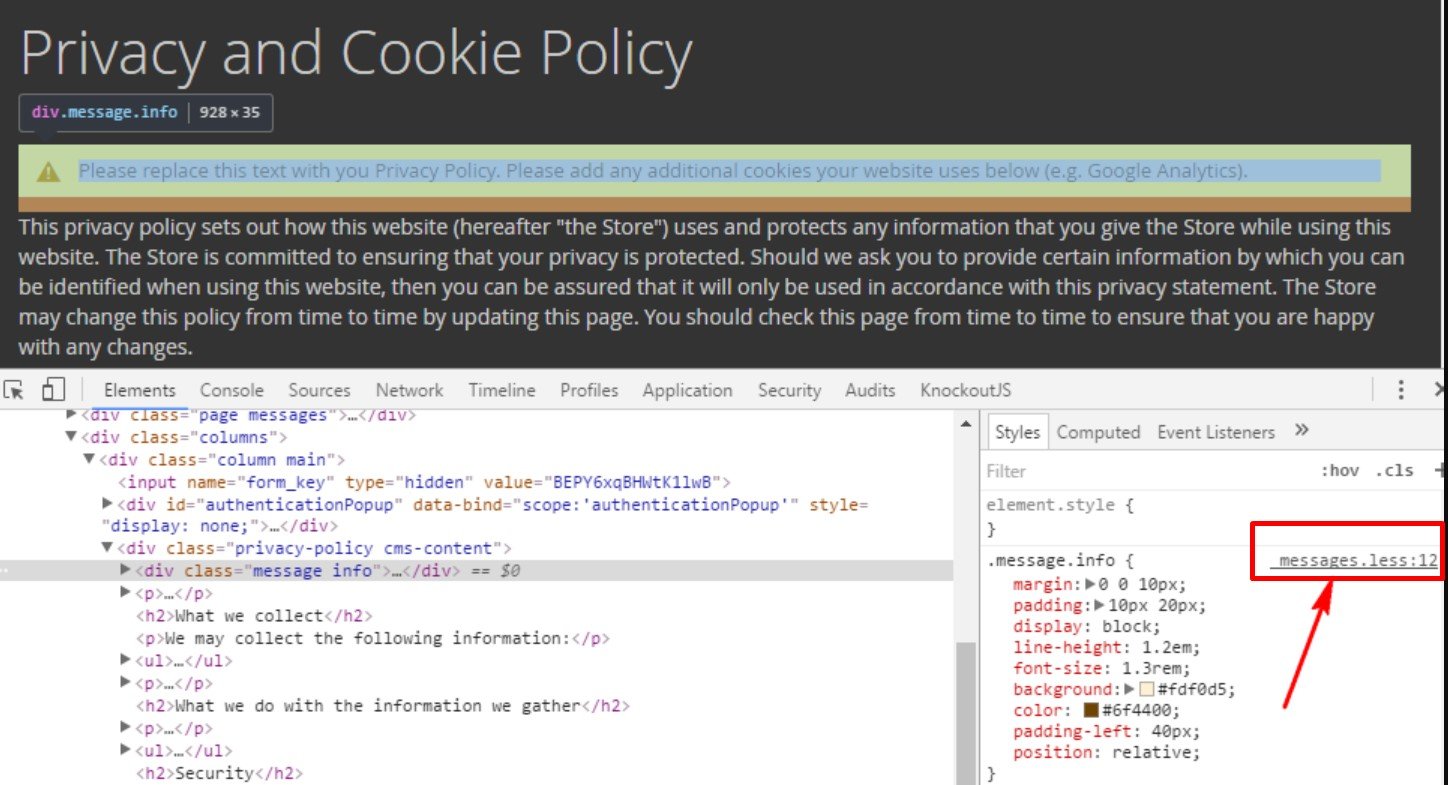
But you will eliminate the problem with CSS source maps, which will help you find the .less file, where the style is specified. The official documentation provides the following illustration:
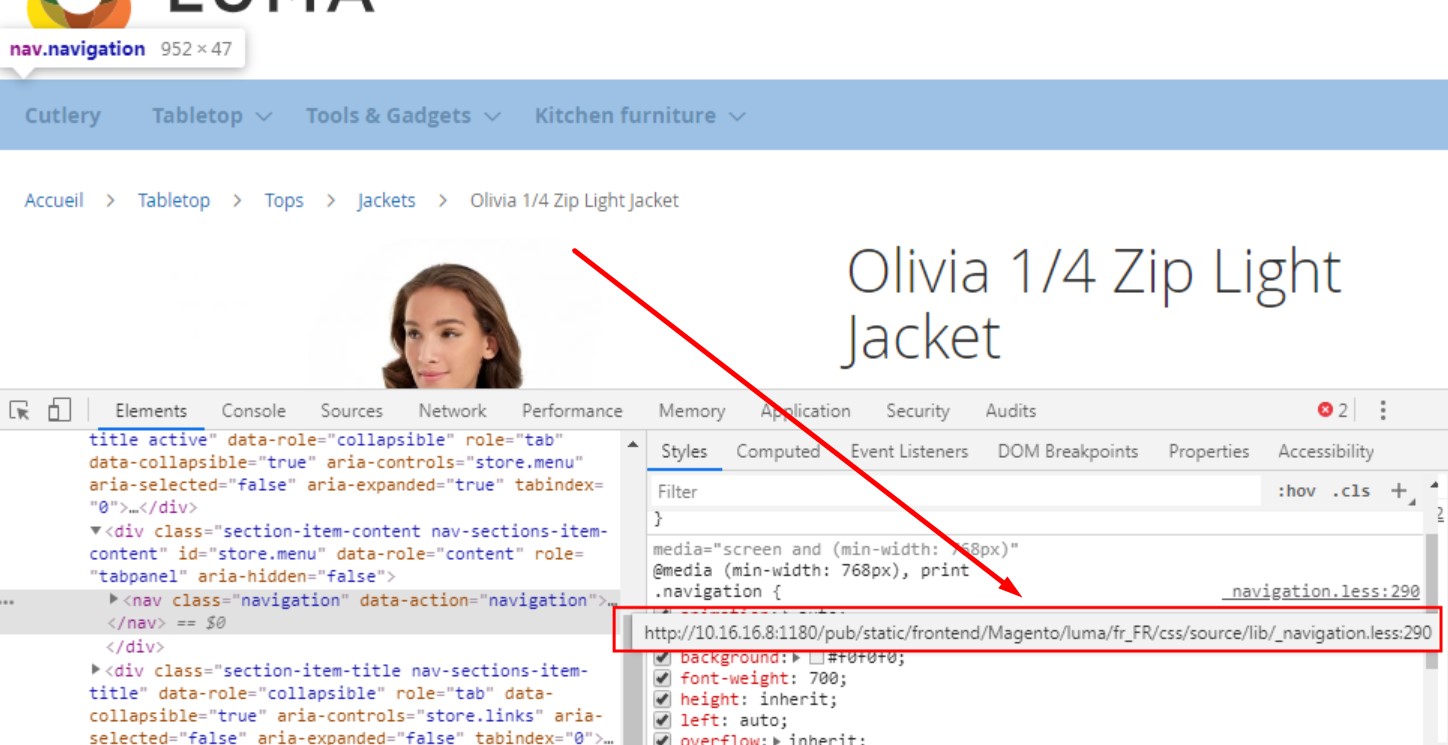
The best thing about CSS source maps is that they are generated automatically if you compile CSS for your theme using the grunt less: <theme> command. But it is also necessary to enable the display of source maps in your browser. In Chrome, you will find the corresponding option under Developer Tools: Settings -> Preferences -> Enable CSS source maps.
Also, note that Magento has a base set of variables that define a theme and its aspects. Such variables usually cover colors, fonts, style of page titles, etc. Go to the <magento-root>/lib/web/css/source/lib/variables directory to find LESS files that define values assigned to variables. You can change or override any of these variables creating a file in <theme-dir>/web/css/source/_theme.less. The official documentation offers the following example:
|
1 2 |
@navigation__background: @secondary__color__light; @font-family__sans-serif: 'Helvetica Neue', Helvetica, Arial, sans-serif; |
Grunt for Magento 2 tasks
Below, we shed light on more detailed aspects of configuring Grunt for various Magento 2 tasks.
Overview
Due to the nature of Grunt, you can use it to automate any tasks you need. As mentioned above, Magento 2 comes with pre-configured Grunt tasks for compiling LESS files by default.
Prerequisites
The only prerequisite at this stage is to set your Magento application to the developer or default mode.
Installing and configuring Grunt in Magento 2
Before using the built-in Grunt tasks, You still have to follow these steps:
- have to be installed in any location on your machine.
- After that, you can install the Grunt CLI tool globally, using the following command:
1npm install -g grunt-cli - Go to the <Magento_root> directory to copy and paste the contents of the following sample files:
- package.json.sample into package.json
- Gruntfile.js.sample into Gruntfile.js
- grunt-config.json.sample into grunt-config.json
- In a command prompt, run the following commands to refresh or install the node.js project dependency, including Grunt:
|
1 2 3 |
cd your_Magento_instance_directory npm install npm update |
There is also an optional step related to the Grunt’s opportunity for “watching” changes automatically with no page reloads in a browser. To implement this feature, you have to install the .
Grunt configuration file
Now, you have to copy the contents of themes.js into local-themes.js in the dev/tools/grunt/configs/ directory.
If everything is ok with the installation (you’ve followed the steps above successfully), Grunt will use the default configuration files located in dev/tools/grunt/configs/.
Note that it is possible to define your theme in the local-themes.js file at this stage as follows:
|
1 2 3 4 5 6 7 8 9 10 |
Theme_Name: { area: 'frontend', name: 'Vendor_Name/Theme_Name', locale: 'en_US', files: [ 'css/styles-m', 'css/styles-l' ], dsl: 'less' } |
Custom Grunt configuration files
In the following section, we describe what to do with custom Grunt configuration files.
How to declare a custom config file
There are two options that let you declare a custom config file in a different manner.
Option 1
To declare a custom config file for Grunt, follow these steps:
- First of all, you have to copy the default configuration file to the preferred location in the directory of your Magento 2 instance. The file name should be unchanged.
- Next, you can open the grunt-config.json file in the Magento root and set configuration objects as follows
12key: file aliasvalue: path to your custom file
Note that for custom configuration files – local-themes.js – located in the <magento_root>/dev/tools/grunt/configs directory, the grunt-config.json file already includes the following:
|
1 2 3 |
{ "themes": "dev/tools/grunt/configs/local-themes" } |
It is also necessary to mention that this path is added to your .gitignore automatically.
Option 2
As for the second option, it consists of the following steps:
- Go to your Grunt related scripts and, in the file router, set the alias and path to the default configuration file. The official example for the themes.js configuration is the following:
1filesRouter.set('themes', 'dev/tools/grunt/configs/themes');
Note that it must be added earlier than the get() method. - Now, create a copy of the default configuration file in the dev/tools/grunt/configs/ directory. You should change its name by adding the “.loc” suffix. For example, replace themes.js with themes.loc.js.
How to use a custom configuration file
Now, you have to teach Grunt to use a custom configuration file, instead of the default one. To achieve this goal, you have to add the following elements to your script:
- Require file-router is based on this command:
1var fileRouter = require('/files-router'); - To call the get(%file_alias%) method to get the configuration file, use this command:
1var themes = fileRouter.get('themes');
For further information, follow these links: & .
Magento 2 Theming with Grunt.js
A brand new theme management mechanism introduced in Magento 2 offers the following features:
- Extended layout files. Instead of copying an entire XML layout file to a local folder you only need to copy the part that you are going to change.
- Organized layout structure. It is not possible to add layout files without a module folder in Magento 2.
- CSS and LESS inheritance. Now, you can change LESS files from a parent theme in custom themes.
- Built-in LESS compiler. Development in Magento 2 is easy, but you can make it even easier with Grunt.
In Magento 2, Grunt helps to streamline styles customizations while in a server-side compilation mode. Hence, you should understand how to install, configure, and use the task runner for styles debugging. The following section of our Grunt/Magento 2 tutorial describes these processes.
How to install and configure Grunt in Magento 2
Although Magento 2 introduces built-in Grunt tasks, there are still several steps you have to perform before using it:
- First of all, you should install Node.js.
- Then, it’s necessary to install Grunt CLI tool globally:
|
1 |
npm install -g grunt-cli |
- … as well as Grunt in your Magento 2 directory:
|
1 2 |
cd <your_Magento_instance_directory> npm install grunt --save-dev |
- Now, it’s time to work with the node.js project dependency for your Magento 2 instance: you have to refresh (or install) it:
|
1 2 3 |
cd <your_Magento_instance_directory> npm install npm update |
- The next step requires adding your theme to the Grunt configuration. In the dev/tools/grunt/configs/theme.js file, add it to module.exports as in the example:
|
1 2 3 4 5 6 7 8 9 10 11 |
module.exports = { <theme>: { area: 'frontend', name: '<Vendor>/<theme>', locale: '<language>', files: [ '<path_to_file1>', //path to root source file '<path_to_file2>' ], dsl: 'less' }, |
Where:
- <theme> is your theme code which should correspond to the theme directory name;
- <language> is specified in the ‘code_subtag’ format. For instance, t can be en_US. Please note that just one locale can be specified, so for debugging a theme with another locale, you have to create an additional theme declaration.
- <path_to_file> is a path to the root source file. In case when your theme does not contain its own root source files and inherits them from a certain theme, you should specify the files of that parent theme.
This step is optional, but it can be very useful. By installing the for your browser, you will be able to “watch” changes automatically without any need to reload pages.
Don’t forget to check the video below, since it describes how to install Grunt in Magento 2.
Magento 2 Grunt Commands
Use the Grunt commands described below to perform different customization tasks in your Magento 2 project. All commands should be run from the installation directory of Magento 2.
- grunt clean:<theme>. This command removes static files related to your theme in both pub/static and var directories.
- grunt exec:<theme>. This one republishes source files symlinks to pub/static/frontend/<Vendor>/<theme>/<locale>.
- grunt less:<theme> should be used to compile .css files using symlinks from the aforementioned directory.
- grunt watch. This command is designed for the LiveReload extension. It tracks changes in the source files, recompiles .css files and reloads browser pages.
Tracking Changes in Magento 2 Using Grunt
If you don’t know which Grunt tasks to use for debugging Magento 2 styles, examine the following use cases:
- You can run the exec task after switching the compilation mode from client-side to server-side.
- Run the less command (and reload the page) after customizing the less file content. Note that root source files are the only exception.
- After customizing root source files or move their contents, it is necessary to run the exec task and then reload the page.
With LiveReload installed all these actions look even simpler.
Simple Style Changes in Magento 2 Server-Side Compilation Mode via Grunt
- Create and apply a new theme.
- Go to your theme directory and, add web/css/source/_extend.less there.
- Now, you should install Grunt as well as register your theme (the procedure is described above).
- Go to your Magento installation directory and run the following commands:
|
1 2 3 |
grunt exec: <your_theme> grunt less: <your_theme> grunt watch |
Please note that <your_theme> is the code of your theme that should coincide with the name of your theme directory.
- To change the color of the buttons, add the following code in _extend.less:
|
1 2 3 4 5 6 |
.action { &.primary { background-color: palevioletred; border-color: palevioletred; } } |
- Now, you should refresh the page in order to see the changes applied.
- To change the font of the buttons, add the following code in _extend.less:
|
1 2 3 4 5 6 7 |
.action { &.primary { background-color: palevioletred; border-color: palevioletred; font-size:1.5em; } } |
- Refresh the page once more to view the changes.
A Brief Magento 2 Grunt Manual
In addition to the aforementioned actions, it is also necessary to mention some core CSS tips for Magento 2.
How to clean CSS cache in Magento 2
To clean CSS cache or refresh less files, use the following command:
|
1 |
php bin/magento setup:static-content:deploy |
Alternatively, you can use dev mode during development:
- Clear the var/generation and var/di directories:
|
1 |
rm -rf /var/di/* /var/generation/* |
- Run the mode:
|
1 |
php bin/magento setup:mode:set developer |
Source () ()
How to add the new theme name to run Grunt in Magento 2?
Go to \dev\tools\grunt\configs, open your themes.js file, and change it according to the following example:
|
1 2 3 4 5 6 7 8 9 10 11 12 13 14 15 16 17 18 19 20 |
luma: { area: 'frontend', name: 'Magento/luma', locate: 'en_US', files: [ 'css/styles-m', 'css/styles-1' ], dsl: 'less' }, luma2: { // your nem theme name area: 'frontend', name: 'Vendor/luma2', //theme path locate: 'en_US', files: [ 'css/styles-m', 'css/styles-1' ], dsl: 'less' }, |
Now, it is necessary to open your less.js and change it as follows
|
1 2 3 4 5 6 7 8 9 |
blank: { files: combo.lessFiles (‘blank’) }, luma: { files: combo.lessFiles (‘blank’) }, luma2: { files: combo.lessFiles (‘blank’) }, |
After all these manipulations, you can run a Grunt less:luma2 task which will generate the pub static files for the theme.
Source () ()
Magento 2 LESS compilation with Grunt on Windows
First of all, you should install Grunt in your Magento 2 project. Then, it is necessary to:
- Add a theme to Grunt configuration. Add your theme to module.exports in dev/tools/grunt/configs/theme.js:
|
1 2 3 4 5 6 7 8 9 10 11 |
module.exports = { <theme>: { area: 'frontend', name: '<Vendor>/<theme>', locale: '<language>', files: [ '<path_to_file1>', //path to root source file '<path_to_file2>' ], dsl: 'less' }, |
- Run CMD as an admin and go to the root directory of your Magento 2 project via cmd
- Enter the following command :
|
1 |
grunt exec:<theme> |
- …and this one:
|
1 |
grunt watch |
- Changes your Less file.
- Refresh browser. As mentioned above, it is possible to see all changes without refreshing your browser with the aid of the LiveReload extension.
Patches for Master branch users are listed in the full article about Magento 2 Grunt. For further information, follow the link below.
Source ()
Grunt.js in Magento 2 Presentation
If you are going to master Grunt in Magento 2, Check this presentation, as it fully describes how to use the popular tool if you work with our favorite ecommerce platform.
Gulp Instead of Grunt
Some specialists recommend using Gulp instead of Grunt since it offers much faster building process. Therefore, Gulp should replace Grunt as a method for building static assets. Besides, it is better to use the tool for decoupling PHP calls from the Node.js build process: PHP calls from Node should be moved to ./bin/magento so node/js, while code is kept in Node.js only and PHP scripts are called from PHP. As a result, you can essentially streamline the deployment process.

It is also necessary to mention that Gulp focuses on code, while Grunt is all about configuration and it was developed around a set of commonly used tasks, while Gulp is based on the idea of connecting community-developed micro-tasks to each other. You can find the whole discussion about Grunt and Gulp in Magento on GitHub here: .
And don’t forget to check a set of front-end tools for Magento 2 based on Gulp.js: .
That was our Magento 2 Grunt guide. Feel free to ask any questions via comments.
Related posts
 Magento 2 B2B Company Explained: A Complete Guide to Setup, Structure, Management & Import
 Magento 2 Export Customers Tutorial: Export Customer Data with Ease
 E-Commerce Impulse Buys Guide: Boost Your Sales with Effective Strategies and Smart Tools
 Export Products from Magento 1 to Magento 2 Easily: Full Migration Tutorial for 2025
 How to Import Customers & Customer Addresses to Magento 2: Complete Tutorial, CSV Samples & Tips
 How to Import & Export Products in Magento 2: The Complete Guide for 2025 (CSV, Images, MSI, Configurable Products & More)
 Shopify PHP Data Transformation on Import: Automate Price, Inventory, and Other Adjustments with Custom Scripts
 How to Import Products to Shopware 6 & Automatically Assign Them to Parent Categories: A Time-Saving Import Feature You Shouldn’t Miss