
How to Configure Varnish for Magento 2

Benchmarks show that Magento 2 is much faster than the 1.X version of the platform, but you can improve its performance with the aid of Varnish. Being an HTTP accelerator, it is often used with heavily consumed APIs and content-heavy dynamic websites. Unlike other similar solutions, Varnish is focused exclusively on HTTP. About 10% of the Top 10K websites rely on this accelerator. The most prominent Varnish users are The New York Times, Wikipedia, Vimeo, Facebook, and Twitter. Since the performance of these websites might be a great reason to use Varnish with Magento 2, we’d like to shed light on its configuration within the platform, but let’s start with the nature of the accelerator.

Every web server receives HTTP requests and returns HTTP responses. Unfortunately, it doesn’t return the response immediately. A long sequence of steps required for each request may include loading script files, launching interpreter processes, and performing database queries. When all these actions are multiplied by thousands of requests, the server gets overloaded, system resources are drained, and you witness a significant performance decrease.
It is also worth mentioning that there are a lot of repeated requests, but the server does not remember them, so the same painful processes take place. Luckily, you can change this algorithm by using Varnish. In case of this HTTP accelerator, every request is received by Varnish instead of your web server. It looks at what’s being requested and sends the request to its backend, which is your web server. In its turn, the server performs its regular tasks and sends a response to Varnish to pass it back to the client.
The increase of performance occurs due to Varnish’s ability to store responses from the back end. All the responses are situated in its cache, so Varnish can rapidly serve further repeated responses without connecting to the back-end server.
So, by using Varnish, you get the following benefits:
- the load on the back end is reduced;
- the time of nearly every response is improved;
- the system can serve more requests per second.
Another optimization that makes Varnish lightning fast is in-memory cache storage. Please note that memory is more limited than disk, so you it is extremely necessary to follow these two rules: size your Varnish cache properly; prevent the system from caching duplicate objects.
Now, when you know why Varnish is so valuable, we can continue with its configuration within Magento 2. The platform supports versions 3.0.5 or later or any Varnish 4.x version out-of-the-box, so you will not spend too much time and effort on its installation and maintenance.
Please pay attention to the following aspects:
- Enter the commands described below as a user with root privileges. Note that there can be exceptions.
- The post illustrates Varnish configuration on CentOS and Apache 2.2. In other environments, some commands can be different, so use the official Varnish documentation.
Table of contents
- 1 Magento 2 Varnish issues
- 2 Check if Magento 2 supports your Varnish version
- 3 Configure your web server for using Varnish
- 4 Change the Varnish system configuration
- 5 Verify that Varnish is working without configuring Magento 2
- 6 Install Magento 2
- 7 Check if Varnish looks at HTTP response headers
- 8 Configure Magento 2 to use Varnish
- 9 Final steps
Magento 2 Varnish issues
- The lack of support (but you can fix this problem with the help of ).
- It is necessary to restart Varnish every time you manually delete the contents of your <your Magento install dir>/var/cache directory.
- For the following error:
|
1 2 3 4 |
Error 503 Service Unavailable Service Unavailable XID: 303394517 Varnish cache server |
Edit default.vcl by adding a timeout to the backend stanza:
|
1 2 3 4 5 |
backend default { .host = "127.0.0.1"; .port = "8080"; .first_byte_timeout = 600s; } |
Check if Magento 2 supports your Varnish version
To display a current Varnish version, use the following command:
|
1 |
varnishd -V |
You should get the following result:
|
1 2 3 |
varnishd (varnish-4.0.3 revision b8c4a34) Copyright (c) 2006 Verdens Gang AS Copyright (c) 2006-2014 Varnish Software AS |
Your Varnish should not be older than 3.0.5 or it can be any version of 4.x.
Configure your web server for using Varnish
Now, when you know that you use a suitable Varnish version, it is time to configure your web server. It should replace the default port 80, since Varnish responds directly to incoming HTTP requests. In our example, we use port 8080. Let’s change the listen port of Apache 2.2:
- Find /etc/httpd/conf/httpd.conf and open it in a text editor.
- Now, you should locate the Listen directive and change the value of the listen port to 8080 or any other available listen port.
- Save the changes and close the editor.
Change the Varnish system configuration
The next step requires modifying the Varnish system configuration:
1. Find /etc/sysconfig/varnish and open it in a text editor.
2. Now you should set the Varnish listen port to 80 VARNISH_LISTEN_PORT=80
3. Please note that it might be necessary to comment out the following:
|
1 2 3 4 5 6 7 8 9 10 11 12 13 |
## Alternative 1, Minimal configuration, no VCL #DAEMON_OPTS="-a :6081 \ # -T localhost:6082 \ # -b localhost:8080 \ # -u varnish -g varnish \ # -s file,/var/lib/varnish/varnish_storage.bin,1G" ## Alternative 2, Configuration with VCL #DAEMON_OPTS="-a :6081 \ # -T localhost:6082 \ # -f /etc/varnish/default.vcl \ # -u varnish -g varnish \ # -S /etc/varnish/secret \ # -s file,/var/lib/varnish/varnish_storage.bin,1G" |
4. Save the changes and close the editor.
Change default.vcl
The below material describes how to set Varnish to return HTTP response headers. As a result, you will be able to verify that Varnish works even before you configure Magento 2 for using Varnish.
1. Create the backup of default.vcl:
|
1 |
cp /etc/varnish/default.vcl /etc/varnish/default.vcl.bak |
2. Take your /etc/varnish/default.vcl file and open it in a text editor.
3. Find the following code:
|
1 2 3 4 |
backend default { .host = "127.0.0.1"; .port = "80"; } |
4. Now, you have to replace the value of .host with IP address and listen port of the Varnish backend or the server that provides Varnish with the content for acceleration. Probably, it should be your web server. For further information, follow .
5. Replace the value of .port with 8080 or any other web server’s listen port. In our example, Apache is installed on host 192.0.2.55:
|
1 2 3 4 |
backend default { .host = "192.0.2.55"; .port = "8080"; } |
In a situation when Apache and Varnish are running on the same host, it is better to use an IP address or hostname instead of localhost.
6. Save the changes and close the editor.
7. Now, you can restart Apache. Use the following command:
|
1 |
service httpd restart |
8. The same is about Varnish. Run the command below to restart it:
|
1 |
service varnish restart |
In case of failed start, run Varnish from the command line:
|
1 |
varnishd -d -f /etc/varnish/default.vcl |
This should lead to the appearance of error messages. For further help check these sources: ; and
Verify that Varnish is working without configuring Magento 2
Perform the following tasks before configuring Magento 2. Thus, you will be able to find out problems related to Varnish on early stages.
Start Varnish
The easiest way to start Varnish is to enter the service varnish start command. If the accelerator fails to run as a service, you can easily start it from the command line:
1. First of all, you have to start the Varnish CLI:
|
1 |
varnishd -d -f /etc/varnish/default.vcl |
2. The second step requires starting the Varnish child process. Then, you will be asked to enter start. The message below illustrates a successful start:
|
1 2 3 4 5 |
child (29805) Started 200 0 Child (29805) said Child (29805) said Child starts |
netstat
Now, it’s time to log in to the Varnish server and run this command:
|
1 |
netstat -tulpn |
You should get output similar to the following one:
|
1 2 3 4 |
tcp 0 0 0.0.0.0:80 0.0.0.0:* LISTEN 32614/varnishd tcp 0 0 127.0.0.1:58484 0.0.0.0:* LISTEN 32604/varnishd tcp 0 0 :::8080 :::* LISTEN 26822/httpd tcp 0 0 ::1:48509 :::* LISTEN 32604/varnishd |
From the above example, we can see that Varnish runs on port 80, while Apache – on port 8080. If there is no output for varnishd, check if Varnish is running. For further information about netstat options, follow .
Install Magento 2
Install Magento 2 if it is not installed yet. As for Varnish configurations, use the Varnish host and port 80 when prompted for a Base URL.
In case of the following error:
|
1 2 3 4 |
Error 503 Service Unavailable Service Unavailable XID: 303394517 Varnish cache server |
edit the default.vcl file by adding a timeout to the backend stanza:
|
1 2 3 4 5 |
backend default { .host = "127.0.0.1"; .port = "8080"; .first_byte_timeout = 600s; } |
Check if Varnish looks at HTTP response headers
To verify if Varnish is serving pages by looking at returned HTML response headers set Magento 2 for developer mode. Use the command or modify your .htaccess file. The second method is described below:
1. Be logged in to the Magento server as the Magento file system owner.
2. Find the <your Magento install dir>/.htaccess file and open it in a text editor.
3. Uncomment this line: SetEnv MAGE_MODE developer.
4. Save the changes and close the editor.
Now, it is necessary to look at the Varnish log. If Varnish is running, enter the following command on its server:
|
1 |
varnishlog |
If not – start Varnish and run the same command. Open a web browser and go to any page of your Magento 2.
There will be a long list of response headers in a command prompt window. Find the following:
|
1 2 3 4 5 6 7 8 9 10 11 12 |
- BereqHeader X-Varnish: 3 - VCL_call BACKEND_FETCH - VCL_return fetch - BackendOpen 17 default(10.249.151.10,,8080) 10.249.151.10 60914 - Backend 17 default default(10.249.151.10,,8080) - Timestamp Bereq: 1440449534.261791 0.000618 0.000618 - ReqHeader Host: 10.249.151.10 - ReqHeader Connection: keep-alive - ReqHeader Content-Length: 86 - ReqHeader Cache-Control: max-age=0 - ReqHeader Accept: text/html,application/xhtml+xml,application/xml;q=0.9,image/webp,*/*;q=0.8 - ReqHeader Origin: http://10.249.151.10 |
If there are no such headers, stop Varnish, look if everything is ok with your default.vcl, and try again.
And finally we can examine HTML response headers. You can use Live HTTP Headers – a browser plug-in for and . In this post, we rely on curl. Enter the command from any machine that has access to the Magento server via HTTP:
|
1 |
curl -I -v --location-trusted '<your Magento base URL>' |
For curl -I -v –location-trusted ‘http://192.0.2.55/magento2’, you will get the following result:
|
1 2 3 4 5 |
Content-Type: text/html; charset=iso-8859-1 X-Varnish: 15 Age: 0 Via: 1.1 varnish-v4 X-Magento-Cache-Debug: HIT |
Configure Magento 2 to use Varnish
To configure Magento 2 to use Varnish You should be logged in as a Magento administrator.
1. Go to STORES > Configuration > ADVANCED > System > Full Page Cache
2. Find Varnish Caching in the Caching Application list. Choose this option.
3. In TTL for public content, enter a value.
4. Expand Varnish Configuration with the following information:
- Access list requires the fully qualified host name, IP address, or CIDR for which to invalidate content. Follow for further information.
- Backend host requires the fully qualified hostname or IP address as well as listen port of the Varnish backend (origin server). It can be your web server that provides the content for Varnish to accelerate. Follow for additional information.
- Backend port requires backend server’s listen port.
5. Don’t forget to save configurations. Click Save Config.
6. Now, it is necessary to create a default.vcl file that you will use with Varnish. Use one of the export buttons.
7. For Varnish 4, use Export VCL for Varnish 4.

8. Utilize this file to replace your old default.vcl.
9. The last thing you should do is to relaunch both Varnish and a web server:
|
1 2 |
service varnish restart service httpd restart |
Final steps
First of all, you should Verify HTTP response headers once more.
For curl, we have the following example:
|
1 |
curl -I -v --location-trusted 'http://192.0.2.55/magento2' |
Note that important headers are
|
1 2 3 |
X-Magento-Cache-Control: max-age=86400, public, s-maxage=86400 Age: 0 X-Magento-Cache-Debug: MISS |
X-Magento-Cache-Debug: HIT is also acceptable.
Now, it is necessary to check page load times. Note that for front door, storefront category, or any Magento 2 page it should be less than 150ms. You can use a browser inspector to measure index within your store. The algorithm for Chrome inspector is described below:
1. In Chrome, open any cacheable page of your Magento 2.
2. Open the pop-up menu right-clicking anywhere on the page.
3. Choose the Inspect Element option.
4. Now, while in the inspector pane, you have to click the Network tab.
5. Don’t forget to refresh the page.
6. Scroll to the top of the inspector pane. You should see the URL of the Magento 2 page you are viewing. The page load time is displayed next to the page URL.
7. By clicking the page URL in the Name column, you will see HTTP response headers.
Finally, you can verify the Magento 2 cache.
The <your Magento install dir>/var/page_cache directory should be empty. You should be logged in to your Magento 2 server as the Magento 2 file system owner.
1. To verify Magento 2 cache, run this command:
|
1 |
rm -rf <your Magento install dir>/var/page_cache/* |
2. Access cacheable Magento 2 pages.
3. The var/page_cache/ directory should be empty. It means that Varnish for Magento 2 is configured successfully.
Check the and .
Mirasvit Full Page Cache Warmer for Magento 2
We also recommend you to pay attention to the Mirasvit Full Page Cache Warmer Magento 2 extension. This tool allows you to increase the speed of your store pages – loading speed is increased up to several times. Besides, you get more effective usage of FPC and a robust background functionality when store pages are improved without loading speed issues. The latest cache version and the fastest page speed are guaranteed! Consequently, you increased SERP ranking and get more loyal customers with all that it implies.
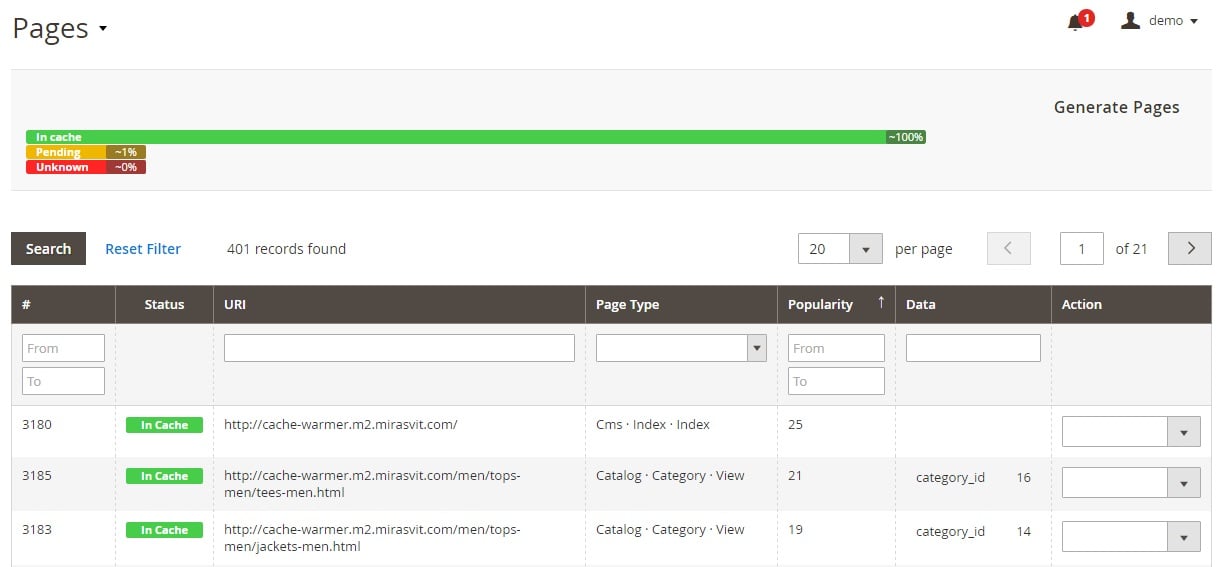
All pages processed by the extension are gathered in a grid:
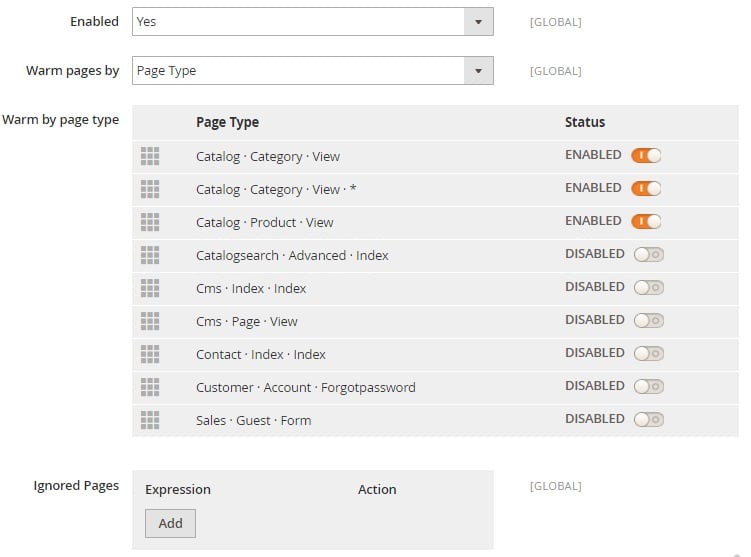
And you can easily choose what pages should be warmed:
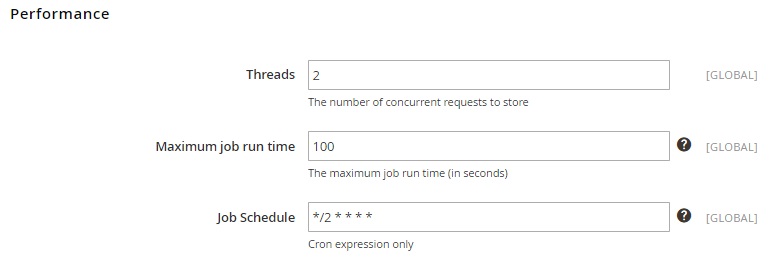
Besides, it is possible to run cron job:
Check our review on the extension here: Mirasvit FPC Warmer Overview.
Related posts
 Magento 2 Release Notes
 Adobe (Magento 2) Commerce and Cloud (Enterprise Edition) Specific Features
 How to generate order increment IDs automatically during Magento 2 import
- How to update products that are not listed in a product table during Magento 2 import
- How to Import Customers & Customer Addresses to Magento 2
 Amasty ChatGPT AI Content Generator for Magento 2
 Reputon Amazon Importer Review: How to Connect Shopify to Amazon in a Few Clicks
 CopyAI Review 2023