
How to Install Magento Extensions (Magento Connect, FTP, SSH, Modman, Composer)

Magento extension development is not for everyone, but regardless of coding experience everyone can utilize the end product of this complicated process. It’s just important to know how to install Magento extension right. The below guide contains universal instructions for a seamless installation of any Magento extension. We’ve described 5 types of installation: via Magento Connect, FTP, SSH, Modman, and Composer.
Magento Marketplace Merchant Guide

The following FTP guide is designed for a basic webserver setup: Mysql, Apache, and PHP. For the server with more advanced setups, you will need to adjust these steps. Ask your system admin about details. You can also automate the installation process with the help of a command line equivalent.
We also strongly recommend you to use your test site to install modules. You can have troubles even in a case of the best Magento extensions, so you should check how they work without doing any harm to your live website. That’s why you must install modules in a test environment first. If everything is OK, repeat the installation on a live site.
Table of contents
- How to Manually Install Magento Extensions via FTP (6 Universal Steps and Troubleshooting)
- Turn off Compilation
- Turn on Cache
- Perform the Installation
- Refresh Cache
- Re-enter to the Backend
- Turn On Compilation
- Troubleshooting
- How to disable the new extension
- How to Install Free Extensions via Magento Connect
- Troubleshooting
- How to uninstall extensions with the help of Magento Connect Manager
- How to Install Magento Extension via SSH
- How to Install Magento Extension via Modman and Composer
- How to install Magento extensions via modman:
- How to install magento extension via Composer
How to Manually Install Magento Extensions via FTP (6 Universal Steps and Troubleshooting)
The below guide explains how to install Magento extensions avoiding Magento Connect. It also describes the most common problems of manual installation and shows how to fix them. Below in the article you will also find the description of installation via Magento Connect, but let’s start with 6 universal FTP steps:
- Turn off Compilation
- Turn on Cache
- Perform the Installation
- Refresh Cache
- Re-enter to the Backend
- Turn On Compilation
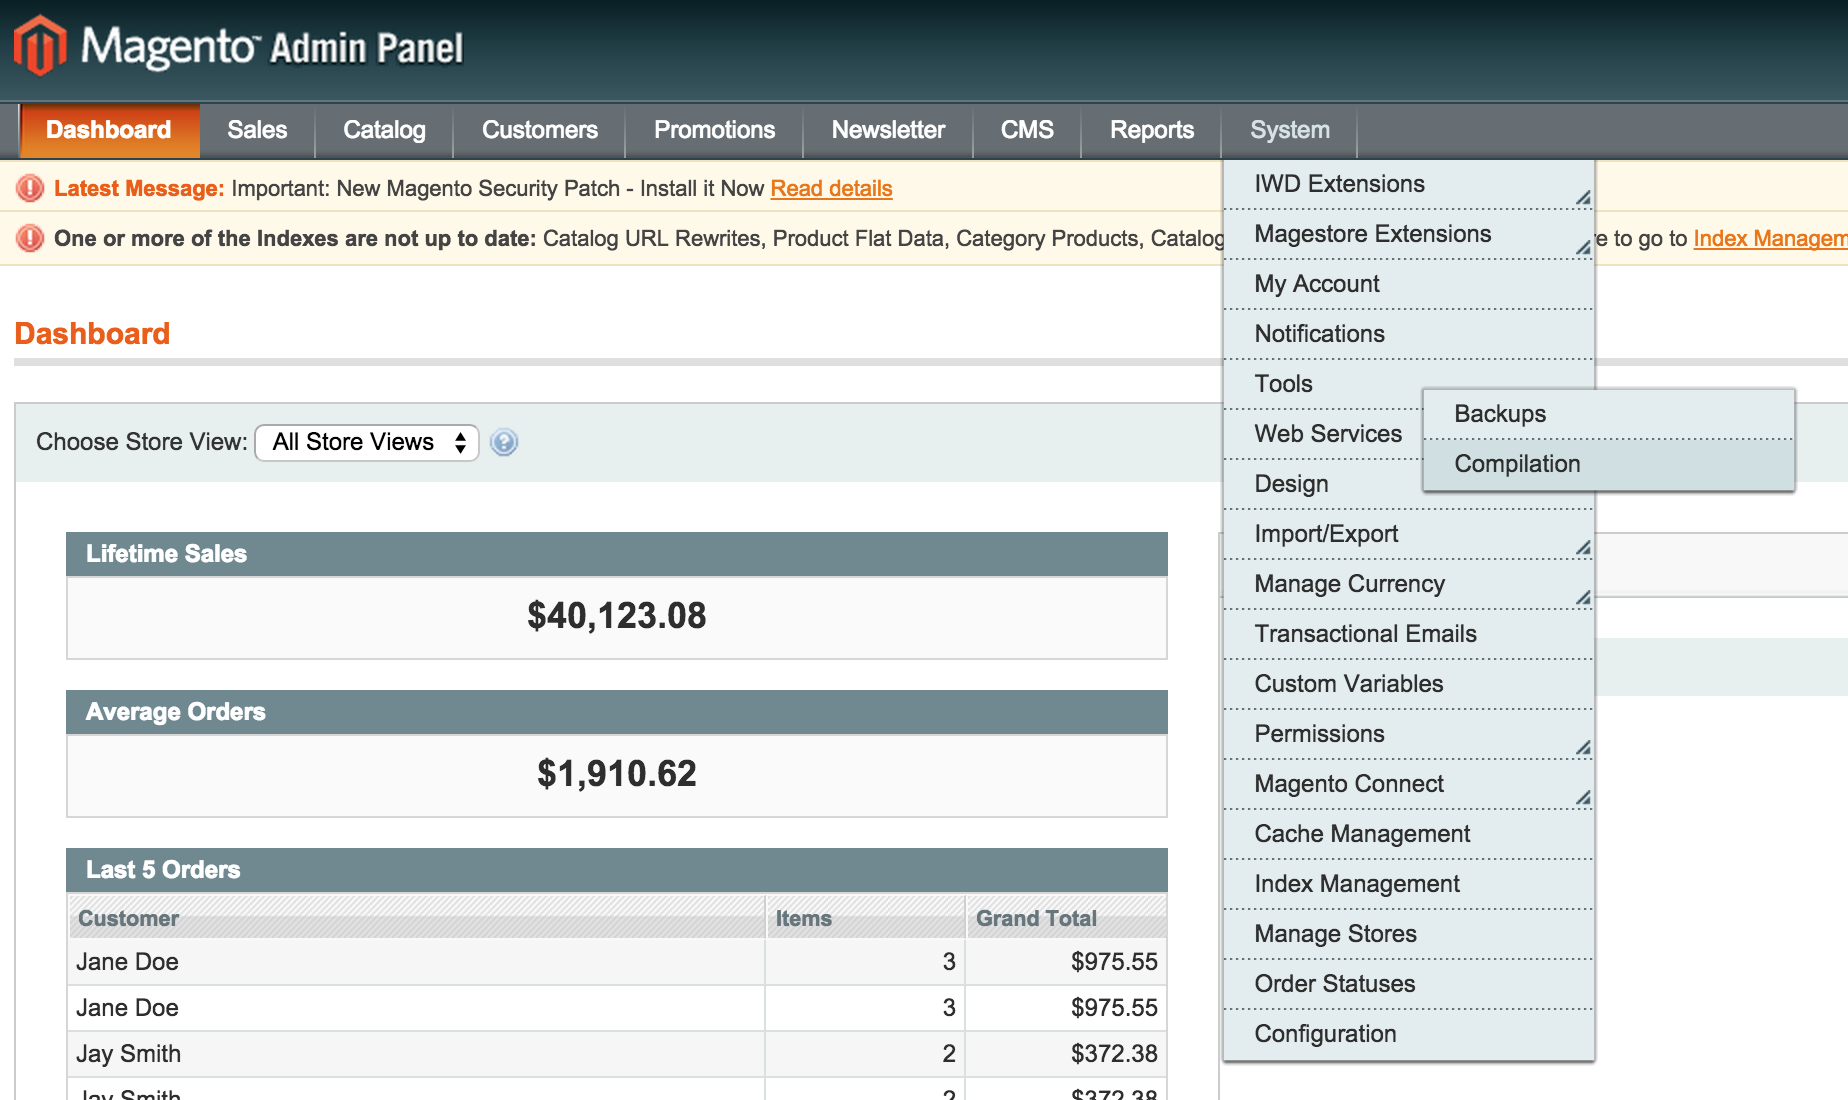
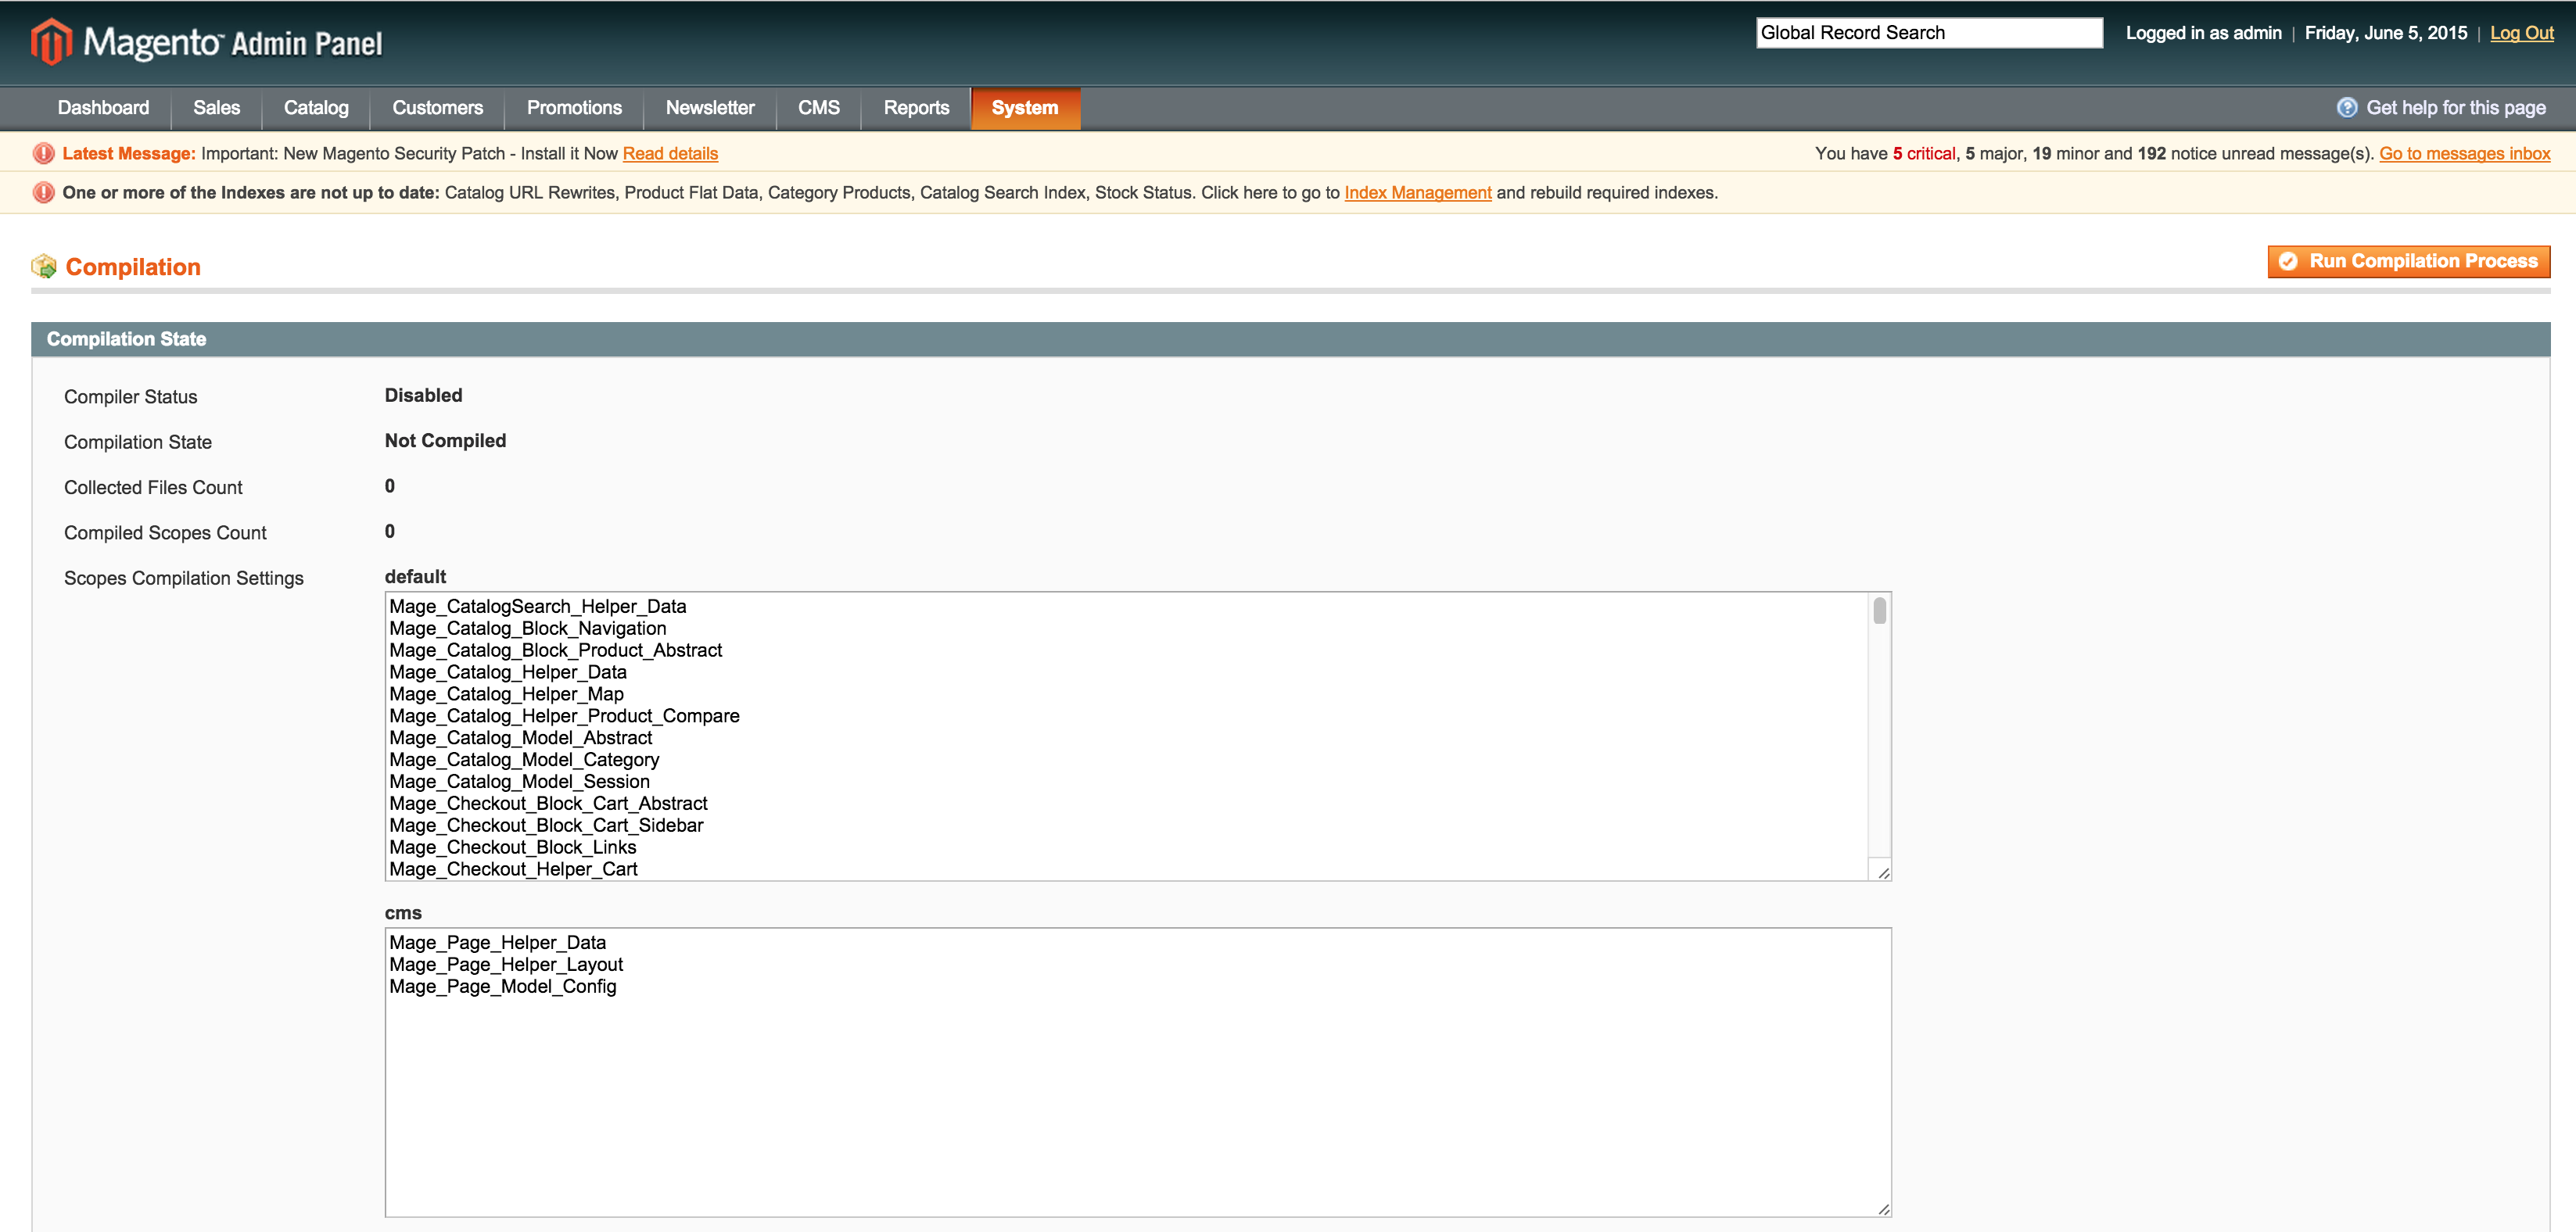
Turn off Compilation
If a compilation mode in your Magento is enabled, you have to turn it off. Otherwise, your e-commerce store and its admin would be inaccessible after you install an extension. To disable Magento compilation, go to System-Tools-Compilation.
If you prefer working with command line, you should use this equivalent:
|
1 |
php -f shell/compiler.php -- clear |
In addition, we recommend you to create backup of all Magento files. In a case when something goes wrong, you will be able to fix all problems with ease. You can also refresh the cache and check if your website works well. Don’t start the installation if there are issues with your ecommerce website.
Another optional step is a database backup. You should create it for additional safety purposes. You can take your website offline or keep it live. In a second case, it will be necessary to manually re-add orders done after you’ve created the backup.
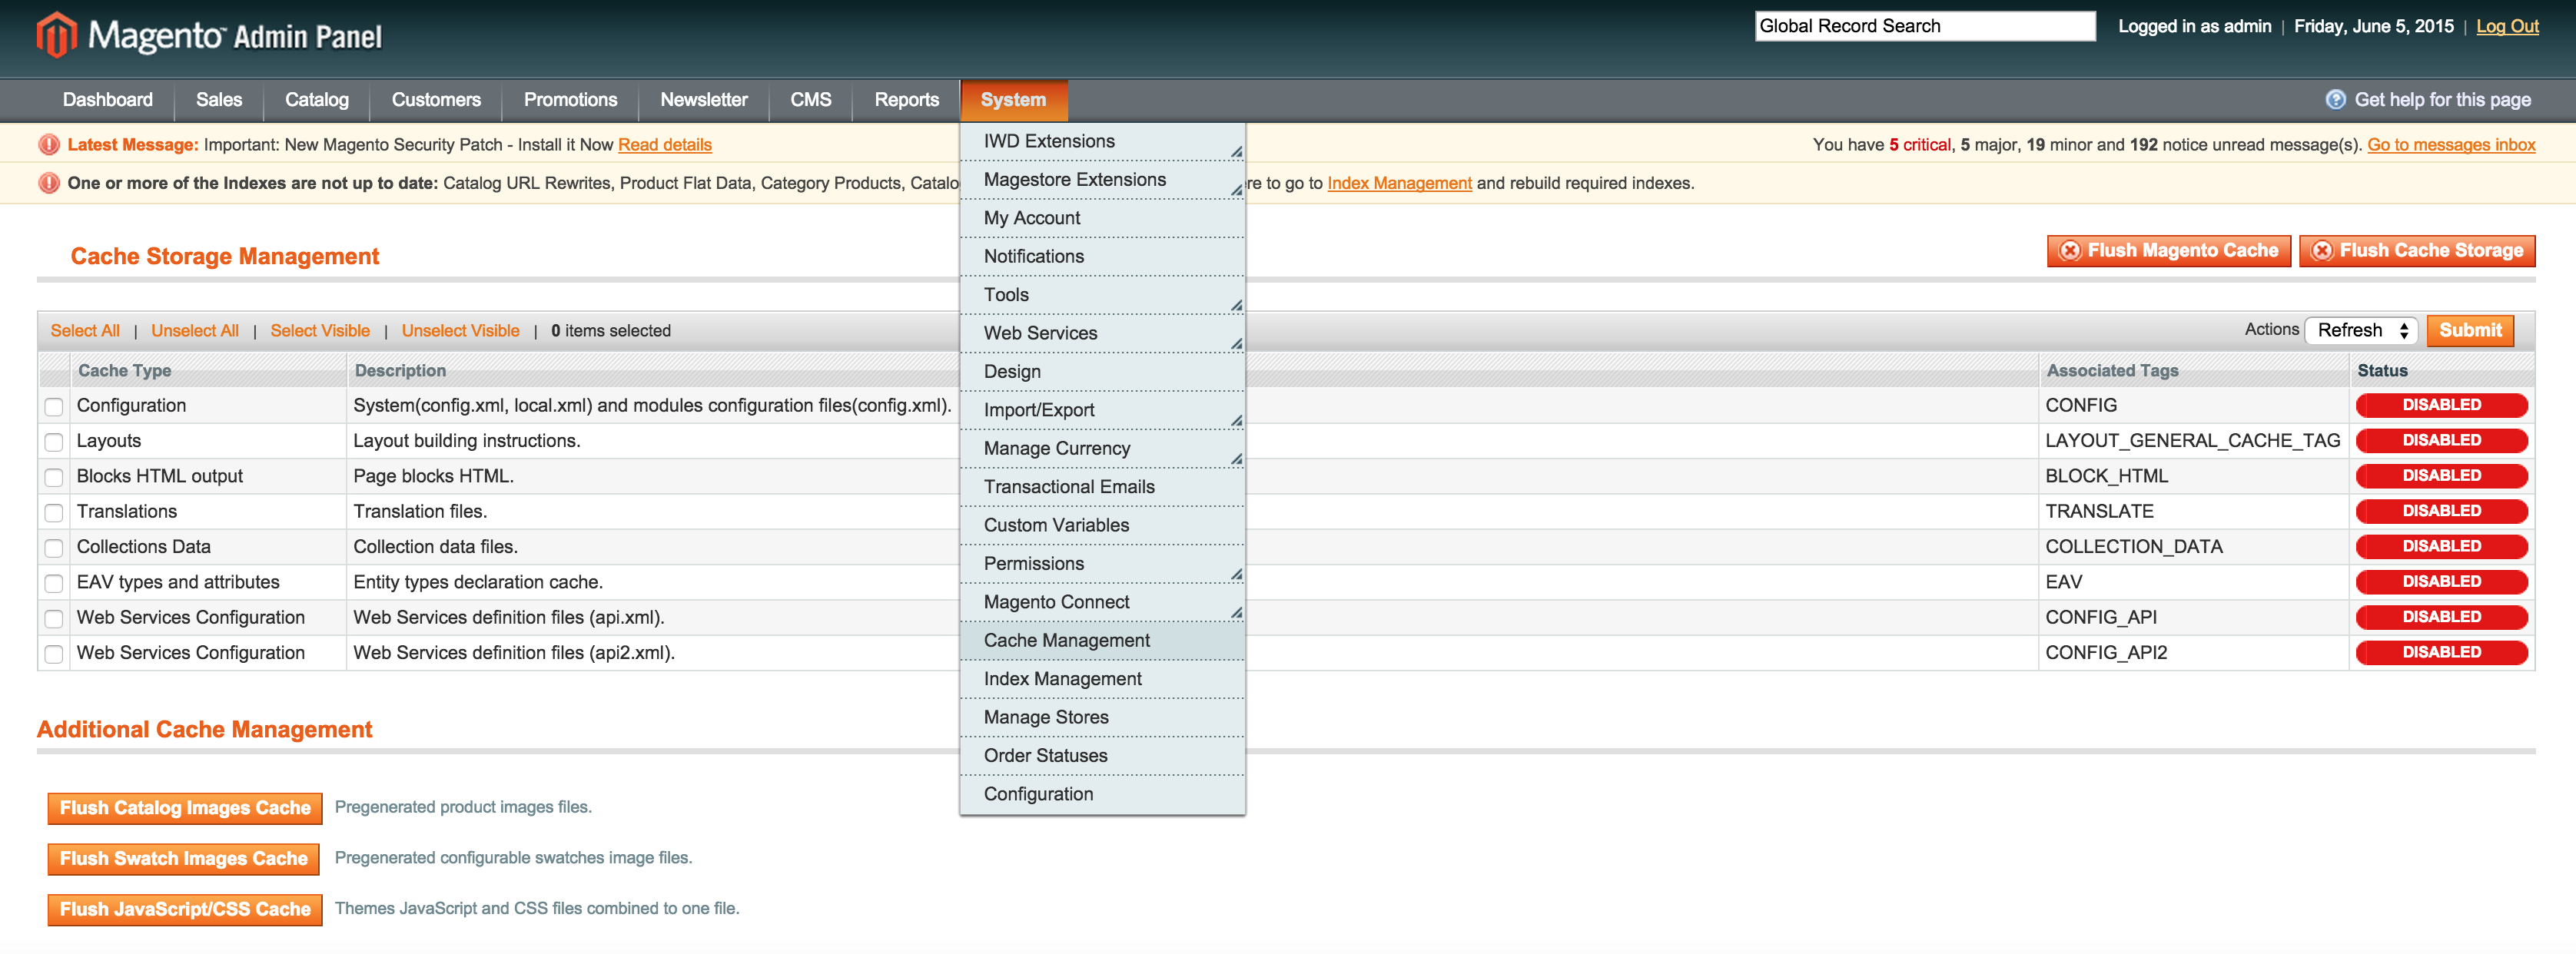
Turn on Cache
Now, you have to turn on configuration cache to prevent early installation, as it could be a reason of errors. Go to System-Cache Management.
Perform the Installation
When you’ve find the extension which is necessary for your ecommerce website, you have to read its installation instruction first. Thus, you will get the vital information important for a successful installation, so don’t ignore this advice.
Now when you know all the nuances, you should download the Magento extension and unzip it into a separate folder.
You have to upload the unzipped content to the server via SFTP or FTP. Connect to your Magento server; go to root directory; upload appropriate files to the root folder.
The root folder includes such subfolders as app, downloader, errors, etc.
One of the best free FTP tools
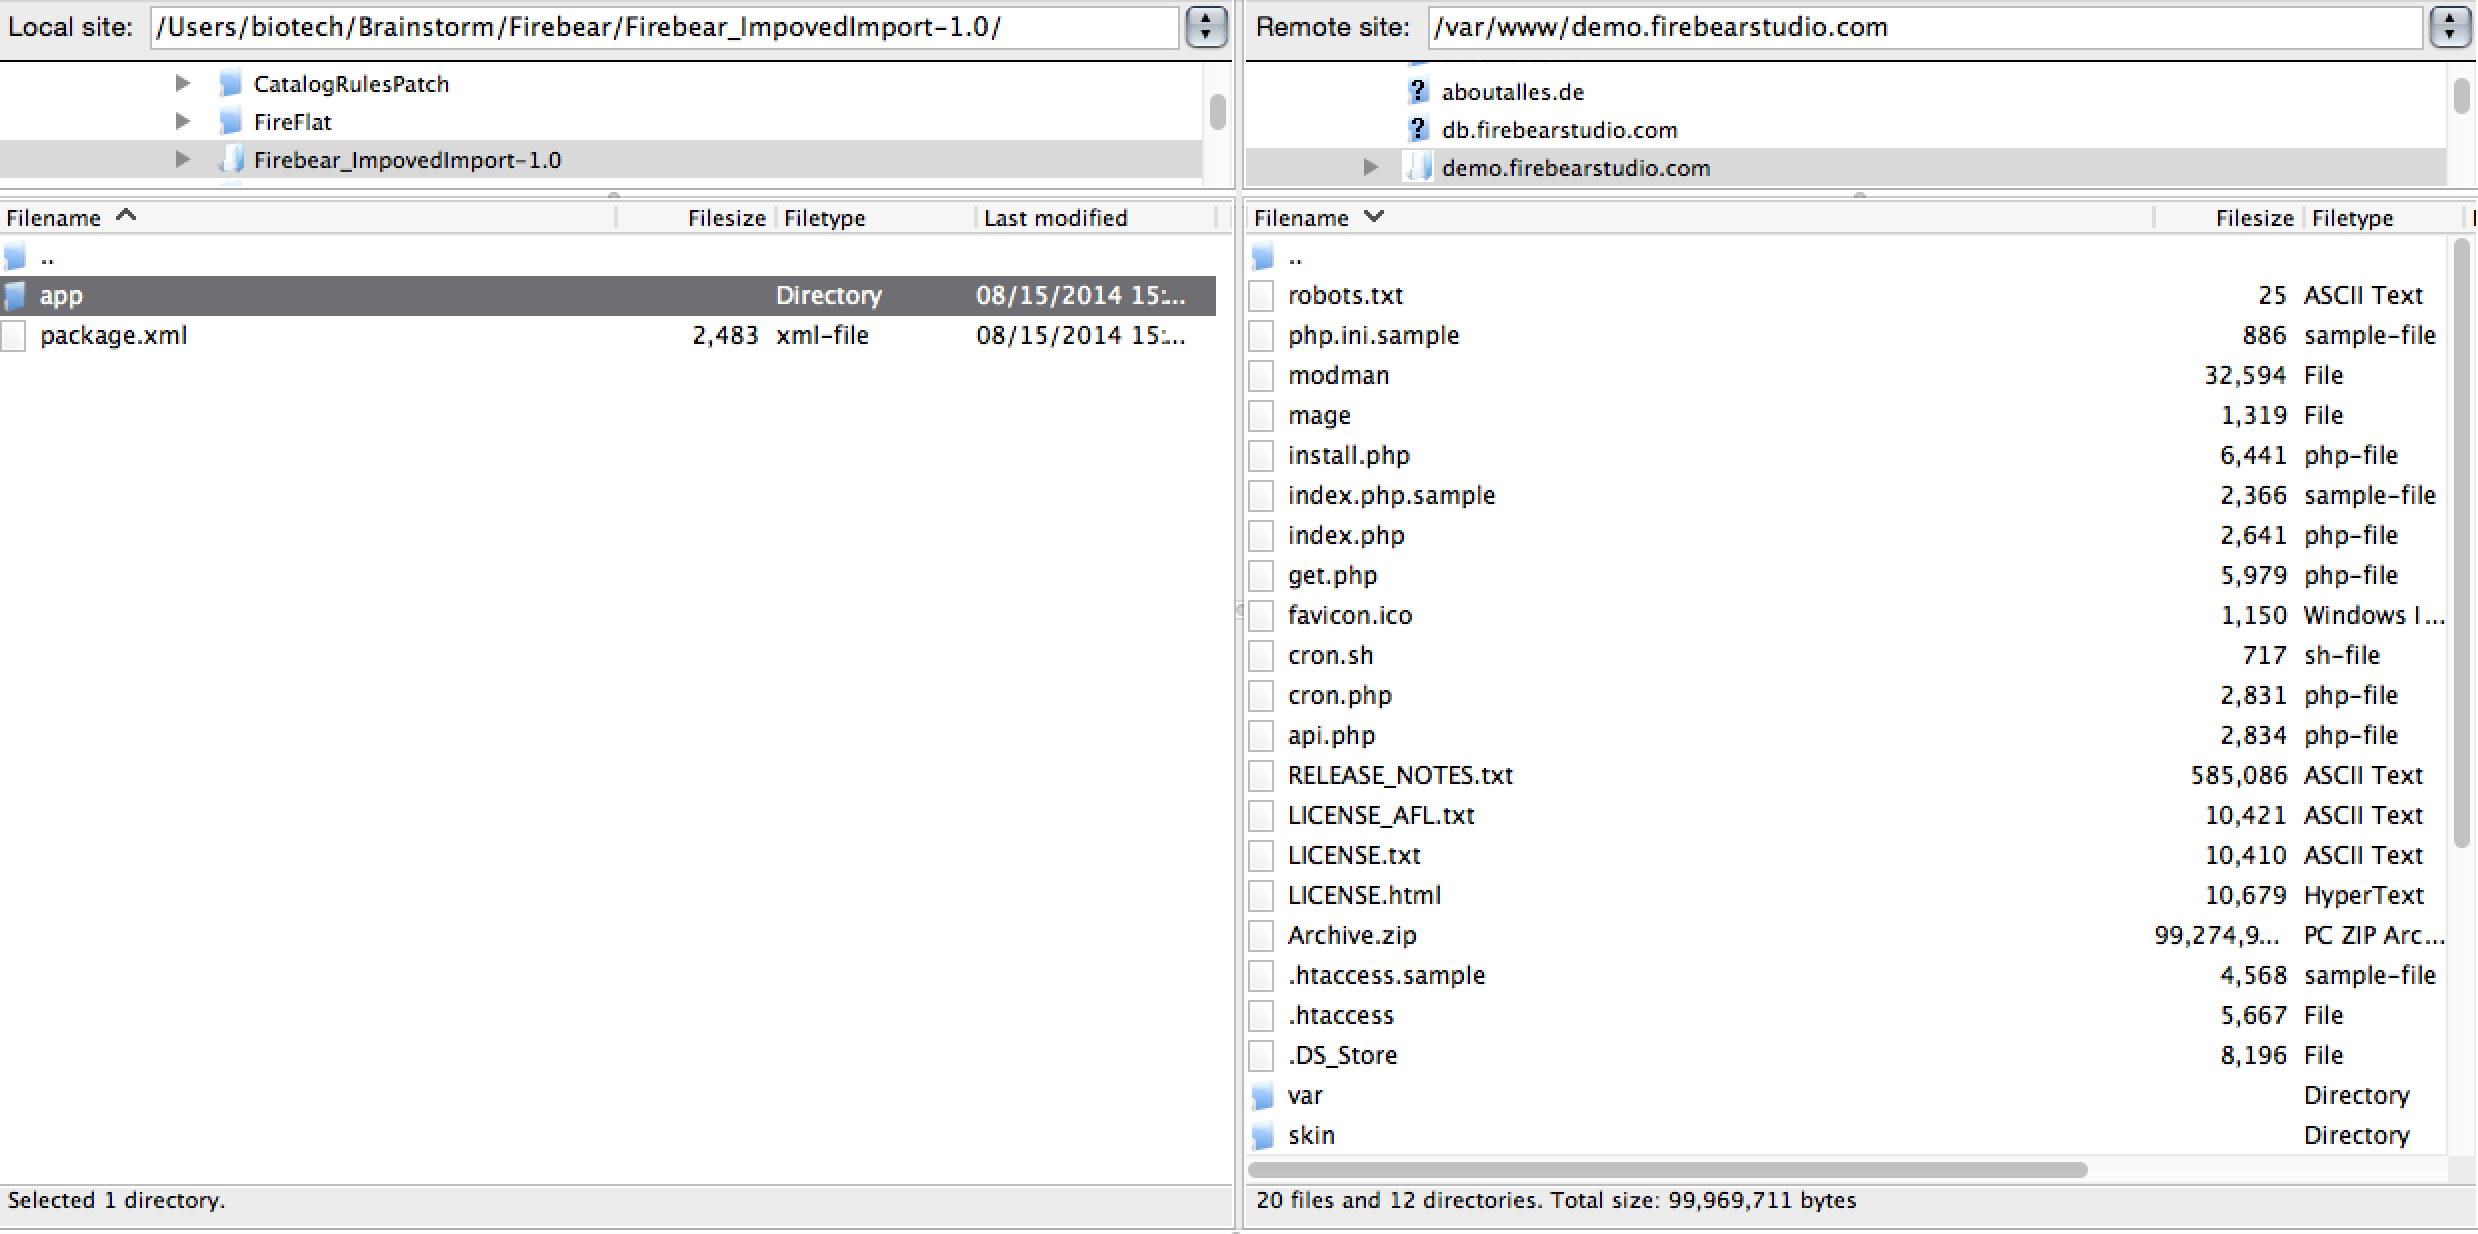
Note, that the uploaded files have to be readable by the webserver. It means that they should have the same permissions as the existing ones.
Refresh Cache
Now, you should again go to System-Cache Management and refresh Magento’s cache. This step is necessary for providing Magento with the ability to register a new extension.
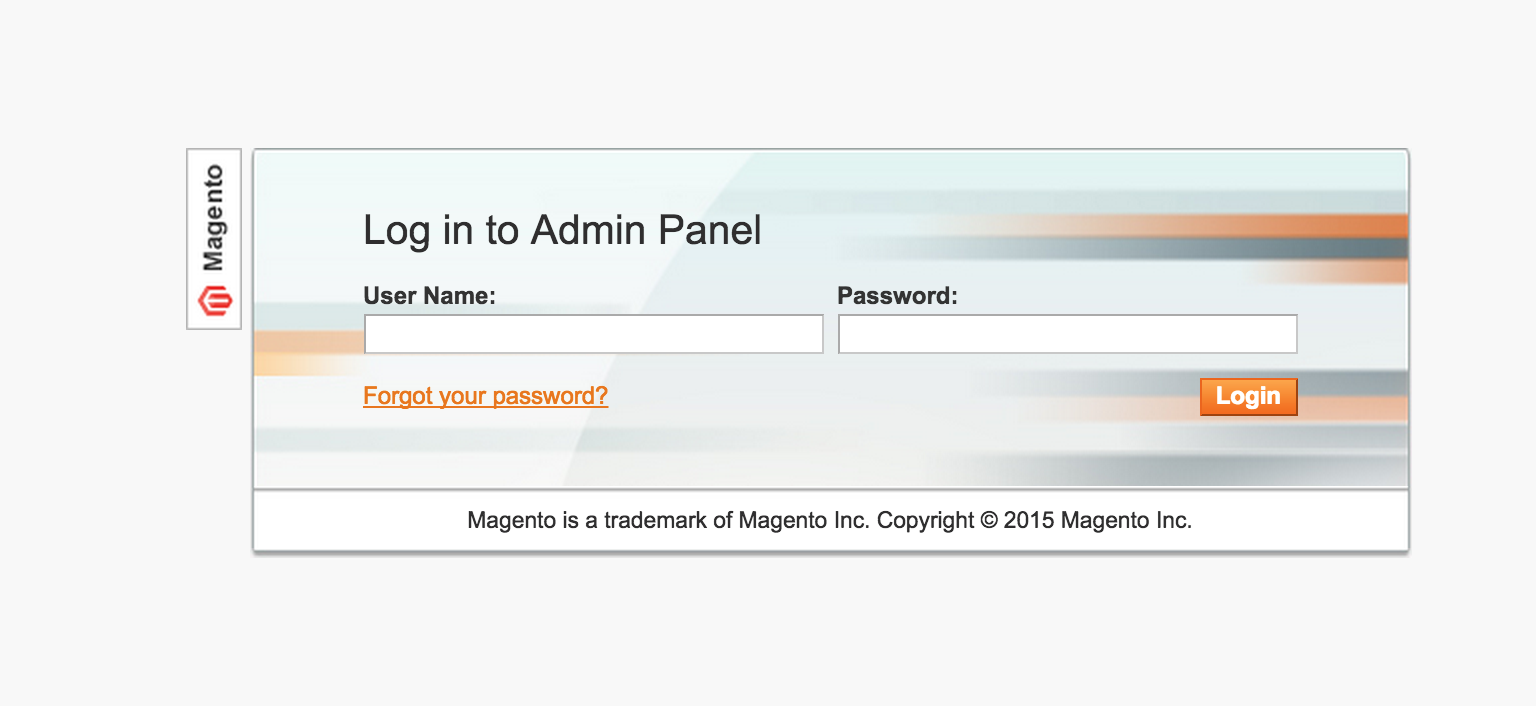
Re-enter to the Backend
To prevent an “Access Denied” error, you have to re-enter to the backend. Log in with a full administrator account to get the new permissions.
Now you have to check whether your ecommerce website works as always. If you’ve turned the store off, you should bring it online now.
Turn On Compilation
In a case you are using a compilation mode, which was previously disabled, you have to turn it on. Go to System-Tools-Compilation and hit the “Run Compilation Process” button.
You can also use a command line instead:
|
1 |
php -f shell/compiler.php -- compile |
Warning! In order to prevent potential conflicts, you have to install only one extension at a time.
Troubleshooting
Below we explain how to fix the most common errors related to Magento extension installation.
I did everything as described above but I can’t find the extension
Chances are, that Magento can’t read the NAME.xml file, which should be related to the module’s name or developer.
First of all check System-Configuration-Advanced-Disable Modules Output. If the extension is not there, you have 2 more tips.
Check the permissions of uploaded files once more – they should be readable by Magento.
Flush the cache and delete the contents of var/cache (in rare cases this content can be cached in tmp/ folder) .
The error page with reference number at the bottom occurs
This number corresponds to a file from the server. The file is situated in <MAGENTO_ROOT_FOLDER>/var/report/
To get more information about the error, you have to open this file. If files from includes/src folder are mentioned in a report, it’s likely that you’ve failed in the first step of the above guide. Now you will not have an access to your admin.
Luckily, you can fix the problem by by editing includes/config.php file. Change
|
1 |
define(‘COMPILER_INCLUDE_PATH’, dirname(__FILE__).DIRECTORY_SEPARATOR.’src’); |
to
|
1 |
#define(‘COMPILER_INCLUDE_PATH’, dirname(__FILE__).DIRECTORY_SEPARATOR.’src’); |
The Magento backend should be functional again, so you can rerun the compilation process as described in the sixth step above.
If this doesn’t help, contact the extension developer.
I’ve refreshed cache but there are still no new configuration options
Once again check if Magento can read the permissions of uploaded files.
Flush the cache and delete the contents of var/cache.
I see a white page after the installation
It’s a fatal error which occurred while the page was loading. You have to check the detail of this problem in server’s error log. It is often necessary to contact the extension developers with this log to fix the issue.
How to disable the new extension
- Go to app/etc/modules folder.
- Change filename ending – xml of <companyname>_<extensionname>.xml – to something like “off”.
- Refresh Magento cache: go to var/cache folder and delete its content.
You can always re-enable the extension by changing filename ending back to xml.
Note that Disable Modules Output option disables block output only, so uninstall extensions right.
How to Install Free Extensions via Magento Connect
Below we will show how to install free Magento modules via Magento Connect. For commercial extensions, you should use the previous guide.
Some specialists don’t recommend to use Magento Connect. Despite it is the easiest way to install the extension, there are several drawbacks:
- By using the same key at different installations, you can install the wrong version of the module;
- It is unsafe to use Magento Connect Downloader with 777 permission;
- You don’t have any chances to inspect the code;
- By using Magento Connect Manager you can accidentally trigger an upgrade of the Magento core.
If these aspects didn’t stop you, then you should check the below steps:
- Go to the profile of prefered extension.
- Check the supported versions of the platform.
- Select your platform (e.g. Community).
- Hit the “Install Now” button.

- Choose the Magento Connect channel: 1.0 for Magento CE 1.4.x and below; 2.0 for Magento CE 1.4.2.0 beta; CE 1.5+; EE 1.9.0.0-RC2+.
- Don’t forget to check the box of license agreement.
- Get Extension Key.
- Copy the key by clicking “Select Key”.
- Log into Admin of your Magento.
- Go to System-Magento Connect-Magento Connect Manager
- Paste the Key into the appropriate field.
- Click “Install”.
- Now you can cancel or proceed the installation.
- Click “Proceed”
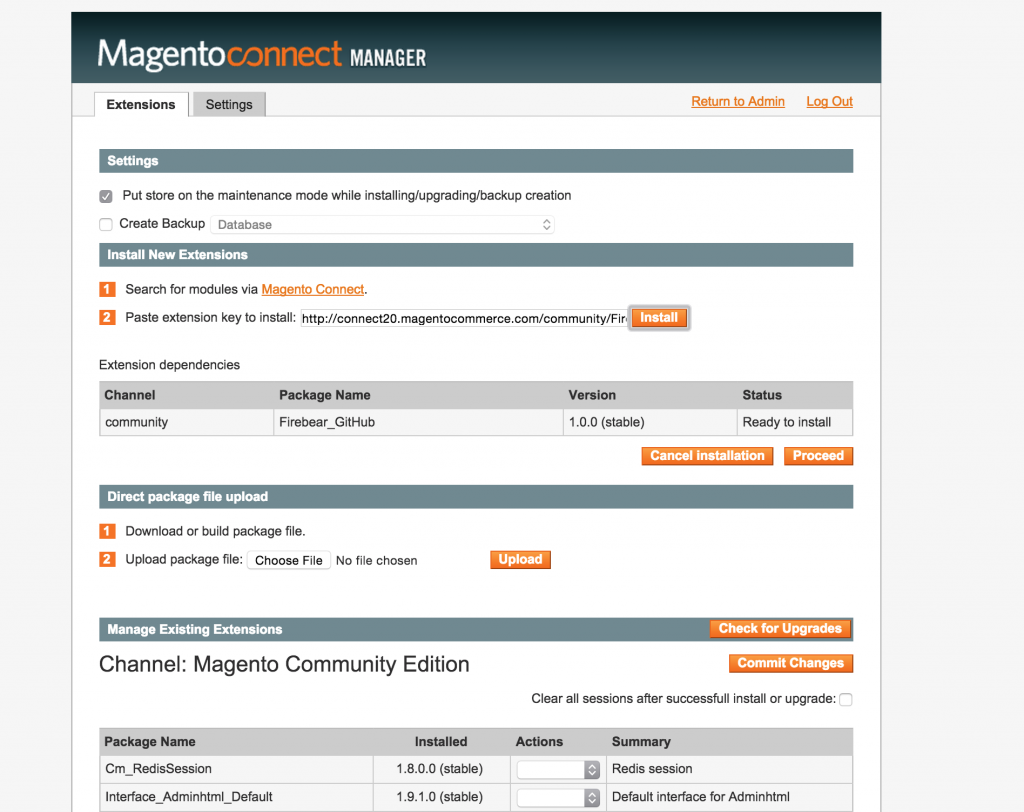
- The Console Box will appear. It shows the installation process and displays issues (if there are any).
- Hit “Refresh” button to finish the installation.


Troubleshooting
If there are any troubles with Magento Connect Manager installation, you should check if the correct extension key was used. Another discrepancy factor is stability. It is impossible to install beta extension if your system is set to “Stable”. This is how you should change the stability settings on Manager:
- Go to admin panel and choose System-Configuration.
- Enter your Magento Connect account.
- Hit Settings.
- Choose the necessary state from the pull-down menu.
- You can select between stable, alpha or beta.
- Click “Save”.
Check for other issues and their troubleshooting.
How to uninstall extensions with the help of Magento Connect Manager
- Open Magento Connect Manager.
- Go to Manage Existing Connections section.
- Choose the extension.
- Choose “Uninstall” from drop down menu under the Actions column.
- Hit the “Commit Changes” button.
- End the process with the help of “Refresh”.
How to Install Magento Extension via SSH
Another installation method is based on the use of SSH:
- Go to the directory with the installed Magento.
- Run these commands:
|
1 2 3 4 5 6 7 |
chmod +x mage ./mage mage-setup . ./mage config-set preferred_state stable ./mage install http://connect20.magentocommerce.com/REPO PACKAGE_NAME |
Note, that you should replace REPO and PACKAGE_NAME with the values related to your extension.
For Magento 1.4.x or earlier use the below commands:
|
1 2 3 4 5 6 7 |
chmod +x pear ./pear mage-setup . ./pear config-set preferred_state stable ./pear install EXTENSION_KEY |
Note, that you should change EXTENSION_KEY with the new value related to your extension.
Warning! It is important to install core Magento extensions for Magento 1.4.x or earlier versions of the platform. Otherwise, Magento will upgrade your ecommerce website to the latest version. You can check if core Magento extensions are installed on Magento Connect – log in to get the information.
How to Install Magento Extension via Modman and Composer
If there is a modman file in the module’s root folder, you can install it with the help of script. It parses the modman configuration file and creates symlinks to your module from the location inside Magento directory structure. As a result, your extensions and the core are separated. Thus, you can use different VCS locations to manage the modules and the core. It is also possible to reuse generic modules across project with the help of this installation method. Additionally, you can utilize Magento modules directly from the original source. Moreover, modman installation simplifies the update of modules and the core. And there is even a better uninstallation, as you just have to delete the appropriate folder inside the .modman directory.
To use modman go to System-Configuration-Advanced-Developer and enable symlinks (Allow Symlinks).
How to install Magento extensions via modman:
- Go to Magento root directory and create a .modman folder, such as htdocs. You can even create it next to the Magento root directory outside the web root, but a .basedir file inside .modman folder will be required. This file should contain the path to the Magento root directory. The directory structure looks like the following one:
|
1 2 3 4 5 6 7 8 9 10 |
/var/www/magento/ .modman/ .basedir (<- contains "htdocs") ModuleA/ ModuleB/ ... htdocs/ index.php app/ ... |
- Now you have to clone the repository of the module:
|
1 2 |
cd /var/www/magento/.modman git clone https://github.com/AOEpeople/Aoe_Scheduler.git Aoe_Scheduler |
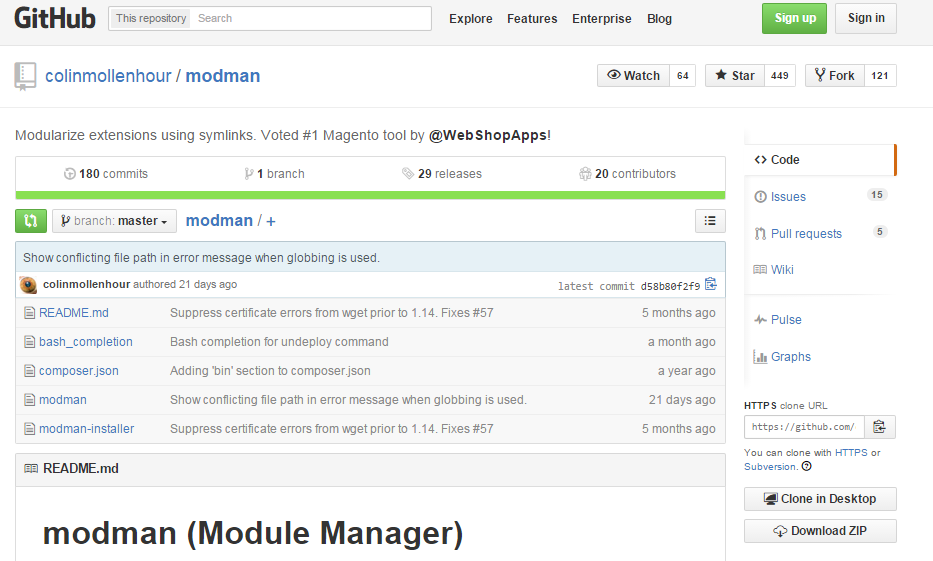
- It’s time to download modman:
|
1 2 |
wget https://raw.githubusercontent.com/colinmollenhour/modman/master/modman -O /var/www/magento/modman chmod +x /var/www/magento/modman |
- Now you can run the modman script
|
1 2 |
cd /var/www/magento modman deploy-all |
How to install magento extension via Composer
became the one ot the best ways of connecting Magento modules to Magento. Hit to find out how to install it. You can also use as well as

AOEpeople is a replacement for the Hackathon Composer, as it works with Magento modules which include a composer.json file with a reference to the Hackathon.
|
1 2 3 4 5 6 7 |
{ ... "require": { "magento-hackathon/magento-composer-installer": "*" }, ... } |
- Unfortunately, you should use the original modman script to parse modman files, since AOEpeople will not deal with this process.
- Сreate a composer.json file in youк project root folder.
- Register Composer on packagist.org.
- To let the Composer work with repository, add the below lines to composer.json file:
|
1 2 3 4 5 6 7 8 9 10 |
{ ... "repositories": [ { "type": "composer", "url": "http://packages.firegento.com" } ], ... } |
Add custom sources:
|
1 2 3 4 5 6 7 8 9 10 11 12 13 14 15 16 17 |
{ ... "require": { ... "aoepeople/aoe_scheduler": "*", ... }, "repositories": [ ... { "type": "vcs", "url": "https://github.com/AOEpeople/Aoe_Scheduler.git" }, ... ], ... } |
Add the following lines to use the AOEpeople instead of Hackathon:
|
1 2 3 4 5 6 7 8 9 10 11 12 13 14 15 16 17 18 19 20 21 |
{ ... "require": { "aoepeople/composer-installers": "*", "aoepeople/aoe_scheduler": "...", ... }, "repositories": [ ... { "type": "vcs", "url": "https://github.com/AOEpeople/composer-installers.git" }, { "type": "vcs", "url": "https://github.com/AOEpeople/Aoe_Scheduler.git" }, ... ], ... } |
When you have the composer.json file in a project root directory, Composer should download it:
|
1 |
composer.phar install |
The module are in the .modman folder now. With the Magento core in htdocs, you should run modman to generate the symlinks:
|
1 |
modman deploy-all |
Congratulations! Now you know how to install Magento modules via modman and Composer.
Related posts
 Magento to Shopify Migration – The Ultimate Guide
 Magento to Shopify Product Migration: Complete 2025 Guide to Import & Export
 How to Edit Products in Shopify: Step-by-Step Guide for Individual and Bulk Updates
 Shopware Pricing Guide: How to Manage & Import Advanced Prices in Shopware 6
 Mastering Shopify Collabs: Guide to Platform’s Influencer Marketing Tool
 Best AI Tools for 2025: Ultimate Guide to Paid & Free AI Tools for Copywriting, SEO & Marketing
 How to Remove “Powered by Shopify”: Say Goodbye to the Tagline for a Polished Look
 Shopify PHP Data Transformation on Import: Automate Price, Inventory, and Other Adjustments with Custom Scripts