
Complete Magento 2 Tax Configuration Guide: Add, Import & Export Tax Classes and Rules
Configuring taxes correctly in Magento 2 is critical for maintaining compliance, building customer trust, and ensuring accurate pricing across your store. In this comprehensive guide to Magento 2 tax configuration, we’ll walk you through everything you need to know — from setting up tax classes and tax rules to leveraging automation for importing and exporting tax data.
You’ll discover how the Estimate Shipping and Tax feature works in Magento 2 and how it affects the shopping experience. We’ll also explain how to add new tax classes for products and shipping, configure Magento 2 tax rules, and ensure your tax calculation settings are accurate for any region or customer group.
Beyond manual setup, we’ll show you how to import and export Magento 2 tax rates using a properly structured CSV file — a must for multi-store setups, regional tax updates, or migrating from Magento 1. To help streamline this process, we’ll introduce a powerful third-party extension that automates tax class imports, improves flexibility, and reduces configuration errors.
Whether you’re launching a new store or optimizing an existing one, this guide will give you the tools to handle Magento tax calculation confidently and efficiently.

Table of contents
- Why Magento 2 Tax Configuration Matters
- Overview of Magento 2 Tax Calculation Process
- Magento 2 Tax Classes Explained (with Examples)
- What Is the Magento 2 Estimate Shipping and Tax Panel?
- Step-by-Step Magento 2 Tax Configuration
- Magento 2 Tax Rate Import & Export
- Troubleshooting Common Magento Tax Issues
- Final Words: Master Your Magento 2 Tax Configuration — and Beyond
- Magento 2 Tax Configuration FAQ
Why Magento 2 Tax Configuration Matters
Getting your Magento 2 tax configuration right is more than just ticking off a technical requirement — it’s a cornerstone of running a compliant, customer-friendly, and scalable e-commerce operation.
Taxes affect nearly every transaction in your store. If your Magento tax calculation is inaccurate or incomplete, it can lead to overcharging customers, losing trust, or even facing penalties for non-compliance. That’s why it’s essential to configure tax settings that accurately reflect your business model, products, and regional tax obligations.
At the heart of this setup are Magento 2 tax classes and tax rules. These components determine how taxes are applied based on product types, customer groups, shipping regions, and more. For example, some products might be exempt from tax, while others may carry different rates depending on the destination country or state.
An optimized tax configuration ensures:
- Transparent pricing at checkout
- Seamless international transactions
- Fewer abandoned carts due to unexpected charges
- Reliable financial reporting and accounting
In short, configuring your taxes properly is not just about legal compliance — it’s also a key part of delivering a consistent and trustworthy shopping experience that scales with your business.
Overview of Magento 2 Tax Calculation Process
Understanding how Magento 2 tax calculation works is crucial for setting up accurate pricing and ensuring compliance with regional tax laws. Magento’s tax engine is flexible and powerful, but only if properly configured.
At the core of the Magento tax calculation process are several key components that work together:
- Product Tax Class – Defines how a specific product should be taxed. For example, physical goods may be standard-rated while digital products or books could be tax-exempt depending on your location.
- Customer Tax Class – Groups customers based on how they’re taxed, such as retail customers, wholesalers, or non-taxable entities.
- Shipping Tax Class – Allows you to apply tax to shipping based on shipping origin, billing address, or shipping destination.
- Tax Zones and Rates – Determine the applicable tax rate based on customer location. You can configure multiple zones for country/state-level precision.
- Tax Rules – Link together product tax classes, customer tax classes, and tax zones to determine the final tax applied to each transaction.
Magento calculates tax dynamically based on the interaction of these elements. For example, if a retail customer purchases a product with a standard Magento product tax class and ships it to a taxable zone, the system will automatically apply the correct rate.
You also have the flexibility to display prices:
- Including tax – Useful for regions like the EU, where tax-inclusive pricing is common.
- Excluding tax – More typical in North America.
- Or both, based on customer group or store view.
And don’t forget shipping — Magento tax class for shipping ensures that delivery costs are taxed correctly too, which is especially important in jurisdictions where shipping is taxable.
Magento 2 Tax Classes Explained (with Examples)
In Magento 2, tax classes are the building blocks of your store’s tax logic. They define how different products and customers are taxed, and they directly interact with your tax rules to determine the correct rate at checkout.
There are three main types of Magento 2 tax classes:
| Tax Class Type | Description | Example Use Case |
| Product Tax Class | Assigned to products to define how they should be taxed. | Standard goods, reduced VAT, tax-exempt items |
| Customer Tax Class | Assigned to customer groups to define how they should be taxed. | Retail customers, wholesalers, nonprofits |
| Shipping Tax Class | Used to apply tax to shipping rates, if required by region. | Taxable shipping fees in the US or EU countries |
Product Tax Class Example
Suppose you sell both electronics and eBooks. Electronics may use a standard Magento product tax class with a 20% VAT rate, while eBooks could be assigned a reduced or zero-rated class depending on regional laws.
Customer Tax Class Example
A Magento 2 customer tax class allows you to treat B2B and B2C transactions differently. For instance, retail customers may be taxed normally, while a verified reseller (wholesaler) may be tax-exempt.
How Tax Classes Tie into Tax Rules
Tax rules connect the dots. They combine:
- A product tax class
- A customer tax class
- A tax rate (based on a geographic zone)
For example, a “Retail Tax Rule” could apply a 20% VAT when a product with the “Standard” product class is purchased by a customer with the “Retail” class and shipped to the UK.
Proper use of Magento 2 tax classes simplifies complex tax scenarios, especially for stores that operate across multiple regions or serve both retail and wholesale clients.
What Is the Magento 2 Estimate Shipping and Tax Panel?
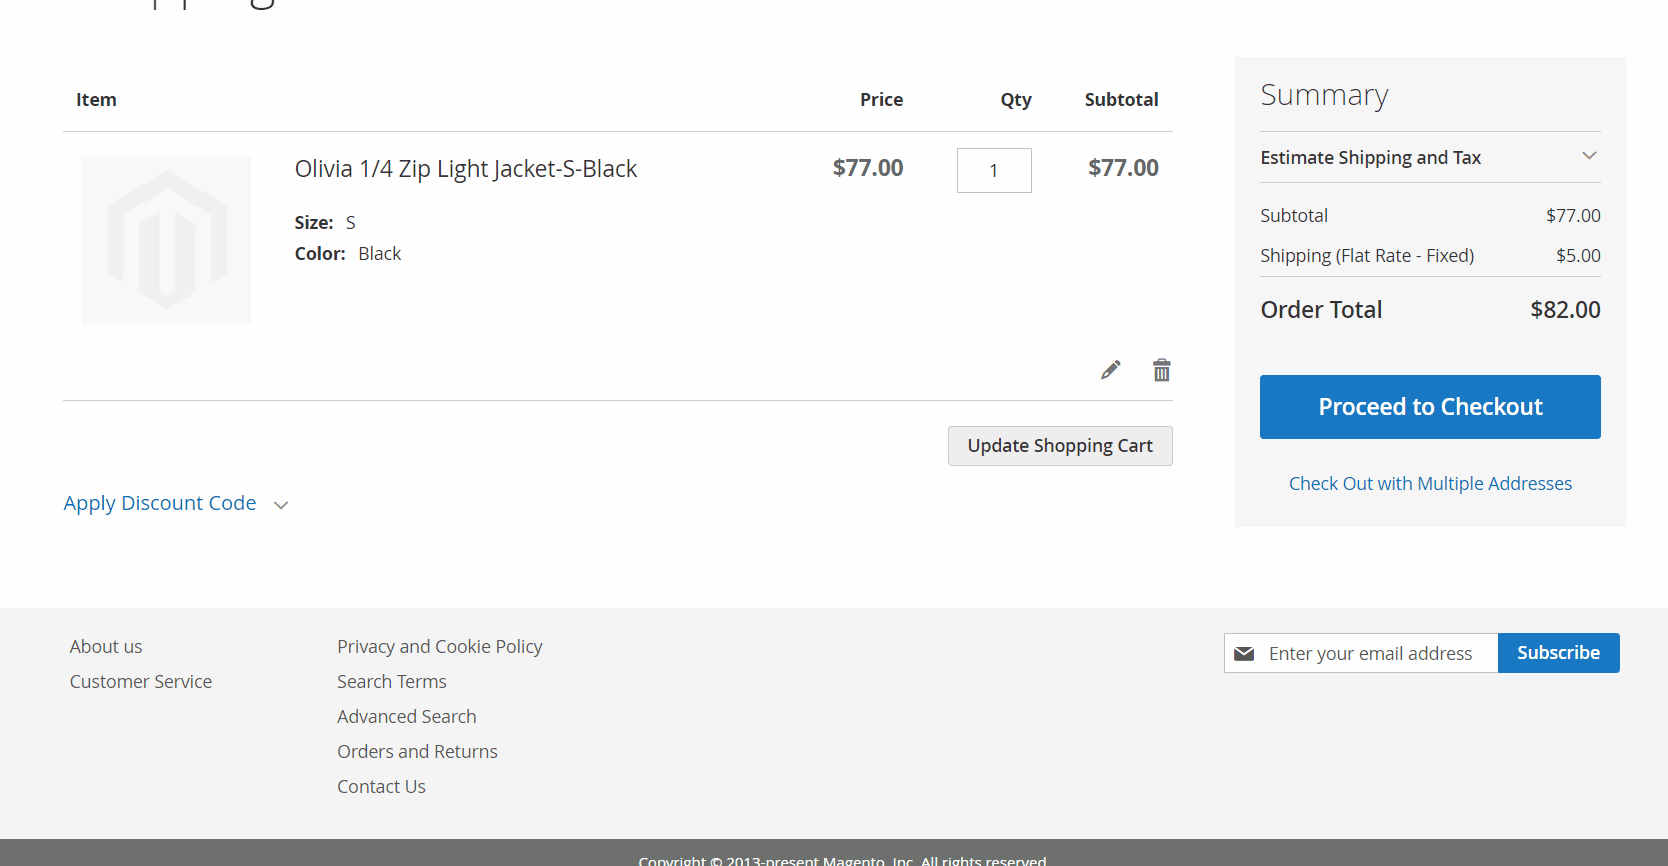
Before reaching the checkout, your customers often want a clear picture of what their final total will be — and that includes taxes and shipping. That’s where the Magento 2 Estimate Shipping and Tax panel comes into play. Found right on the shopping cart page, this feature helps deliver pricing transparency and improves the overall shopping experience.
The panel allows customers to calculate estimated tax and shipping costs based on their location, even before entering the full checkout process. It’s especially useful for stores with variable tax rates by region or those that ship internationally.
Here’s how the Estimate Shipping and Tax feature works in Magento 2:
- The customer adds a product to the cart.
- On the cart page, they click the Estimate Shipping and Tax link within the order summary block.
- A dropdown panel appears where the customer selects their country, state/province, and ZIP/postal code.
- Magento uses this information to apply the appropriate Magento tax calculation rules and display estimated costs for both tax and shipping.
- The displayed estimate updates dynamically, giving the customer confidence in the final price.
Behind the scenes, this functionality is powered by the store’s Magento 2 tax configuration, including tax zones, rates, and rules. The system checks the customer’s selected region against your configured tax classes and applies the appropriate rules — whether that’s a standard sales tax, VAT, or a location-specific exemption.
Whether you’re dealing with complex international tax structures or regional shipping taxes, this feature helps reduce cart abandonment by eliminating surprises at checkout. And when paired with proper Magento product tax class and shipping tax class setup, it ensures your store delivers accurate, region-aware pricing from the start.
Step-by-Step Magento 2 Tax Configuration
To ensure your store applies taxes correctly and automatically, you need to configure tax classes and rules accurately. Let’s walk through this process step by step.
How Magento 2 Uses Tax Classes
In Magento 2, tax classes define how taxes apply to products, customers, and shipping charges. These tax classes are then assigned to tax rules, which drive Magento 2 tax calculation at checkout. Here’s how they work together:
- Customer Tax Class: You can create multiple classes and assign them to customer groups — for example, Retail, Wholesale, or Tax-Exempt.
- Product Tax Class: Each product can be assigned a class that determines its tax treatment, such as Standard, Reduced, or None.
- Shipping Tax Class: Magento allows you to apply tax to shipping based on shipping origin, billing address, or shipping destination using a Magento tax class for shipping.
The combination of these three elements determines how taxes are calculated per transaction. If any part is misconfigured, your Magento tax calculation can produce errors, resulting in incorrect totals or compliance issues.
How to Add a Magento 2 Tax Class
Magento lets you define custom tax classes directly from the admin. To create or assign Magento 2 tax classes, follow these steps:
- Navigate to Admin > Stores > Settings > Configuration.
- In the left panel, expand the Sales tab and choose Tax.
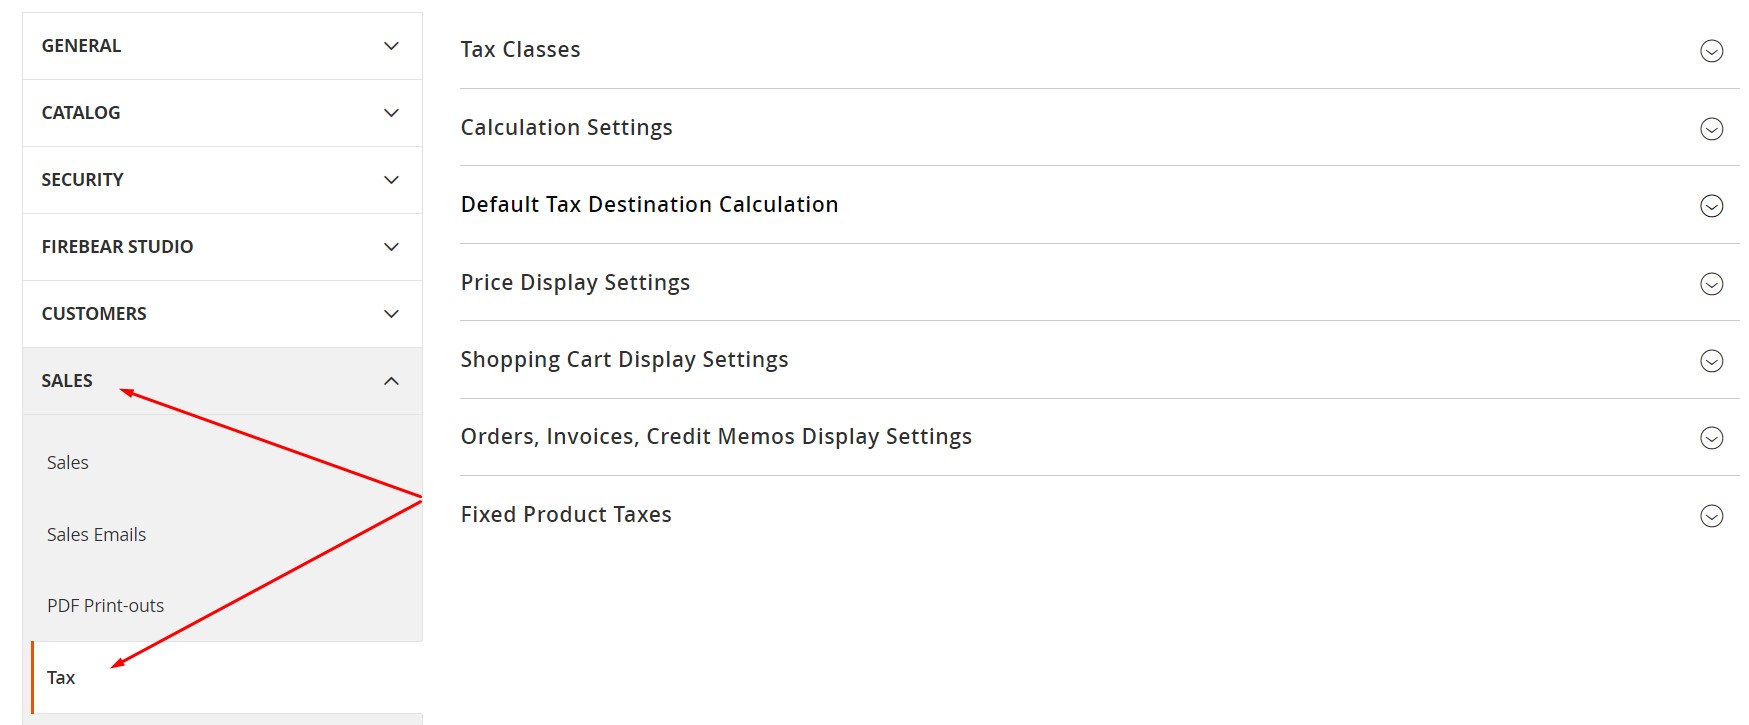
- Expand the Tax Classes section at the top.
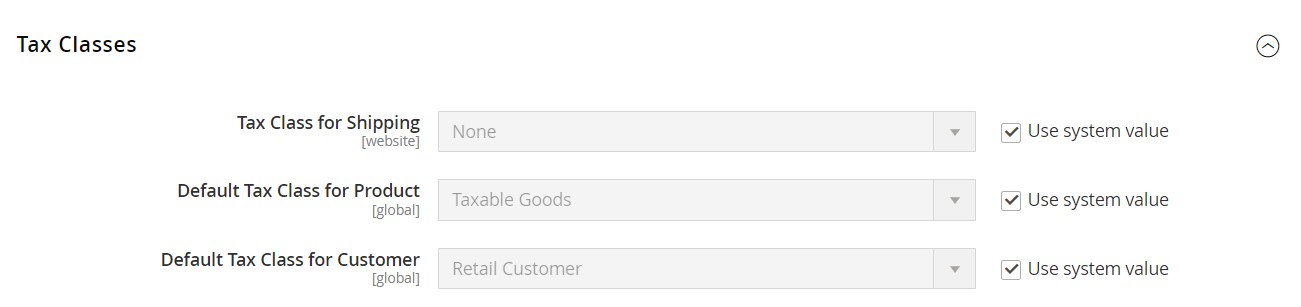
- Here, you’ll find options to assign or create:
- Tax Class for Shipping
- Default Tax Class for Product
- Default Tax Class for Customer
- Disable “Use system value” if needed, select or add your desired classes, and click Save Config.
💡 You can also add a tax class in Magento 2 dynamically when creating tax rules — more on that below.
How to Create Magento 2 Tax Rules
Tax rules act as the glue between your tax classes and region-based tax rates. You can create them through the admin interface by doing the following:
- Go to Stores > Taxes > Tax Rules.
- Click Add New Tax Rule.
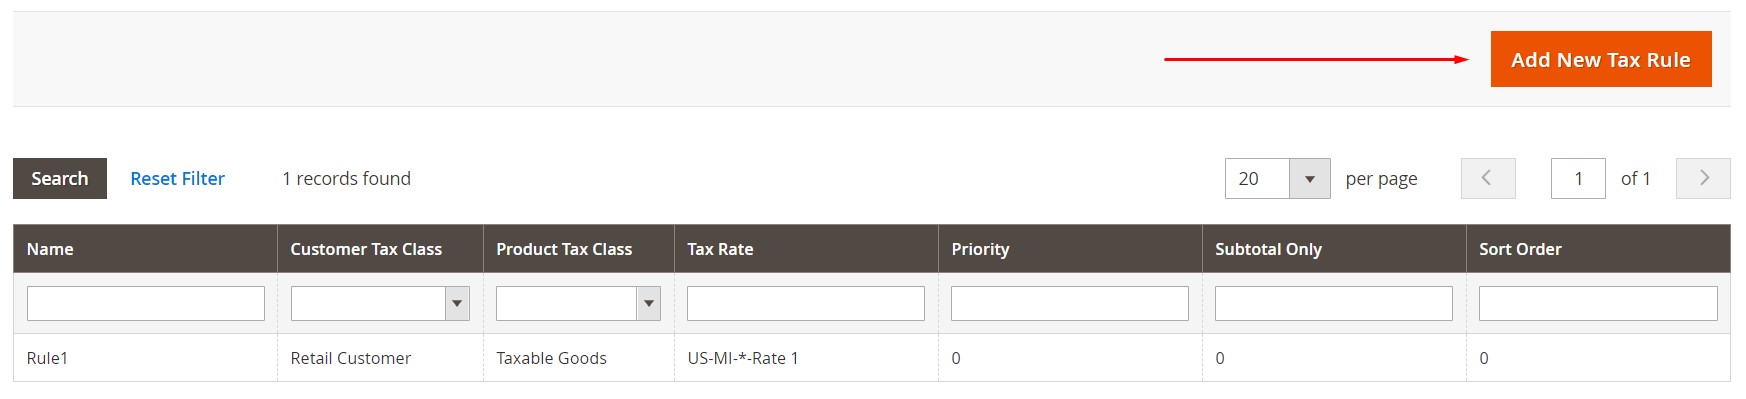
- Enter a name for your rule.
- Select a tax rate.
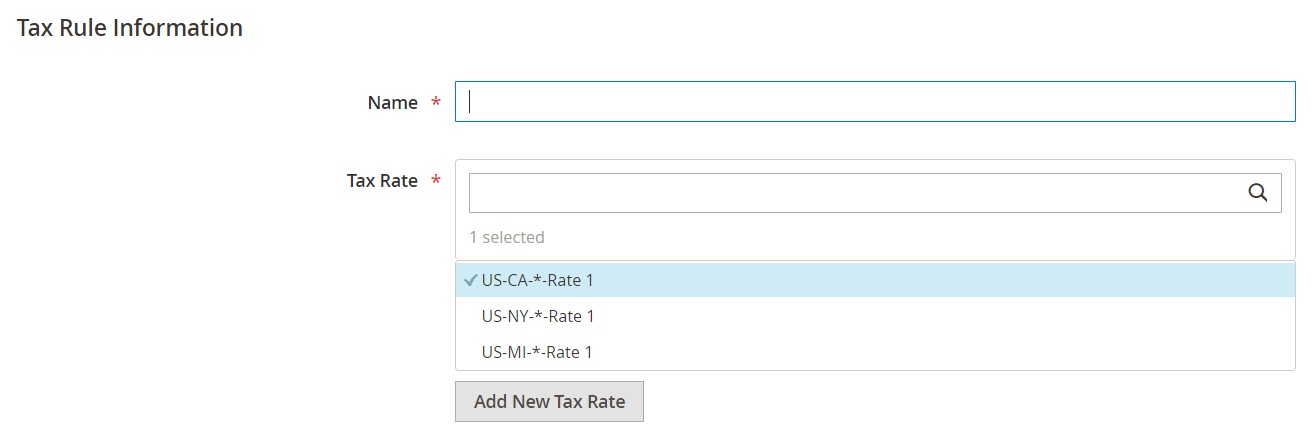
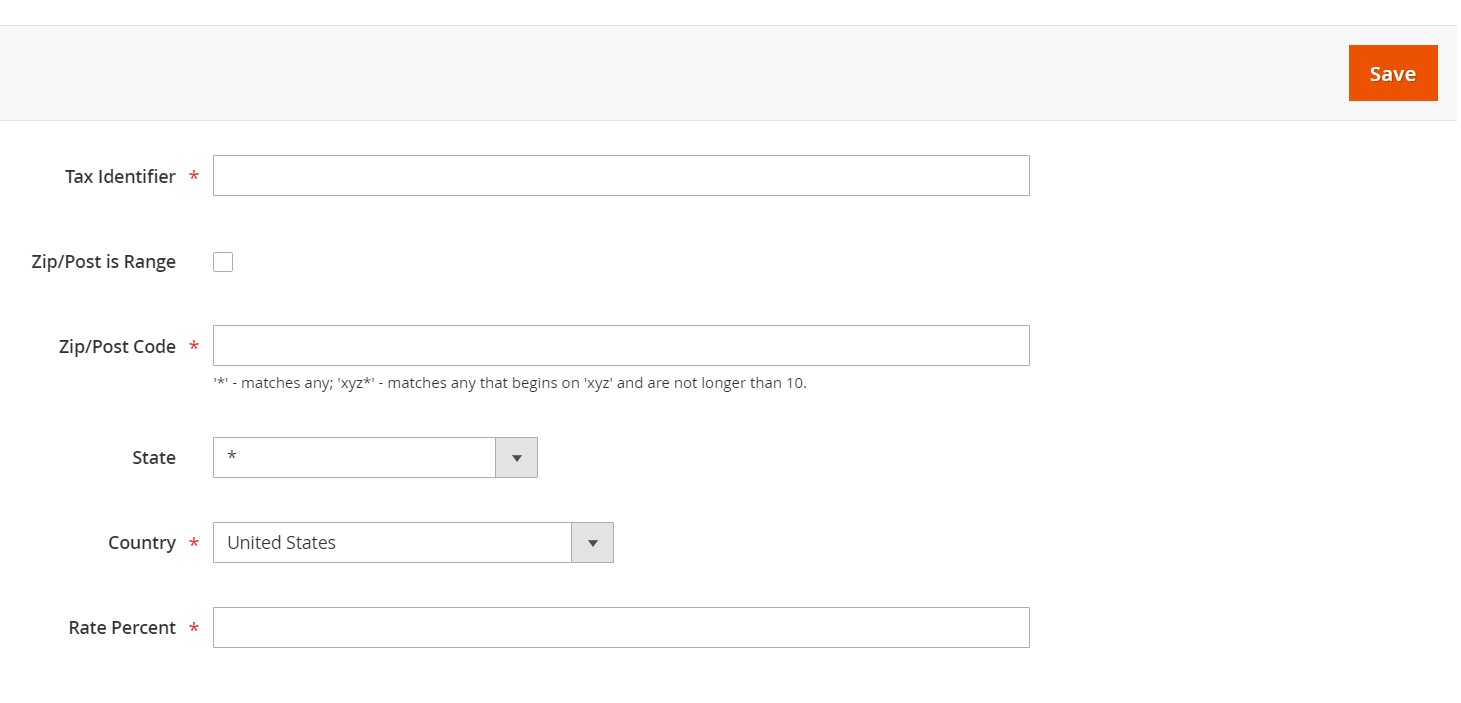
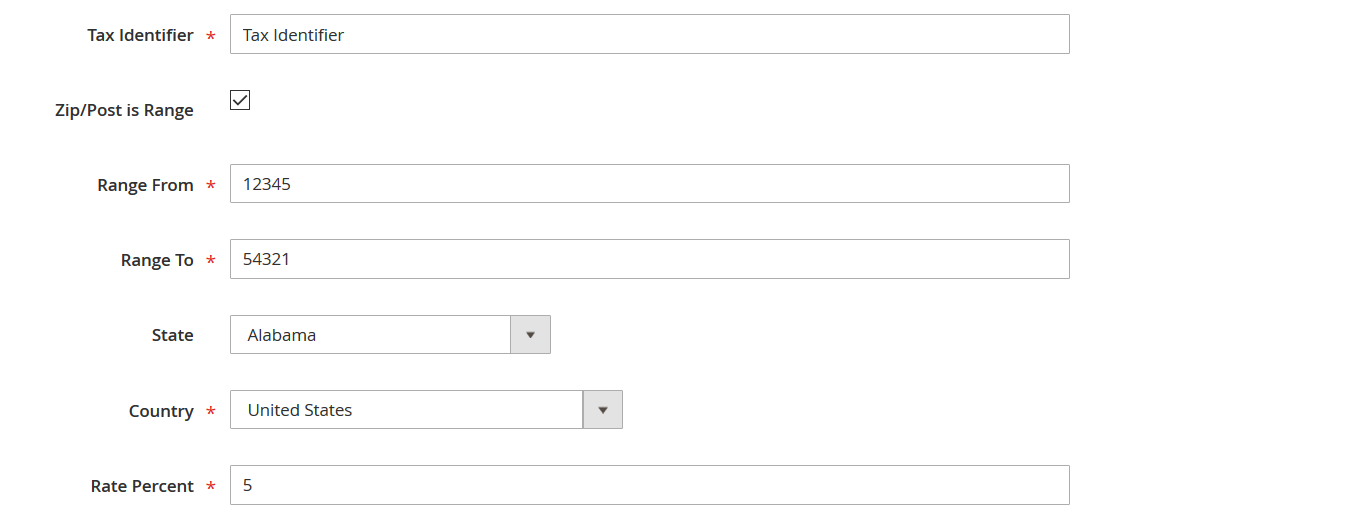
Alternatively, you can create one. Just click Add New Tax Rate and specify the following parameters:- Tax Identifier
- ZIP/Postcode or range
- Country and state
- Tax rate percentage
- In the Additional Settings section, you can:
- Click Add New Tax Class under Customer or Product Tax Class.
- Name and confirm the class to add it to the list.
- Assign classes to the rule using checkmarks.
You can also define: - Priority: Determines rule processing order.
- Sort Order: Helps manage multiple rules.
- Calculate Off Subtotal Only: Useful for skipping shipping or discounts during tax calculation.
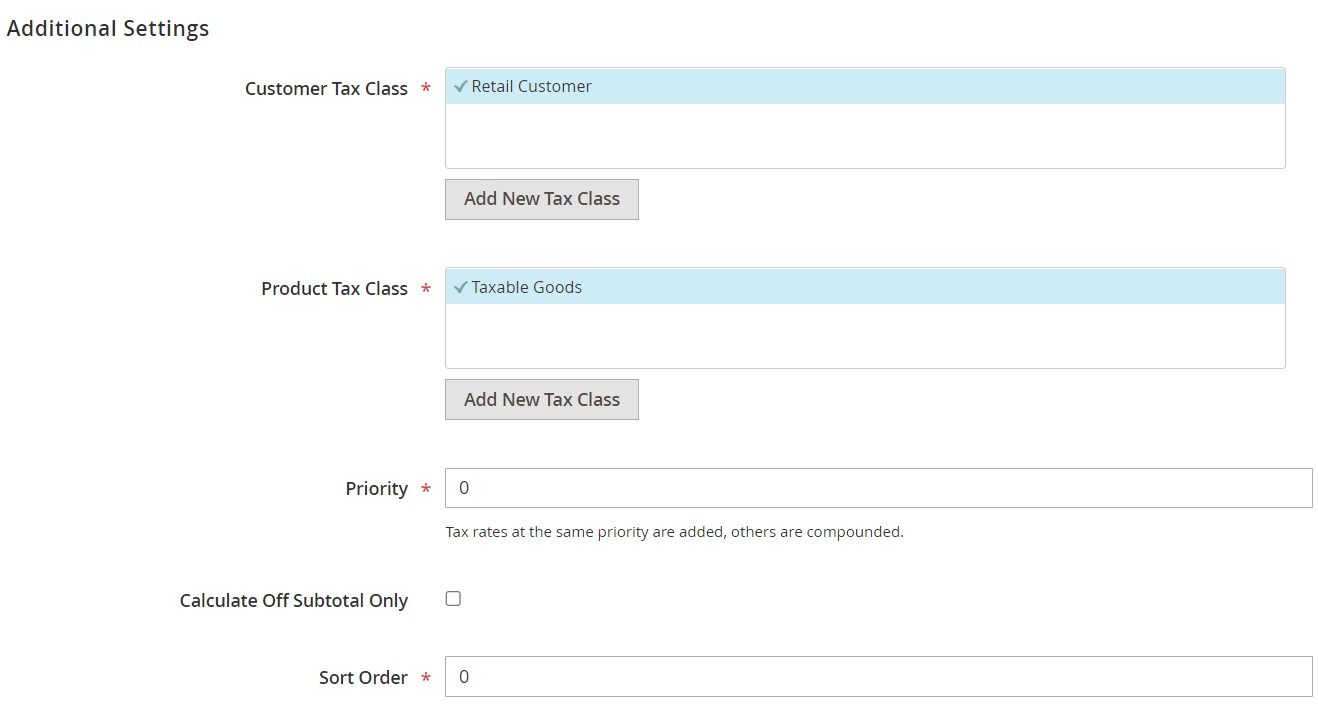
- Once everything is configured, click Save to finalize your Magento 2 tax rule.
How to Add a Magento 2 Tax Rate (Manually)
If you want to add tax rates without creating new rules, Magento makes that easy:
- Go to Stores > Tax Zones and Rates.
- Click Add New Tax Rate.
- Fill out the form with:
- Tax Identifier
- ZIP/Postcode or range
- Country and state
- Tax Rate (in percentage)
- Click Save Rate.
This standalone method is especially helpful for updating region-specific rates or preparing your tax table for bulk export/import. Alternatively, you can import tax rates to Magento 2. Continue reading to learn more about this procedure.
Magento 2 Tax Rate Import & Export
Below, we explore how to import and export Magento 2 tax rates via CSV, prepare your file for import, and automate the process using advanced tools — perfect for streamlining tax configuration across multiple stores.
Magento 2 Tax Rate Attributes: Reference Table
Before you import or export any tax data, it’s essential to understand the Magento 2 tax rate attributes that make up your tax configuration file. Magento uses a structured CSV format to store tax information — and each column must match the expected structure to be processed correctly.
Below is a reference table that explains each tax attribute used during Magento tax rate export or import:
| Attribute Name | Description | Expected Values | Example |
| Code | Tax Identifier | Any valid string used to name the tax rate | US-NY-Rate |
| Country | Country Name | Full name per Magento’s country table | United States |
| State | State Name | Full name per Magento’s state table | Alabama |
| Zip/Post Code | Postal Code | Only numeric values are allowed | 12345 |
| Rate | Tax Rate (%) | Numeric percentage (e.g., 10 for 10%) | 10 |
| Zip/Post is Range | Enable Zip Code Range | 1 = Yes, 0 = No | 1 |
| Range From | Range Start (if enabled) | Numeric only | 12345 |
| Range To | Range End (if enabled) | Numeric only | 54321 |
Each field must be correctly filled in your CSV file to ensure that Magento 2 tax calculation works as expected across different regions. Below is an example of a properly created CSV with Magento 2 tax rates:

How to Export Magento 2 Tax Rates (Step-by-Step)
Exporting your tax configuration is useful for backups, migrations, or making bulk edits in a spreadsheet before re-importing. Here’s how to export Magento 2 tax rates:
- Go to Admin > System > Import and Export Tax Rates.
- Click Export Tax Rates.
- Magento will generate a CSV file containing all currently configured tax rates for your store.
- Open the file in your spreadsheet editor to view or modify the Magento 2 tax class, country, state, ZIP, and rate values.
This exported file serves as the baseline for importing updated or additional tax rates.
How to Import Tax Rates into Magento 2
Once you’ve edited or prepared a CSV file with tax data, you can import Magento 2 tax rates from the same admin section:
- Go to Admin > System > Import and Export Tax Rates.
- Click Browse and select your tax rate CSV file (formatted according to the reference structure above).
- Click Import Tax Rates.

If your CSV is correctly formatted, the new tax rates will be immediately available in your Magento 2 tax configuration, reducing manual entry and minimizing errors.
💡 Pro tip: Use the , which includes validated columns and attribute hints. It’s designed to make your import process fast, accurate, and frustration-free.
Automating Magento 2 Tax Imports with Improved Import & Export
For growing businesses or agencies managing multiple Magento stores, manually importing tax rates can become time-consuming. That’s where the Improved Import & Export extension for Magento 2 becomes a game-changer.
With this powerful tool, you can:
- Automate Magento 2 tax imports on a schedule using cron jobs — perfect for regular updates or syncing with third-party systems.
- Import tax data in various formats, including CSV, Excel, XML, JSON, and even OpenOffice formats.
- Load tax data from external sources such as Google Sheets, Dropbox, FTP/SFTP servers, Google Drive, or via REST and SOAP APIs.
- Take advantage of attribute mapping and data transformation, allowing you to import files even if they don’t follow Magento’s native format.
- Support FPT (Fixed Product Tax) import — useful for regions with special tax rules like environmental fees or electronic waste surcharges.
Here are just a few use cases the extension supports:
- Sync with suppliers who post tax updates in a shared Google Sheet.
- Integrate Magento 2 with ERP or CRM platforms through API-based automation.
- Migrate tax data seamlessly from Magento 1, Shopify, PrestaShop, or legacy Magento 2 stores.
The flexibility of the extension allows you to build an import strategy that fits your unique workflow, whether you’re managing 100 or 100,000 tax records.
Explore the full feature set and advanced use cases on the Improved Import & Export product page, and check out our Magento 2 Import Guide List to dive deeper.
Troubleshooting Common Magento Tax Issues
Even with the most carefully planned setup, things can go wrong — and when they do, tax issues can create serious headaches for both you and your customers. Misconfigured settings in your Magento 2 tax configuration may lead to incorrect pricing, compliance risks, or abandoned checkouts. Let’s take a look at the most common Magento tax problems and how to fix them.
1. Prices Are Shown With the Wrong Tax
One of the most frequent issues is product prices displaying with or without tax when they shouldn’t. This usually stems from incorrect settings in your tax display configuration.
How to fix it:
- Go to Stores > Configuration > Sales > Tax > Price Display Settings.
- Make sure your preferences for “Display Product Prices In Catalog” and “Display Shipping Prices” are set correctly — either Including Tax, Excluding Tax, or Both, depending on your region and store policy.
- Double-check the assigned Magento 2 tax class for the affected products — the wrong tax class may be applying an unexpected rule.
2. Tax Not Being Calculated at Checkout
Another common issue is seeing no tax applied at checkout, even though you know it should be. This is often caused by one of the following:
- The customer is not assigned to the correct customer tax class.
- The product lacks a valid product tax class.
- The customer’s location doesn’t match any configured tax zone.
- A Magento tax calculation rule is missing or misconfigured.
How to fix it:
- Verify that both the product and customer group are associated with valid tax classes.
- Go to Stores > Taxes > Tax Rules and confirm that a tax rule exists linking the product class, customer class, and correct region.
- Check Stores > Tax Zones and Rates to ensure the shipping/billing location is covered by your tax rates.
3. Tax Is Calculated for the Wrong Region
If a customer from California sees New York tax rates, you’re likely dealing with a mismatch between the address type used for calculation and the tax zones.
How to fix it:
- Navigate to Stores > Configuration > Sales > Tax > Calculation Settings.
- Review the “Tax Calculation Based On” setting. Magento lets you choose between shipping address, billing address, or shipping origin — pick the one that matches your business model and compliance requirements.
- Ensure your tax zones and rates reflect the correct countries, states, and postal codes.
4. Shipping Is Not Being Taxed (When It Should Be)
In some regions, shipping charges are taxable, but Magento might skip this if your Magento tax class for shipping isn’t configured.
How to fix it:
- Go to Stores > Configuration > Sales > Tax > Tax Classes.
- Set the “Tax Class for Shipping” to a valid class that’s part of your tax rules.
- Revisit your tax rule and ensure this shipping class is included.
5. Rounding or Calculation Inconsistencies
You may occasionally notice slight rounding errors or discrepancies between displayed and charged tax amounts. These usually come down to Magento tax calculation settings.
How to fix it:
- Under Stores > Configuration > Sales > Tax > Calculation Settings, fine-tune:
- “Apply Tax On” (Custom price, Row total, Total)
- “Tax Calculation Method Based On” (Total, Row Total, or Unit Price)
- “Apply Discount On Prices” (Including or Excluding tax)
- Test your configuration on different product types and cart combinations to ensure consistency.
By proactively checking these areas, you can prevent most tax-related issues before they affect customers — and ensure that your Magento 2 tax configuration is accurate, compliant, and customer-friendly.
Final Words: Master Your Magento 2 Tax Configuration — and Beyond
A well-structured Magento 2 tax configuration is essential for delivering transparent pricing, ensuring tax compliance, and maintaining a smooth checkout experience. Thankfully, Magento offers a solid native framework to help you define tax classes, create tax rules, and manage tax rates through its built-in import and export tools.
Whether you’re assigning a new Magento 2 tax class, configuring tax zones, or troubleshooting calculation errors, Magento 2 gives you the flexibility to tailor tax logic to your store’s needs. And when it comes to importing taxes at scale — for migrations, updates, or regional expansion — the built-in CSV functionality gets the job done with minimal friction.
But if you’re looking to go beyond tax rates and streamline your entire data management strategy, it’s time to level up.
🔥 With the Improved Import & Export extension for Magento 2, you can:
- Automate tax imports and exports using cron jobs.
- Import FPT taxes (Fixed Product Tax) and all other tax-related entities with advanced mapping tools.
- Seamlessly sync Magento 2 with ERP, CRM, PIM, and accounting platforms using REST/SOAP APIs.
- Use flexible data sources — import from Google Sheets, Dropbox, Google Drive, or FTP.
- Support multiple formats including CSV, Excel, XML, JSON, and OpenOffice.
This extension isn’t just about tax — it’s your all-in-one solution for importing products, customers, orders, attributes, categories, and much more. Whether you’re managing multichannel sales, integrating third-party systems, or migrating from Magento 1 or Shopify, the IIE extension makes it simple and scalable.
✅ Take control of your Magento 2 data with precision and confidence. Visit the Improved Import & Export product page to explore all the features and get started today:
Get The Improved Import & Export Extension for Magento 2
Want to master Magento 2 import from A to Z? Explore our complete guide and unlock step-by-step tutorials, tips, and expert tools.
👉 Go to the Full Magento 2 Import & Export Guide
Magento 2 Tax Configuration FAQ
What is Magento 2 tax configuration?
Magento 2 tax configuration is the process of setting up tax rules, tax classes, and rates to ensure accurate tax calculation based on products, customer types, and shipping regions.
How does Magento 2 calculate tax?
Magento 2 calculates tax by evaluating the combination of product tax class, customer tax class, and the applicable tax zone based on the customer’s address. The correct tax rule is then applied accordingly.
What is a Magento 2 tax class?
A Magento 2 tax class defines how tax is applied to a product or customer. Magento includes default product and customer tax classes, but you can create custom classes to support your business needs.
How do I add a new tax class in Magento 2?
Go to Stores > Configuration > Sales > Tax > Tax Classes, and define new classes for products, customers, or shipping. You can also add new tax classes directly when creating a tax rule.
What are Magento 2 tax rules?
Magento 2 tax rules connect product and customer tax classes with specific tax rates. They define how much tax should be applied to which types of transactions and in which regions.
Can I import tax rates into Magento 2?
Yes. You can import Magento 2 tax rates using a pre-formatted CSV file via System > Import and Export Tax Rates. This is useful for bulk updates or setting up tax zones across multiple regions.
What is the Magento Estimate Shipping and Tax panel?
It’s a cart page feature that lets customers estimate shipping fees and taxes based on their location. This improves transparency and helps reduce cart abandonment caused by unexpected costs.
Why isn’t Magento calculating tax correctly?
Common causes include missing tax rules, incorrect tax class assignments, or mismatched address settings. Ensure all required elements — product tax class, customer tax class, and tax rates — are configured correctly.
How can I apply tax to shipping in Magento 2?
Go to Stores > Configuration > Sales > Tax, and set a valid “Tax Class for Shipping.” Ensure that this class is included in at least one tax rule with applicable rates.
Can I automate tax imports in Magento 2?
Yes. Use the Improved Import & Export extension to automate tax imports via scheduled jobs, sync tax data from Google Sheets or APIs, and support multiple formats like XML, Excel, and JSON.
Related posts
 Mastering Magento 2 Upsell Products: Setup, Management, Import & Export Guide
 Magento 2 Cross-Sell Products Guide: Manual Setup, Bulk Import & Cart Optimization Tips
 Shopify Order Tracking: How to Configure, Automate & Optimize the Post-Purchase Experience
 How to Import Metafields in Shopify: A Complete Guide
 How to Import & Export Shopware 6 Advanced Prices as Separate Entity
 How to Fulfill Dropshipping Orders on Shopify When Your Supplier Has No Integration
 How to Boost Sales with Shopware 6 Cross Selling: The Ultimate 2025 Guide
 AI Revolution in Shopify Imports: Smarter, Faster, Better