
Exploring Shopware: Integrations in Shopware 6 Settings
![]()
This material is dedicated to another section of Shopware 6 Settings – Integrations. By default, you get the ability to connect third-party systems to your Shopware 6 website. Below, we shed light on how to apply basic configuration in the admin and what alternative approach to utilize.
The following article will help you learn how to manage integrations in Shopware 6. We start from such basics as where to find Shopware 6 Integrations and proceed to more complex tasks, such as how to create and edit integrations in Shopware 6. The last chapter unveils a reliable third-party tool that is much more powerful than the default data transfer solutions of Shopware 6.

Note that we provide Shopware integration with external platforms. Contact our support for further information or try our Improved Import, Export & Mass Actions for Shopware. We can import your products and other entities to Shopware 6.
Table of contents
- 1 How to Manage Integrations in Shopware 6
- 2 Where to Find Shopware 6 Integrations
- 3 How to Edit Integrations in Shopware 6
- 4 How to Create Integrations in Shopware 6
- 5 How to Connect External Platforms to Shopware 6
- 6 Shopware 6 Essentials FAQ
- 6.1 How to create a Shopware ID?
- 6.2 How to create a Shopware account?
- 6.3 What is Shopware master data?
- 6.4 How to add a shop in Shopware?
- 6.5 How to add a payment method to your Shopware account?
- 6.6 How to create a deposit in Shopware?
- 6.7 How to purchase Shopware extensions?
- 6.8 How to get support in Shopware?
- 6.9 How to migrate to Shopware 6?
- 6.10 How to automate import and export processes in Shopware 6?
- 6.11 How to integrate Shopware 6 with external systems?
How to Manage Integrations in Shopware 6
With Shopware 6, you get a powerful API for integrating third-party systems into your e-commerce processes. However, establishing proper communication requires external applications to authenticate through individual security keys. By default, Shopware 6 lets you create those individual keys right within the system. Consequently, you get the ability to track changes associated with external apps
Where to Find Shopware 6 Integrations
Shopware 6 lets you establish API connections with third-party systems. As a result, you can seamlessly connect applications and systems to your storefront. The corresponding section is situated under Settings -> System -> Integrations. It looks as follows:
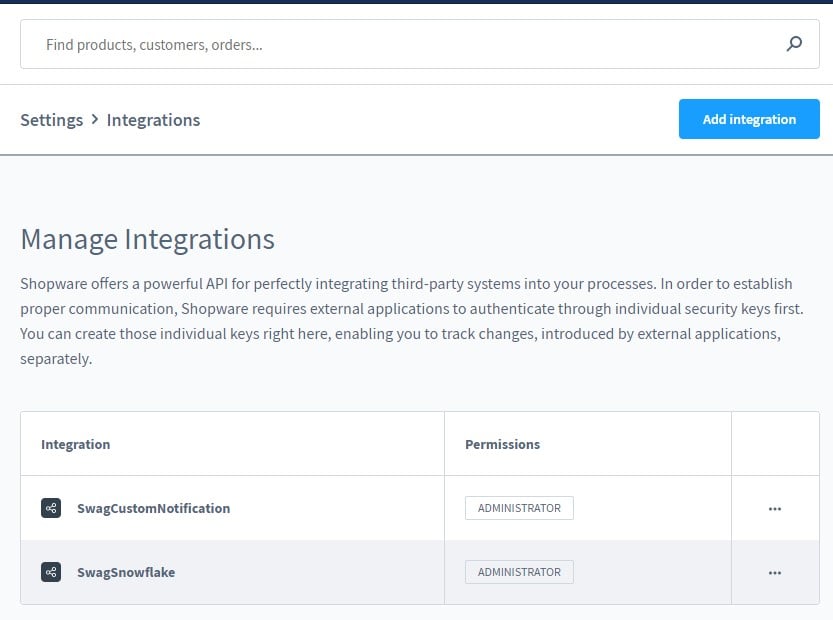
Here, you get all the instruments necessary for creating API access for each of the applications you want to connect to Shopware 6. Besides, it is possible to view and manage the existing connections on this page.
How to Edit Integrations in Shopware 6
Use the context menu to edit or delete integrations in Shopware 6.
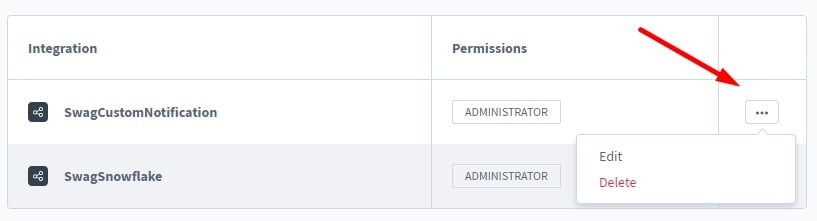
Alternatively, you can click on the integration title to edit it.
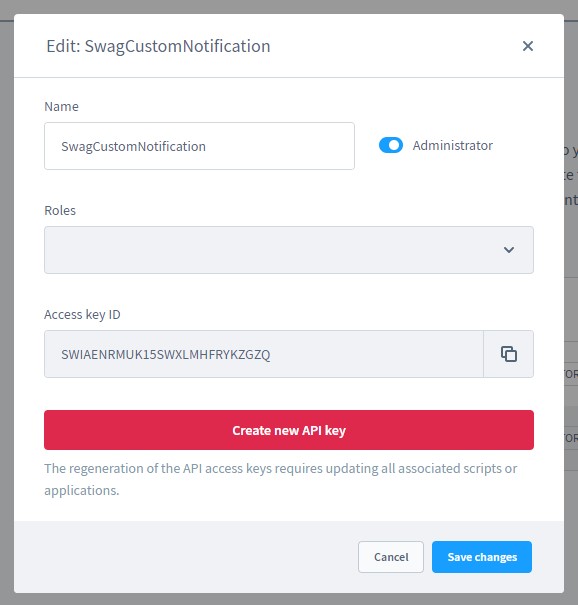
While editing an existing integration, you can regenerate an existing security key via the Regenerate API access key. The system lets you recreate both the security key and the access ID here.
How to Create Integrations in Shopware 6
To create a new integration in Shopware 6, hit the Add Integration button.
You will see the following form:
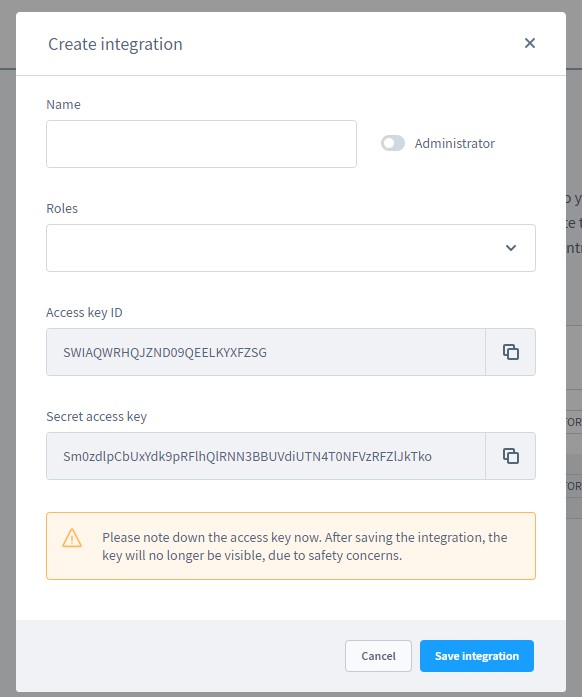
- Assign a name to your new Shopware 6 integrations;
- Choose whether the integration should have the admin permission;
- Select a role defined under Users & Permissions;
- Receive an access ID and a security key for your integration. Bear in mind that the access key is no longer displayed after saving the integration due to safety concerns.
How to Connect External Platforms to Shopware 6
Our team lets you simplify and automate various processes associated with data migration to Shopware 6, including integrations with third-party systems. Contact our support for more details and try our . You can use it to import any entities to Shopware 6 from any external platform. The module lets you automate data transfers with cron-based schedules. Besides, it enables you to transfer third-party data without any additional manipulations. The extension introduces mapping schemes that let you match unsupported designation to ones used in Shopware 6 automatically. Please, consult our specialists before using the module for connecting external platforms to Shopware 6.
Shopware 6 Essentials FAQ
How to create a Shopware ID?
You get a ShopwareID along with a Shopware account. We explain how to create the account below.
How to create a Shopware account?
You can create a Shopware account as follows. Go to a registration page, click the Register Now link, and fill in the registration form. Proceed to your email to follow the instructions provided in a confirmation message.
What is Shopware master data?
Under master data, we assume all the information you provide while creating a Shopware account: address, email, phone, name, and other company details.
How to add a shop in Shopware?
Go to your merchant area and click the corresponding link on the start screen’s right part to launch a new shop in Shopware 6. Here, you can choose between a cloud storefront or an on-premise installation. Next, provide more information about your new storefront and save changes.
How to add a payment method to your Shopware account?
Go to Basic Information -> Accounting to add a payment method to your Shopware account. Choose PayPal, credit card, or direct debit.
How to create a deposit in Shopware?
With an active payment method, you can transfer funds to your Shopware 6 shop necessary for purchasing themes and extensions. Go to Merchant Area -> Shops, choose a shop to provide funds to, click Open Account Details, and start the money transfer.
How to purchase Shopware extensions?
Add a deposit and go to the Shopware Marketplace or Plugin Manager to purchase extensions and themes in Shopware. Choose a solution your business requires and complete the purchase.
How to get support in Shopware?
Inquiries regarding your account or license should be sent to info@shopware.com or +49 2555 9288 50. Inquiries regarding accounting and financial services should be sent to financial.services@shopware.com or +49 2555 9288 510.
How to migrate to Shopware 6?
Despite Shopware 6 offering a separate section for integrations, we recommend utilizing the Improved Import & Export tool to migrate to Shopware. The module offers several benefits over the default tools. For instance, it lets you move core entities to your new website from any external platform or transfer them from Shopware’s previous versions. Export solutions for other e-commerce platforms, such as Magento and Shopify, are at your disposal to help you migrate from them. Contact our team for more information.
How to automate import and export processes in Shopware 6?
Regular data updates will no longer consume your free time. With the Improved Import & Export extension, you will be able to automate recurring import and export processes. The module provides the ability to create a schedule for each data transfer. Consequently, the extension can launch the corresponding data transfer according to the time frames you specify.
How to integrate Shopware 6 with external systems?
You may argue that the Integration section of Shopware 6 should replace all third-party connectors but it doesn’t do that. Thus, the Improved Import & Export extension lets you integrate your store with ERPs, CRMs, and accounting tools in a more user-friendly way. As we’ve just mentioned, it automates repetitive import and export processes on the basis of cron-based schedules. Furthermore, it modifies data with the help of mapping schemes according to the requirements of your Shopware store upon import. The same logic is applied to exported data to create a perfect output for the connected platforms upon export.
Related posts
 Shopware 6 Advanced Pricing Guide + Import Tutorial
 How To Bulk Import Products In Shopify: CSV Description & Step-By-Step Guide
 Magento 2 B2B Company Guide: Revealing Company Structure & Import
 How to Import Customers & Customer Addresses to Magento 2
 A Complete Guide to Shopify Customer Import
 Amasty ChatGPT AI Content Generator for Magento 2
 Reputon Amazon Importer Review: How to Connect Shopify to Amazon in a Few Clicks
 CopyAI Review 2023