
Exploring Shopware: How to Upload & Manage Files in Shopware 6
![]()
In the following material, we explore the Media menu item of Shopware 6 administration. Merchants visit this section to upload and manage media files, sorting them into folders. Below, we shed light on how to find your Shopware 6 media library and how to upload files to Shopware 6. You will discover supported file formats and possible file configuration options. Besides, we shed light on how to add folders to Shopware 6 media library, and how to edit them.

Note that we provide Shopware integration with external platforms. Contact our support for further information or try our Improved Import & Export Extension for Shopware.
Table of contents
- 1 Shopware 6 Media Library
- 2 How to Import Media Files to Shopware 6
- 3 Shopware 6 Essentials FAQ
- 3.1 How to create a Shopware ID?
- 3.2 How to create a Shopware account?
- 3.3 What is Shopware master data?
- 3.4 How to add a shop in Shopware?
- 3.5 How to add a payment method to your Shopware account?
- 3.6 How to create a deposit in Shopware?
- 3.7 How to purchase Shopware extensions?
- 3.8 How to get support in Shopware?
- 3.9 How to migrate to Shopware 6?
- 3.10 How to automate import and export processes in Shopware 6?
- 3.11 How to integrate Shopware 6 with external systems?
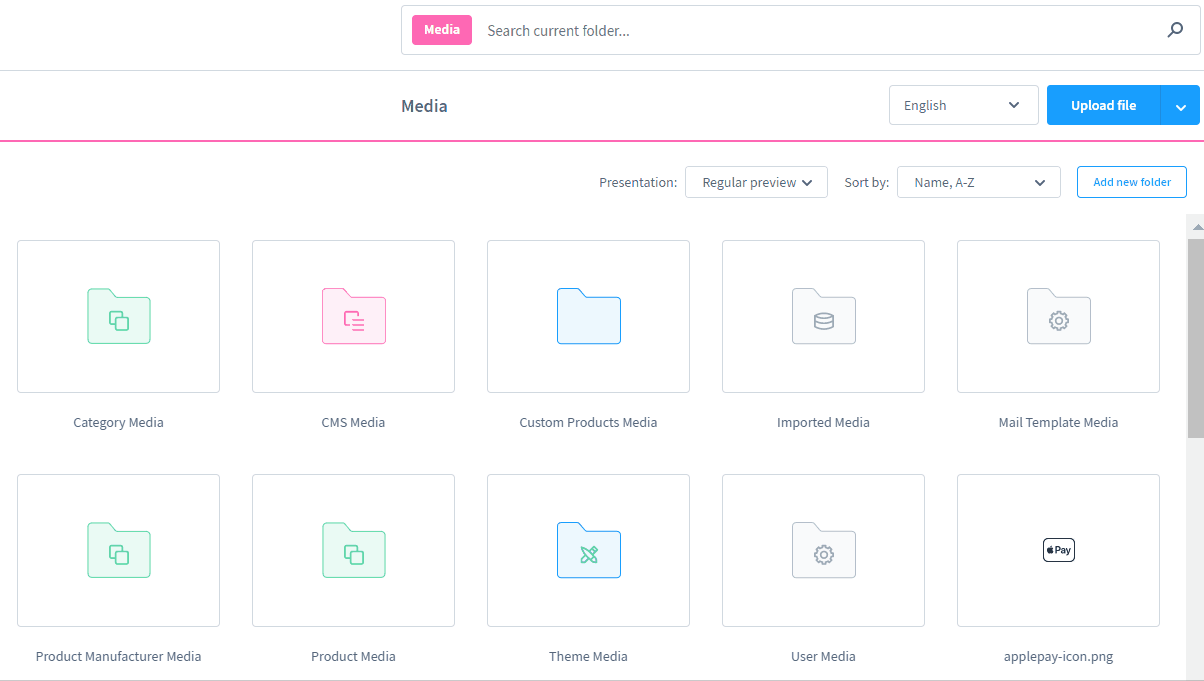
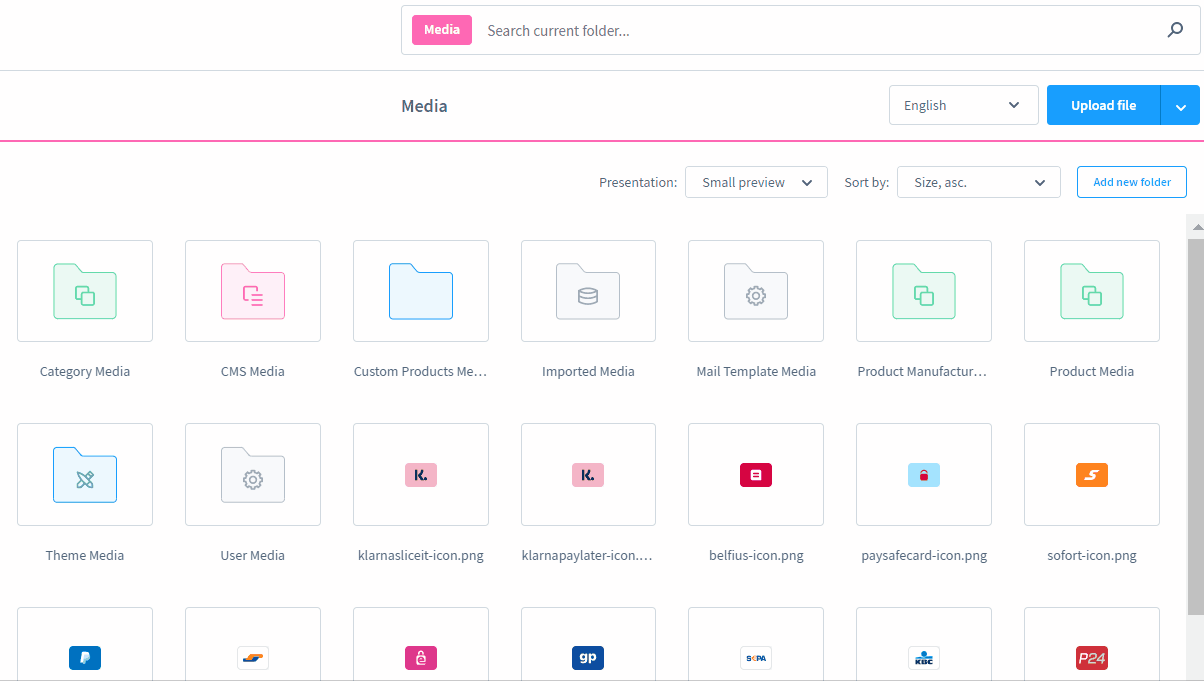
Shopware 6 Media Library
Your Shopware 6 media library is situated under Content -> Media. The files stored here are used everywhere on your website.
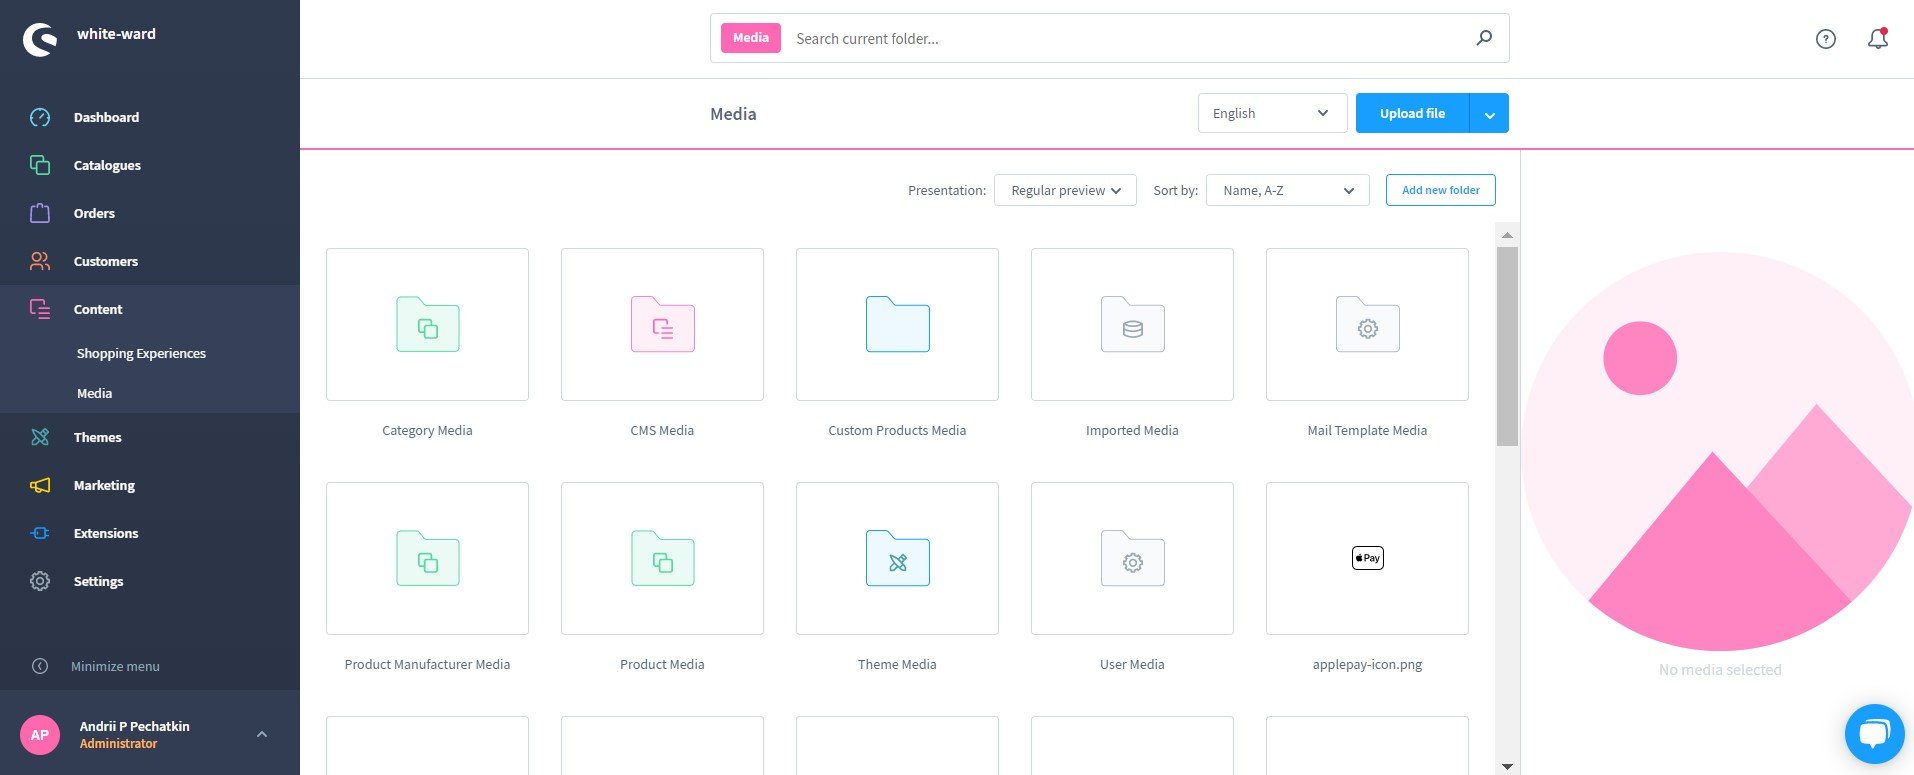
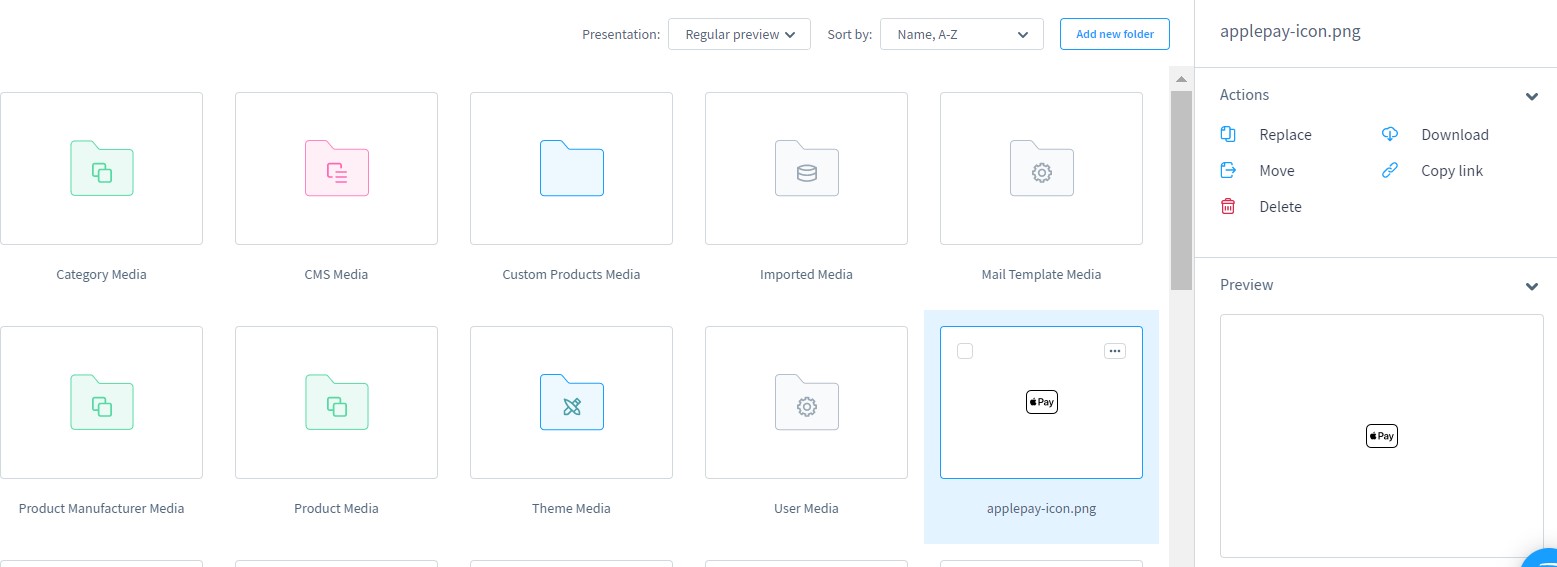
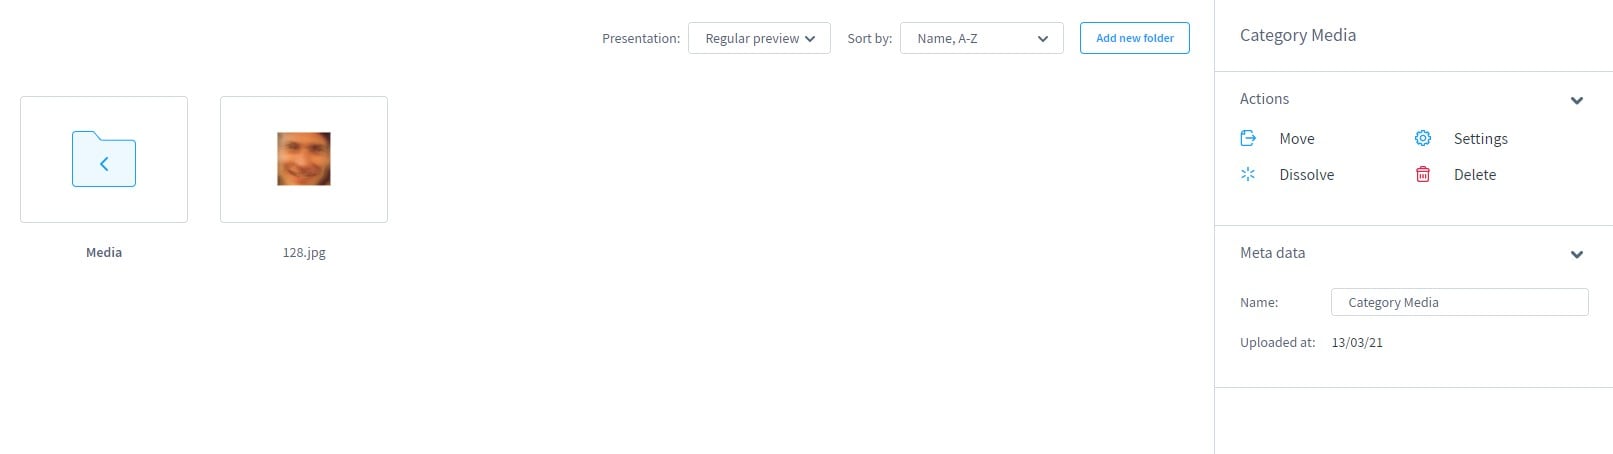
As for the section, it contains folders with files and separate images. On the right, you can see a preview section. Select a file, and you will see its thumbnail and additional actions:
- Replace;
- Download;
- Move;
- Copy link;
- Delete.
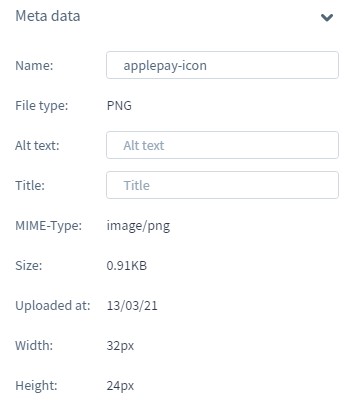
Besides, there is a section with meta data below. It lets you edit a file name, alt text, and title. Besides, you can view a file type, MIME-type, size, upload date, width, and height.
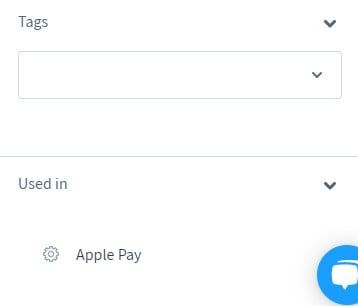
Two more sections are Tags and Used in. The first one shows tags associated with the image, while the second one displays where the file appears.
If you select a folder, Shopware opens it and displays two sections: Actions and Meta data. The first one lets you move, dissolve, or delete the folder as well as proceed to its settings. The second one displays a folder name and upload date.
The search field at the top lets you quickly find any file or folder you want. Besides, you can switch between several preview types and choose different sorting options.
How to upload files to Shopware 6
You can upload images to Shopware 6 as follows:
- Go to the Media Overview page;
- Click the Upload File button;
- Choose a file you want to upload.
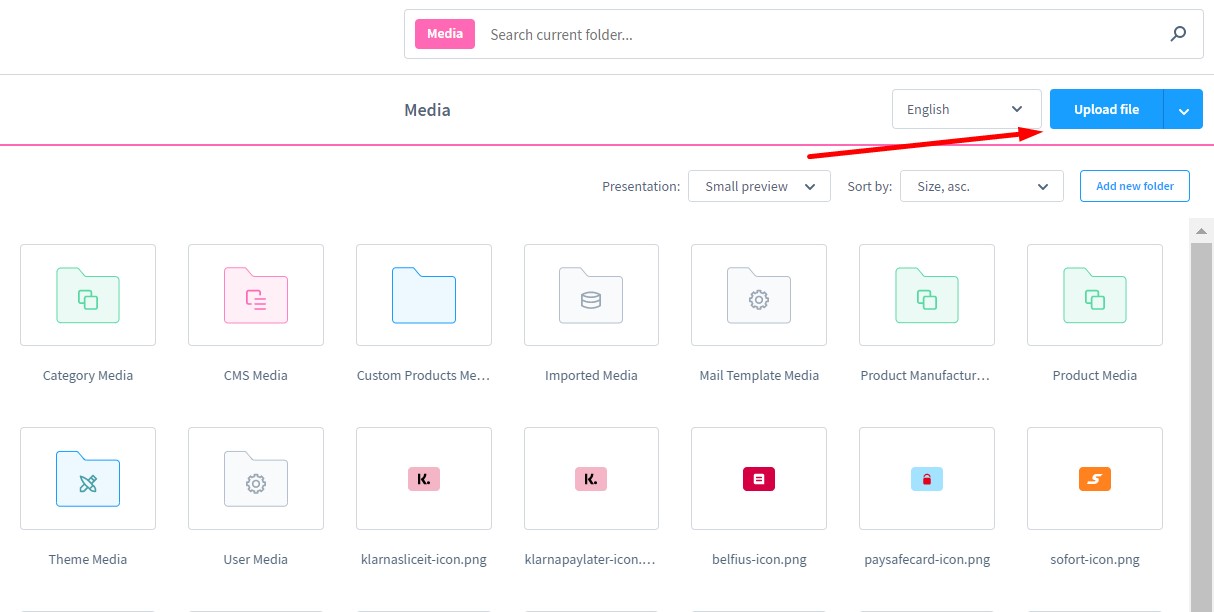
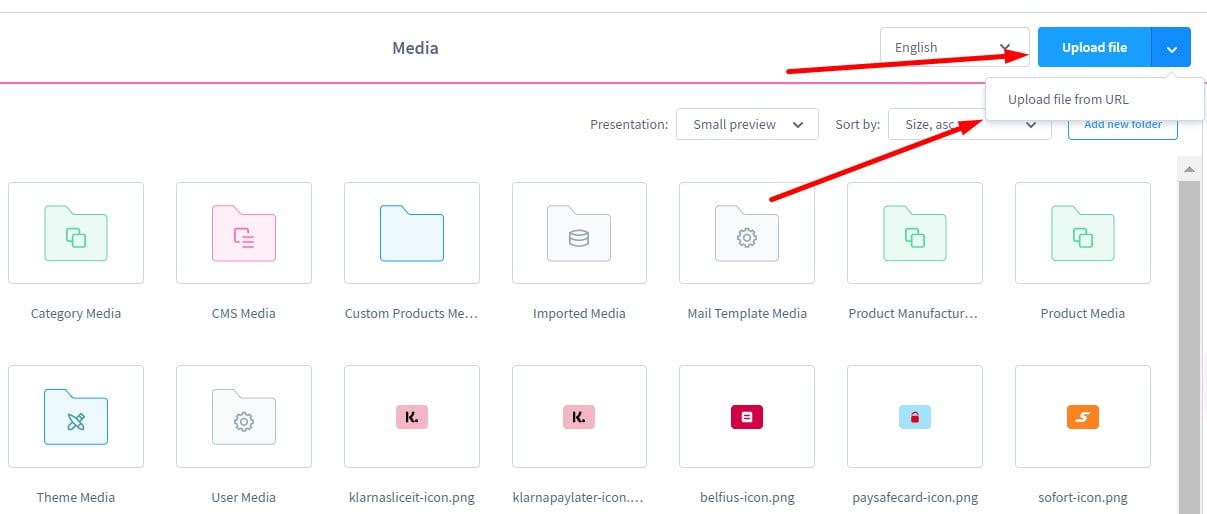
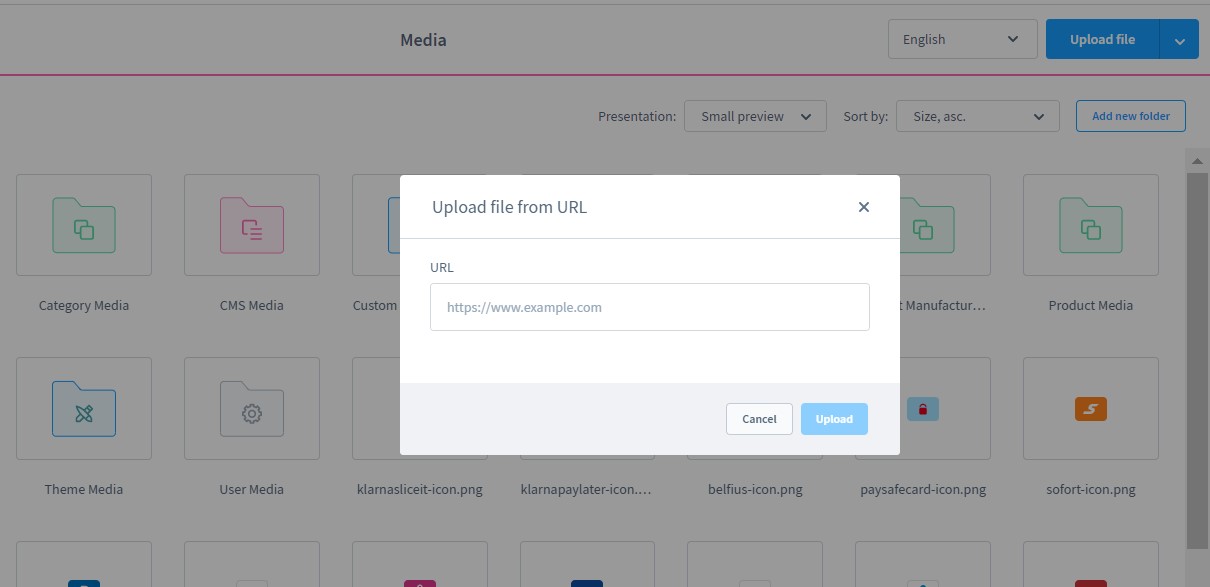
Alternatively, you can click on the arrow button to upload a file from the URL.
Supported file formats
Shopware 6 supports the following formats when it comes to its media manager:
- Images:
- jpg,
- jpeg,
- png,
- webp,
- gif,
- svg,
- bmp,
- tiff,
- tif,
- eps;
- Video:
- webm,
- mkv,
- flv,
- ogv,
- ogg,
- mov,
- mp4,
- avi,
- wmv;
- Audio:
- aac,
- mp3,
- wav,
- flac,
- oga,
- wma,
- Text:
- pdf,
- txt,
- doc.
How to configure files in Shopware 6 media library
As we’ve already mentioned, selecting a media file in your administration activates a screen with actions. Therefore, you can manage your Shopware 6 files as follows:
- Replace an already uploaded file with another one (you upload it in the next step);
- Initiate the download of the selected files;
- Move the selected files to a new folder;
- Copy link from the selected file;
- Delete the selected file.
The Preview section lets you display the selected media.
The metadata of the selected media file is partly editable. You change the file name, alt-text, and meta-title.
Besides, you can set up tags and view where in your shop you are using the selected files. Note that you can access those places by clicking the corresponding links.
How to add folders to Shopware 6 media library
To optimize your daily workflow, Shopware 6 lets you place media files into folders. The system lets you create as many folders and subfolders as necessary. You can do that as follows:
- Go to the Media screen;
- Click the Add new folder button (you can do that at the exact place in the folder structure, where you need a new folder);
- Name your new folder.
That’s it! You’ve just created a new folder in your Shopware 6 administration.
Click on the Back icon to return to the previous level.
How to edit folders in Shopware 6
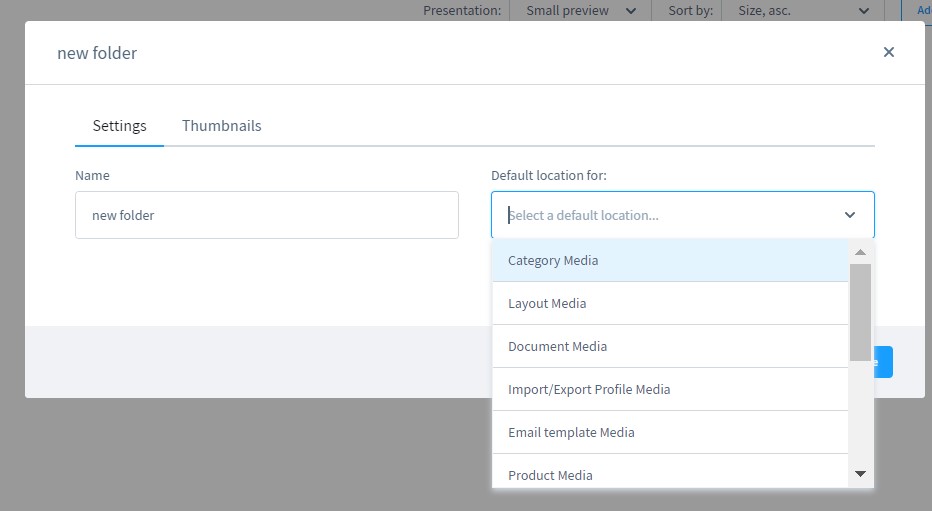
As with the media files, you can find actions of the selected folder on the right. It is possible to move, dissolve, or delete the folder as well as proceed to its settings.
The settings section is divided into the general settings and the thumbnail settings.
The general settings section lets you change the folder name or specify media files for which the folder should serve as a default location: category, layout, documents, etc.
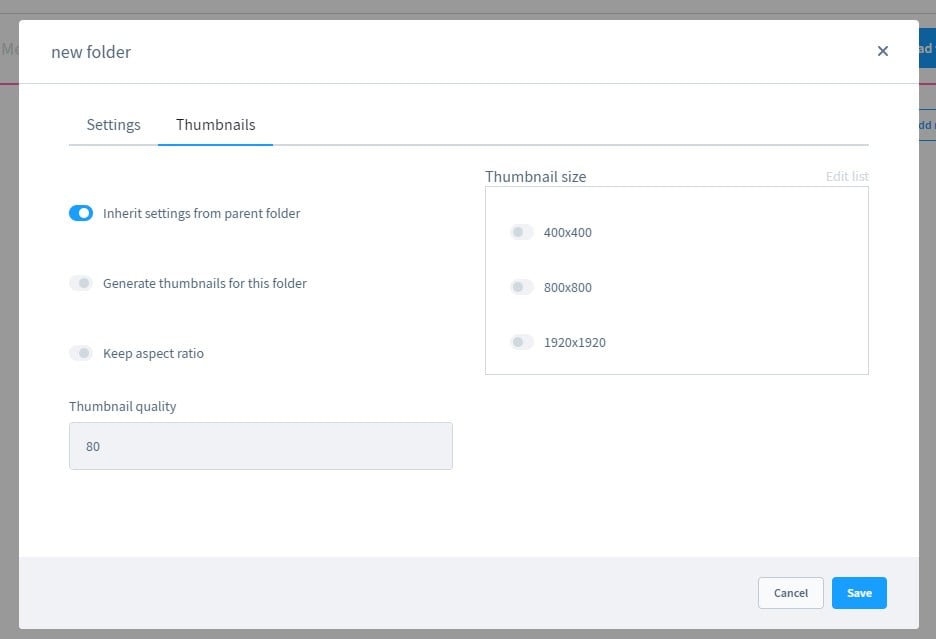
As for the thumbnail tab, it lets you define settings for the thumbnails used within the system and on the storefront. You can enable the Inherit settings from the parent folder feature to apply the thumbnail settings of the parent folder to the current folder. The Generate thumbnails for this folder tool lets you activate or deactivate thumbnail generation for this folder. With the Keep aspect ratio instrument, you can preserve the aspect ratio of the original image, ensuring that square thumbnail settings do not distort a rectangular image.
In the Thumbnail quality field, Shopware 6 lets you determine the quality of your thumbnails. Note that 100 is the highest possible quality, and 1 is the lowest.
The Thumbnail Size section empowers you to define sizes for creating thumbnails. The Edit list link in the upper right corner can help you add new thumbnail sizes or remove the existing ones. Note that the active lock symbol keeps width and height always the same.
How to Import Media Files to Shopware 6
Our team lets you simplify and automate various routine processes associated with Shopware 6 backend management based on importing the existing data. Contact our support for more details and try our . You can use it to import any entities to Shopware 6. Please, consult our specialists before using the module for transferring media files to Shopware 6. The extension usually works as follows. It automates data transfers according to the schedule and lets you apply mapping schemes to transform the imported data according to the requirements of Shopware 6.
Shopware 6 Essentials FAQ
How to create a Shopware ID?
Before importing media files or applying any changes to your Shopware installation, you need to get a ShopwareID. The system provides it when you create a Shopware account. See the next question for more information.
How to create a Shopware account?
It is possible to create a new shopware account and get your Shopware ID simultaneously. Just visit the Shopware registration page and hit the Register Now link. After that, you will need to fill in the registration form and receive an email with a confirmation link.
What is Shopware master data?
Shopware master data is all the core information about your company used within Shopware 6. It consists of contact and company details, such as an address, email, phone, company name, etc.
How to add a shop in Shopware?
Go to your merchant area to create a new Shopware shop. Its start-screen contains a corresponding link on the right. Hit this link and the system will ask you to choose whether you deal with a cloud storefront or it should be an on-premise installation. Next, it is necessary to provide data about your new Shopware Shop and save changes.
How to add a payment method to your Shopware account?
Shopware 6 lets you add a payment method under Basic Information -> Accounting. You can choose between PayPal, credit card, or direct debit.
How to create a deposit in Shopware?
You need to create a deposit to pay for purchasing extensions in advance. You can do that under Merchant Area -> Shops. Specify a shop to provide funds to and click Open Account Details. Next, the system provides the ability to add funds there. Follow the detailed instructions.
How to purchase Shopware extensions?
You can purchase extensions and themes for your Shopware 6 website after placing a deposit. Proceed to the Shopware Marketplace or open the Plugin Manager to buy the necessary tools.
How to get support in Shopware?
Shopware support is divided into two branches. One of them works with questions about your account or license. You can contact the corresponding specialists via info@shopware.com or +49 2555 9288 50. Another one works with inquiries about accounting and financial services. These questions are accepted here: financial.services@shopware.com or +49 2555 9288 510.
How to migrate to Shopware 6?
With Shopware 6, you cannot seamlessly migrate from external platforms. It is always necessary to use a third-party extension to simplify data transfers. We recommend you utilize the Improved Import & Export tool for Shopware 6 for these purposes. It provides the ability to automate data transfers and avoid issues caused by different attribute standards. Contact us for more information.
How to automate import and export processes in Shopware 6?
As for regular data transfers, the Improved Import & Export for Shopware 6 is useful too. If you receive data updates or provide information to external systems, the extension will help you automate these procedures. With ita help, you can create a schedule of updates per each import and export process. Consequently, they will run in the background without external interactions on the admin side.
How to integrate Shopware 6 with external systems?
You cannot integrate your e-commerce storefront with external platforms due to the limited import and export capabilities of Shopware. Therefore, use the Improved Import & Export extension to connect your website to various external systems. For instance, our extension can help you integrate Shopware 6 with ERPs, CRMs, and accounting tools. Our module automates repetitive import and export processes and modifies data according to internal and external requirements.
Related posts
 Shopware 6 Advanced Pricing Guide + Import Tutorial
 A Complete Guide to Shopify Customer Import
 Magento Open Source and Adobe Commerce 2.4.7 Release Notes
 How to generate order increment IDs automatically during Magento 2 import
 Magento 2 Release Notes
- How to Import Customers & Customer Addresses to Magento 2
 CopyAI Review 2023
 Reputon Amazon Importer Review: How to Connect Shopify to Amazon in a Few Clicks