
Ultimate Guide To Shopware 6 Import
Welcome to the world of Shopware import! Like every e-commerce system, Shopware 6 provides the ability to import and export information between your website and external data sources. This functionality simplifies content management chores, such as data updates or product translations. Besides, the Shopware 6 import lets you easily move products to product comparison engines and marketplaces. In this Shopware import guide, we generally describe the available options, reviewing the basic import plugin of Shopware 6 along with its profiles. You will learn how to import data to Shopware 6 and what entities are supported. Also, check our Ultimate Guide To Shopware 6 Export.

Note that we provide Shopware integration with external platforms. Contact our support for further information or try our Improved Import, Export & Mass Actions.
Table of contents
- Shopware Import Plugin
- How To Create Custom Import Profiles In Shopware 6
- How To Create Mapping For Shopware 6 Import
- Shopware 6 Import Object Types
- How To Import Products To Shopware 6
- How To Import Newsletter Recipients To Shopware 6
- How To Import Properties To Shopware 6
- How To Import Categories To Shopware 6
- How To Import Media To Shopware 6
- How To Import Advanced Prices To Shopware 6
- How To Import Product Variants To Shopware 6
- Final Words
Shopware Import Plugin
The import functionality of Shopware 6 is always at your disposal. You can find the basic import module in your administration under Settings -> Shop -> Import/Export.
Shopware 6 Import Requirements
Shopware 6 supports CSV files containing character sets in the UTF-8 format, separated with semicolons. The system interprets quotation marks as string separators. So, the basic requirements for a successful Shopware 6 import procedure include
- UTF-8 character set
- semicolon field separator
- quotation mark string separator
Therefore, you need to set these parameters in advance in your spreadsheet editor. Also, if your data files contain umlauts, ensure the CSV is UTF-8 compliant to enable the Shopware import.
Shopware Import Run
The Import tab of the Shopware import/export module lets you transfer data to your e-commerce website. You should use CSV files only, following the basic import requirements.
The platform’s default import functionality lets you add information. You cannot use the module to remove the existing data. For instance, it is impossible to remove a sales channel assigned to a product upon product import.
Always use a period (.) in product prices, such as 3.99 instead of 3,99, because using a comma (,) leads to incorrect import. Ensure that every price associated with the database entry “price” is separated with a dot.
So, the basic import procedure in Shopware 6 is quite straightforward:
- Upload a CSV file;
- Select an import profile;
- Launch the process.
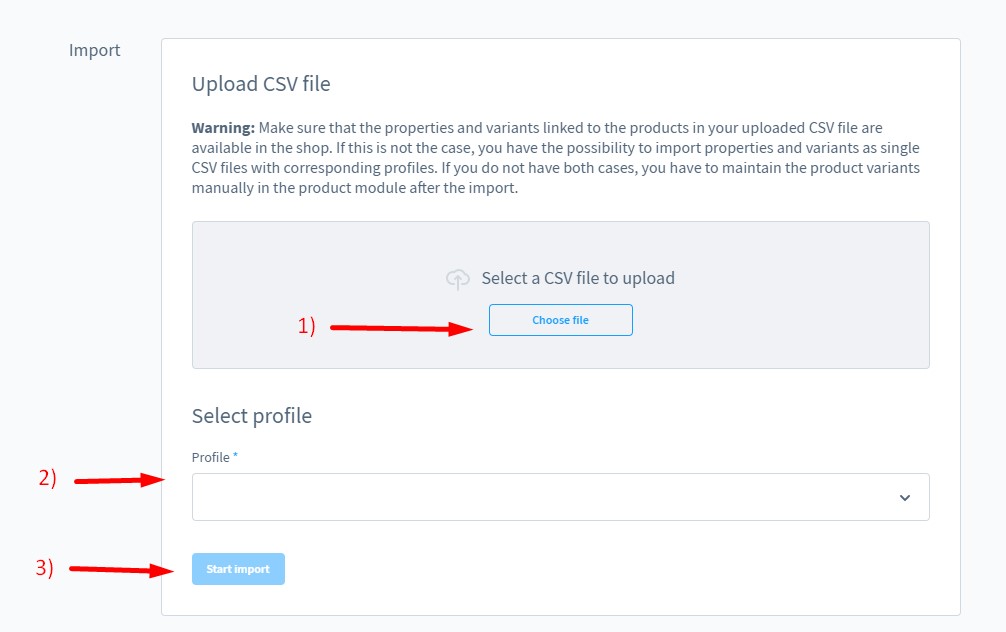
Hit the Choose file button to select a CSV file that contains an update. Since some spreadsheet editors may affect field separators or other CSV file parameters, you should double-check whether your update file satisfies the Shopware 6 import requirements.
You should keep in mind that the selected Shopware 6 import profile determines how to treat the imported CSV file. It specifies a database where the transferred information will be stored with all the corresponding consequences.
When a CSV file is selected, and the import profile is specified, hit the Start import button to launch the CSV transfer to Shopware 6. The system will validate all its records. It imports only error-free entries.
As for the records associated with errors, they are combined in a new CSV file. You can download it afterward, fix the problems, and re-upload it back to the system.
According to the official Shopware 6 import guide, you can also start a dry run to check whether it is possible to import a complete CSV file or just some of its records. This feature lets you avoid a situation when you transfer only a part of the update. It helps to find errors, fix them, and import all CSV entries.
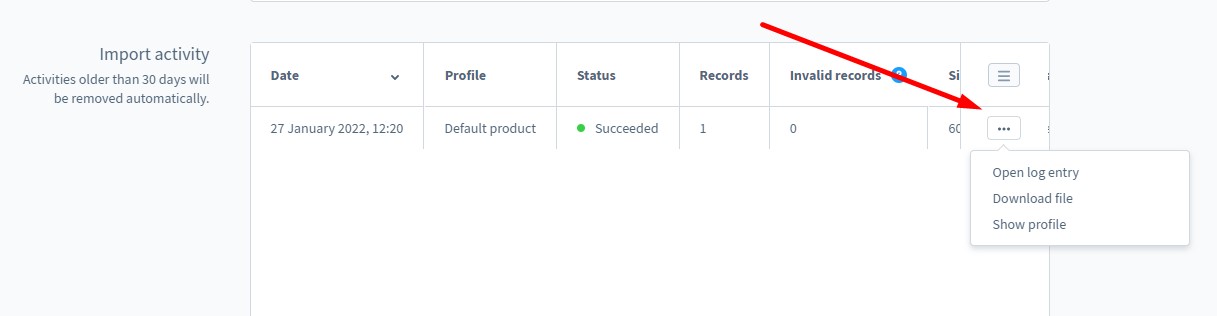
The Import activity grid contains a history of your imports. Note that the system automatically removes activities older than 30 days.
The context menu at the end of each line lets you download the imported CSV file as well as open the profile used. If an imported CSV file contains unsupported records, you can download them as a separate CSV file. Also, the context menu lets you cancel imports during the process.
In a nutshell, the import procedure is admin-friendly and intuitive. However, you may face lots of nuances described below. Let’s look at the Profiles tab of the Import/Export section and then proceed to other important details.
Shopware 6 Import Profiles
The Profiles tab contains all the import and export profiles. You can edit them and also create new profiles here.
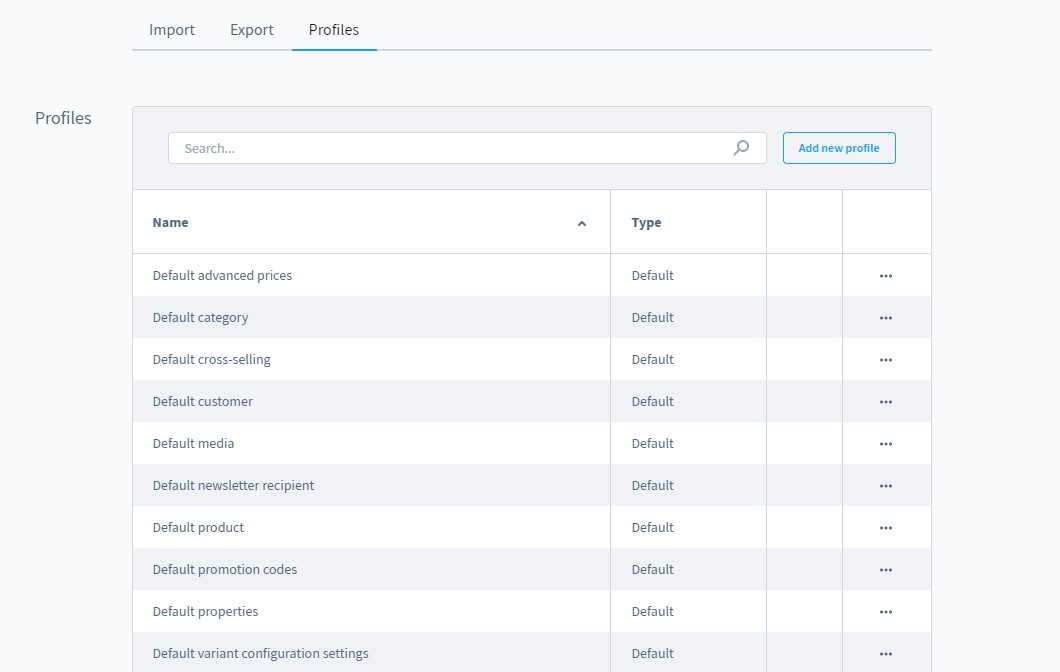
Use the context menu to open, delete, or duplicate profiles.
Hit the Add new profile button to create a new profile. If you have many profiles, use the search function to find the desired option.
How To Create Custom Import Profiles In Shopware 6
Below, we explain how to create custom import profiles for your Shopware 6 website. If you’ve decided to do that, ensure that you have selected the default system language. Otherwise, you won’t be able to use them. This requirement also applies to profiles in other languages.
There are two ways to create a new import profile:
- Hit the Add new profile button;
- Use the context menu to duplicate an existing profile and apply changes to it.
Let’s explore the first approach. Hit the Add new profile button, and Shopware 6 will display a window divided into the following two tabs:
- General;
- Field Indicator.
General
The General tab lets you name your new import profile as well as select its object type. The latter defines a certain mode for importing data and reduces the number of mapping options according to the linked database.
Use the mapping table to match CSV fields to their respective database counterparts. Also, pay heed to the fact that it is impossible to change the object type after introducing mapping options.

Field Indicator
The Field Indicator tab lets you specify a separator and an enclosure character. In Shopware 6, they are used to indicate the separate field within a CSV file:
Separators split single fields. A semicolon is the default option.
Enclosure characters group multiple fields. They appear at the beginning and end of a text. Note that separator characters are ignored within enclosure characters. A double quotation mark is the default option.

If your Shopware version contains import settings, you can also define how the system should handle the import file values. You can enable the creation of new records in the store as well as overwrite existing information.
Upload CSV File
Shopware also lets you create a new import profile based on existing CSV. It can be a file exported from another store. Upload it to provide your new import profile with the corresponding fields this CSV includes. Next, assign them to the corresponding database entries. That’s it!

How To Create Mapping For Shopware 6 Import
In a nutshell, creating a mapping scheme for an import profile in Shopware 6 is reduced two just two repetitive actions: you specify values from a CSV file and set a corresponding database value in front of it. That’s it. However, you need to keep several nuances in mind.
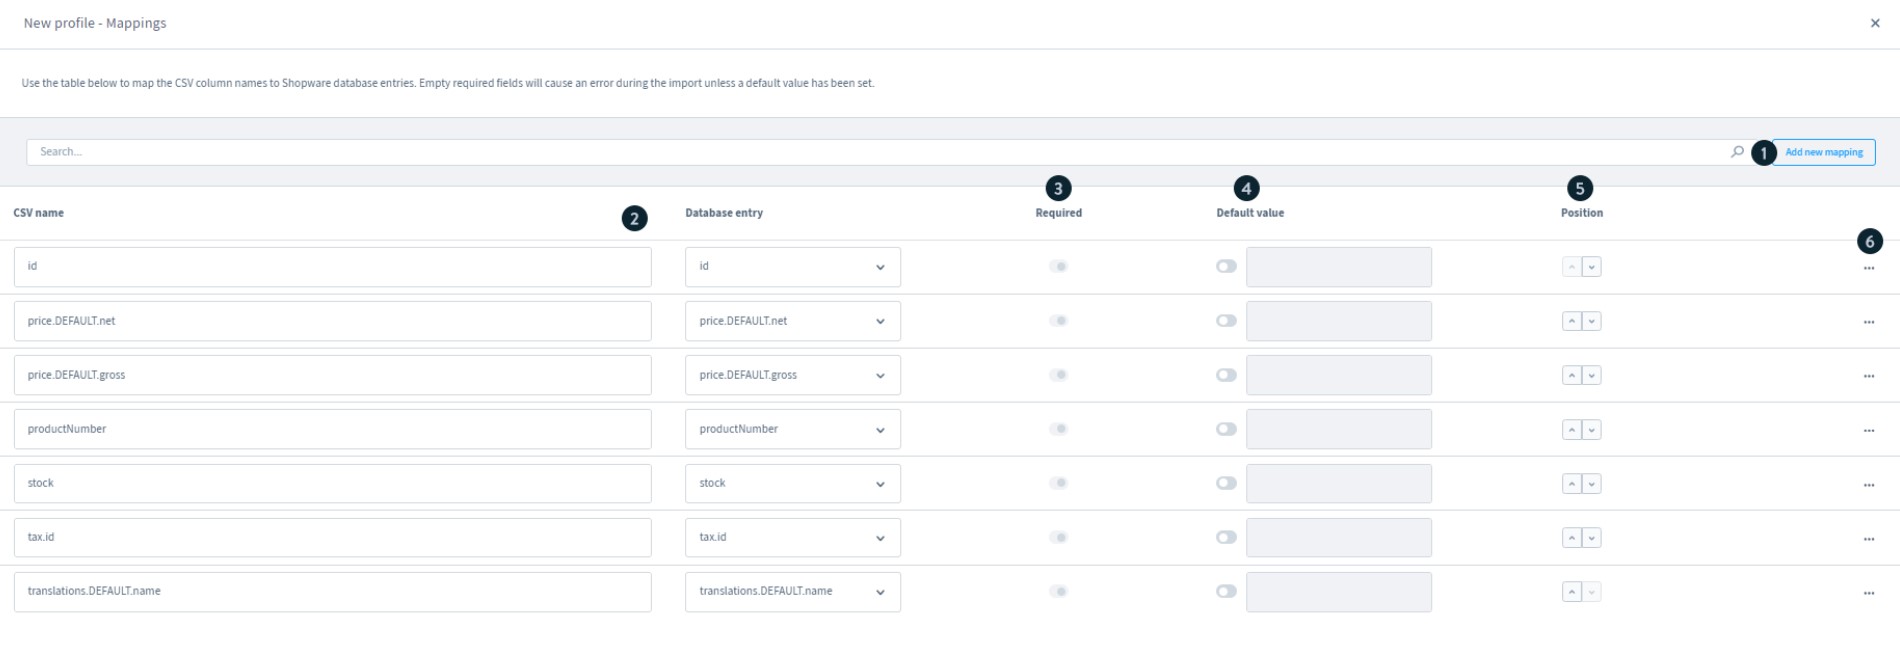
Add New Mapping
Hit the Add new mapping (1) button to add a line (2) to the mapping section of your import profile, where you can match a CSV entry with a database record. Note that you should use the name of the corresponding column from the CSV file that will be used with this profile as a CSV name.
Specify Required Fields
Use the Require (3) toggle to specify whether the respective field is a required field. If the toggle is active, the corresponding filled in your import file must be populated. Otherwise, you will get an import error.
Add Default Values
Shiopware 6 also lets you specify default values (4) that are provided automatically upon import if the corresponding field is empty.
Specify Field Position
This column lets you define which position (5) the corresponding field may appear in a CSV file.
Remove Entities
Use the context menu (6) on the right and its Delete option to remove unnecessary fields from your mapping scheme.
Shopware 6 Import Object Types
The following chapter explores all object types supported in Shopware 6 import by default. You will discover all database entries of each individual object type described.
Product
You can save only a complete profile that contains the following mandatory fields: id, stock, name, taxId, productNumber.
| Database entry | Description | Database table |
| active | This entry shows whether the product is active | product |
| autoIncrement | It is a unique decimal number | product |
| available | Availability indication | product |
| availableStock | Available stock | product |
| childCount | Number of variants | product |
| configuratorGroupConfig | Own property sorting | product |
| cover.id | UUID of the preview image of the product | product_media |
| cover.versionId | UUID, which indicates the version of the preview image of the product. | product_media |
| cover.media.Id | UUID of the preview image of the product. A dot can be set behind media to access further fields within media. | media |
| cover.position | Preview image position in the product media overview. | product_media |
| cover.customFields | Preview image additional field | custom_field |
| cover.createdAt | Preview image uploaded | product_media |
| cover.updatedAt | Preview image updated | product_media |
| deliveryTime.id | UUID of delivery time | delivery_time |
| deliveryTime.name | Name of the delivery time | delivery_time_translation |
| deliveryTime.customFields | Delivery time additional fields | delivery_time_translation |
| deliveryTime.min | Min. delivery time | delivery_time |
| deliveryTime.max | Max. delivery time | delivery_time |
| deliveryTime.unit | Delivery time Unit | delivery_time |
| deliveryTime.translations | Translations of the “deliveryTime” fields. You can place a period behind “translations” to access further fields. | delivery_time_translation |
| deliveryTime.createdAt | Delivery time created | delivery_time |
| deliveryTime.updated | Delivery time updated | delivery_time |
| ean | EAN number | product |
| height | Product height | product |
| Id | UUID, which is assigned by the system. This column should be left empty when creating new products. | product |
| isCloseout | Sale | product |
| length | Length | product |
| manufacturer.id | UUID of the manufacturer | product_manufacturer |
| manufacturer.versionId | UUID, which indicates the version of the manufacturer. | product_manufacturer |
| manufacturer.link | Manufacturer’s website | product_manufacturer |
| manufacturer.name | Manufacturer’s name | product_manufacturer_translation |
| manufacturer.description | Manufacturer’s description | product_manufacturer_translation |
| manufacturer.customFields | Manufacturer Additional fields | product_manufacturer_translation |
| manufacturer.media.Id | UUID of the manufacturer picture. You can place a dot behind “media” to access further fields within media. | media |
| manufacturer.translations | Translations of the manufacturer fields. You can place a dot behind “translations” to access further fields. | product_manufacturer_translation |
| manufacturer.createdAt | Manufacturer created | product_manufacturer |
| manufacturer.updatedAt | Manufacturer updated | product_manufacturer |
| manufacturerNumber | Manufacturer’s product number | product |
| markAsTopseller | Promote product | product |
| maxPurchase | Maximum purchase | product |
| media | URL of all product images except the cover image. | is generated |
| minPurchase | Minimal purchase | product |
| optionIds | Variant options | product_option |
| options | Variant options | property_group_option |
| parent | Fields of the main product for variant products. You can set a period after “parent” and thus access all fields that are also available in the Object Type Product. | product |
| price.DEFAULT.net | Standard net price. You can replace “DEFAULT” with the respective currency. e.g., EUR | product |
| price.DEFAULT.gross | Standard gross price. You can replace “DEFAULT” with the respective currency. e.g., EUR | product |
| price.DEFAULT.currencyId | UUID of the currency. You can replace “DEFAULT” with the respective currency. e.g., EUR | currency |
| price.DEFAULT.linked | Indicates whether the net and gross price are linked. You can replace “DEFAULT” with the respective currency. e.g., EUR | product |
| price.DEFAULT.listPrice | Extended prices. You can replace “DEFAULT” with the respective currency. e.g., EUR | product |
| productNumber | Product number | product |
| properties | UUID of the properties separated by a pipe symbol (|). | property_group_option |
| purchasePrice | Purchase price | product |
| purchaseSteps | Scaling | product |
| purchaseUnit | Sales unit | product |
| ratingAvarage | Average valuation | product |
| referenceUnit | Basic unit | product |
| releaseDate | Release date | product |
| restockTime | Restock time | product |
| shippingFree | Free shipping | product |
| stock | Stock | product |
| tagIds | Product tags | product_tag |
| tags | UUID of the tags, separated by a pipe symbol (|) | product_tag |
| tax.Id | UUID of the tax rate | tax |
| tax.taxRate | Percentage | tax |
| tax.name | Tax name | tax.translate |
| tax.customField | Additional fields | custom_field |
| tax.createdAt | The time when the tax rate was created | tax |
| tax.updatedAT | The time when the tax rate was updated | tax |
| translations.DEFAULT | All language-dependent product fields. You can replace “DEFAULT” with the language, and the respective field can be accessed after a subsequent period. e.g. translations.en-GB.name | product_translation |
| unit.Id | UUID of the measurement units | unit |
| unit.shortCode | Unit of measurement Abbreviation | unit_translation |
| unit.name | Unit of measurement name | unit_translation |
| unit.customFields | Measurement unit Additional fields | unit_translation |
| unit.translations | Translations of the unit of measurement fields. You can place a period after “translations” to access further fields. | unit_translation |
| unit.createdAt | Unit of measurement created | unit |
| unit.updatedAt | Unit of measurement updated | unit |
| variantRestrictions | Excluding variants from the variant generator | product |
| versionId | UUID, which indicates the version of the product. | product |
| visibilities.all | UUID of the sales channel in which the product is completely available | product_visibility |
| visivilities.link | UUID of the sales channel in which the product is hidden and only accessible through the direct link | product_visibility |
| visibilities.search | UUID of the sales channel where the product is only accessible by search. | product_visibility |
| weight | Weight | product |
| width | Width | product |
Customer
You can save only a complete profile that contains the following mandatory fields: id, firstName, lastName, customerNumber, email, defaultBillingAddressId, defaultShippingAddressId.
| Database entry | Description | Database table |
| active | Shows whether the customer is active | customer |
| affiliateCode | Affiliate code | customer |
| autoincrement | Unique decimal number | customer |
| birthday | Birthday | customer |
| campaignCode | Campaign code | customer |
| company | Company | customer |
| createdAt | Displays when was the customer created | customer |
| customFields | Customers additional fields | customer |
| customerNumber | Customer number | customer |
| defaultBillingAddress.id | UUID of the billing address | customer |
| defaultBillingAddress.firstName | First name of Invoice address | customer_address |
| defaultBillingAddress.lastName | Invoice address surname | customer_address |
| defaultBillingAddress.zipcode | Invoice address postcode | customer_address |
| defaultBillingAddress.city | Invoice address city | customer_address |
| defaultBillingAddress.company | Invoice address company | customer_address |
| defaultBillingAddress.street | Invoice address street | customer_address |
| defaultBillingAddress.department | Invoice address department | customer_address |
| defaultBillingAddress.title | Invoice address title | customer_address |
| defaultBillingAddress.vatId | Invoice address Tax-IdNr. | customer_address |
| defaultBillingAddress.phoneNumber | Invoice address phone number | customer_address |
| defaultBillingAddress.additionalAddressLine1 | Address suffix 1 of the invoice address | customer_address |
| defaultBillingAddress.additionalAddressLine2 | Address suffix 2 of the invoice address | customer_address |
| defaultBillingAddress.customFields | Additional fields of the invoice address | customer_address |
| defaultBillingAddress.customer | Customer fields of the invoice address. A period can be placed after “customer” to access further fields. | customer, customer_address |
| defaultBillingAddress.country | Country fields of the invoice address. A period can be set after “country” to access further fields. | customer_address, country, country_translation |
| defaultBillingAddress.countryState | State fields of the invoice address. A period can be set behind “countryState” to access further fields. | customer_address, country_state, country_state_translation |
| defaultBillingAddress.salutation | Salutation fields of the invoice address. A period can be placed after “salutation” to access further fields. | customer_address, salutation, salutation_translation |
| defaultBillingAddress.createdAt | When the invoice address was created. | customer_address |
| defaultBillingAddress.updatedAt | When the invoice address was updated. | customer_address |
| defaultPaymentMethod.id | UUID of the standard payment type. | customer |
| defaultPaymentMethod.pluginID | UUID of the plugin of the default payment method | payment_method |
| defaultPaymentMethod.handleridentifier | The storage location of the PaymentHandler | payment_method |
| defaultPaymentMethod.name | Name of the default payment method | payment_method |
| defaultPaymentMethod.description | Description of the default payment method | payment_method |
| defaultPaymentMethod.position | Position of the default payment type | payment_method |
| defaultPaymentMethod.active | Specifies whether the default payment type is active. | payment_method |
| defaultPaymentMethod.customFields | Additional fields of the default payment type | payment_method_translation |
| defaultPaymentMethod.formattedHandlerIdentifier | Shortened form of the HandlerIdentifier | payment_method |
| defaultPaymentMethod.translations | Translations of the default payment method. A period can be placed after “translations” to access additional fields. | payment_method, payment_method_translation |
| defaultPaymentMethod.media | Fields of the payment method logo. A period can be set behind “media” and thus access further fields within media. | payment_method, media |
| defaultPaymentMethod.availabilityRule | Fields of the payment type availability rule. You can set a period behind “availabilityRule” and thus access further fields. | payment_method, rule |
| defaultPaymentMethod.plugin | Fields of the payment method plugin. Behind the “plugin”, a period can be set to access further fields. | payment_method, plugin |
| defaultPaymentMethod.salesChannels | Sales channels in which the default payment method is stored. You can separate different channels with a “pipe” symbol (|). | payment_method |
| defaultPaymentMethod.createdAt | When the default payment type was created. | payment_method |
| defaultPaymentMethod.updatedAt | When the default payment method was updated. | payment_method |
| defaultShippingAddress.id | UUID of the delivery address. | customer |
| defaultShippingAddress.firstName | First name of delivery address. | customer_address |
| defaultShippingAddress.lastName | Surname of delivery address. | customer_address |
| defaultShippingAddress.zipcode | Postcode of delivery address. | customer_address |
| defaultShippingAddress.city | Postcode of delivery address. | customer_address |
| defaultShippingAddress.company | Company of delivery address. | customer_address |
| defaultShippingAddress.street | Street of delivery address. | customer_address |
| defaultShippingAddress.department | Department of the delivery address. | customer_address |
| defaultShippingAddress.title | Delivery address title. | customer_address |
| defaultShippingAddress.vatId | Tax ID number of the delivery address. | customer_address |
| defaultShippingAddress.phoneNumber | Phone number of the delivery address. | customer_address |
| defaultShippingAddress.additionalAddressLine1 | Address suffix 1 of the delivery address. | customer_address |
| defaultShippingAddress.additionalAddressLine2 | Address suffix 2 of the delivery address. | customer_address |
| defaultShippingAddress.customFields | Additional fields of the delivery address. | customer_address |
| defaultShippingAddress.customer | Customer fields of the delivery address. A period can be placed after “customer” to access further fields. | customer, customer_address |
| defaultShippingAddress.country | Country fields of the delivery address. A period can be set behind “country” to access further fields. | customer_address, country, country_translation |
| defaultShippingAddress.countryState | State fields of the delivery address. Behind “countryState”, you can set a period to access further fields. | customer_address, country_state, country_state_translation |
| defaultShippingAddress.salutation | Salutation fields of the delivery address. A period can be placed after “salutation” to access further fields. | customer_address, salutation, salutation_translation |
| defaultShippingAddress.createdAt | When the delivery address was created. | customer_address |
| defaultShippingAddress.updatedAt | When the delivery address was updated. | customer_address |
| doubleOptInConfirmDate | When the “doubleOptIn” mail was confirmed. | customer |
| doubleOptInEmailSendDate | When the “doubleOptIn” mail was sent. | customer |
| doubleOptInRegistration | Whether “doubleOptIn” registration was active during registration. | customer |
| Email. | customer | |
| firstLogin | First login of the customer. | customer |
| firstName | First name. | customer |
| group.id | UUID of the customer group. | customer |
| group.name | Customer group name. | customer_group |
| group.displayGross | Tax representation of the customer group. | customer_group |
| group.customFields | Customer groups additional fields. | customer_group_translation |
| group.translations | Translations of the customer group fields. You can place a period behind “translations” to access further fields. | customer_group_translation |
| group.createdAt | When the customer group was created. | customer_group |
| group.updatedAt | When the customer group was updated. | customer_group |
| guest | Whether it is a guest order? | customer |
| hash | The hash value used for the “doubleOptIn” confirmation mail. | customer |
| Id | UUID of the customer. | customer |
| language.id | UUID of the language. | customer |
| language.name | Name of the language. | language |
| language.customFields | Language additional fields. | language |
| language.parent | UUID of the language from which it is inherited. | language |
| language.locale | Fields of language localization. You can place a period after “locale” to access further fields. | language, locale, locale_translation |
| language.translationCode | ISO code fields of the language. You can place a period after “translationCode” to access further fields. | language, locale, locale_translation |
| language.salesChannels | UUID of the sales channels where the language is used. | language |
| language.createdAt | When was the language created | language |
| language.updatedAt | When was the language updated | language |
| lastLogin | Last login of the customer | customer |
| lastName | Surname | customer |
| lastOrderDate | Date of the last order | customer |
| lastPaymentMethods | Fields of the last payment method. You can place a period behind “lastPaymentMethods” to access additional fields. | customer, payment_methods, payment_methods_translation |
| legacyEncoder | Encoder to decrypt foreign system password | customer |
| legacyPasswort | Encrypted password from another system, e.g., after a migration | customer |
| newsletter | Whether the customer has opted into the newsletter. | customer |
| orderCount | Number of orders | customer |
| password | The encrypted hash value of the password | customer |
| remoteAddress | Customer’s IP address | customer |
| salesChannel.id | UUID of the sales channel to which the customer is assigned | customer |
| salesChannel.type. | Fields for the sales channel type. You can place a period after “type” to access further fields. | sales_channel, sales_channel_type, sales_channel_type_translation |
| salesChannel.language. | Fields for the language of the sales channel. You can place a period after “language” to access further fields. | sales_channel,
language, language_translation |
| salesChannel.customerGroup. | Fields for the standard customer group of the sales channel. You can set a period and thus access further fields after “customerGroup”. | sales_channel, customer_group, customer_group_translation |
| salesChannel.currency | Fields for the default currency of the sales channel. You can set a period after “currency” to access other fields. | sales_channel, currency, currency_translation |
| salesChannel.paymentmethod | Fields for the standard payment type of the sales channel. You can set a period after “paymentmethod” to access further fields. | sales_channel, payment_method, payment_method_translation |
| salesChannel.shippingMethod | Fields for the standard shipping type of the sales channel. You can set a period after “shippingMethod” to access additional fields. | sales_channel, shipping_method, shipping_method_translation |
| salesChannel.country | Fields for the default country of the sales channel. You can set a period after country to access other fields. | sales_channel, country, country_translation |
| salesChannel.navigationCategory | Fields for the category defined as the entry point for the main navigation of the sales channel. You can set a period behind “navigationCategory” to access additional fields. | sales_channel, category, category_translation |
| salesChannel.navigationCategoryDepth | Main navigational levels. | sales_channel |
| salesChannel.footerCategory | Fields for the category that is stored as the entry point for the footer navigation of the sales channel. You can set a period after “footerCategory” to access additional fields. | sales_channel, category, category_translation |
| salesChannel.serviceCategory | Fields for the category defined as the entry point for the service navigation of the sales channel. You can set a period after “serviceCategory” to access additional fields. | sales_channel, category, category_translation |
| salesChannel.mailHeaderFooter | Fields for the header and footer of the sales channel’s mail template. Behind “mailHeaderFooter”, you can place a period to access further fields. | sales_channel, mail_header_footer, mail_header_footer_translation, |
| salesChannel.name | Name of the sales channel. | sales_channel |
| salesChannel.shortName | Sales channel abbreviation. | sales_channel |
| salesChannel.accessKey | API access. | sales_channel |
| salesChannel.configuration | Config entries for the sales channel. | sales_channel |
| salesChannel.active | Specifies whether the sales channel is active. | sales_channel |
| salesChannel.maintenance | Maintenance mode. | sales_channel |
| salesChannel.maintenanceWhiteList | Maintenance mode whitelist. | sales_channel |
| salesChannel.customFields | Sales channel additional fields. | sales_channel_translation |
| salesChannel.translations | Translations of the sales channel fields. You can place a period after “translations” to access further fields. | sales_channel_translation |
| salesChannel.currencies | Sales channel currencies. | sales_channel_currency |
| salesChannel.languages | Sales channel languages. | sales_channel_language |
| salesChannel.countries | Sales channel countries. | sales_channel_country |
| salesChannel.paymentMethods | Sales channel payment methods. | sales_channel_payment_method |
| salesChannel.shippingMethods | Sales channel shipping methods. | sales_channel_shippingMethod |
| salesChannel.createdAt | When the sales channel was created. | sales_channel |
| salesChannel.updatedAt | When the sales channel was updated. | sales_channel |
| salesChannel.themes | A theme assigned to the sales channel. | theme_sales_channel |
| salutation.id | UUID of the salutation. | |
| salutation.salutationKey | The technical name of the salutation. | salutation |
| salutation.displayName | The name of the salutation. | salutation_translation |
| salutation.letterName | Address by letter. | salutation_translation |
| salutation.translations | Translations of the salutation fields. You can place a period after “translations” to access additional fields. | salutation, salutation_translation |
| salutation.createdAt | When the salutation was created. | salutation |
| salutation.updatetAt | When the salutation was updated. | salutation |
| tags | Customer tags. | customer_tag |
| title | Title. | customer |
| updatedAt | When the customer was updated. | customer |
Categories
You can save only a complete profile that contains the following mandatory fields: id, name, type.
| Database entry | Description | Database table |
| active | Whether the category is active. | category |
| afterCategoryId | UUID of the category before this category. | category |
| afterCategoryVersionID | The version of the category before this category. | category |
| autoincrement | Unique decimal number. | category |
| childCount | The number of subcategories. | category |
| cmsPage.id | UUID of the deposited shopping experiences. | category |
| cmsPage.name | Name of the deposited shopping experiences. | cms_page_translation |
| cmsPage.type | Layout Type of the stored shopping experiences. | cms_page |
| cmsPage.customFields | Shopping experiences Additional fields. | cms_page_translation |
| cmsPage.locked | Shopping experiences may not be edited. | cms_page |
| cmsPage.translations | A dot can be placed behind translations to access additional fields. | cms_page, cms_page_translation |
| cmsPage.previewMedia | Fields for preview pictures of the world of experience. You can set a period behind “previewMedia” to access further fields. | cms_page, media |
| cmsPage.createdAt | When the shopping experiences were created. | cms_page |
| cmsPage.updatedAt | When the shopping experiences were updated. | cms_page |
| id | UUID of the category. | category |
| level | Category level. | category |
| media | Fields of the category display image. A period can be placed after “media” to access further fields. | category, media |
| parent | Fields of the parent category. You can place a period after “parent” to access further fields. | category, category_translation, media |
| path | Category path. | category |
| products | UUID of the products deposited in the category, separated by a pipe symbol (|). | product_category |
| tags | Category tags. | category_tag |
| translations.DEFAULT
e.g. translations.de_DE.name translations.de_DE.description translations.en_GB.keywords |
All language-dependent category fields. You can replace “DEFAULT” with the language, and the respective field can be accessed by a subsequent period. For instance, translations.en-GB.name | category, category_translation |
| type | Category type. | category |
| versionId | UUID, which indicates the version of the category. | category |
| visible | Hide in the navigation. | category |
Orders
You can save only a complete profile that contains the following mandatory fields: id, salesChannelId, orderDateTime, stateId.
| Database entry | Description | Database table |
| affiliateCode | Partner (affiliate) code | order |
| amountNet | Net amount | order |
| amountTotal | Total amount | order |
| autoIncrement | Unique decimal number | order |
| billingAddress.additionalAddressLine1 | Address addition to the billing address | order_address |
| billingAddress.additionalAddressLine2 | Address addition to the billing address | order_address |
| billingAddress.city | City of the billing address | order_address |
| billingAddress.company | Company | order_address |
| billingAddress.country | Country | order_address |
| billingAddress.country.active | Country is active | country |
| billingAddress.country.checkVatIdPattern | country | |
| billingAddress.country.companyTax | Company tax | country |
| billingAddress.country.companyTaxFree | Company is tax free | country |
| billingAddress.country.customerTax | Customer tax | country |
| billingAddress.country.displayStateInRegistration | Region is displayed in the registry | country |
| billingAddress.country.forceStateInRegistration | Region is required | country |
| billingAddress.country.id | Billing address ID | order_address
country |
| billingAddress.country.iso | ISO-Code | country |
| billingAddress.country.iso3 | ISO 3-Code | country |
| billingAddress.country.position | Position | country |
| billingAddress.country.salesChannels | Sales channel ID | sales_channel_id |
| billingAddress.country.shippingAvailable | Billing address available for shipping | country |
| billingAddress.country.taxFree | Tax free | country |
| billingAddress.country.translated | country_state_translation | |
| billingAddress.country.translations.DEFAULT.
bsp. billingAddress.country.translations.de-DE.country billingAddress.country.translations.en-GB.country |
||
| billingAddress.country.vatIdPattern | ||
| billingAddress.country.vatIdRequired | Vat required | country |
| billingAddress.countryId | bBilling address ID | order_adress |
| billingAddress.countryState.active | State is active | country_state |
| billingAddress.countryState.shortCode | Shortcode | country_state |
| billingAddress.countryState.translated | ||
| billingAddress.countryState.translations
bsp. billingAddress.countryState.translations.de-DE.countryState billingAddress.countryState.translations.en-GB.countryState |
||
| billingAddress.countryStateId | State ID | order_adress
country_state |
| billingAddress.createdAt | When the billing address was created | order_adress |
| billingAddress.customFields | Custom fields | order_adress |
| billingAddress.department | Department | order_adress |
| billingAddress.firstName | First name | order_adress |
| billingAddress.id | UUID if the address | order_adress |
| billingAddress.lastName | Last name | order_adress |
| billingAddress.order.affiliateCode | Partner code | order |
| billingAddress.order.amountNet | Net amount | order |
| billingAddress.order.amountTotal | Total amount | order |
| billingAddress.order.autoIncrement | Unique decimal number | order |
| billingAddress.order.billingAddressId | Billing address ID | order |
| billingAddress.order.billingAddressVersionId | UUID, which indicates the version of the billing address | order |
| billingAddress.order.campaignCode | Campaign code | order |
| billingAddressId | UUID of the billing address | order |
| billingAddressVersionId | UUID, which indicates the version of the billing address | order |
| campaignCode | Campaign code | order |
| createdAt | When the order was created | order |
| createdBy.
bsp. createdBy.admin createdBy.firstName |
Created by | order |
| currency.translated | curreny_translation | |
| currency.factor | Currency factor | currency |
| currency.id | Currency ID | order |
| currency.isSystemDefault | System default currency | |
| currency.isoCode | ISO-code | currency |
| currency.itemRounding | Decimal place | currency |
| currency.position | Position | currency |
| currency.salesChannels | Currency of Sales channel | sales_channel_currency |
| currency.symbol | Symbol of the currency | currency |
| currency.taxFreeFrom | Tax-free from | currency |
| currency.translated
e.g. currency.translations.de-DE.createdAt currency.translations.en-GB.createdAt |
curreny_translation | |
| currencyFactor | Currency factor | order |
| currencyId | Currency ID | order
currency |
| customFields | Custom fields | order |
| customerComment | Customer comment | order |
| deepLinkCode | Code for deep link | order |
| deliveries.createdAt | Created at | order_delivery |
| deliveries.customFields | Custom fields | order_delivery |
| deliveries.id | Lieferung ID | order_delivery |
| deliveries.order | ||
| deliveries.orderId | UUID of order | order_delivery |
| deliveries.orderVersionId | UUID, which indicates the version of the order | order_delivery |
| deliveries.positions | Delivery position | order_delivery_position |
| deliveries.shippingCosts | Shipping costs | order_delivery |
| deliveries.shippingDateEarliest | Shipping date earliest | order_delivery |
| deliveries.shippingDateLatest | Shipping date latest | order_delivery |
| deliveries.shippingMethod | Shipping method | order_delivery |
| deliveries.shippingMethodId | Shipping method ID | order_delivery |
| deliveries.shippingOrderAddress | Shipping order address | |
| deliveries.shippingOrderAddressId | Shipping order address ID | order_delivery |
| deliveries.stateId | ID of state | order_delivery |
| deliveries.stateMachineState. | Order status | state_machine_state |
| deliveries.trackingCodes | Partner code | order_delivery |
| deliveries.updatedAt | Updated at | order_delivery |
| deliveries.versionId | Delivery version ID | order_delivery |
| id | ID | order |
| itemRounding | Decimal places | currency |
| language.
bsp. language.id language.locale |
Diverse language information | language |
| languageId | UUID of language | order |
| lineItems | order_line_item | |
| orderCustomer.company | Company | order_customer |
| createdBy.recoveryUser.user.aclRoles |
Media
The standard Shopware 6 import procedure lets you save only a complete profile that contains the following mandatory field: id.
| Database entry | Description | Database table |
| avatarUser | Links to the user to which this picture is assigned as an avatar. Behind “avatarUser”, you can set a period so that further fields can be accessed | media |
| fileExtension | File extension | media |
| fileName | Filename | media |
| fileSize | File size | media |
| id | UUID of the media file | media |
| mediaFolder.childCount | Number of subfolders | media_folder |
| mediaFolder.configuration.createThumbnails | Generate thumbnails for this folder | media_folder_configuration |
| mediaFolder.configuration.createdAt | When the folder settings were created | media_folder_configuration |
| mediaFolder.configuration.customFields | Additional fields for the folder settings | media_folder_configuration |
| mediaFolder.configuration.id | UUID of the configuration | media_folder |
| mediaFolder.configuration.keepAspectRation | Keep aspect ratio | media_folder_configuration |
| mediaFolder.configuration.mediaThumbnailSizes | Thumbnail size | media_folder_configuration |
| mediaFolder.configuration.thumbnailQuality | Thumbnail quality | media_folder_configuration |
| mediaFolder.configuration.updatedAt | When were the folder settings updated | media_folder_configuration |
| mediaFolder.createdAt | When the folder was created | media_folder |
| mediaFolder.customFields | Media folder additional fields | media_folder |
| mediaFolder.defaultFolder | fields to the default location. Set a period behind “defaultFolder” to access further fields. | media_folder, media_default_folder |
| mediaFolder.id | UUID of the folder where the media file is located | media |
| mediaFolder.name | Folder name | media_folder |
| mediaFolder.parent | Fields to the folder above this folder. A period can be placed after “parent” to access further fields. | media_folder |
| mediaFolder.updatedAt | When the folder was updated | media_folder |
| mediaFolder.useParentConfiguration | Adopt settings from the superordinate folder | media_folder |
| mediaType | Media type | media |
| metaData | Metadata of the media | media |
| mimeType | Internet media type | media |
| tags | Media tags | media_tags |
| translations. DEFAULT’
e.g. translations.de-DE.alt translations.de-DE.title |
All language-dependent media fields. “DEFAULT” can be replaced by the language, and the respective field can be accessed by a subsequent period. For instance, translations.en-GB.old | |
| uploadedAt | When the media file was uploaded | media |
| url | URL to the media file | wird generiert |
| user. | Fields of the user who uploaded the media file. A period can be set after “user” to access further fields. | user |
Newsletter Recipients
You can save only a complete profile that contains the following mandatory fields: id, email, status, hash, salesChannelId.
| Database entry | Description | Database table |
| city | Newsletter recipient city | newsletter_recipient |
| confirmedAt | Newsletter recipient confirmation date | newsletter_recipient |
| createdAt | Newsletter recipient creation date | newsletter_recipient |
| customFields | Newsletter recipient additional fields | newsletter_recipient |
| Newsletter recipient email address | newsletter_recipient | |
| firstName | Newsletter recipient first name | newsletter_recipient |
| hash | Hash value to confirm the newsletter recipient | newsletter_recipient |
| id | Newsletter recipient UUID | newsletter_recipient |
| language | Newsletter recipient language. You can place a period behind “language” to access further fields. | newsletter_recipient, language, |
| salesChannel | A sales channel in which the newsletter recipient is registered. You can set a period behind “salesChannel” to access further fields. | newsletter_recipient, sales_channel |
| salutation | Newsletter recipient salutation. You can place a period behind “salutation” to access further fields. | newsletter_recipient, salutation |
| status | Newsletter recipient status | newsletter_recipient |
| street | Newsletter recipient street | newsletter_recipient |
| tags | Newsletter recipient tags | newsletter_recipient_tag |
| title | Newsletter recipient title | newsletter_recipient |
| updatedAt | When the newsletter recipient was updated | newsletter_recipient |
| zipCode | Newsletter recipient postcode | newsletter_recipient |
Properties
You can save only a complete profile that contains the following mandatory fields: id, group.Id, and name.
| Database entry | Description | Database table |
| colorHexCode | Color code of the color stored in the property. | property_group_option |
| group.displayType | Display of the characteristic selection | property_group |
| group.id | Property group UUID | property_group |
| group.sortingType | Property group sorting | property_group |
| group.translations.DEFAULT
e.g. group.translations.de-DE.description group.translations.en-GB. |
All language-dependent fields of the property group. You can replace “DEFAULT” with the language and the respective field can be accessed with a subsequent period. For instance group.translations.en-GB.description | property_group_translations |
| id | Property value UUID | property_group_option |
| media | Fields of the default picture of the property profile. You can place a period “media” to access other fields. | property_group_option,
media |
| productOptions | UID of the variants that use this property value | product_option |
| productProperties | Product UUIDs to which this property value has been assigned as a property. | product_property |
| translations.DEFAULT
e.g. translations.de-DE.name translations.en-GB.position |
All language-dependent fields of the property value. You can replace “DEFAULT” with the language and the respective field can be accessed with a subsequent period. For instance, translations.en-GB.name | property_group_option_translation |
Variant Configuration
You can save only a complete profile that contains the following mandatory fields: id, productid, and option.id.
| Database entry | Description | Database table |
| createdAt | Variant configuration creation date | product_configurator_setting |
| customFields | Variant configuration of additional fields | product_configurator_setting |
| is | Variant configuration UUID | product_configurator_setting |
| media | Media fields of the property pictures from the storefront view | product_configurator_setting |
| option.id | Property value UUID | property_group_option |
| option.group | Fields of the property group of the property attribute. You can set a period after “group” and thus access other fields. | property_group_option, property_group |
| option.Id | Property value UUID | property_group_option |
| option.media | Fields on the screen for the characteristic value.
A dot can be placed after media to access other fields. |
property_group_option, media |
| option.productOptions | UUID of variants that use this option | product_option |
| option.properties | Product UUIDs to which this option has been assigned as a property. | product_property |
| option.translations.DEFAULT
e.g. translations.de-DE.name translations.en-GB.position |
All language-dependent fields of the property value. You can replace “DEFAULT” with the language, and the respective field can be accessed with a subsequent period. For instance, translations.en-GB.name | property_group_option_translation |
| position | Storefront display position | product_configurator_setting |
| price.DEFAULT.net | Net surcharge. You can replace “DEFAULT” with the respective currency. For instance, EUR | product_configurator_setting |
| price.DEFAULT.gross | Gross mark-up. You can replace “DEFAULT” with the respective currency. For instance, EUR | product_configurator_setting |
| price.DEFAULT.currencyId | Currency UUID. You can replace “DEFAULT” with the respective currency. For instance, EUR | product_configurator_Setting, currency |
| price.DEFAULT.linked | Indicates whether the net and gross price are linked. You can replace “DEFAULT” with the respective currency. For instance, EUR | product_configurator_setting |
| price.DEFAULT.listPrice | Extended prices. You can replace “DEFAULT” with the respective currency. For instance EUR | product_configurator_setting |
| product | Fields of the product to which variant configuration is assigned | product_configurator_setting |
| updatedAt | When the variant configuration was updated | product_configurator_setting |
Shopware 6 Cross-Selling
You can save only a complete profile that contains the following mandatory fields: id, productid, and optionid.
| Database entry | Description | Database table |
| active | Shows whether the entity is active | product_cross_selling |
| assignedProducts | The product ID of the assigned product | product_cross_selling_assigned_products |
| id | The ID of the product recommendation | product_cross_selling |
| limit | Maximum number of products | product_cross_selling |
| position | Numerical value | product_cross_selling |
| product.active | Product is active | product |
| product.autoIncrement | Unique numerical value | product |
| product.available | Product is available | product |
| product.availableStock | Available stock | product |
| product.canonicalProduct.
diverse Optionen |
You can place a period behind “canonicalProduct” to access additional fields. | product |
| product.canonicalProductId | product | |
| product.categories | UUID of category | product |
| product.categoriesRo | ||
| product.categoryIds | ID of category | product |
| product.categoryTree | IDs of the categories | product |
| product.cheapestPrice | Cheapest price | product |
| product.childCount | Number of variants | product |
| product.cmsPage.translations.DEFAULT
e.g. product.cmsPage.translations.de-DE.cmsPage product.cmsPage.translations.en-GB.cmsPage |
cms_page_translation | |
| product.cmsPage.config | Configuration | cms_page |
| product.cmsPage.entity | Object | cms_page |
| product.cmsPage.id | ID | product |
| product.cmsPage.locked | Locked | cms_page |
Promotions
You can save only a complete profile that contains the following mandatory fields: id, productid, and optionid.
| Database entry | Description | Database table |
| active | Shows whether the promotion is active | promotion |
| code | The activation code for the discount promotion | promotion |
| use.codes | Shows whether an activation code is used | promotion |
| id | Promotion discount ID | promotion_discount |
| promotion.id | Promotion ID | promotion, promotion_discount |
| scope | The range where the discount is applied | promotion_discount |
| type | Type of discount deduction | promotion_discount |
| value | Discount value | promotion_discount |
| consider.advanced.rules | Shows whether extended rules are included in the discount promotion | promotion_discount |
| max.value | The maximum value of the discount that will be granted | promotion_discount |
| discount.rules | Shows whether rules are stored in the discount | promotion_discount |
| applier.key | How many items receive the discount | promotion_discount |
| sorter.key | Shows whether the price is sorted in ascending or descending order | promotion_discount |
| valid.from | From when the promotion is active | promotion |
| valid.until | Until when the promotion is active | promotion |
Advanced Prices
You can save only a complete profile that contains the following mandatory fields: id, productId, ruleId, and quantityStart.
| Database entry | Description | Database table |
| createdAt | When was the extended price created | product_price |
| id | Advanced price unique UUID | product_price |
| price.DEFAULT
bsp. price.EUR.currencyId price.USD.gross price.GBP.net |
All fields for the price to be imported. You can replace “DEFAULT” with the ISO code of the currency and, by the following period, access the respective field. E.g., price.USD.gross | product_price |
| product.DEFAULT
bsp. product.active product.availableStock product.categories |
All product-dependent fields of the product for which the extended prices apply. You can replace “DEFAULT” with the field name to be accessed. E.g., product.id | product |
| purchasePrices.DEFAULT
bsp. purchasePrices.EU.currencyId purchasePrices.USD.gross purchasePrices.GBP.net
|
All fields for the purchase price to be imported. You can replace “DEFAULT” with the ISO code of the currency and, by the following period, access the respective fields. E.g., price.USD.gross | product |
| quantityEnd | The maximum quantity of the product in the cart for this price to be applied. | product_price |
| quantityStart | Minimum quantity of the product in the cart for this price to be applied. | product_price |
| ruleId | Unique UUID of the rule applied to this extended price. | product_price |
| rule.DEFAULT
bsp. rule.name rule.priority |
All fields for the used rule from the rule builder. DEFAULT can be replaced by the field name to be accessed. Ex. rule.name | rule |
Promotion Codes
No restrictions are listed in the official documentation.
| Database entry | Description | Database table |
| promotion.active | Shows whether the promotion is active | promotion |
| promotion.cartRules | Cart rule for promotion | promotion_cart_rule |
| promotion.code | Promotion Code | promotion |
| promotion.customerRestriction | Customer restriction | promotion |
| promotion.exclusionIds | ID | promotion |
| promotion.id | UUID | promotion |
| promotion.individualCodePattern | Custom pattern for individual code | promotion |
| promotion.maxRedemptionsGlobal | Max. total uses | promotion |
| promotion.maxRedemptionsPerCustomer | Max. uses per customer | promotion |
| promotion.orderCount | Order count | promotion |
| promotion.orderRules | Order rule | promotion_order_rule |
| promotion.personaCustomers | Information about promotion ID & customer ID | promotion_persona_customer |
| promotion.personaRules | Information about promotion ID & rule ID | promotion_persona_rule |
| promotion.perventCombinaton | Prevent combination with other promotions | promotion |
| promotion.translated.DEFAULT.
Example: translations.de_DE.language translations.de_DE.customFields.FiledName translations.en_GB.name |
All language-dependent fields of the property value. You can replace “DEFAULT” with the language and the respective field can be accessed with a subsequent period. For instance, translations.en-GB.name | promotion_translation |
| code | Promotion Code | promotion |
| createdAt | Created at | promotion |
| id | UUID | promotion |
| payload | Information on the order ID, customer ID, and customer name | promotion_individual_code |
| promotionId | UUID | promotion_individual_code |
| updatedAt | Updated at | promotion |
How To Import Products To Shopware 6
Now, let’s see how to import products to Shopware 6. As usual, the system lets you start the import procedure under Settings -> Shop -> Import/Export -> Import tab. Below, you will find not only the import process associated with your Shopware administration but also a corresponding CSV file. Let’s see other important nuances in this Shopware 6 import guide.
Don’t start your Shopware 6 product import by choosing a CSV file. Select a corresponding import profile instead – Default product. The Import product variants checkbox displays. Do not activate it. We describe how to import product variants below.
Now, choose a CSV file that matches the selected profile. You should ensure that your CSV file contains all products and required information, as we’ve already mentioned. Correct column names are mandatory.
When everything is configured properly, click Start import.
Example CSV Fle
You can view and download an example of a default product profile here: .
The corresponding table consists of the following columns. You have to edit them accordingly:
| id | A unique product UUID. It is automatically assigned during import. It can be left empty. |
| parent_id | A unique parent product UUID. It is assigned if it is a variant product. It can be left empty. |
| product_number | Place a product number here. |
| active |
|
| stock | Specify a current product stock here. |
| name | Add a product name to this column. |
| description | Add a product description here |
| price_net | Add a net price into this column. |
| price_gross | Add a gross price here. |
| tax_id | Specify a unique UUID of the tax rate here. Leave empty to create a new tax rate later. If you call the configuration page of the respective headset, the ID is displayed in the address line. |
| tax_rate | Add a tax rate value here (e.g., 5 or 20) |
| tax_name | Add the name of the tax rate (e.g., 5% or 20%) |
| cover_media_id | Enter the image UUID to use it as a preview image. You can find its UUID in the database table media in the id column. Leave this field empty to import a new image later. |
| cover_media_url | Enter the image URL to use it as a preview image. Shopware 6 supports external URLs outside your installation.
The import of additional images is not included in the standard profile. For this purpose, it is necessary to create a new product profile and add the database mapping “media”. |
| cover_media_title | Add a title to internally save the imported preview image. |
| cover_media_alt | Add an alternate text of the preview image here. |
| manufacturer_idThe manufacturer should already exist in your store. | Enter the manufacturer’s UUID to assign them to the imported item. The corresponding ID displays in the address line when you visit the configuration page of the respective manufacturer. Leave this field empty to import a new manufacturer later. |
| manufacturer_name | Enter a manufacturer name to create a new manufacturer. |
| categories | Enter category UUIDs to assign the product to. A category ID displays in the address line when you go to the configuration page of the respective category. Separate UUIDs with pipe symbols (|) to assign several categories. |
| sales_channels | Enter sales channel UUIDs to assign the product to. A sales channel ID displays in the address line when you go to the configuration page of the respective sales channel. Separate UUIDs with pipe symbols (|) to assign several sales channels. |
After Shopware Import
If the Shopware 6 import process is successful, the system displays a message with the corresponding information. It means that your imported products are already available under Catalog -> Products.
In the case of a failed import process, Shopware 6 displays a message under the Start Import button, informing you of the numbers of both successfully imported and failed records.
As mentioned above, Shopware 6 import is associated with the ability to download the unimported entries in a separate CSV file. The latter consists of the failed records and an extra column titled _error. Here, you can see the import of the corresponding record failed.
Correct errors straight in the downloaded CSV file and then re-import it back.
Automated Product Import
If you have to deal with regular data updates, the basic Import/Export module of Shopware 6 may not be enough for satisfying your business needs. If it is necessary to periodically import products to your e-commerce website, a third-party tool can help you automate these processes. It means that you only need to configure the process once, and it will run in the background following the specified schedule.
You need the Improved Import, Export & Mass Actions extension to automatically create a schedule of updates and import products to Shopware 6. Besides, the module lets you map all the external data to the corresponding values from your Shopware database so that you can link any external source to your e-commerce website. Contact our support for further information and follow this link:
How To Import Newsletter Recipients To Shopware 6
Now, let’s see how to import newsletter recipients to Shopware 6. As usual, the system lets you start the import procedure under Settings -> Shop -> Import/Export -> Import tab. Below, you will find not only the import process associated with your Shopware administration but also a corresponding CSV file.
Don’t start your Shopware 6 newsletter recipient import by choosing a CSV file. Select a corresponding import profile instead – default newsletter recipient.
Now, choose a CSV file that matches the selected profile. You should ensure that your CSV file contains all products and required information, as we’ve already mentioned. Correct column names are mandatory.
When everything is configured properly, click Start import.
Example CSV File
You can view and download an example of a default newsletter recipient profile here: .
The corresponding table consists of the following columns. You have to edit them accordingly:
| id | A recipient UUID. Leave it empty to automatically assign during the import. |
| Specify a recipient’s email address here. | |
| title | Type an optional recipient title in this column. |
| salutation | Specify salutations here. |
| first_name | Enter the recipient’s first name. |
| last_name | Enter the recipient’s last name. |
| zip_code | Enter the recipient’s zip code. |
| city | Enter the recipient’s city. |
| street | Enter the recipient’s street. |
| status | Enter the recipient status. By default, the standard system uses “direct” here. Some plugins may use other statuses. |
| hash | Shopware 6 uses the hash value to ensure the correct registration. A random unique hash value is required. |
| sales_channel_id | Enter the sales channel UUIDs to which the newsletter subscriber is assigned. A sales channel ID displays in the address line when you go to the configuration page of the respective sales channel. Separate UUIDs with pipe symbols (|) to assign several sales channels. |
After Shopware Import
If the Shopware 6 import process is successful, the system displays a message with the corresponding information. It means that your imported newsletter recipients are already available under Marketing -> Newsletter recipient.
In the case of a failed import process, Shopware 6 displays a message under the Start Import button, informing you of the numbers of both successfully imported and failed records.
As mentioned above, Shopware 6 import is associated with the ability to download the unimported entries in a separate CSV file. The latter consists of the failed records and an extra column titled _error. Here, you can see the import of the corresponding record failed.
Correct errors straight in the downloaded CSV file and then re-import it back.
Automated Newsletter Subscriber Import
If you have to deal with regular data updates, the basic Import/Export module of Shopware 6 may not be enough for satisfying your business needs. If it is necessary to import newsletter subscribers to your e-commerce website periodically, there is a tool that can help you automate these processes. It means that you only need to configure the process once, and it will run in the background following the specified schedule.
You need the Improved Import, Export & Mass Actions extension to automatically create a schedule of updates and import newsletter subscribers to Shopware 6. Besides, the module lets you map all the external data to the corresponding values from your Shopware database so that you can link any external source to your e-commerce website. Contact our support for further information and follow this link:
How To Import Properties To Shopware 6
Now, let’s see how to import properties to Shopware 6. As usual, the system lets you start the import procedure under Settings -> Shop -> Import/Export -> Import tab. Below, you will find not only the import process associated with your Shopware administration but also a corresponding CSV file.
Don’t start your Shopware 6 properties import by choosing a CSV file. Select a corresponding import profile instead – default properties.
Now, choose a CSV file that matches the selected profile. You should ensure that your CSV file contains all products and required information, as we’ve already mentioned. Correct column names are mandatory.
When everything is configured properly, click Start import.
Example CSV File
You can view and download an example of a default property profile here: .
The corresponding table consists of the following columns. You have to edit them accordingly:
| id | A unique property value UUID. You can leave this field empty to automatically assign the ID during import. |
| color_hex_code | A color code of the property. |
| name | Type a property name here. |
| position | A property position according to which it displays in the administration. |
| group_id | A unique property group UUID. |
| group_display_type | Characteristic selection display. |
| group_sorting_type | Characteristic selection sorting: “alphanumeric”, “numeric”, and “position”. |
| group_name | Enter a property group name here. |
| group_description | A property group description is optional. |
| group_position | A property group position is optional. |
| media_id | Enter the image UUID to use it as a preview image. You can find its UUID in the database table media in the id column. Leave this field empty to import a new image later. |
| media_folder_id | You can optionally specify the folder UUID where the image is located. If you go to the configuration page of the respective image folder under Content ->Media to display the ID in the address bar. Leave this field empty to import a new image later. |
| media_type | Live it empty for the Shopware 6 import. As for the export process, this field contains properties of the used image. |
| media_title | Type the image title here. It is possible to leave this field empty. |
| medie_alt | Enter the alternative SEO title of the image here. It is possible to leave this field empty. |
After Shopware Import
If the Shopware 6 import process is successful, the system displays a message with the corresponding information. It means that your imported properties are already available under Catalog -> Properties.
In the case of a failed import process, Shopware 6 displays a message under the Start Import button, informing you of the numbers of both successfully imported and failed records.
As mentioned above, Shopware 6 import is associated with the ability to download the unimported entries in a separate CSV file. The latter consists of the failed records and an extra column titled _error. Here, you can see the import of the corresponding record failed.
Correct errors straight in the downloaded CSV file and then re-import it back.
Automated Property Import
If you have to deal with regular data updates, the basic Import/Export module of Shopware 6 may not be enough to satisfy your business needs. If it is necessary to import properties to your e-commerce website periodically, there is a tool that can help you automate these processes. It means that you only need to configure the process once, and it will run in the background following the specified schedule.
You need the Improved Import, Export & Mass Actions extension to automatically create a schedule of updates and import properties to Shopware 6. Besides, the module lets you map all the external data to the corresponding values from your Shopware database so that you can link any external source to your e-commerce website. Contact our support for further information and follow this link:
How To Import Categories To Shopware 6
Now, let’s see how to import categories to Shopware 6. As usual, the system lets you start the import procedure under Settings -> Shop -> Import/Export -> Import tab. Below, you will find not only the import process associated with your Shopware administration but also a corresponding CSV file.
Don’t start your Shopware 6 category import by choosing a CSV file. Select a corresponding import profile instead – default categories.
Now, choose a CSV file that matches the selected profile. You should ensure that your CSV file contains all products and required information, as we’ve already mentioned. Correct column names are mandatory.
When everything is configured properly, click Start import.
Example CSV File
You can view and download an example of a default category profile here: .
The corresponding table consists of the following columns. You have to edit them accordingly:
| id | A unique category UUID. If you leave it empty, the category is automatically assigned during import. |
| parent_id | A unique UUID of a parent category under which this category should be sorted in a category tree. Go to the configuration page of the respective category under Content->Media to see the ID displayed in the address line. |
| active |
|
| type | Specify a category type here:
|
| visible | Whether the category is hidden in the navigation:
|
| name | Specify a category name here. |
| external_link | Provide the external link here if “link” is your category type. |
| description | Specify a category description here. It is optional. |
| meta_title | Specify an SEO meta title here. It is optional. |
| meta_description | Specify an SEO meta description here. It is optional. |
| media_id | Enter the image UUID to use it as a preview image. You can find its UUID in the database table media in the id column. Leave this field empty to import a new image later. |
| media_url | It is also possible to specify the URL of the image you want to use as a preview image. |
| media_folder_id | You can optionally specify the folder UUID where the image is located. If you go to the configuration page of the respective image folder under Content ->Media to display the ID in the address bar. Leave this field empty to import a new image later. |
| media_type | Live it empty for the Shopware 6 import. As for the export process, this field contains properties of the used image. |
| media_title | Type the image title here. It is possible to leave this field empty. |
| mediea_alt | Enter the alternative SEO title of the image here. It is possible to leave this field empty. |
| cms_page_id | Specify a stored experience world UUID. You can find it on the configuration page of the respective adventure world under Contents > Adventure Worlds. Shopware displays the ID in the address line. Leave this field empty if you do not want to use an adventure world. |
After Shopware Import
If the Shopware 6 import process is successful, the system displays a message with the corresponding information. It means that your imported categories are already available under Catalog -> Categories.
In the case of a failed import process, Shopware 6 displays a message under the Start Import button, informing you of the numbers of both successfully imported and failed records.
As mentioned above, Shopware 6 import is associated with the ability to download the unimported entries in a separate CSV file. The latter consists of the failed records and an extra column titled _error. Here, you can see the import of the corresponding record failed.
Correct errors straight in the downloaded CSV file and then re-import it back.
Automated Category Import
If you have to deal with regular data updates, the basic Import/Export module of Shopware 6 may not be enough for satisfying your business needs. If it is necessary to import categories to your e-commerce website periodically, there is a tool that can help you automate these processes. It means that you only need to configure the process once, and it will run in the background following the specified schedule.
You need the Improved Import, Export & Mass Actions extension to automatically create a schedule of updates and import categories to Shopware 6. Besides, the module lets you map all the external data to the corresponding values from your Shopware database so that you can link any external source to your e-commerce website. Since the plugin is not the main topic of this Shopware 6 import guide, contact our support for further information and follow this link:
How To Import Media To Shopware 6
Now, let’s see how to import media to Shopware 6. As usual, the system lets you start the import procedure under Settings -> Shop -> Import/Export -> Import tab. Below, you will find not only the import process associated with your Shopware administration but also a corresponding CSV file.
Don’t start your Shopware 6 media import by choosing a CSV file. Select a corresponding import profile instead – default media.
Now, choose a CSV file that matches the selected profile. You should ensure that your CSV file contains all products and required information, as we’ve already mentioned. Correct column names are mandatory.
When everything is configured properly, click Start import.
Example CSV File
You can view and download an example of a default media profile here: .
The corresponding table consists of the following columns. You have to edit them accordingly:
| id | Type a unique media file UUID. You can leave this field empty to automatically assign the ID during the Shopware 6 import. |
| folder_id | Specify the folder UUID where the image is located. You can see it on the configuration page of the respective image folder under Content > Media. The system displays the ID in the address bar. |
| url | Enter an URL of a media file that you want to import. External URLs that lead outside the Shopware installation are supported. |
| private | Set “0” for the standard Shopware 6 import. Some plugins may require another value. |
| type | Leave this field empty for import. The system uses it to store the metadata of the media item for export. |
| title | Specify an image title here. |
| alt | Type alternative SEO titles here. |
After Shopware Import
If the Shopware 6 import process is successful, the system displays a message with the corresponding information. It means that your imported media items are already available under Content -> Media.
In the case of a failed import process, Shopware 6 displays a message under the Start Import button, informing you of the numbers of both successfully imported and failed records.
As mentioned above, Shopware 6 import is associated with the ability to download the unimported entries in a separate CSV file. The latter consists of the failed records and an extra column titled _error. Here, you can see the import of the corresponding record failed.
Correct errors straight in the downloaded CSV file and then re-import it back.
Automated Media Import
If you have to deal with regular data updates, the basic Import/Export module of Shopware 6 may not be enough for satisfying your business needs. If it is necessary to import media files to your e-commerce website periodically, there is a tool that can help you automate these processes. It means that you only need to configure the process once, and it will run in the background on following the specified schedule.
You need the Improved Import, Export & Mass Actions extension to automatically create a schedule of updates and import media files to Shopware 6. Besides, the module lets you map all the external data to the corresponding values from your Shopware database so that you can link any external source to your e-commerce website. Contact our support for further information and follow this link:
How To Import Advanced Prices To Shopware 6
Now, let’s see how to import advanced prices to Shopware 6. As usual, the system lets you start the import procedure under Settings -> Shop -> Import/Export -> Import tab. Below, you will find not only the import process associated with your Shopware administration but also a corresponding CSV file.
Don’t start your Shopware 6 advanced price import by choosing a CSV file. Select a corresponding import profile instead – default advanced prices.
Now, choose a CSV file that matches the selected profile. You should ensure that your CSV file contains all products and required information, as we’ve already mentioned. Correct column names are mandatory.
When everything is configured properly, click Start import.
Example CSV File
You can view and download an example of a default advanced price profile here: .
The corresponding table consists of the following columns. You have to edit them accordingly:
| id | A unique advanced price UUID from the product_price database. Note that the import of extended prices in Shopware 6 is not intended to create them. Therefore, this field must not be left empty. |
| product_id | A unique product UUID for which the extended price was set up. |
| rule_id | A unique rule UUID applied to this extended price. |
| price_net | Specify a net price of the extended price here. |
| price_gross | Specify a gross price of the extended price here. |
| quantity_start | Set the min. product quantity that must be in the shopping cart to apply this price. |
| quantity_end | Set the max. product quantity that must be in the shopping cart to apply this price. |
After Shopware Import
If the Shopware 6 import process is successful, the system displays a message with the corresponding information. It means that your imported advanced product prices are already available under Catalog -> Products.
In the case of a failed import process, Shopware 6 displays a message under the Start Import button, informing you of the numbers of both successfully imported and failed records.
As mentioned above, Shopware 6 import is associated with the ability to download the unimported entries in a separate CSV file. The latter consists of the failed records and an extra column titled _error. Here, you can see the import of the corresponding record failed.
Correct errors straight in the downloaded CSV file and then re-import it back.
Automated Advanced Price Import
If you have to deal with regular data updates, the basic Import/Export module of Shopware 6 may not be enough for satisfying your business needs. If it is necessary to import advanced prices to your e-commerce website periodically, there is a tool that can help you automate these processes. It means that you only need to configure the process once, and it will run in the background following the specified schedule.
You need the Improved Import, Export & Mass Actions extension to automatically create a schedule of updates and import advanced prices to Shopware y. Besides, the module lets you map all the external data to the corresponding values from your Shopware database so that you can link any external source to your e-commerce website. Contact our support for further information and follow this link:
How To Import Product Variants To Shopware 6
Now, let’s see how to import product variants to Shopware 6. As usual, the system lets you start the import procedure under Settings -> Shop -> Import/Export -> Import tab. Below, you will find not only the import process associated with your Shopware administration but also a corresponding CSV file.
The following 4 steps are necessary to import variants to Shopware 6:
1) Import Products
Since product variants consist of multiple products, you need to import the products for which you want to import new variants before going any further. However, you may need to transfer variants for already existing products. In this case, it is possible to skip this step.
You can see a default product profile here: . Download the CSV file and leave its id and parent_id columns empty. Proceed to the Import/Export module and launch the transfer.
2) Import Properties
Now, you have to import the properties to create product variants. It is possible to skip this step if the properties you want to use are already available in your administration.
You can see a default property profile here: . Download the CSV file and leave its id column empty. It is generated during the Shopware 6 import.
Enter the UUID of the property group in the group_id column – the ID displays in the browser’s address line when you call up the property group in your administration.
Also, it is possible to use the default property profile of the basic Import/Export module to get the properties you need. Once you have filled in the CSV file, re-import it in the Import/Export module.
3) Import Variant Configuration
We are almost ready since products and properties are already imported. Now, you should link them as variant configurations to create the variants later.
You can see a default variant configuration profile here: . Download the CSV file and specify option_ids there. Consider it an automatically created UUID of the properties. You will get it by exporting the properties from the last step once again.
Now, you need to enter product_ids – the UUIDs of the main products for which you will create variants. The corresponding information is displayed in your browser’s address bar when you call up the products in the administration.
Like in the previous step, Shopware 6 lets you get them by exporting the properties via the default variant configuration settings profile.
You need to leave its id column blank and re-import the file using the standard Import/Export module and the default variant configuration settings profile.
4) Import Variants
The final step of importing product variants to Shopware 6 has two implementations. You can either transfer the corresponding data to your e-commerce website or generate the missing information within the administration.
Let’s see how to import variants to Shopware 6. The previous three steps helped you prepare for the final procedure:
- Go to the default Import/Export module of Shopware 6;
- Open the default product profile;
- Activate the import product variants feature;
- Fill in the mandatory fields in your import CSV file:
- parent_id – the ID of the main product;
- product_number – the desired product number of the variant;
- active – 0 or 1;
- stock – the variant stock availability;
- optionIds – the IDs of the properties that can be separated with “|”.
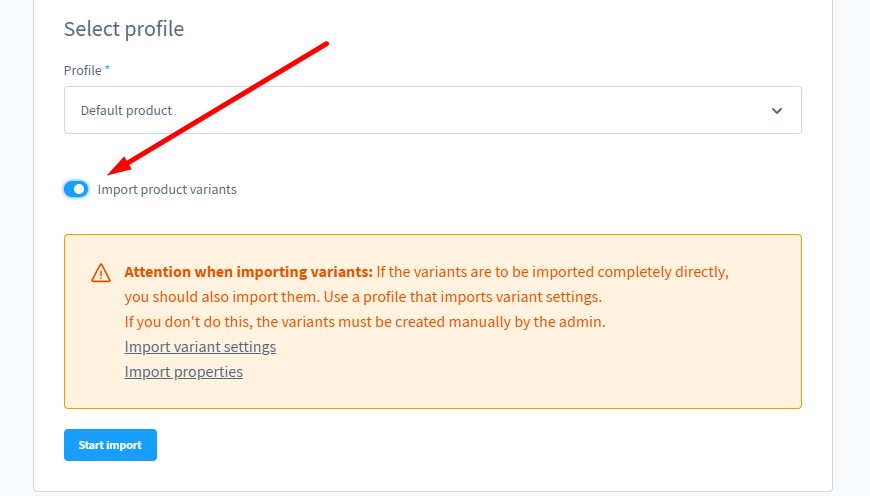
As you can see, the system notifies you about possible issues.
With the first three steps of this chapter, you’ve already prepared the variants. You just need to generate them instead of importing them:
- Go to your Shopware 6 administration;
- Proceed to products;
- Open the product for which you have imported the variants;
- Open the generate variants tab and click Start variant generator.
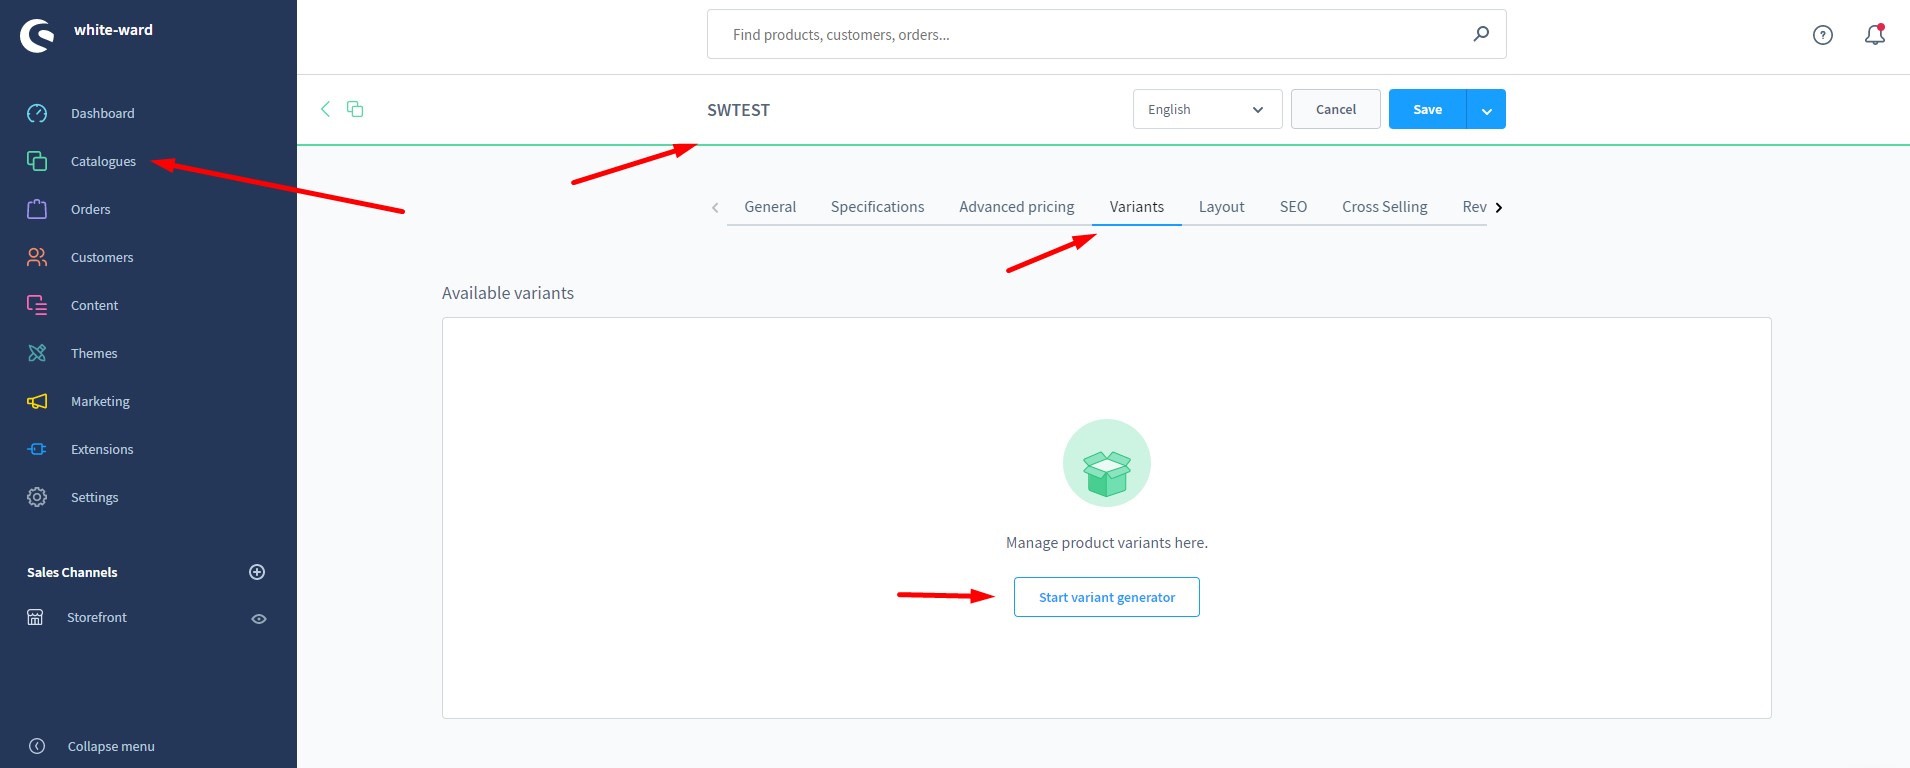
- Select property values to generate variants.
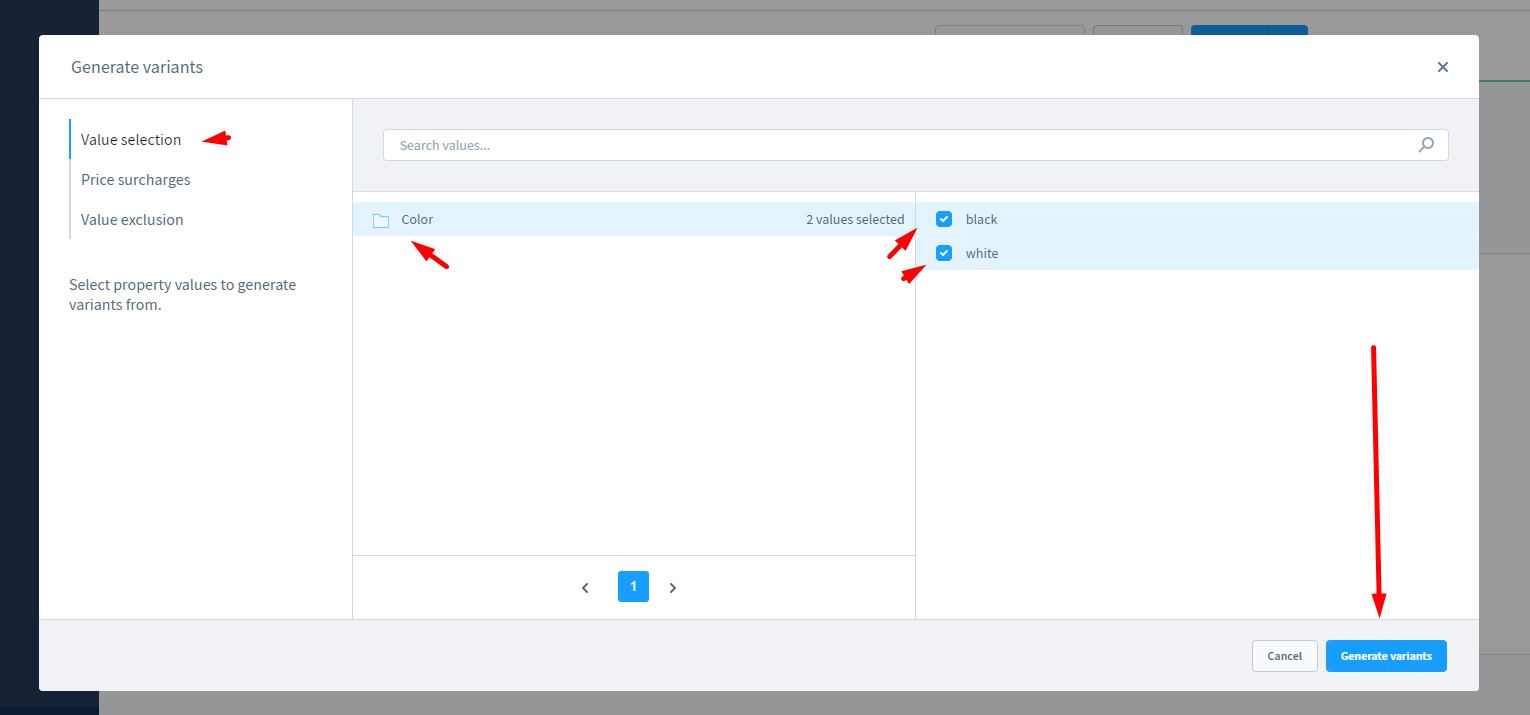
That’s it! Now, you know how to import product variants to Shopware 6.
Final Words
Although the default Shopware import offers a bunch of powerful solutions, there is always a way to improve. We’ve already mentioned above that the default Shopware 6 Import/Export plugin is not enough to satisfy all the existing e-commerce demands. Therefore, let’s return to our Improved Import, Export & Mass Actions extension and focus on its core highlights and features.
The purpose of this Shopware import plugin is to help you bulk edit and update products, prices, and stock information with only a couple of CSV columns. Also, the module supports Google Sheets, so you can implement your product information management (PIM) on top of the popular platform. And unlike Shopoware 6, our plugin supports multiple file formats on import. You get full product import and export with custom properties (attributes) in a single file. Other features include:
- Update schedules – a tool that automates import and export processes;
- Advanced mapping – product properties mapping and presets;
- Intuitive interface – import and export profiles;
- Support for different files and sources – CSV and other file types, Google Sheets, Google Drive.
Note that we provide frequent updates and new functionalities for Improved Import, Export & Mass Actions. Therefore, contact our support for further information on the app and its current feature set that enhances the Shopware 6 import. Also, follow this link you will find the latest version of the extension there:
Related posts
 Introducing New Shopware 6 Feature: Data Transformation – Script Editor for Row Modification During Import
 How to Boost Sales with Shopware 6 Cross Selling: The Ultimate 2025 Guide
 AI Revolution in Shopify Imports: Smarter, Faster, Better
 E-Commerce Impulse Buys Guide: Boost Your Sales with Effective Strategies and Smart Tools
 How to Import Etsy Reviews to Shopify Step-by-Step Guide
 How to Fulfill Dropshipping Orders on Shopify When Your Supplier Has No Integration
 How to Import Reviews from AliExpress to Shopify: Best Tools, Step-by-Step Guide & Management Typs
 Shopify Order Tracking: How to Configure, Automate & Optimize the Post-Purchase Experience