
Magento 2 Promo Banners Extension by Mageplaza

When you think of a promotional tool, does a banner spring to mind? Using banners is considered an effective method to get a message across. Banners can do their best job of catching customer attention to your online store.
If you haven’t used banners, it’s time to make a change. Mageplaza does provide a suitable solution for your Magento store – Promo Banners extension for Magento 2. The extension embellishes store sites with promotion and notification banners with stunning styles. To learn more about this extension, please keep reading the following article.

Table of contents
Why should you install the Mageplaza Promo Banners for Magento 2?
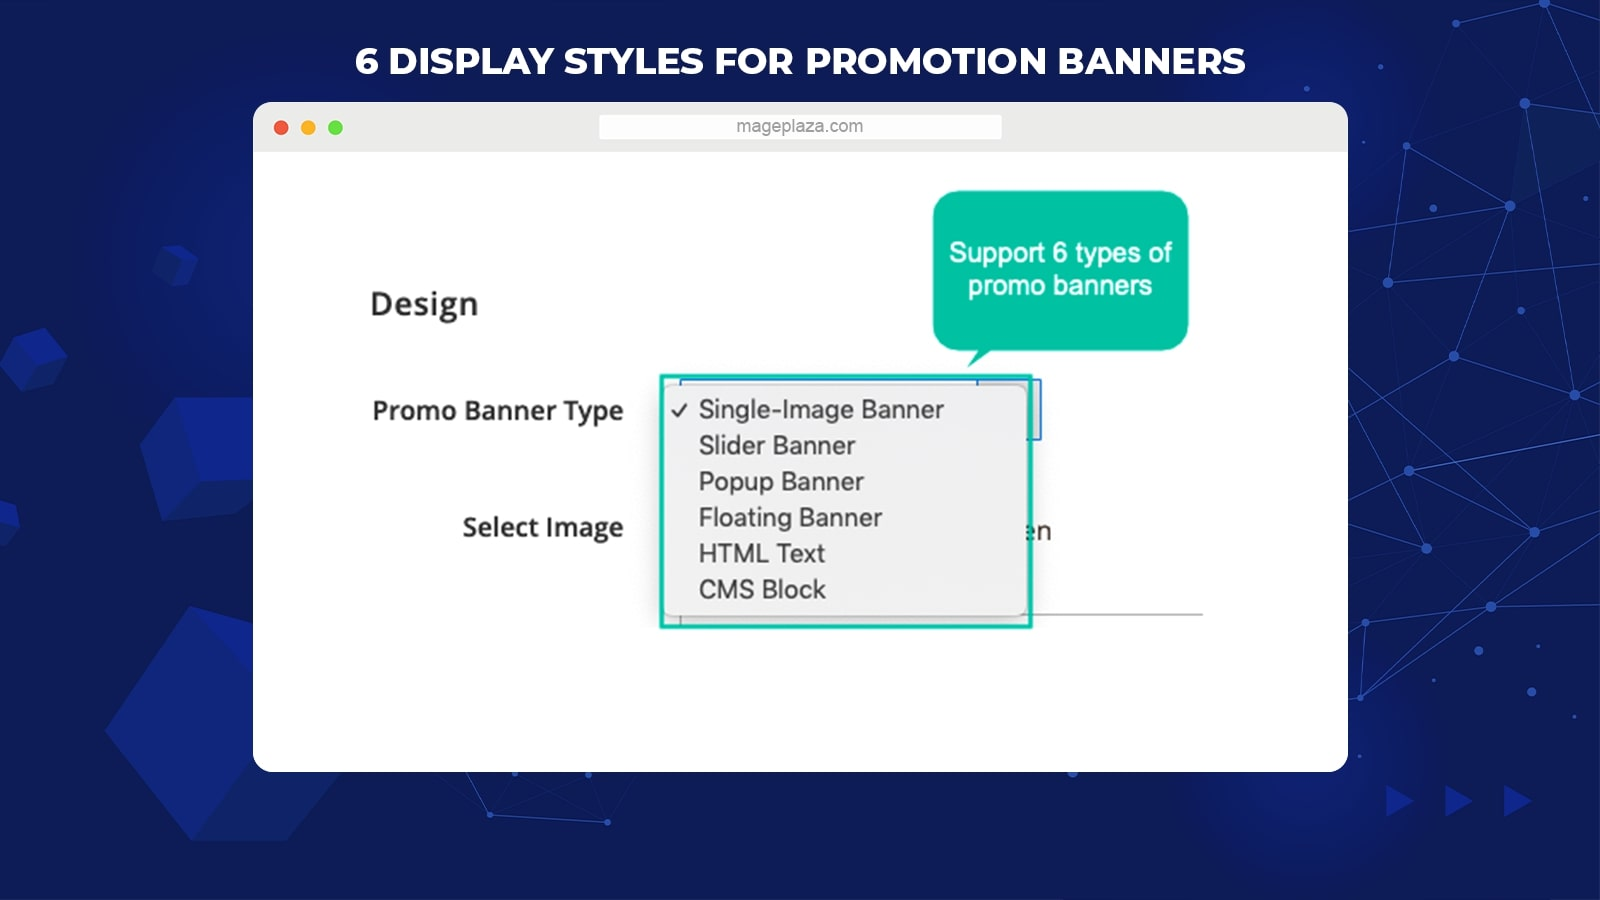
Mageplaza Promo Banners provides 6 different styles of promotion banners that will satisfy any display requirements of websites. The advertisement or notification banners can be shown as a single image, a slider with various images, popup, floating, HTML text, and CMS Block.
- Single Image: Fixed one image as a banner
- Slider: Many images moving forward and backward
- Pop-up: The banner will be displayed as a popup when shoppers visit site pages
- Floating: The promo banner will be shown as a floating box which enables page scrolling
- HTML Text: Banners shown under the format of HTML with free customization
- CMS Block: Choose a CMS block to assign as a banner
The diversity of display style helps store admins apply banners to their site more flexible and appealing.
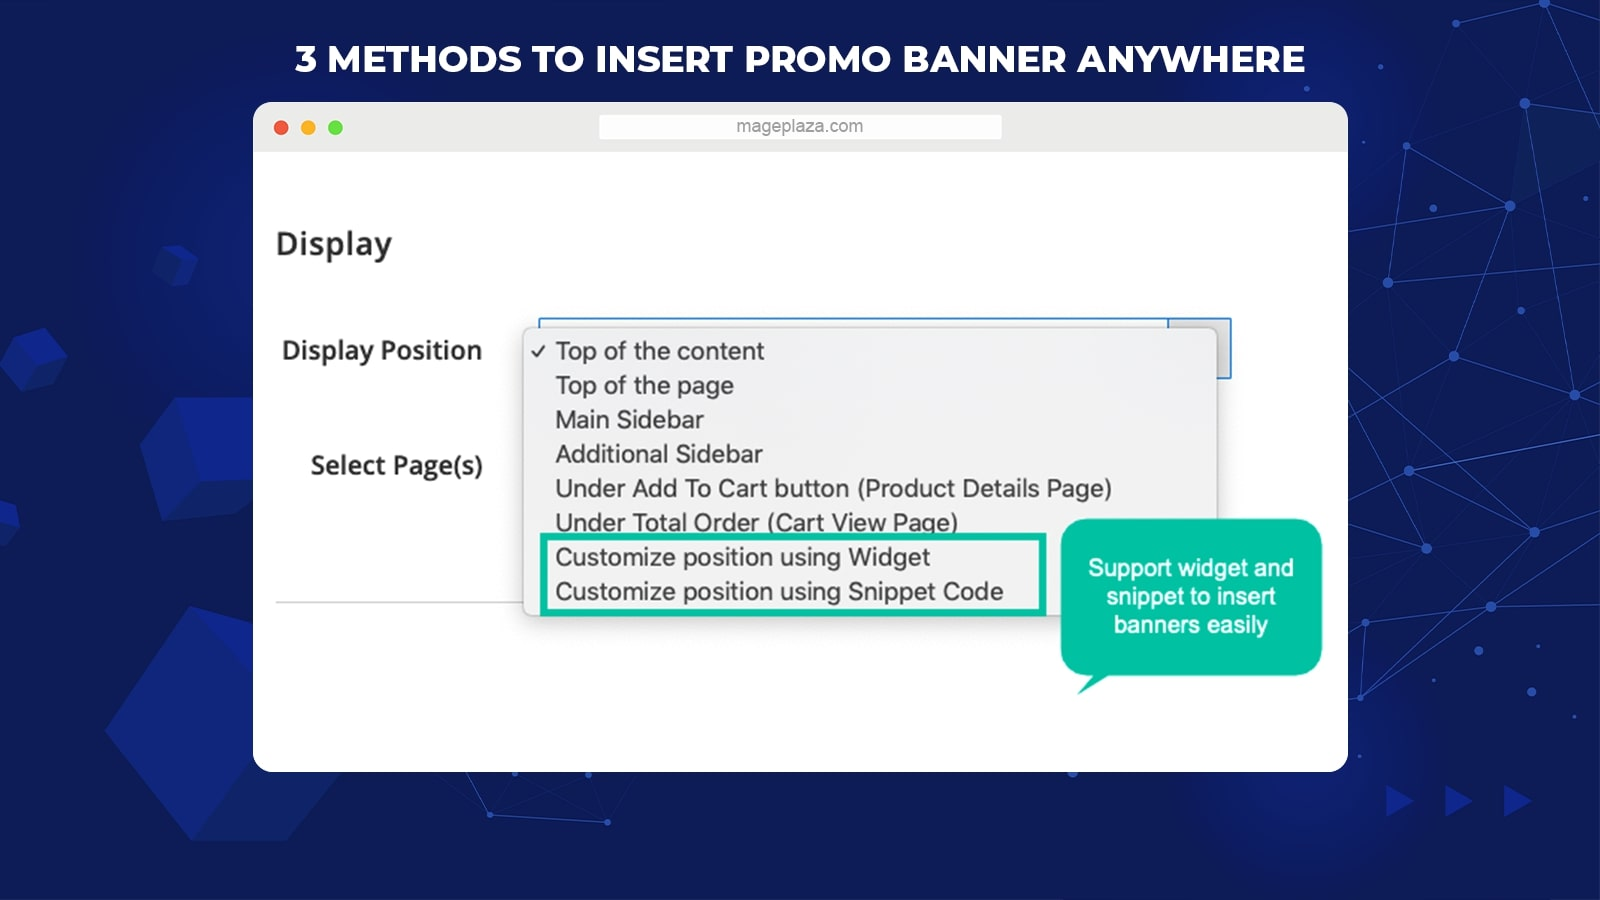
Store owners can position promotion banners anywhere on-site by using multiple methods.
The first method is choosing available suggestions. There are some typical and strategic positions to captivate customer attention, including top of the page, top of the content, main/ additional sidebar, below the Add to cart button, or below total order.
The second one is using Widget. The extension supports using Snippet Code to put the banner on any page and at any position as you want.
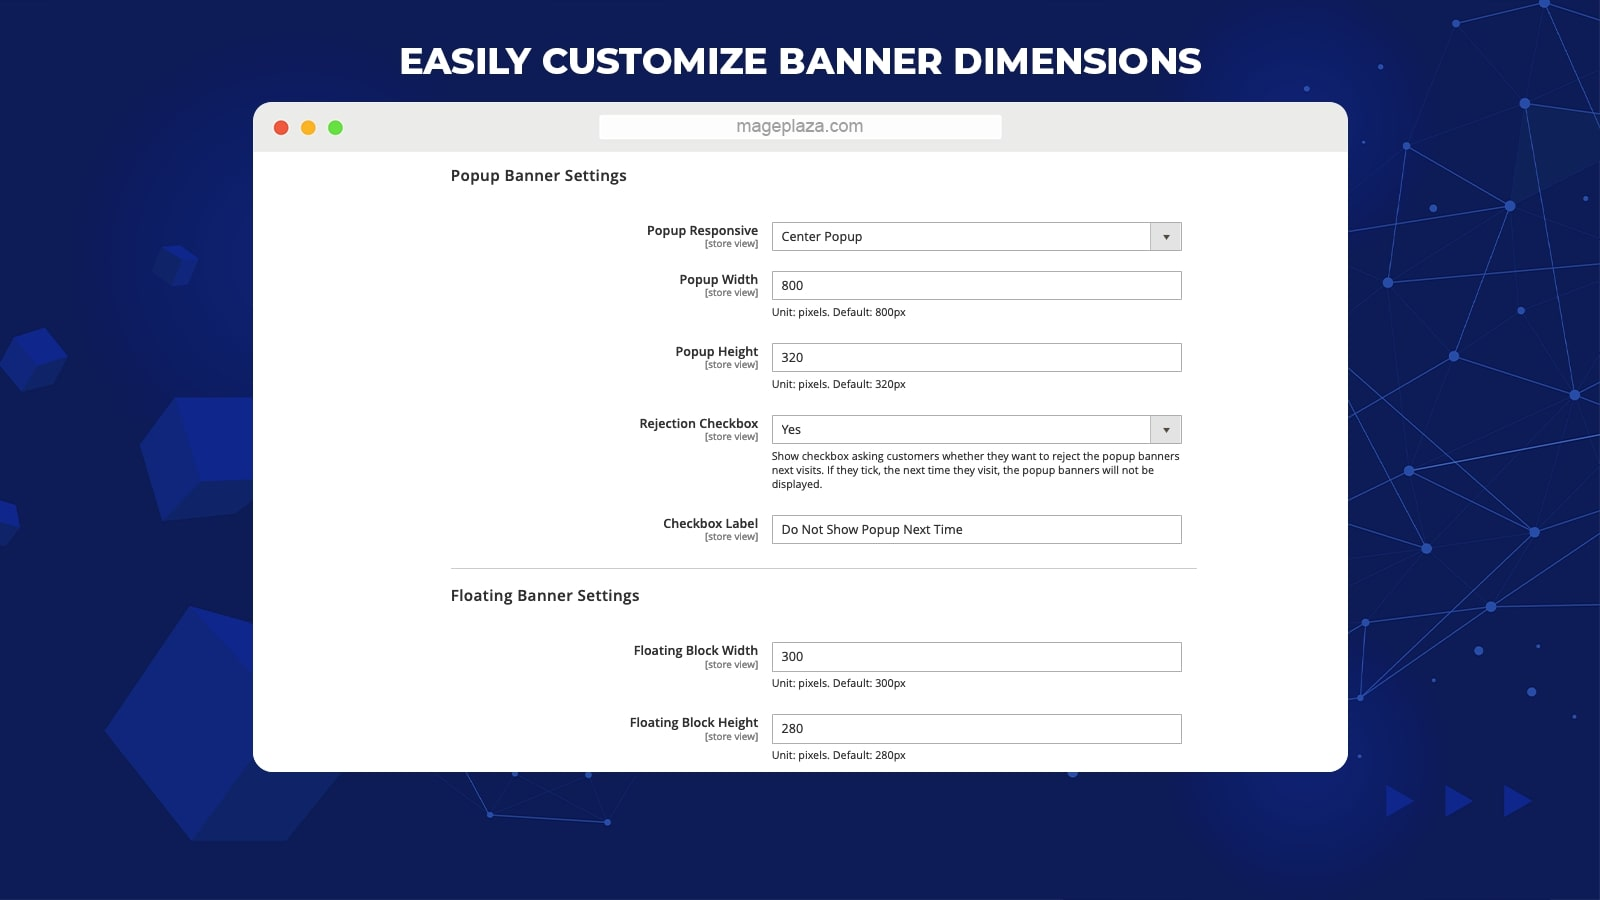
It is simple to specify the dimensions of the promotion banners on store pages to fit with the page size and design.
With each banner style, store owners can decide the height and width and other elements, including the rejection checkbox (with the pop-up style) and Next/ Prev Buttons (with the slider style).
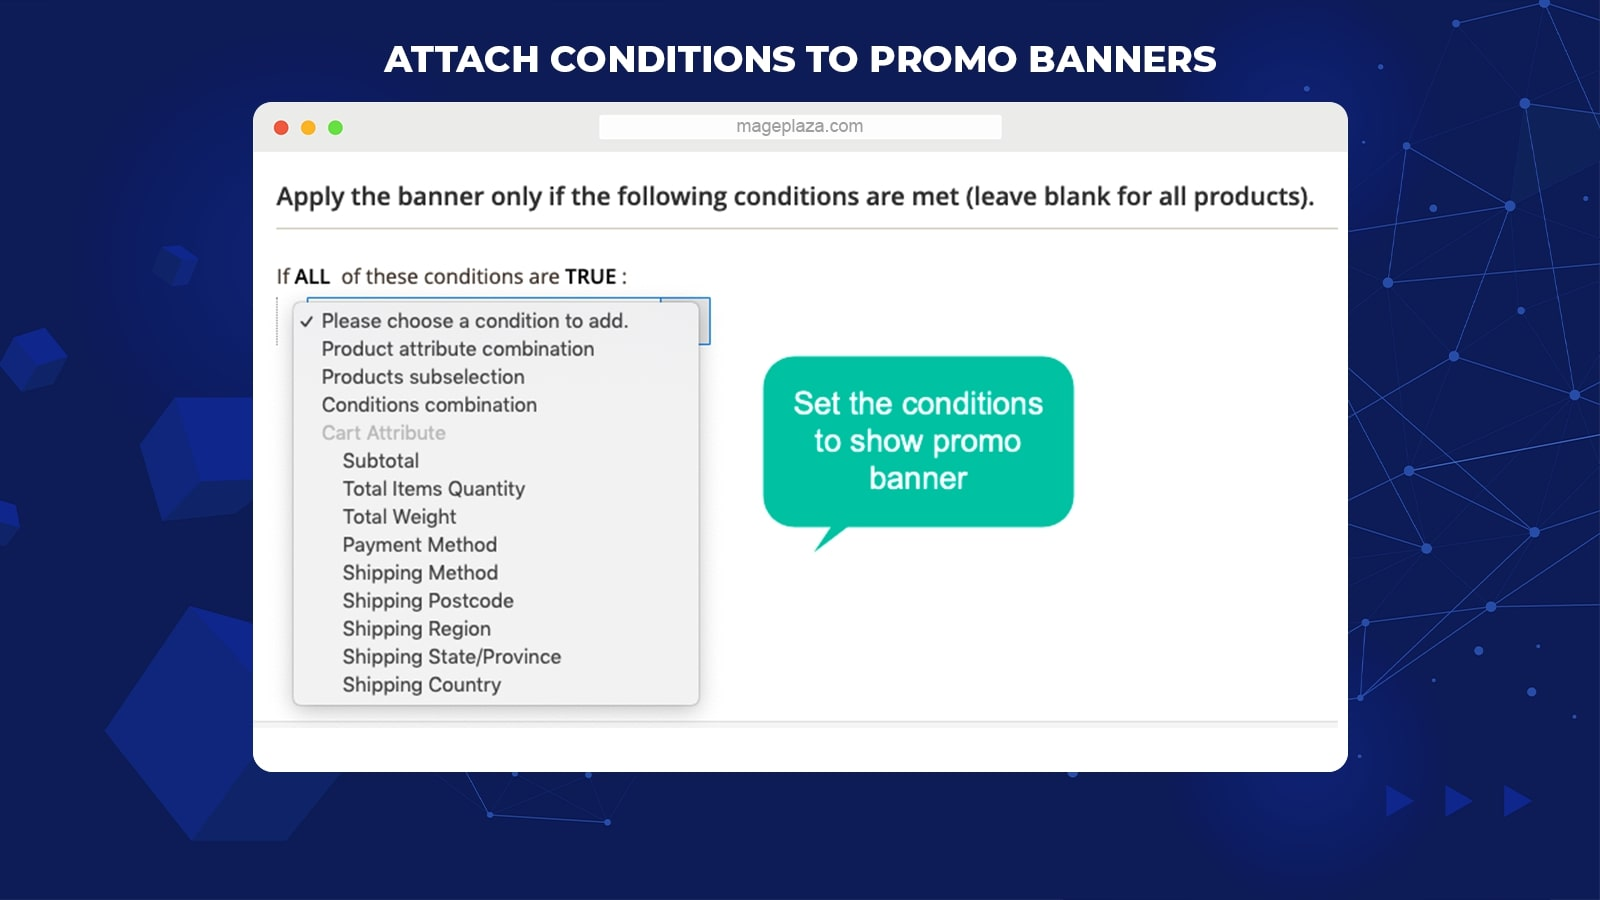
Store owners want to set promotion banners based on specific conditions as some promotional campaigns are only activated in particular events.
Promo Banners from Mageplaza allows assigning banners with specific product attributes or cart attributes. If the shoppers’ purchases satisfy the conditions, shoppers will see banners accordingly.
For instance, a shipping promotion is valid to only Washington city, so when shoppers enter Washington as the shipping country, the “Free Shipping” banners will be presented automatically.
Support setting action schedule
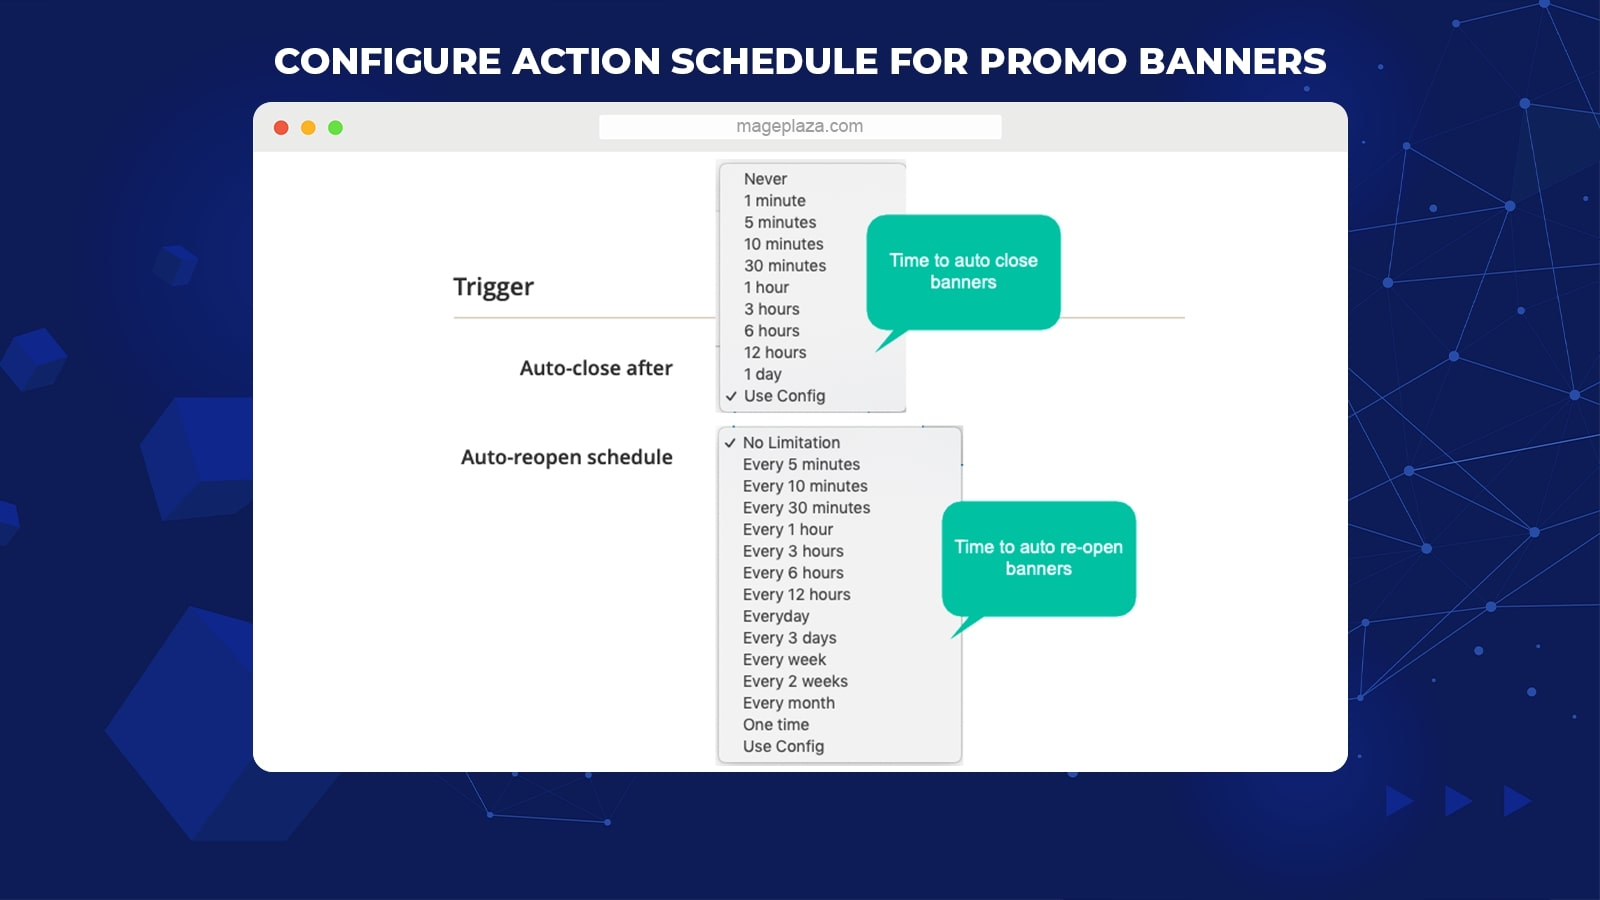
With Magento 2 Promo Banners, store owners can save much time as the promotion banners are automatically enabled at the beginning of each campaign. Users can prepare banners and set the schedule function for different campaigns.
Admins can set the start date, end date, time to re-open and reclose for every banner in the admin backend. Accordingly, banners will be activated and displayed on the frontend at the precise moment.
Additional features
Preview
Store admins can preview banners right from the backend with HTML and CMS block styles.
Management
Users can easily view, filter, and edit banners via a grid. They also can put promo banners into specific categories for better management.
Rejection checkbox
You can choose to add the rejection checkbox to the popup to ask whether shoppers want to turn off the popup next time.
Direct URL
The extension enables adding a URL to the banner to lead visitors to another page when they click on the banner.
Responsiveness
Magento 2 Promo Banners supports two responsive types of popup banners, which are Center and Full Screen. Besides, banners are displayed properly on any devices, including PC, Tablet, and Mobile.
Various display options
Store owners can select to display promo banners by customer group or each store view. Plus, you can set the display order for promo banners.
Auto close and reopen
Users can set the time to auto close and reopen banners from the admin backend.
Compatibility
Promo Banners are well compatible with Better Popup, One Page Checkout, Free Shipping Bar, Banner Slider, and Promo Bar extensions by Mageplaza.
Backend
General Configuration
Log into the Magento Admin, navigate to Stores > Configuration > Mageplaza > Promo Banner > General
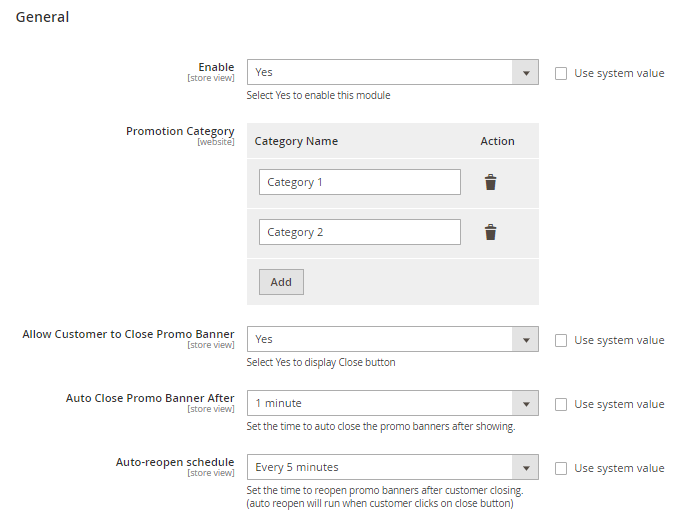
- Choose Enable = Yes to turn on the extension
- Promotion Category:
- Category Name: Create a name for the promotion category. This is a compulsory field.
- Action:
- Delete: Click on the trash icon if you would like to remove the promotion category
- Add: Click on the Add button if you want to generate a promotion category
- Allow Customer to Close Promo Banner: Choose Yes to enable customers to turn off the promo banner
- Auto Close Promo Banner After: Decide the auto-closing time for the banner
- Auto-reopen schedule: Decide the time to reopen the promo banner after being closed
- Notice: The auto-reopen will be activated again if shoppers click on the Close button
Slider Banner Settings
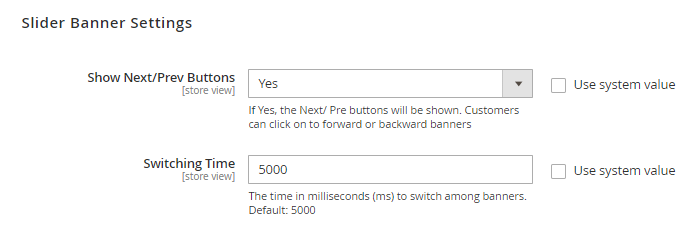
- Show Next/ Prev Buttons: Choose Yes to show the Next/ Prev button. Customers can click these buttons to view more banners or return to the previous banner
- Switching Time: Fill in the displaying time for each slider
Popup Banner Settings
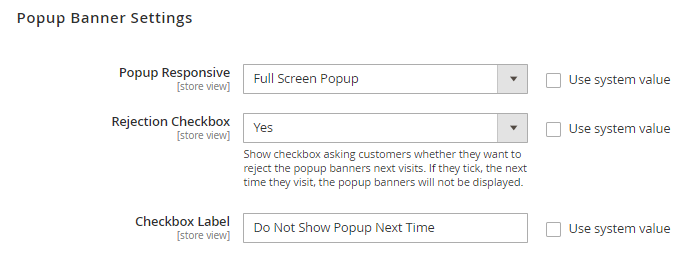
- Popup Responsive: Select the display style of promo banners in the popup
- Center Popup
- Full Screen Popup
- Rejection Checkbox: Choose Yes to show the checkbox to ask shoppers whether they want to see the promo banner next time. If shoppers put a tick on the checkbox, the promo banner will be hidden on the next visit.
- Checkbox Label: Create a name for the checkbox
Floating Banner Settings
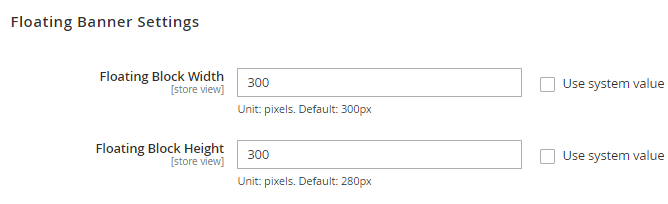
- Floating Block Width: Insert the width of the floating block
- Floating Block Height: Insert the length of the floating block
Manage Promo Banners

- This grid stores all the promo banners
- Within the grid, admins can see all the details of promo banners, including ID, Content, name, Promotion Category, Status, Start Time, End Time, Position, Priority, and Action
- Admins can implement the following actions:
- Edit: Select Edit to change the information on the Edit Promo Banner page
- Delete: Choose Delete to remove the banner
- Change Status: Edit the status of the promo banner
- Add New Promo Banner: Generate a new promo banner
General
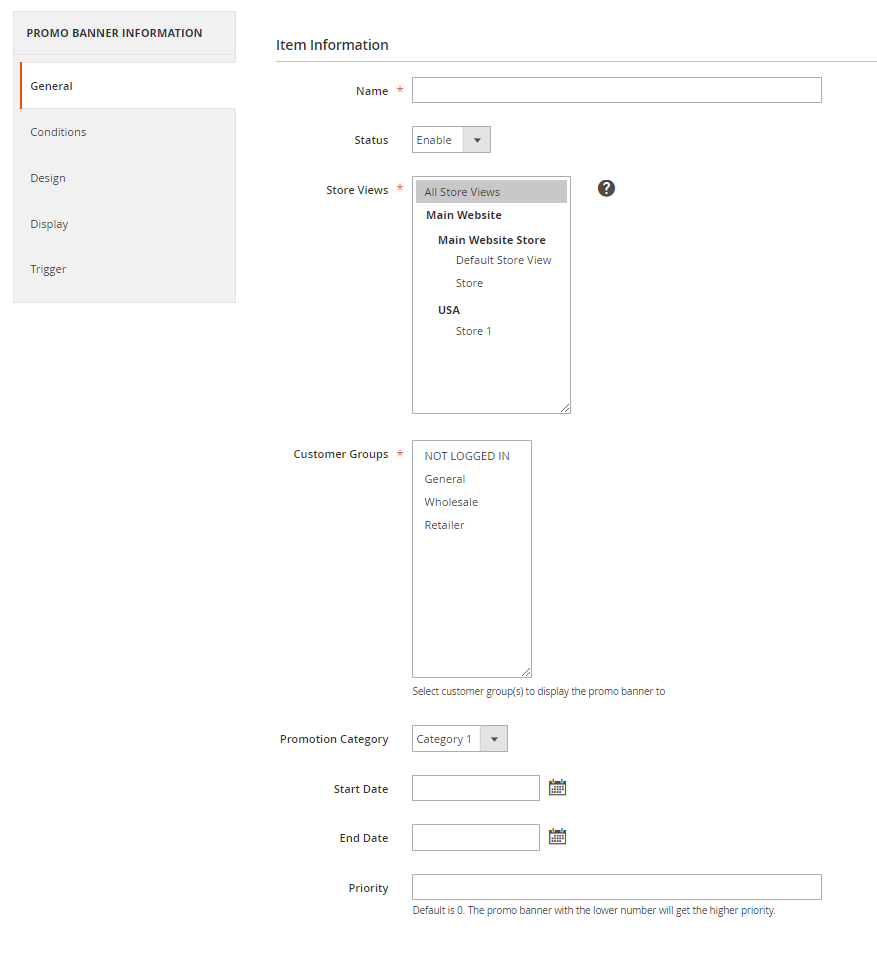
- Name: Create a name for the promo banner
- Set Status = Enable to activate the promo banner
- Store Views: Pick a store to display the promo banner on
- Customer Groups: Choose groups of customers who can see the banner
- Promotion Category: Choose the applicable promotion category
- Start Date: Set the start date to show the banner
- End Date: Set the end date to close the banner
- Priority: Set the priority for the promo banner. The smaller the input value, the higher the priority.
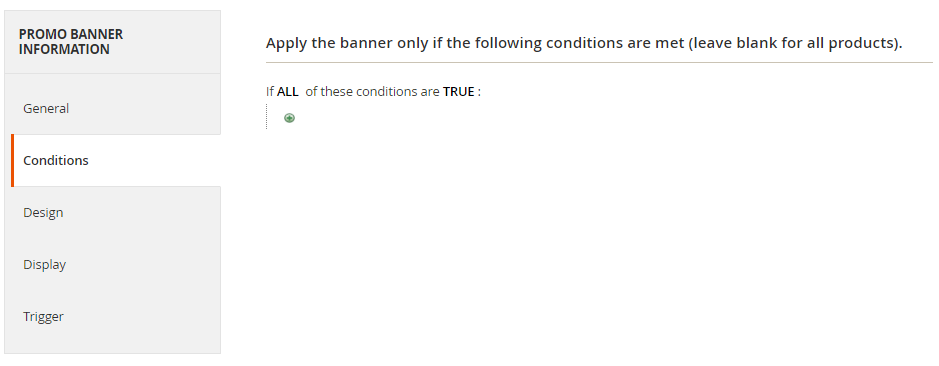
Conditions
The store admin selects the conditions to show the promo banner on the checkout page.
Design
Single-image Banner
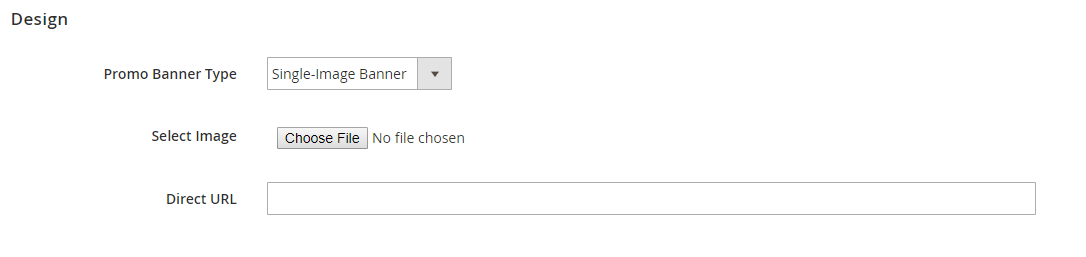
- Select Promo Banner Type = Single-image Banner: The promo banner is displayed in the image form.
- Select Image: Click on Choose File to download images for the promo banner
- Direct URL: Enter a link to redirect visitors to another page when they click on the banner
Slider Banners
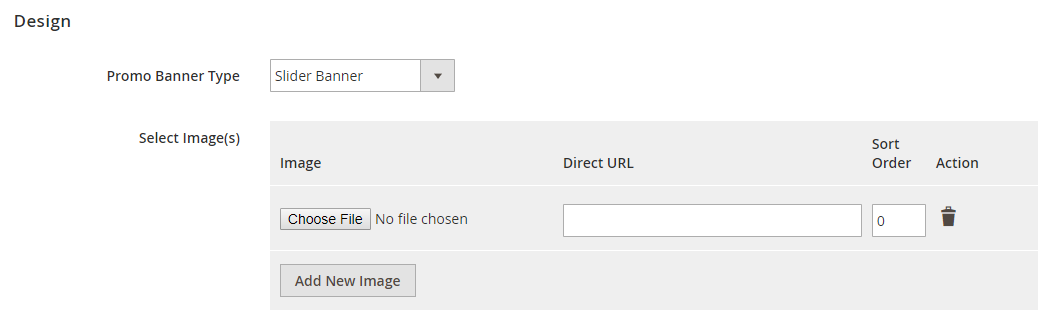
- Choose Promo Banner Type = Slider Banner: The promo banner is displayed in the slider form.
- Select Image(s)
- Add New Image: The system will automatically show the new image creation section for the slider if customers click on this button.
- Image: Click on Choose File to pick images for the slider
- Direct URL: Enter a link to redirect customers to another page
- Sort Order: Set the priority for the images in the slider. The lower the input value, the higher the priority.
- Action: Choose the trash icon to remove the images in the slider
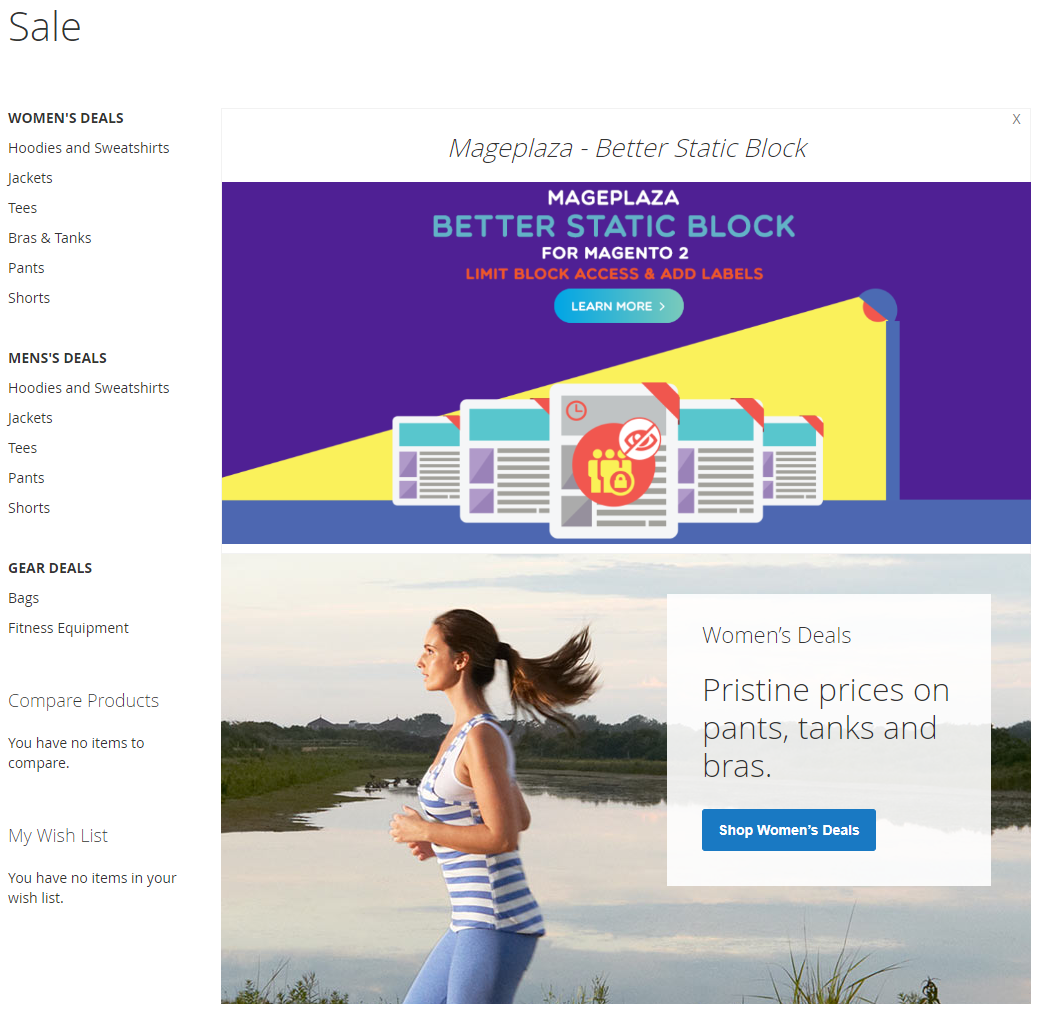
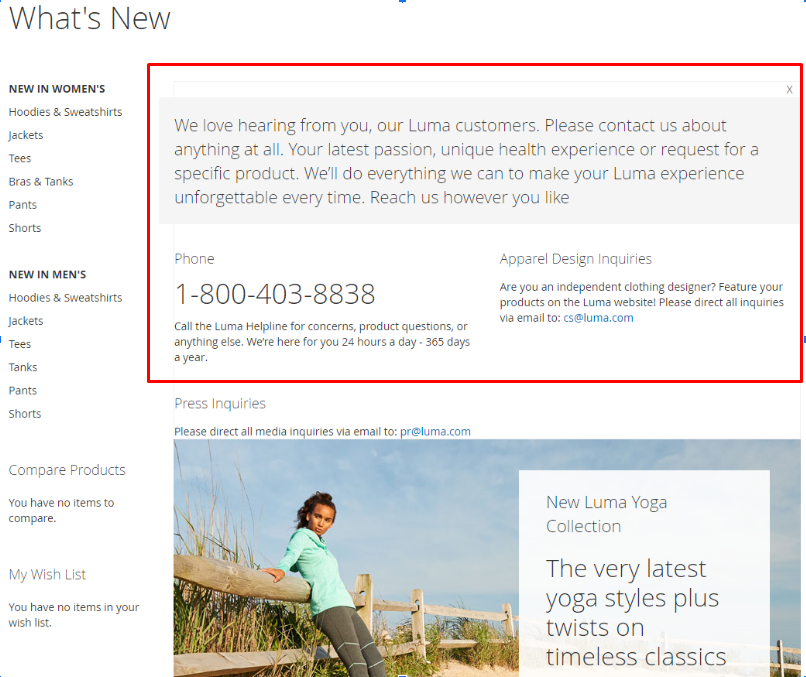
Popup Banner
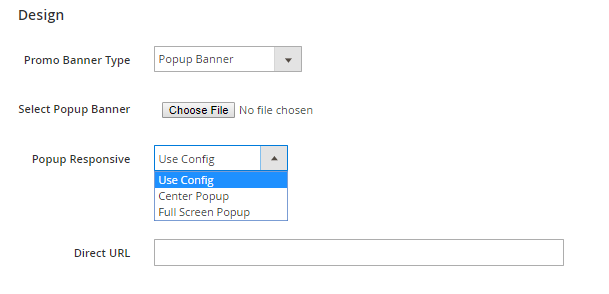
- Select Promo Banner Type = Popup Banner: The promo banner will be displayed in the form of a popup.
- Select Popup Banner: Click on Choose File to pick an image
- Responsive Popup: Choose the position to show the popup
- Use Config: The popup banner is shown based on settings in the configuration
- Center Popup: The banner is shown in the middle of the popup
- Full Screen Popup: The banner is displayed full screen.
- Direct URL: Enter a link to lead customers to another page when they click on the banner
Floating Banner
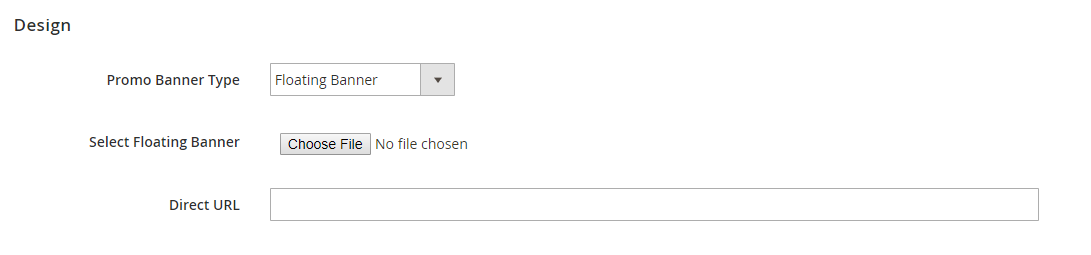
- Choose Promo Banner Type = Floating Banner: The display type of the promo banner is floating
- Select Floating Banner: Click on Choose File to pick an image for the floating banner
- Direct URL: Enter a link to lead customers to another page when they click on the banner
HTML Text
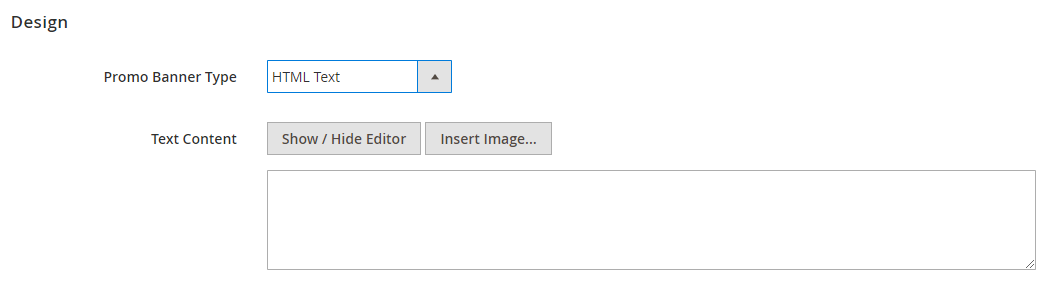
- Select Promo Banner Type = HTML Text: The display style of the promo banner is HTML Text
- Text Content:
- Show/ Hide Editor: Write the content for the promo banner
- Insert Image: Upload photos for the promo banner
CMS Block
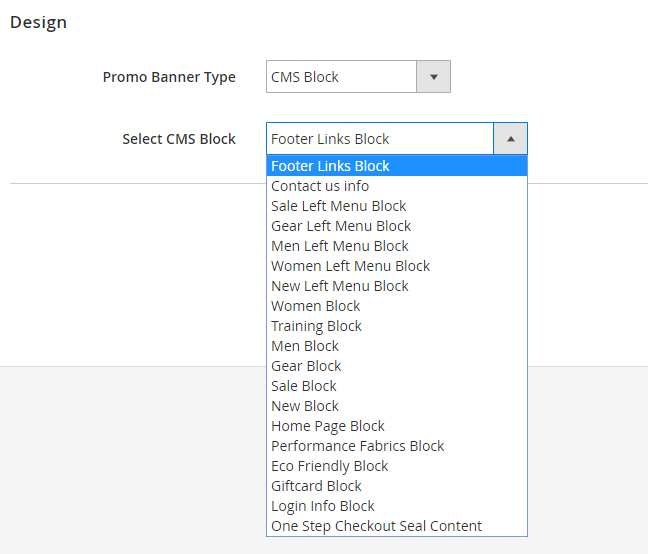
- Choose Promo Banner Type = CMS Block: The promo banner is displayed in the CMS block.
- Select CMS Block: Choose CMS to make the promo banner better
Display
Apply to Design as Single-Image Banner, Slider Banner, CMS Block, HTML Text
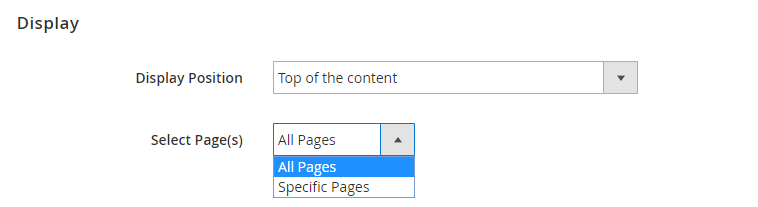
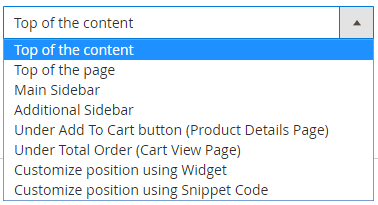
- Display Position: Choose the position to show the promo banner
-
- Top of the content: The promo banner is shown above the content
- Top of the page: The promo banner is displayed in the main sidebar
- Additional Sidebar: The banner is shown in the additional sidebar
- Under Add to Cart button (Product Details Page)
- Under Total Order (Cart View Page)
- Customize position using Widget
- Customize position using Snippet code
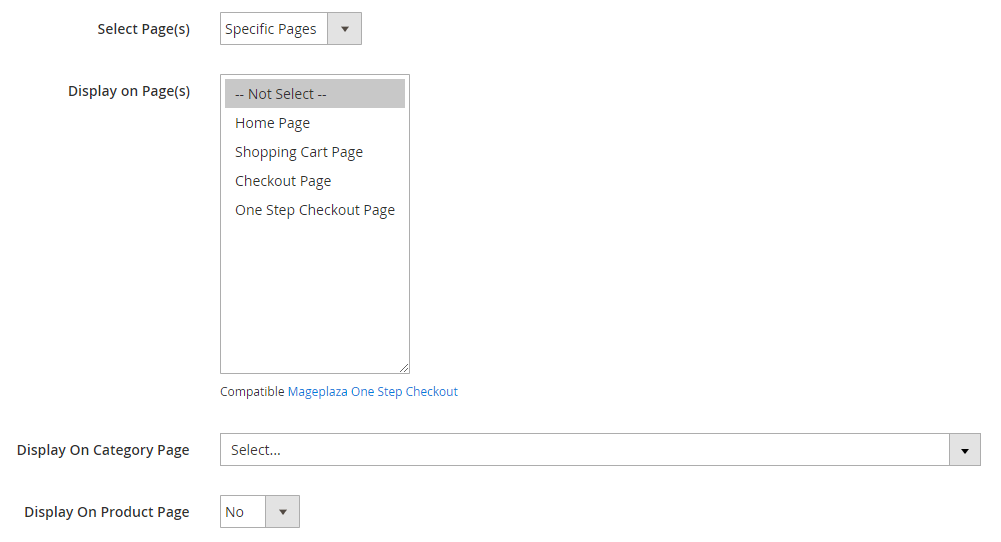
- Select Page(s):
-
- All Pages: The promo banner is shown on every page
- Specific Pages:
-
-
- Display on Page(s): Choose the page that you would like to show the promo banner on
- Display on Category Page: Choose the position on the category page to show the banner
- Display on Product Page: Choose Yes to display the banner on the product page
-
Apply to Design as Floating Banner

- Display Position: Choose the display position for the floating banner: Left Floating or Right Floating
- Select Page(s): Choose pages to show the banner
Apply to Design as Popup Banner

- Display Position: The banner is displayed in the form of a popup
- Select Page(s): Choose pages to present the banner
Trigger
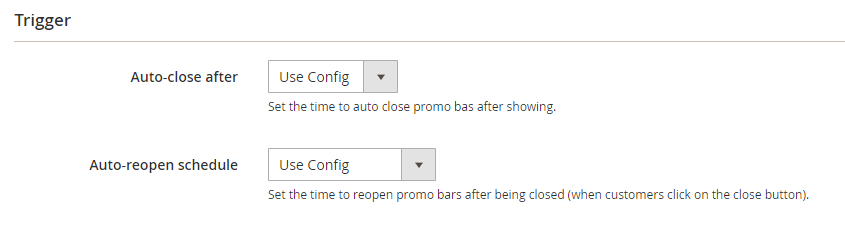
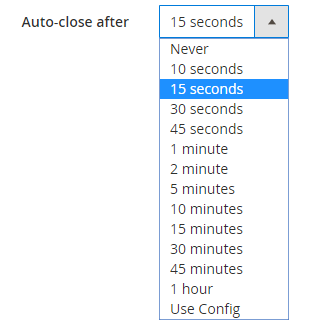
- Auto-close after: Set the time to close the banner automatically. If you choose Use Config, the promo banner will be displayed as the time in the Configuration section.
- Auto-reopen schedule: Set the time to re-open the banner automatically. If you choose Use Config, the promo banner will be displayed as the time in the Configuration section.
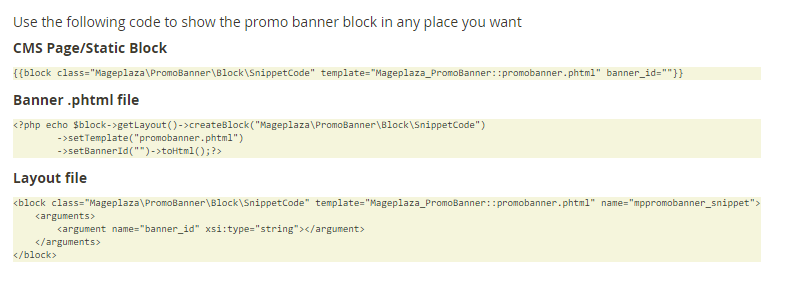
Snippet Code
CMS Page/ Static Block
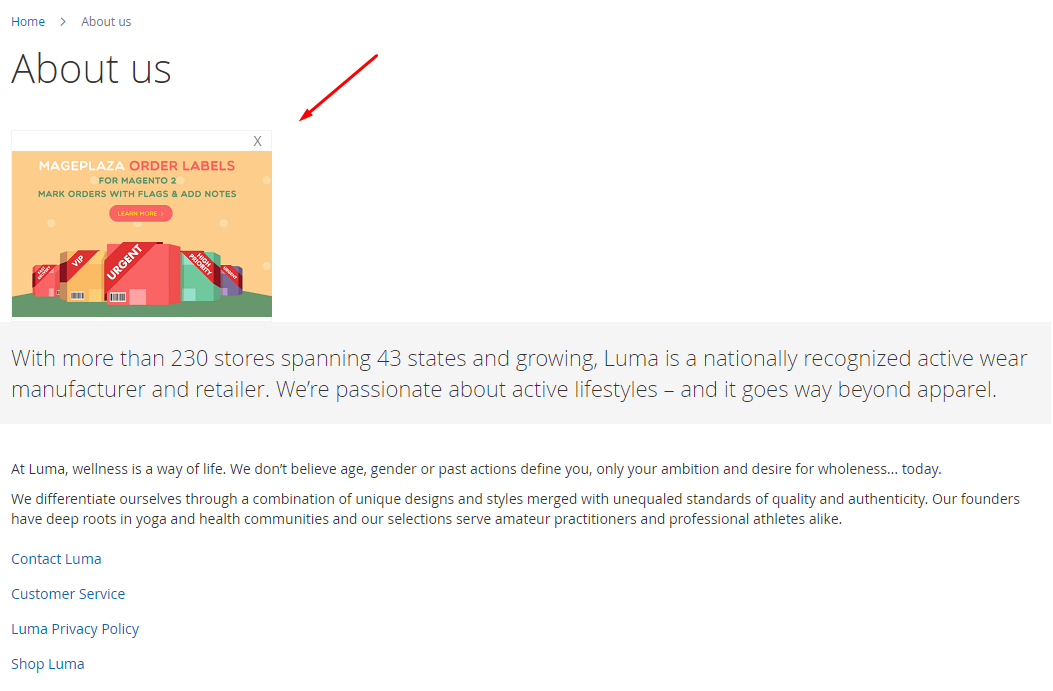
For instance: If you want to display the promo banner on the About us page, follow these steps:
Step 1: Log in to the Magento Admin, go to Content > Pages, then click on Edit at About us
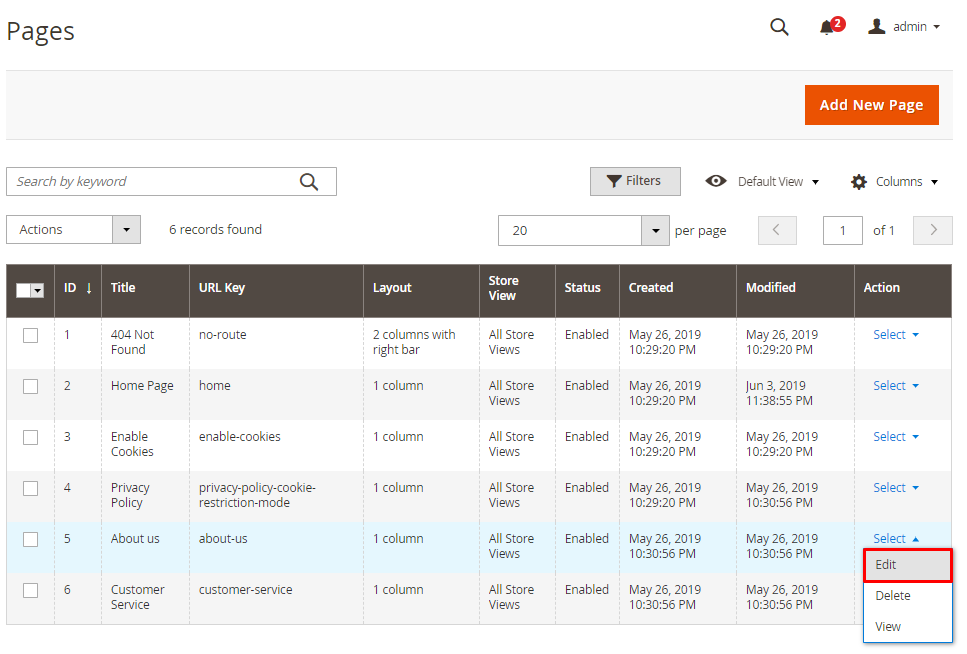
Step 2: Enter the code into the About us page
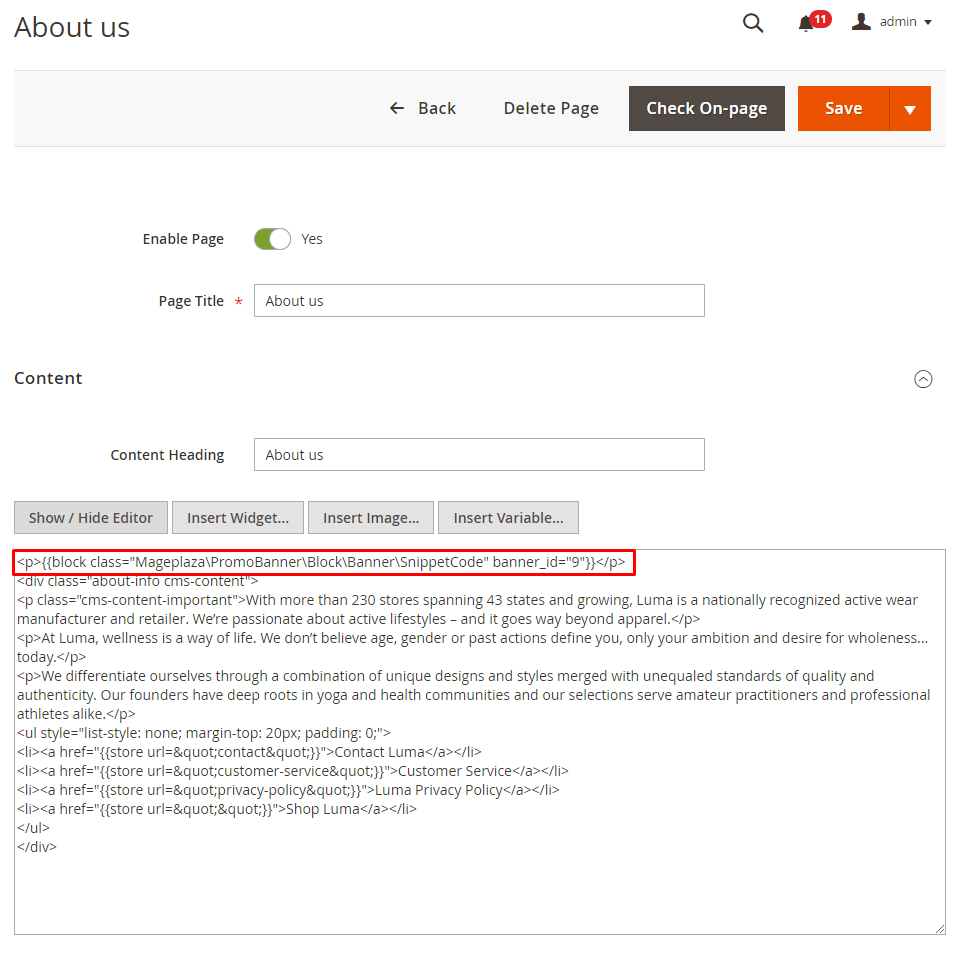
Step 3: Save and check on the frontend
Template .phtml file
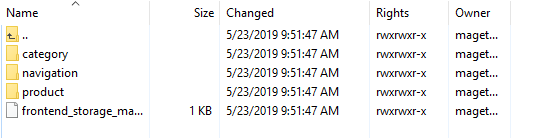
If you want to add a promo banner to a specific location in the .phtml Template file, follow these steps:
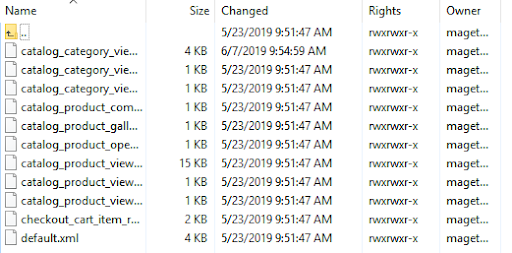
Step 1: Go to the server and find the directory with the path: vendor/magento/module-catalog/view/frontend/templates
Here are folders in the file:
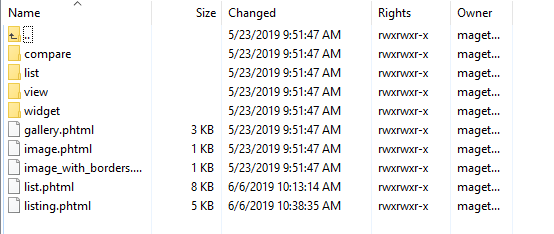
Step 2: Choose the folder and select the file with the format of .phtml
For instance, you choose the product folder and choose the listing.phtml file to perform the action.
Step 3: Go to the selected .phtml file and enter the code
Step 4: Save and check on the frontend
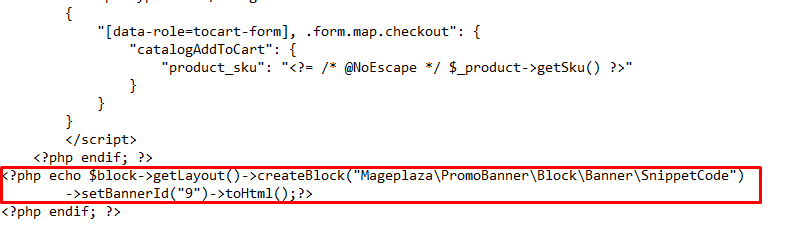
Layout file
If you would like to include a promo banner in a specific location, you can do the following steps:
Step 1: Go to the server and look for the directory with the path: vendor/magento/module-catalog/view/frontend/layout
Step 2: Choose any file and enter the code into the file
For instance, you chose the catalog_category_view.xml file

Step 3: Save and check on the frontend
Widget
Admins can show the promo banner at any position by using Widget. Follow the steps below to generate a widget:
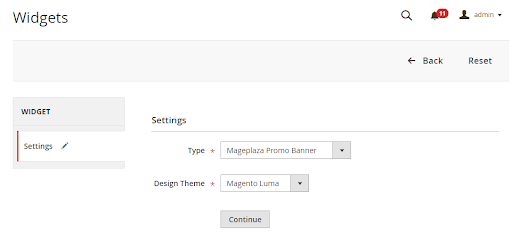
- Step 1: Go to the Admin page, navigate to Content > Elements > Widgets, then choose Add Widget
- Step 2: Choose Type = Mageplaza Promo Banner, Design Theme = Magento Luma. Then click on Continue
- Step 3: Fill in the required information
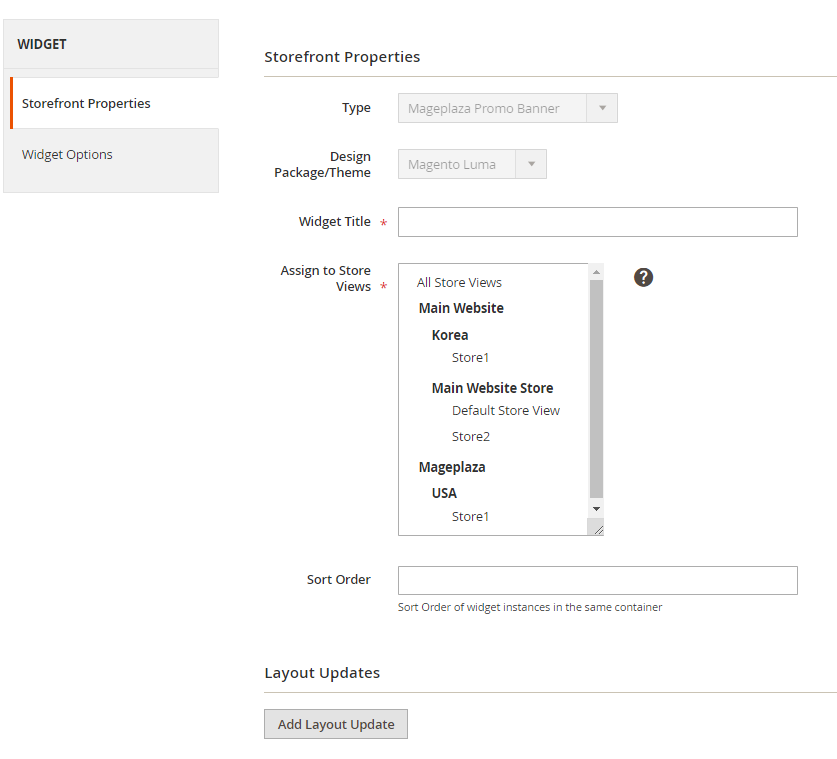
- Step 4: Click on Add Layout Update to define the location for the widget

- Step 5: Choose a promo banner
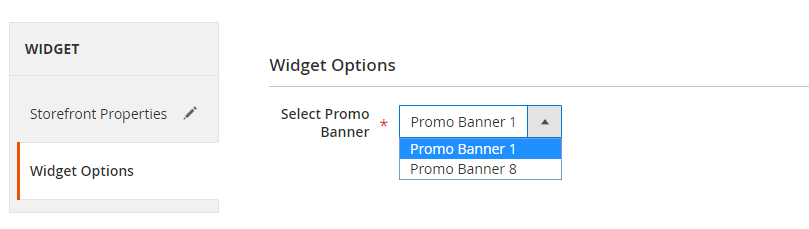
- Step 6: Save and check on the frontend
Frontend
Design
Single-Image Banner

Slider Banner
Popup Banner
Floating Banner

HTML Text
CMS Block
Display
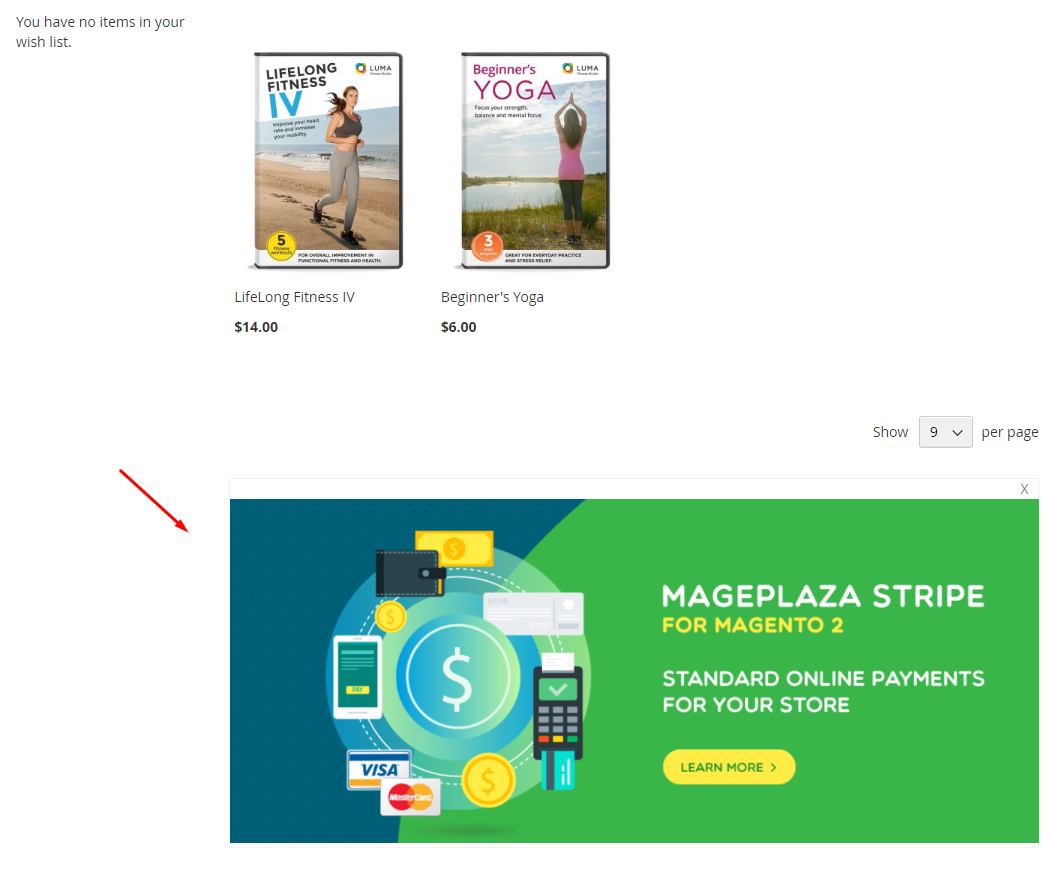
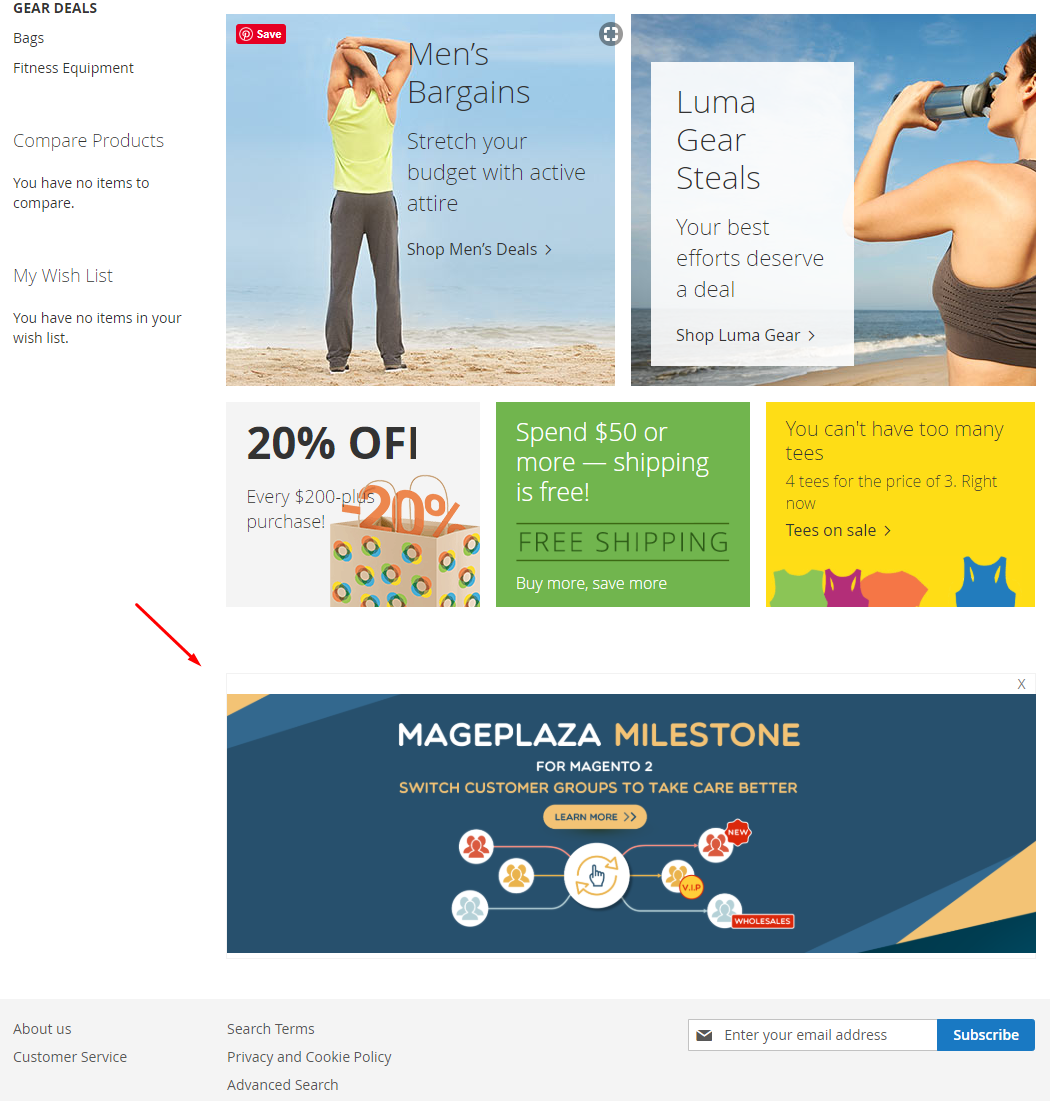
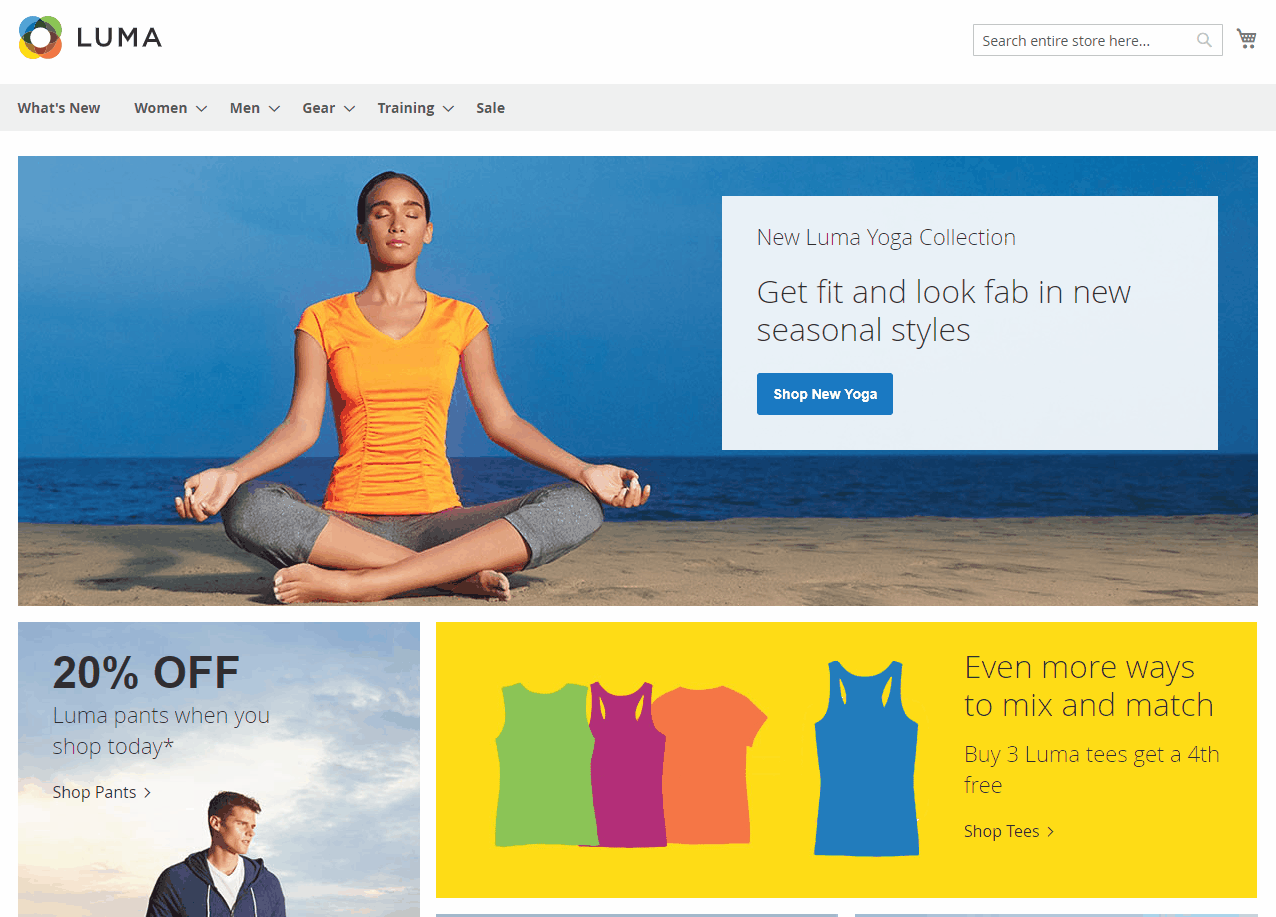
Here are some examples of how promo banners will be displayed on the frontend.
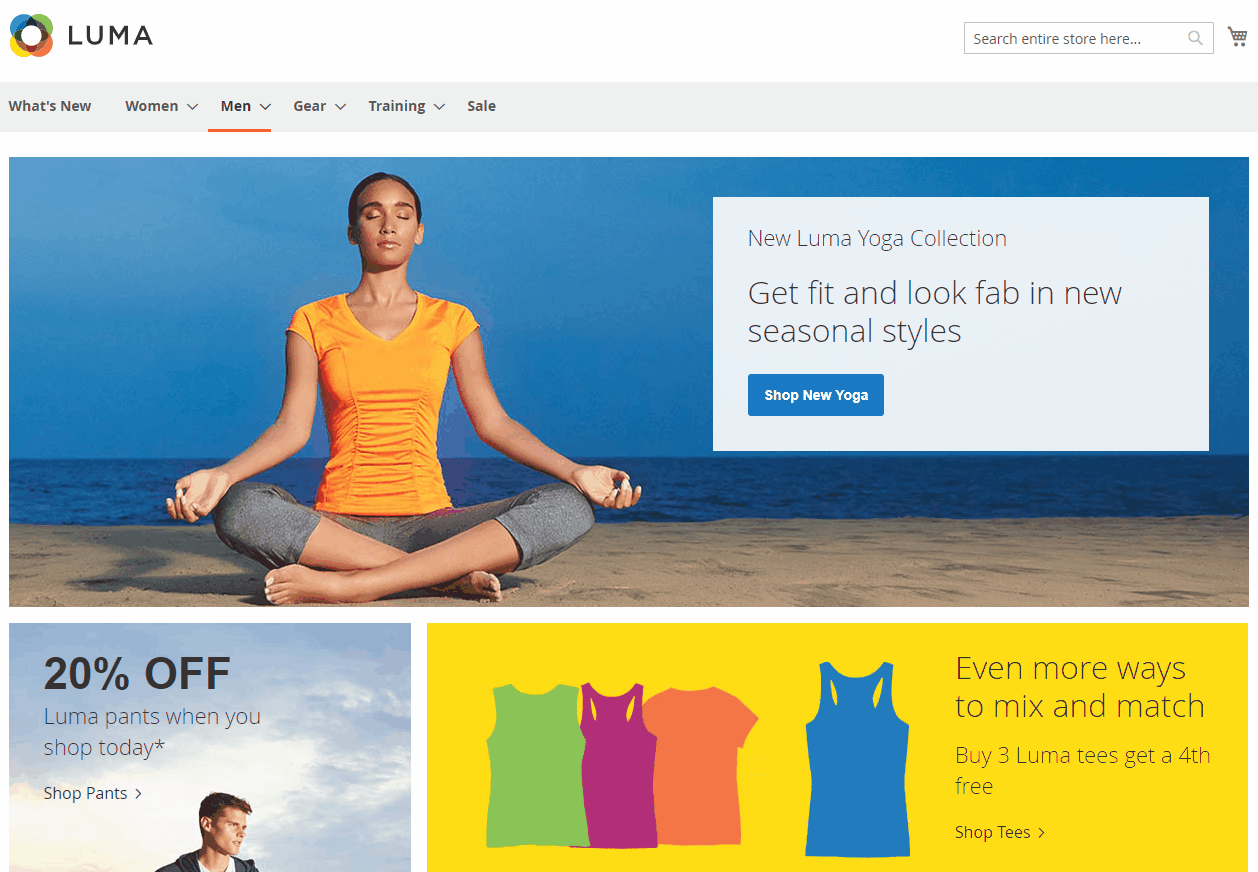
Top of the content
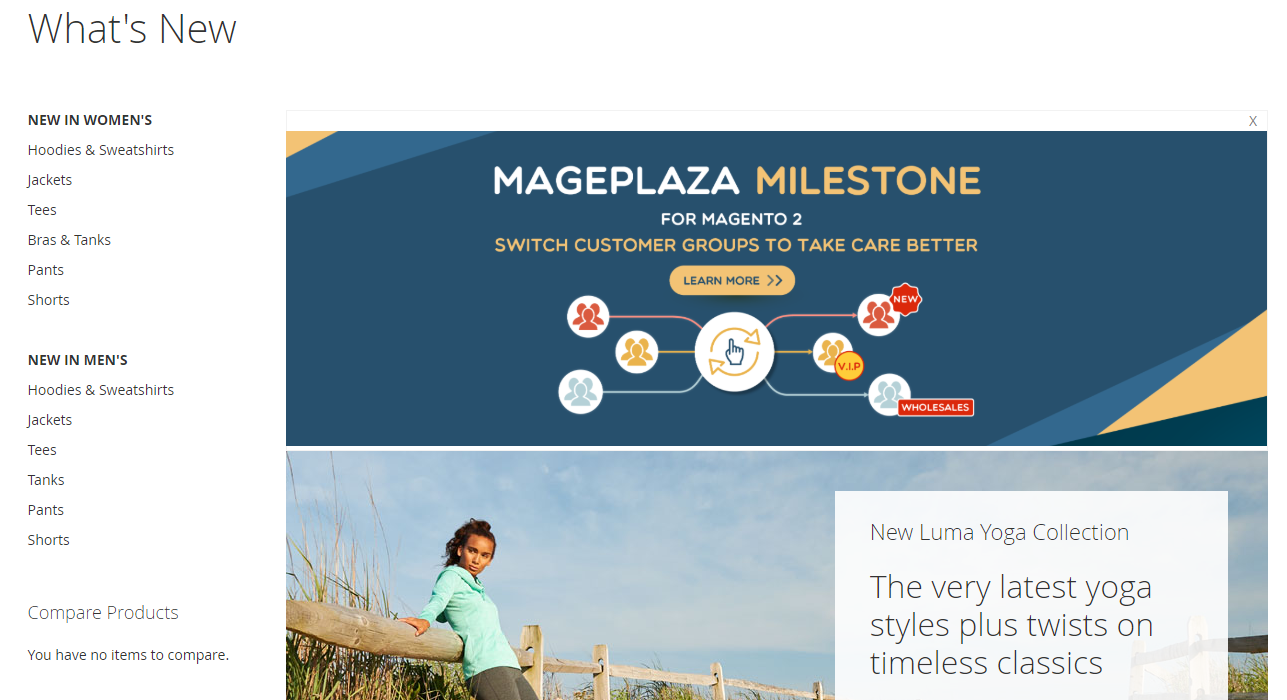
Top of the page
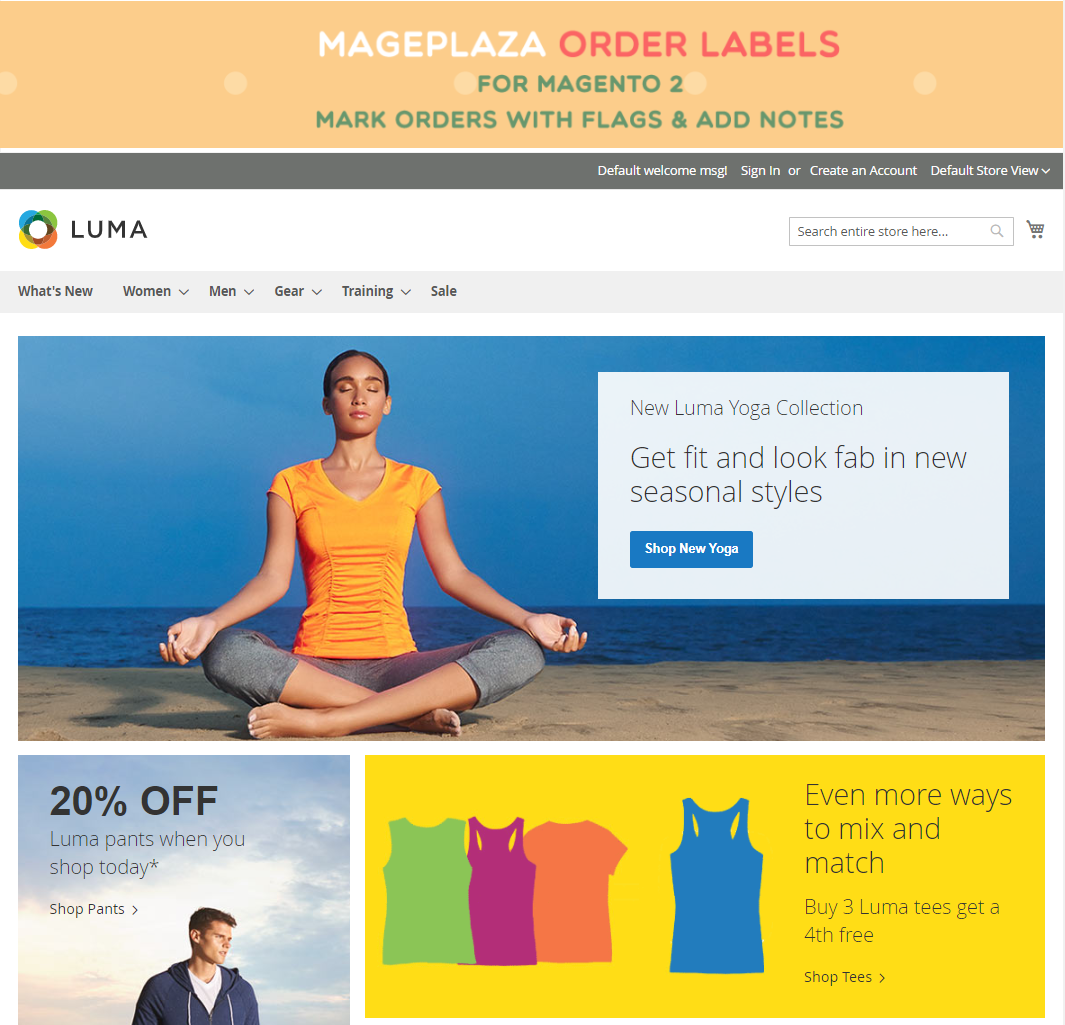
Main Sidebar
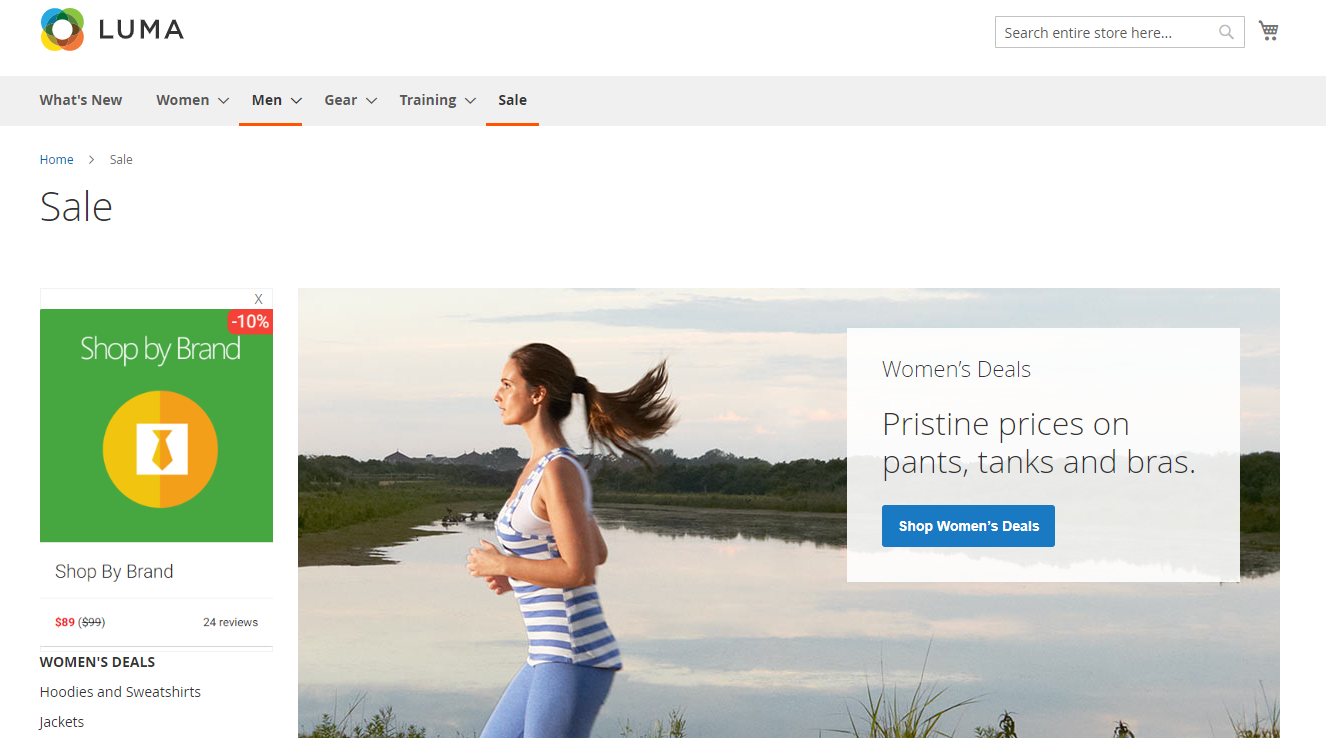
Additional Sidebar

Conclusion
Thanks to the Mageplaza Promo Banners extension, you can make your store become more colorful, lively, and attractive. This can impress the first-coming visitors to your e-commerce site. Moreover, promo banners also help make sure that customers will not miss any good discounts and special deals.
10% DISCOUNT: Use coupon code FIREBEAR to receive a 10% discount when purchasing
Related posts
 Magento 2 Release Notes
 Magento 2 B2B Company Guide: Revealing Company Structure & Import
 How to Import Customers & Customer Addresses to Magento 2
 Amasty ChatGPT AI Content Generator for Magento 2
 Adobe (Magento 2) Commerce and Cloud (Enterprise Edition) Specific Features
 Magento Open Source and Adobe Commerce 2.4.7 Release Notes
 How To Bulk Import Products In Shopify: CSV Description & Step-By-Step Guide
 Reputon Amazon Importer Review: How to Connect Shopify to Amazon in a Few Clicks