
Exploring Magento 2 Backend: Page Hierarchy
Today, we shed light on how to organize your store’s page hierarchy. By default, the Magento 2 admin gives you the ability to manage your content pages: you can add pagination, navigation, menus, etc. If you regularly publish a large amount of content, this article will help you organize your materials to make it easy for store visitors to find articles they need. We describe other admin sections here: Magento 2 Backend Exploration.

Table of contents
Magento 2 Page Hierarchy Explained
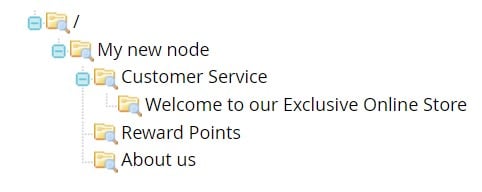
The Magento 2 page hierarchy system is based on nodes. It uses them to identify related pieces of content and organize pages into parent-child relationships. In this system, nodes act as folders. Below, you can find some facts that explain the Magento 2 page hierarchy:
- Thus, a parent node can contain other nodes (child nodes) as well as pages (articles and other materials).
- The same is about a child mode: it can have other nodes and materials inside.
- To simplify navigation, Magento 2 utilizes a tree hierarchy to display relative positions of nodes and pages.
- Also, note that a single content page might be associated not only with multiple nodes but also other content pages. This interaction leads to parent-child or neighbor relationships.
How to Configure Page Hierarchy in Magento 2
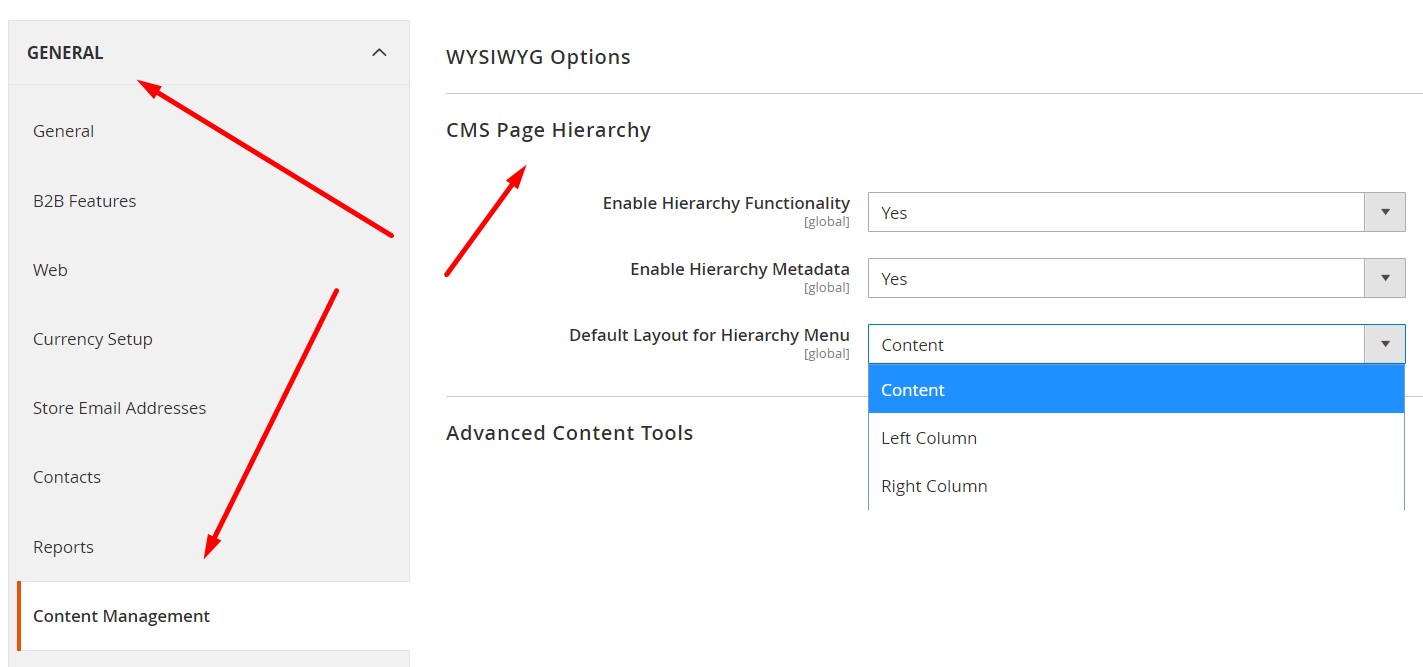
Let’s see how to activate and configure the Magento 2 page hierarchy. The corresponding section is available under Stores-> Settings-> Configuration in the Magento 2 admin. Choose General from the panel on the left and proceed to the Content Management section. Next, open the CMS Page Hierarchy tab to make any necessary changes:
- Enable Magento 2 page hierarchy (Enable Hierarchy Functionality);
- Turn on metadata (Enable Hierarchy Metadata);
- Choose a layout for a hierarchy menu (Default Layout for Hierarchy Menu).
- Click Save Config when complete.
How to Add a Node in Magento 2 Page Hierarchy
Below, we shed light on how to create a node with simple navigation. Note that a single node doesn’t have a content page associated with it. However, it has a URL key so that you can add a link to a node with articles to other CMS pages.
Use the Widget tool to generate a CMS Hierarchy Node link. Next, you can add the corresponding widget to a content block or page.
Create a page hierarchy node
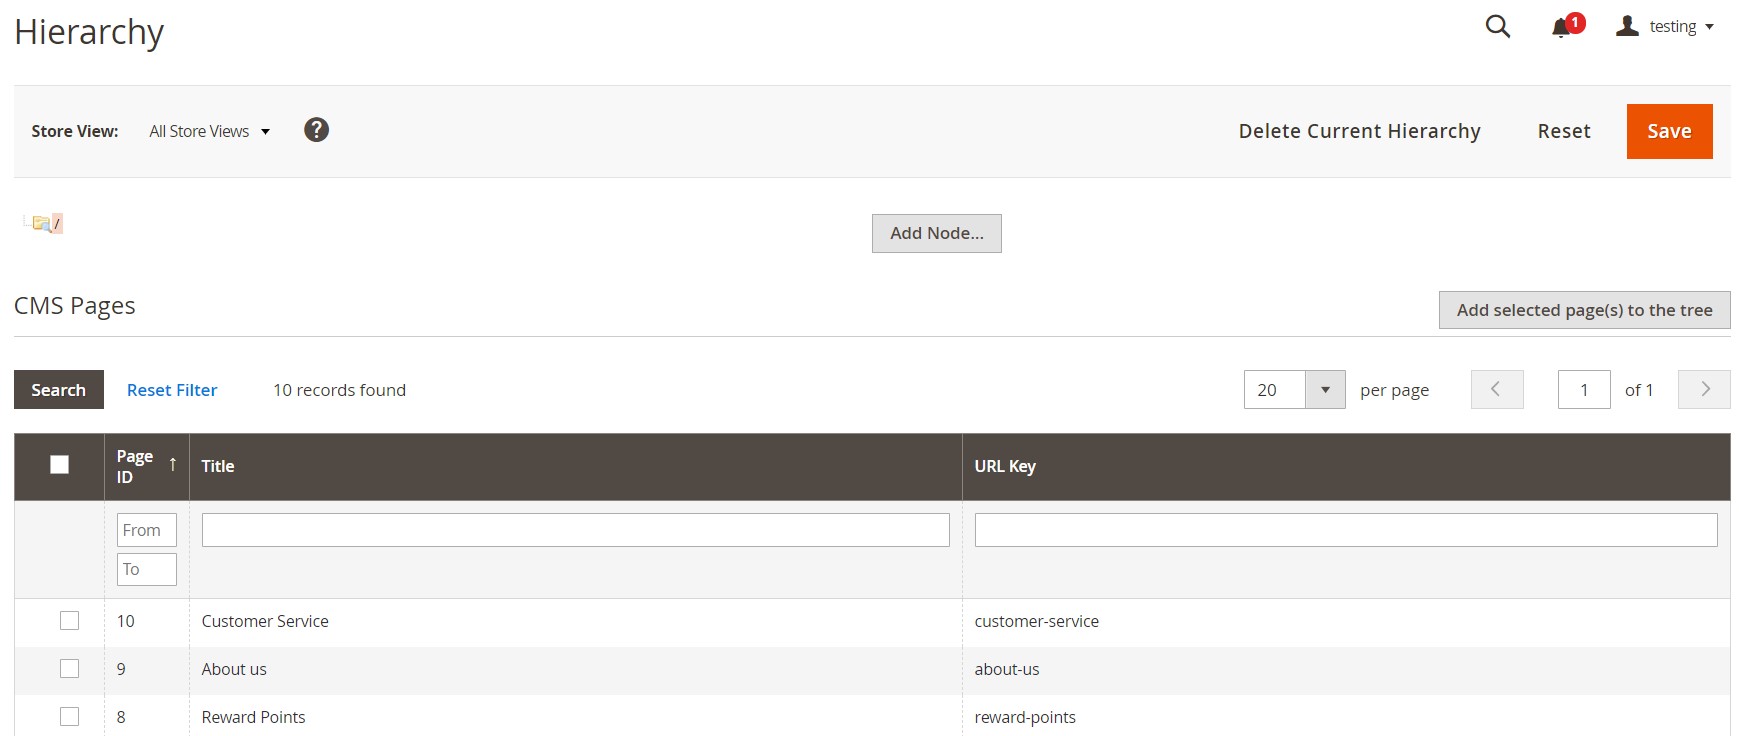
Visit the Hierarchy screen under Content-> Elements-> Hierarchy and click Add Node.
Now, follow these steps to create a Magento 2 page hierarchy node:
- Configure Page Properties:
- Set a node title;
- Enter a URL key: use lowercase characters and hyphens (instead of spaces);
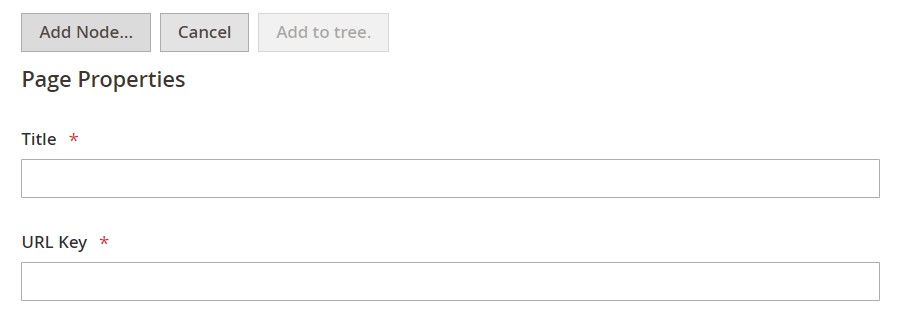
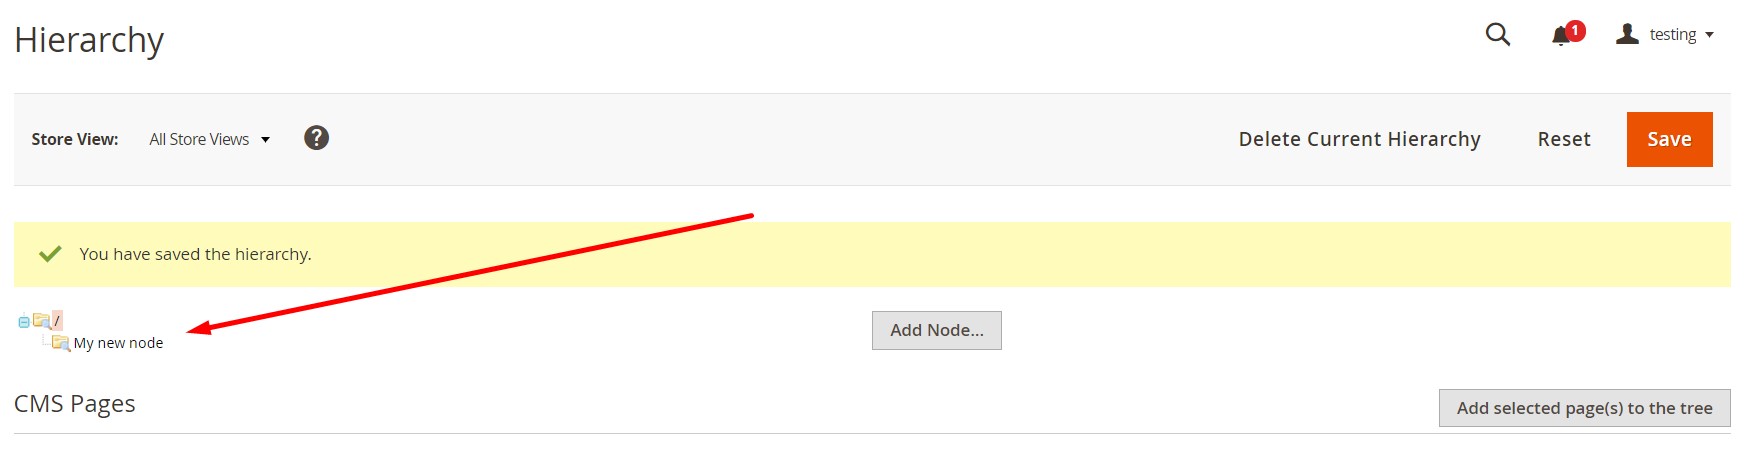
- Save your new node. Now, it is available as a folder in the tree on the left.
Add pages to the node
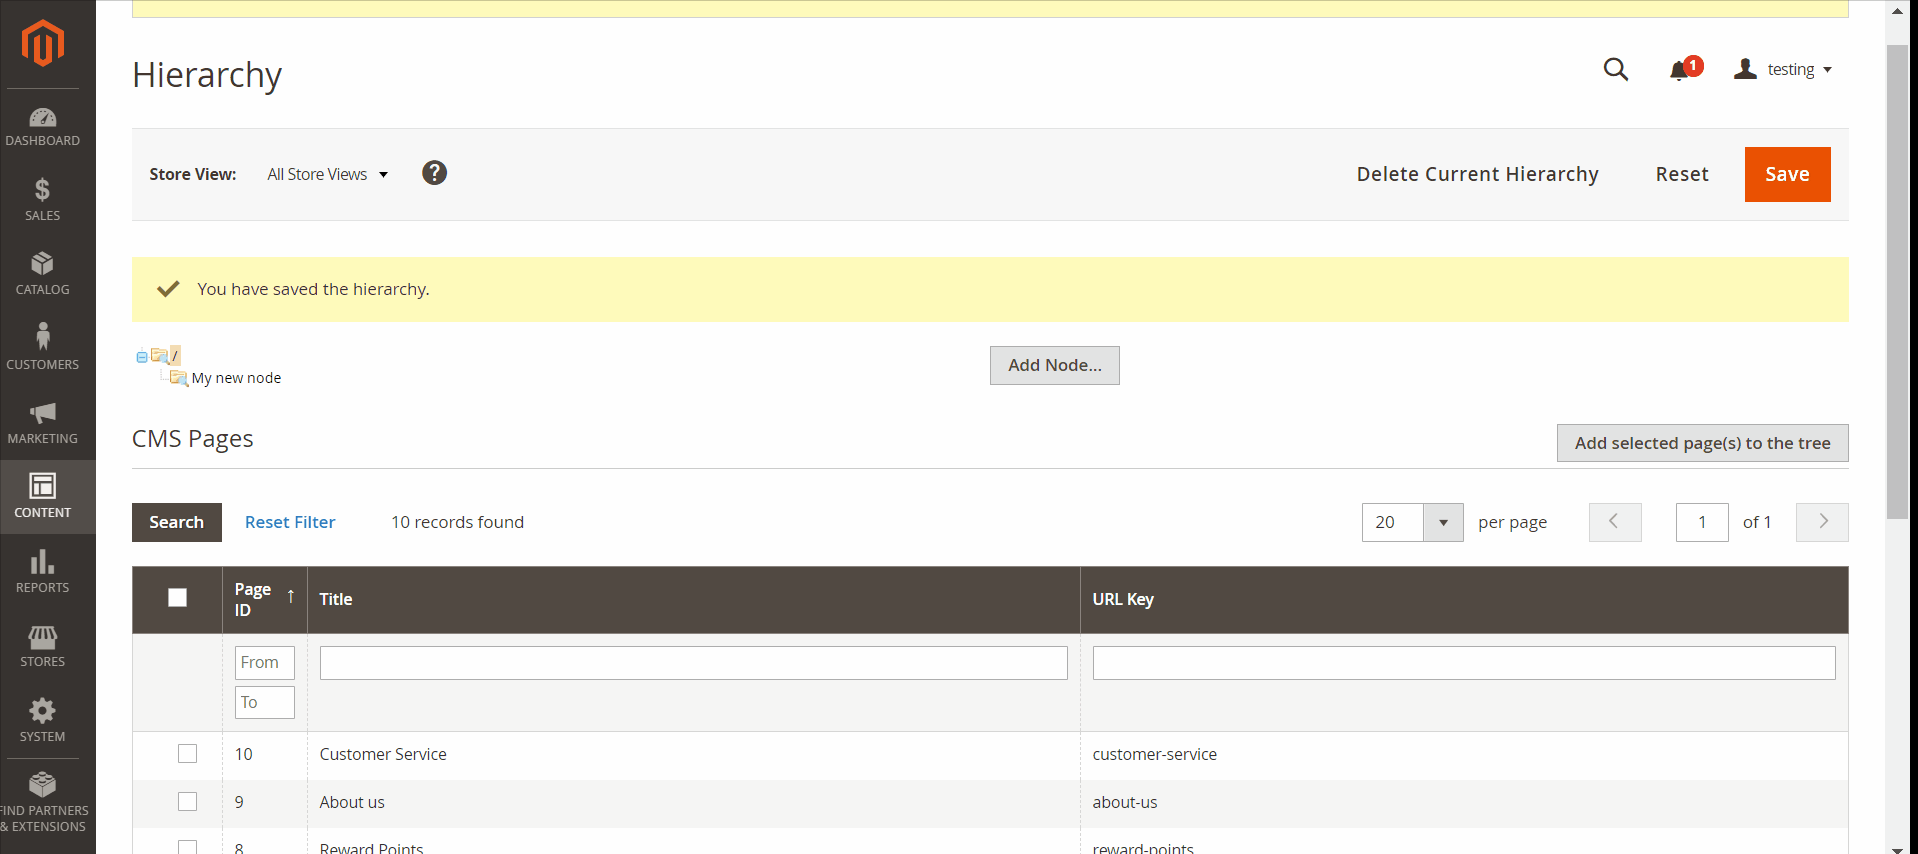
- Now, when your new node is in the hierarchy tree, you can open it in edit mode. Just click the node.
- When in edit mode, scroll down to the CMS pages section to choose the content you want to add to the node. Select the checkbox of each page you need.
- After that, click the Add Selected Pages(s) to Tree button.
Define the node structure
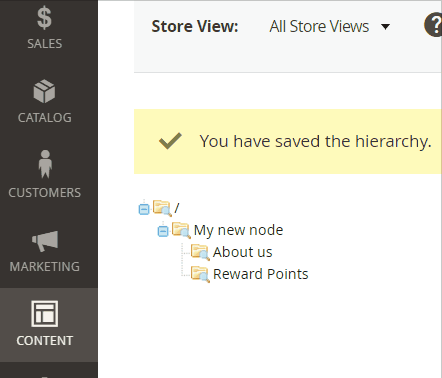
You can change the position of pages in the node. Use the drag-and-drop capabilities of the tree.
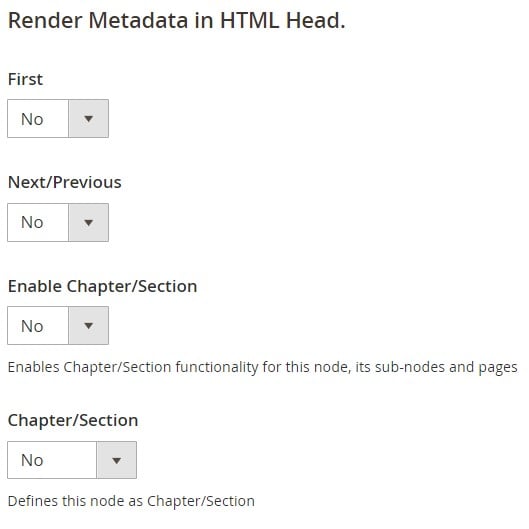
Now, let’s work with the metadata section of the node. Do the following under the Render Metadata in HTML Head section:
- You can identify the node as the top of the hierarchy. To do it, set First to Yes.
- Next, you can enable pagination control. Proceed to the Next/Previous option and set it to Yes.
- Besides, it is possible to organize the pages in the hierarchy as a book. You have to set Enable Chapter/Section to Yes to enable the feature.
- Nest, proceed to the Chapter/Section option. Here, you can assign your node to a specific part of the book: Chapter, Section, or Both. Choose None to exclude the node from the book.
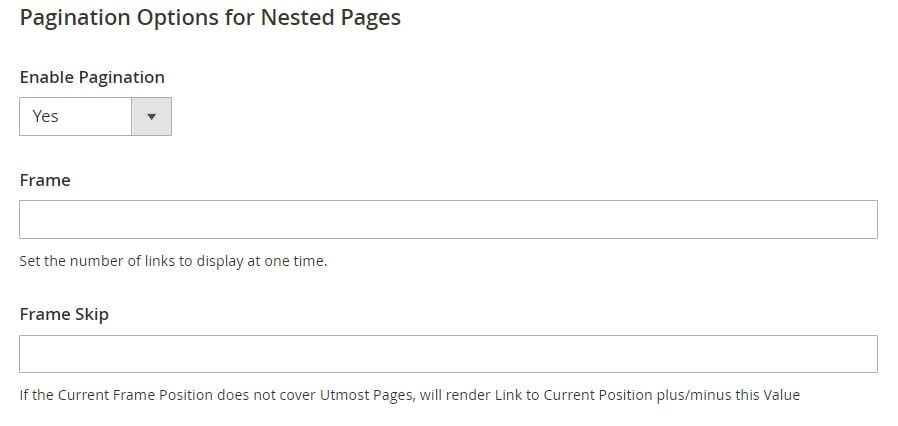
Add pagination controls to the node
- Proceed to Pagination Options for Nested Pages. Here, you should set Enable Pagination to Yes to reveal more options and enable the feature.
- Specify the number of page links to add to the pagination control in the Frame field.
- As for the Frame Skip field, specify the number of pages to skip ahead/back for the next set of pagination links.
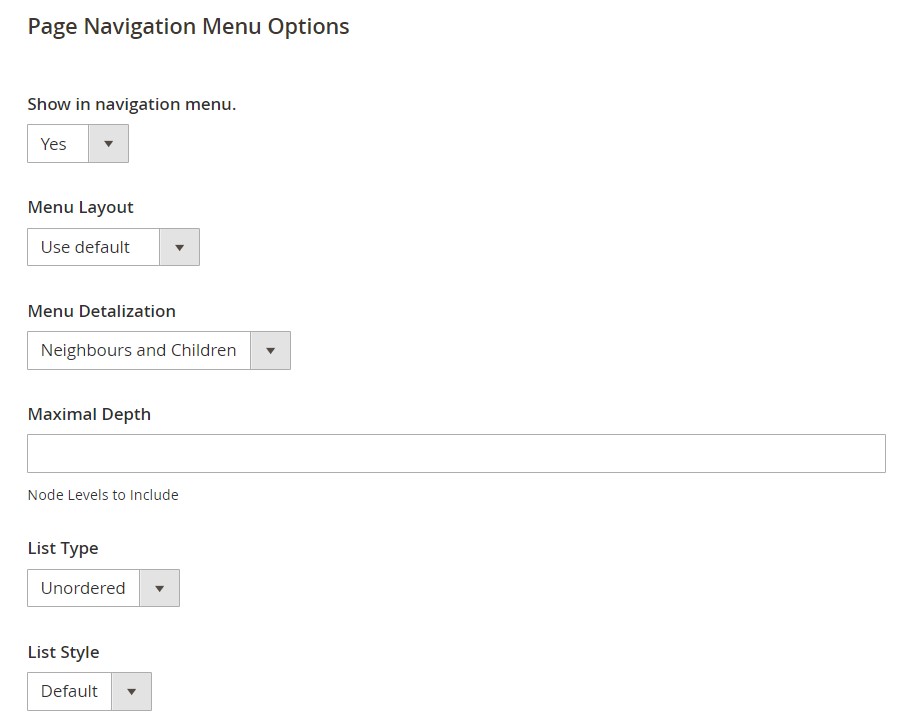
Now, let’s enable the Magento 2 page hierarchy node in the menu. Go to Page Navigation Menu Options and enable the Show in Navigation Menu setting. You will see new settings:
- Specify the position of the menu concerning the content. You can select one of the following options from the Menu Layout dropdown: Use Default, Content, Left Column, or Right Column.
- Next, you can configure the degree of the menu details. Choose one of the following options from the Menu Detalization dropdown:
- Only Children – show only subpages;
- Neighbors and Children – show pages of the same hierarchy level.
- After that, you can set the maximum number of levels to determine the depth of the menu (Maximal Depth).
- The two final options are List Type (Ordered or Unordered) and List Style (Default, Circle, List, Square). Use them to format the menu appearance.
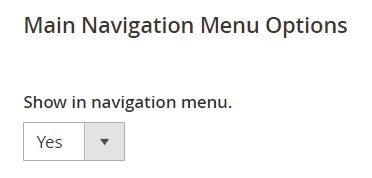
You can add the node to the main navigation menu of your Magento 2 website. Under Main Navigation Menu Options, set Show in Navigation Menu to “Yes.” Save changes when complete.
How to Import & Export Magento 2 Page Hierarchy
Now, let’s concentrate on another aspect related to a Magento 2 page hierarchy. If you are going to migrate to a new store or need to transfer an old page hierarchy to an existing website, you’ve come to the right place. Unfortunately, the default platform’s tools don’t let you do that. However, you can easily import any page hierarchy into Magento 2 with the help of the Improved Import & Export Magento 2 extension. Our module can import and export all core Magento 2 entities, and page hierarchy is not an exception. Besides, it uses different connection types so that it is possible to leverage the extension to integrate your e-commerce store with any external system.
You can simplify the data migration between Magento 2 and Magento 1 or Magento 2 and Magento 2 even more with the free Magento 1 to Magento 2 Migration add-on. The tool works upon the Improved Import & Export Magento 2 extension providing additional data transfer capabilities and automating import and export processes.
You can use both tools to import Magento 2 page hierarchy data. Everything happens right in your admin. Alternatively, it is possible to use simple CLI commands.
Both the extension and its add-on let you benefit from a selective approach to the migration. You move entity after entity so that there is no downtime. However, you need to reindex after every data transfer.
Before using the Free Migration add-on, install the Improved Import & Export module. Download the add-on from your Firebear account after buying the module. if any questions occur.
To import page hierarchy to Magento 2, follow these steps:
- Create a new import job under System-> Improved Import/Export-> Import Jobs.
- Enable the job, specify its title, and configure other General Settings;
- Proceed to Import Settings and choose Page Hierarchy from the Entity Dropdown;
- Configure Import Behavior and determine Import Source.
- Save & Run the job.
That’s it!
Also, note that our extension works with the following entities:
- Categories;
- Inventory;
- Products;
- Product reviews and ratings;
- Orders;
- Order shipping data;
- Order Quotes
- Product media (images and videos);
- Product Attributes;
- Customers and all the related data;
- Customer groups;
- Customer wishlists;
- CMS blocks and pages;
- URL rewrites;
- Store administrator accounts;
- Catalog price rules and cart price rules;
- Invoices and other documents;
- Taxes and order taxes aggregated;
- Newsletter subscribers.
New entities are added with every update.
Also, note that you can automate the Magento 2 page hierarchy import with the Improved Import & Export Magento 2 extension since it provides the ability to create cron schedules. Another essential benefit introduced in our module is the ability to use API and Google Sheets to import/export data. Different file formats and archives are supported! Moreover, you can easily avoid problems caused by different attributes with the help of mapping presets. Both the extension and its add-on are described here:
Get Improved Import & Export Magento 2 Extension
Get Free Magento 1 to Magento 2 Migration Add-On
Related posts
 Amasty ChatGPT AI Content Generator for Magento 2
 Magento 2 B2B Company Guide: Revealing Company Structure & Import
 How to Import Customers & Customer Addresses to Magento 2
 CopyAI Review 2023
 Magento 2 Release Notes
 Adobe (Magento 2) Commerce and Cloud (Enterprise Edition) Specific Features
 How To Bulk Import Products In Shopify: CSV Description & Step-By-Step Guide
 Magento Open Source and Adobe Commerce 2.4.7 Release Notes