
Exploring Shopware: Caches & Indexes in Shopware 6
![]()
Below, you will learn how to manage caches and indexes in Shopware 6. By default, the system lets you leverage both functionalities if you run a self-hosted website. If you use a cloud storefront, the corresponding admin section is absent. So, what are the Shopware 6 caches? Where to find indexes in your admin? How to manage both? You will find answers to these and other questions below. We explain how to clear caches in Shopware 6. Alternatively, you may clear and warm them up. Index update is another Shopware 6 routine procedure that you will discover. And, of course, we shed light on how to simplify your daily chores and automatically empty Shopware 6 cache.

Note that we provide Shopware integration with external platforms. Contact our support for further information or try our Improved Import & Export Extension for Shopware.
Table of contents
- 1 Shopware 6 Caches & Indexes
- 2 How to Import Data from External Platforms to Shopware 6
- 3 Shopware 6 Essentials FAQ
- 3.1 How to create a Shopware ID?
- 3.2 How to create a Shopware account?
- 3.3 What is Shopware master data?
- 3.4 How to add a shop in Shopware?
- 3.5 How to add a payment method to your Shopware account?
- 3.6 How to create a deposit in Shopware?
- 3.7 How to purchase Shopware extensions?
- 3.8 How to get support in Shopware?
- 3.9 How to migrate to Shopware 6?
- 3.10 How to automate import and export processes in Shopware 6?
- 3.11 How to integrate Shopware 6 with external systems?
Shopware 6 Caches & Indexes
A cache in Shopware 6 is a software component that stores data with the following purpose – to speed up future requests. Usually, the data stored in a cache might be the result of earlier interaction with your e-commerce website or a copy of data stored somewhere else.
As for a Shopware 6 index, it is a list of data saved in a plain text format. Usually, indexes represent a group of files or database entries that can be quickly scanned by a search algorithm. Consequently, searching and sorting operations are dramatically enhanced, achieving new performance.
How to find Shopware 6 cache and indexes
You can find the Caches & Indexes module in your Shopware 6 administration under Settings -> System.
How to manage cache and indexes in Shopware 6
The system provides you with the ability to empty and warm up your cache.
At the same time, you can view several other configurations under the Caches & Indexes screen.
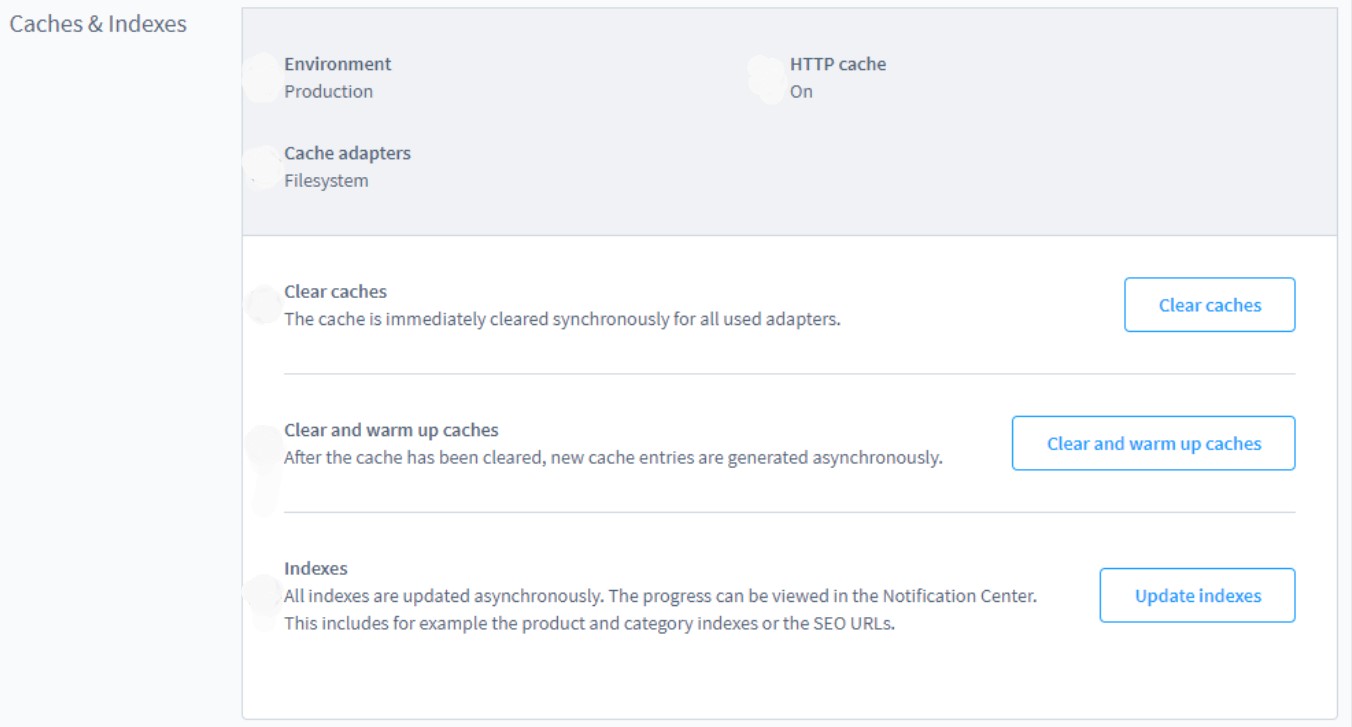
Below, you can see the corresponding admin section:
It informs you whether your e-commerce website is in production mode. This state is indicated as Production under Environment. Besides, Shopware 6 notifies whether the HTTP cache is enabled. The cache adapter currently used in the system also displays here.

As for the environment mode and HTTP cache, you can switch them manually. Find the .env file in the Shopware main directory and apply the necessary changes there.
For instance, you can disable the HTTP cache in Shopware 6 as follows:
- Open the .env file in the Shopware main directory;
- Find the following line:
1SHOPWARE_HTTP_CACHE_ENABLED=1 - Type =0 instead of =1 to deactivate the HTTP cache in Shopware 6.
Also, it is necessary to mention that you have different functions for the cache and index management in the lower part of the module. Let’s describe each one.
How to clear caches in Shopware 6
Shopware 6 lets you clear caches with the help of a single button click. Follow these steps to do that:
- Go to the Caches & Indexes module in your Shopware 6 administration under Settings -> System;
- Find the Clear caches button.
- Click it – this action clears caches synchronously for all used adapters.
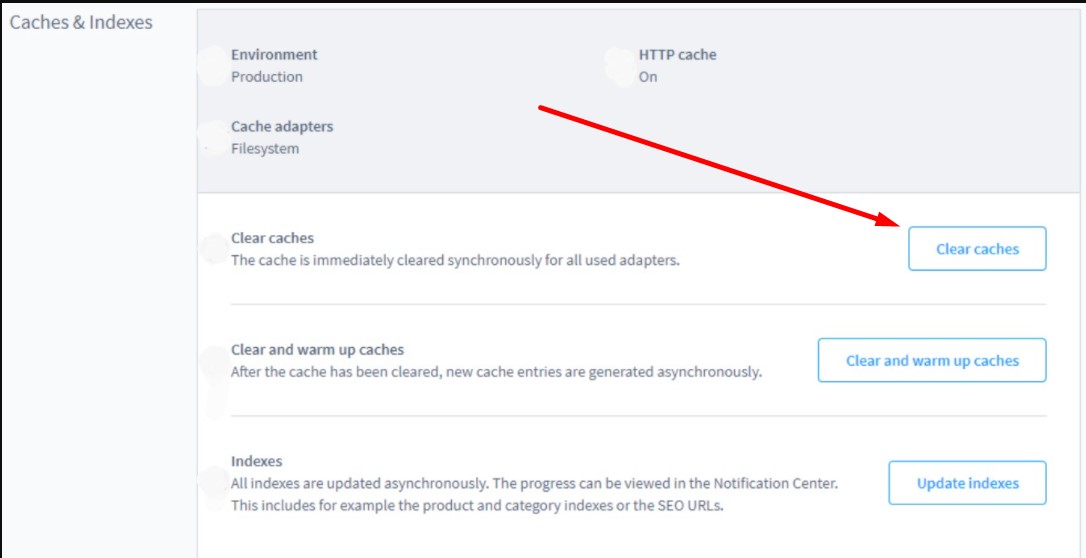
Use this approach to empty the caches without having to reheat them directly afterward.
Alternatively, Shopware 6 lets you achieve the same effect in the console. Use the following command to clear all caches in Shopware 6:
|
1 |
php bin/console cache:clear |
How to clear and warm up caches in Shopware 6
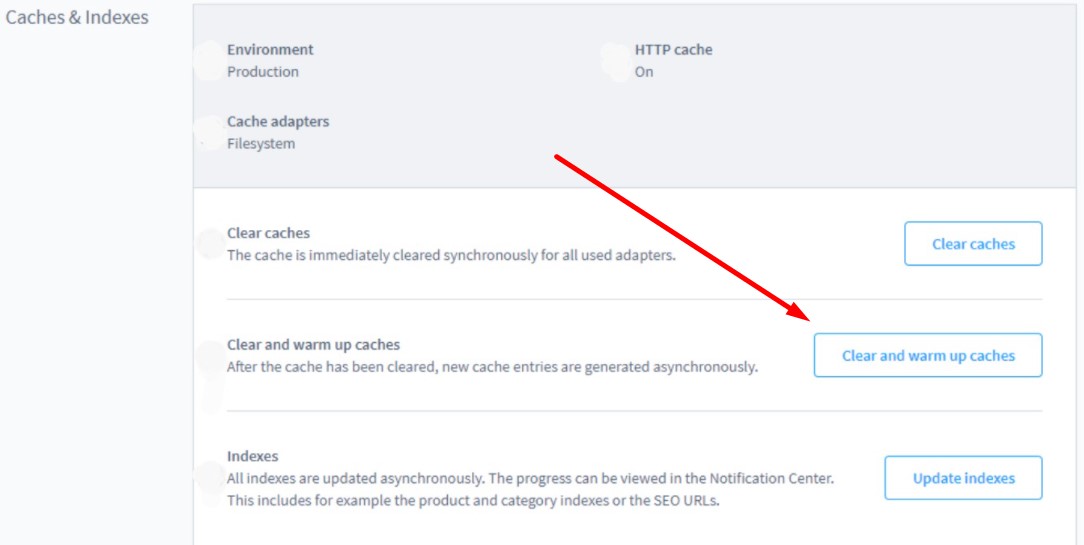
You can clear and warm up caches in Shopware 6 as follows:
- Go to the Caches & Indexes module in your Shopware 6 administration under Settings -> System;
- Find the Clear & warmup caches button.
- Click it – this action clears caches asynchronously, creating new caches afterward.
How to update indexes in Shopware 6
You can update indexes in Shopware 6 as follows:
- Go to the Caches & Indexes module in your Shopware 6 administration under Settings -> System;
- Find the Update Indexes button.
- Click it – this action updates indexes asynchronously.
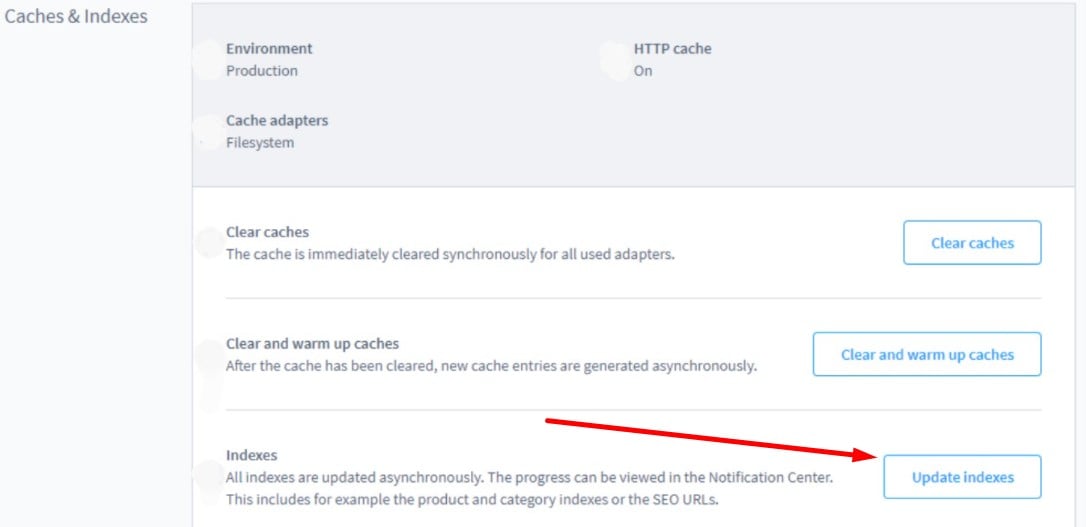
You can view the progress of how Shopware 6 updates such indexes as the category and product indexes and the SEO URLs in the Notification Center.
Alternatively, you can use the following command to update Shopware 6 indexes in the console:
|
1 |
php bin/console dal:refresh:index |
How to empty the cache in Shopware 6 automatically
Since Shopware 6 doesn’t empty the cache automatically, it leads to performance degradation and consumption of additional server space. Therefore, you need to empty the cache of the store periodically. You can do that manually with the help of the following command in the admin console:
|
1 |
rm -rf SHOPWARE-ROOT-DIRECTORY/var/cache/* |
However, you can automate this process with the help of cronjob. The official Shopware 6 documentation recommends executing it once a day. Since the store traffic is usually the lowest during the nighttime, execute the command during this period.
You can find out how to set up a regular cron job on your server from your provider or in the corresponding documentation.
How to Import Data from External Platforms to Shopware 6
You may need to import data to Shopware 6 to get something that the system can cache. In this case, our team will help you a lot. We provide the ability to simplify and automate various processes associated with data transfers to Shopware 6. You need to install the . The module is suitable for importing any entity to Shopware 6 from any external platform. Please, contact our support before using the tool. We will explain how to create schedules to automate all data transfers. Besides, we will teach you how to create mapping schemes to replace unsupported attributes and data with corresponding Shopware 6 designations.
Shopware 6 Essentials FAQ
How to create a Shopware ID?
You need a ShopwareID to start your work within the platform. However, no additional manipulations are necessary to get it. Your ShopwareID is provided along with a Shopware account. We explain how to create it below.
How to create a Shopware account?
You can create a Shopware account in a fast and user-friendly manner. Go to a registration page, click the Register Now link, and fill in the form. After that, you need to proceed to your email and follow the instructions from a confirmation message.
What is Shopware master data?
Shopware master data is all the information provided about your company. It usually includes address, email, phone, name, and other company details.
How to add a shop in Shopware?
You can add a shop in Shopware 6 as follows. Visit your merchant area and click the corresponding link on the start screen’s right part. Next, choose between a cloud storefront or an on-premise installation and provide more information about your new storefront.
How to add a payment method to your Shopware account?
Visit Basic Information -> Accounting to add a payment method. It will be associated with your Shopware account. You can choose PayPal, credit card, or direct debit.
How to create a deposit in Shopware?
Now, you can use an active payment method to transfer funds to your Shopware 6 shop. A deposit is necessary for purchasing themes and extensions. You can create it under Merchant Area -> Shops. Specify a shop to provide funds to, click Open Account Details, and start the money transfer.
How to purchase Shopware extensions?
Now, when your balance is enough to cover the price of a module you want to buy, go to the Shopware Marketplace or Plugin Manager to buy it. Choose the solution and complete the purchase.
How to get support in Shopware?
Provide inquiries about your account or license to info@shopware.com or +49 2555 9288 50. Send inquiries about accounting and financial services to financial.services@shopware.com or +49 2555 9288 510.
How to migrate to Shopware 6?
Use the Improved Import & Export tool to migrate to Shopware. The module lets you move core entities to your new website from any external platform following the schedule of updates. Furthermore, you can use mapping to apply changes to imported data. Migration from Shopware’s previous versions is also possible with our extension. Furthermore, we offer export solutions for other e-commerce platforms, such as Magento and Shopify, to help you migrate from them. Contact our team for more information.
How to automate import and export processes in Shopware 6?
With Improved Import & Export, regular data updates are based on a schedule so that you don’t need to initiate them manually. The extension launches the corresponding data transfer according to the time frames you specify.
How to integrate Shopware 6 with external systems?
The Improved Import & Export extension provides the ability to integrate your store with ERPs, CRMs, and accounting tools in a user-friendly way. As we’ve just mentioned, it automates repetitive import and export processes with cron-based schedules and modifies data with the help of mapping schemes. The plugin lets you apply changes according to the requirements of your Shopware store upon import. The same logic is applied to exported data allowing you to create a perfect output for the connected platforms upon export.
Related posts
 Shopware 6 Advanced Pricing Guide + Import Tutorial
 A Complete Guide to Shopify Customer Import
 How To Bulk Import Products In Shopify: CSV Description & Step-By-Step Guide
 CopyAI Review 2023
 Adobe (Magento 2) Commerce and Cloud (Enterprise Edition) Specific Features
 Amasty ChatGPT AI Content Generator for Magento 2
 Magento Open Source and Adobe Commerce 2.4.7 Release Notes
 Magento 2 B2B Company Guide: Revealing Company Structure & Import