
Exploring Magento 2 Backend: System/Other Settings (Message Inbox, Custom Variables, Encryption Key)

Today, we explore the Other Settings subsection of the System section situated in the Magento 2 backend. Below, you will find out how to manage notifications in your message inbox, work with custom variables, as well as create new encryption keys.

Magento 2 Message Inbox
Magento regularly messages you, rating its letters by importance. Usually, the interconnection is related to system updates, security patches, upcoming events, etc. As a store administrator, you can always see the number of inbox notifications due to the bell icon in the header.
![]()
However, if the importance of the notice is critical, it appears in a pop-up window upon logging into the backend every time until the message is read or removed.
On the Notifications page, the most recent messages appear at the top. You can use the Action commands to mark individual notices as read, reveal additional details, or delete the message. Also, note that for a store Admin with a secure URL, the communication between Magento and you must be maintained over HTTPS.
How to view new incoming messages in Magento 2
Use the Notification icon in the header to view incoming messages in Magento 2. Click it to read the summary. Besides, you can interact with any notification to display its full text. Deleting it is possible as well. Simply click the delete icon to the right of the message. To view the full Notifications list, leverage See All.
How to address a critical message in Magento 2
If a message of critical importance appears in the Magento Message Inbox, click Read Details and peruse the notice. You can also dismiss the alert box but keep the notification active. To do that, click Close.
How to manage notifications in Magento 2
You can get to the Notifications screen by clicking the corresponding icon in the header. If one or more new messages are displayed, click See All. Alternatively, it is possible to see all the available notices under System -> Other Settings -> Notifications.
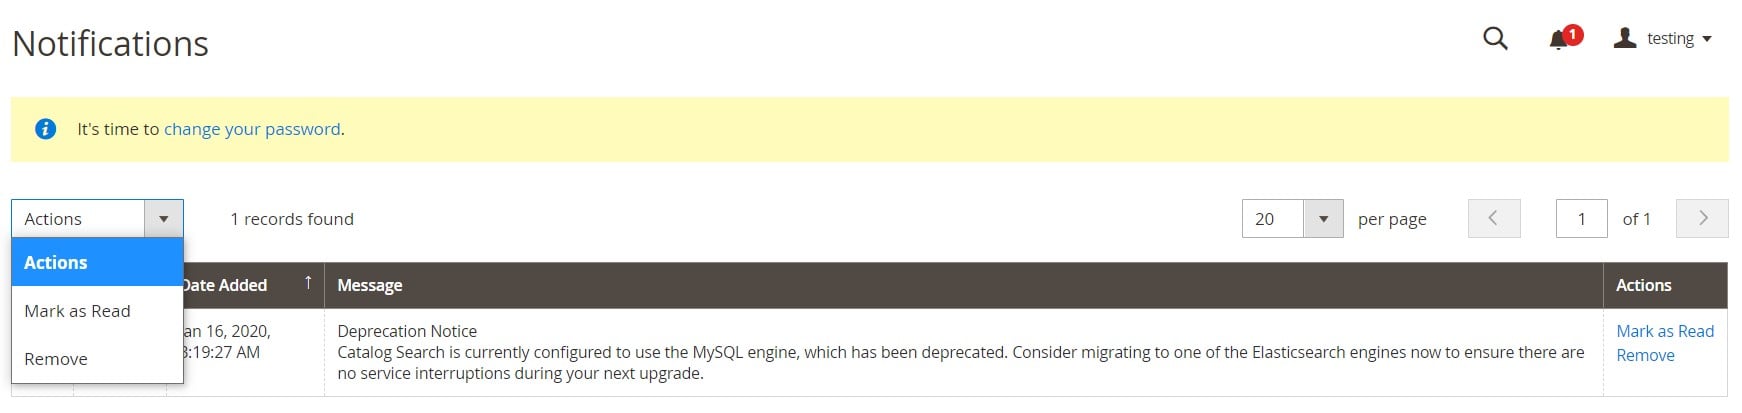
Here, you can click the Read Details link in the Actions column for further information. The system will display the linked page in a new window. You can also keep the message in your inbox but dismiss the notification – hit the Mark As Read link. The third link – Remove – lets you delete the message.
You can apply actions to multiple messages simultaneously. Firstly, go to the grid and tick each record to be managed. Secondly, set the Actions control to Mark as Read or Remove and click Submit.
How to configure notifications in Magento 2
You can configure notifications under Stores -> Settings -> Configuration -> Advanced (left side panel) -> System -> Notifications. There are only two options to configure. Use HTTPS to Get Feed is the first one. Set it to Yes if your store Admin runs over a secure URL. Update Frequency is the second available control. It lets you determine how often your Magento 2 inbox is updated. Choose an interval between one and twenty-four hours.
Don’t forget to save changes when finished.
Magento 2 Custom Variables
Custom variables make Magento 2 more flexible. By inserting them into pages, blocks, and email templates, you may easily follow the specific demands of your business. Below, we shed light on how to create and use custom variables in Magento 2.
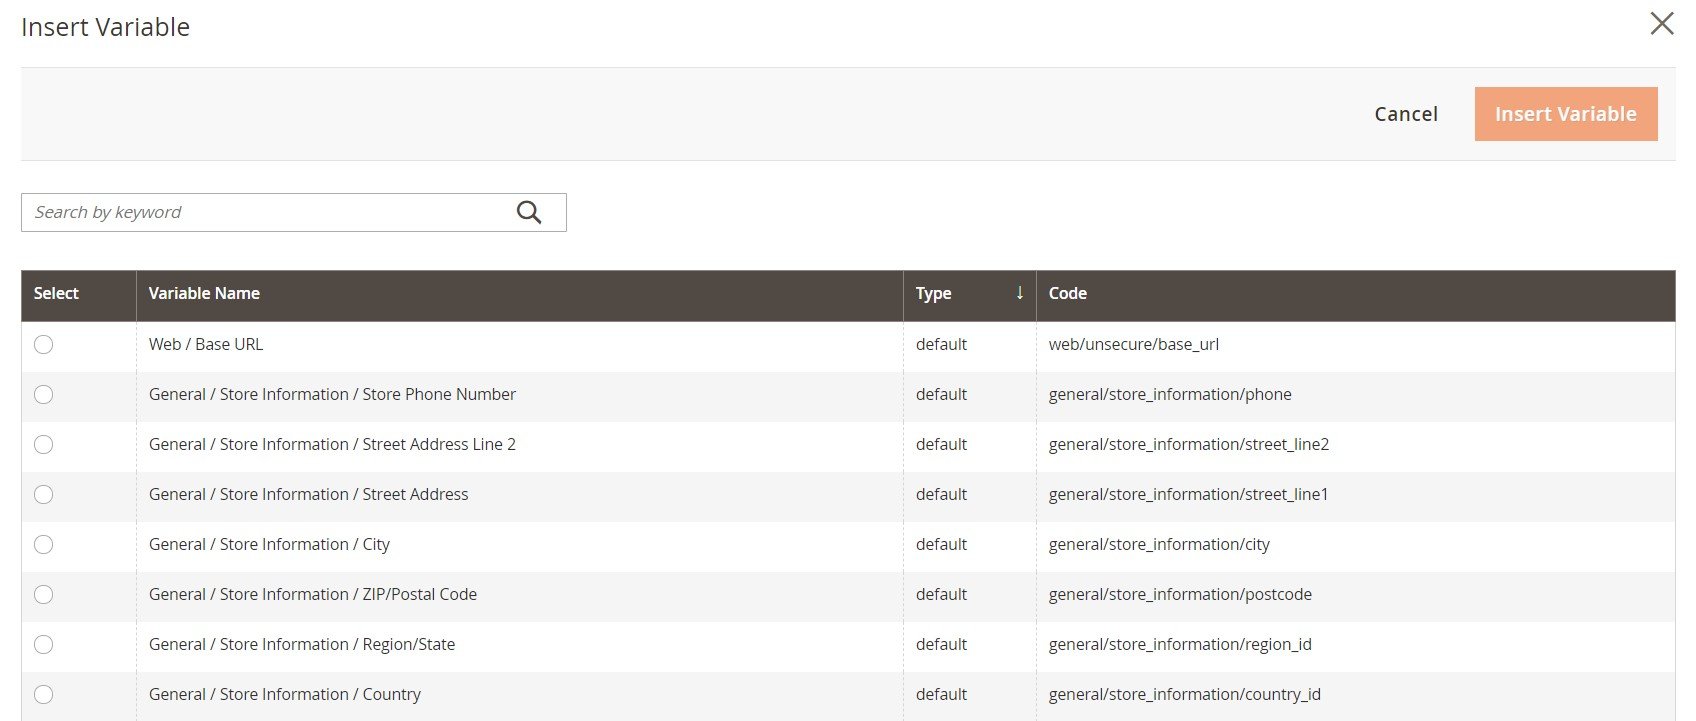
The list of available variables appears when you click the Insert Variable button. It contains both predefined and custom values. However, the list may vary a lot, depending on a selected email template.
How to create a custom variable in Magento 2
Go to System -> Other Settings -> Custom Variables. A grid with custom variables is situated here.
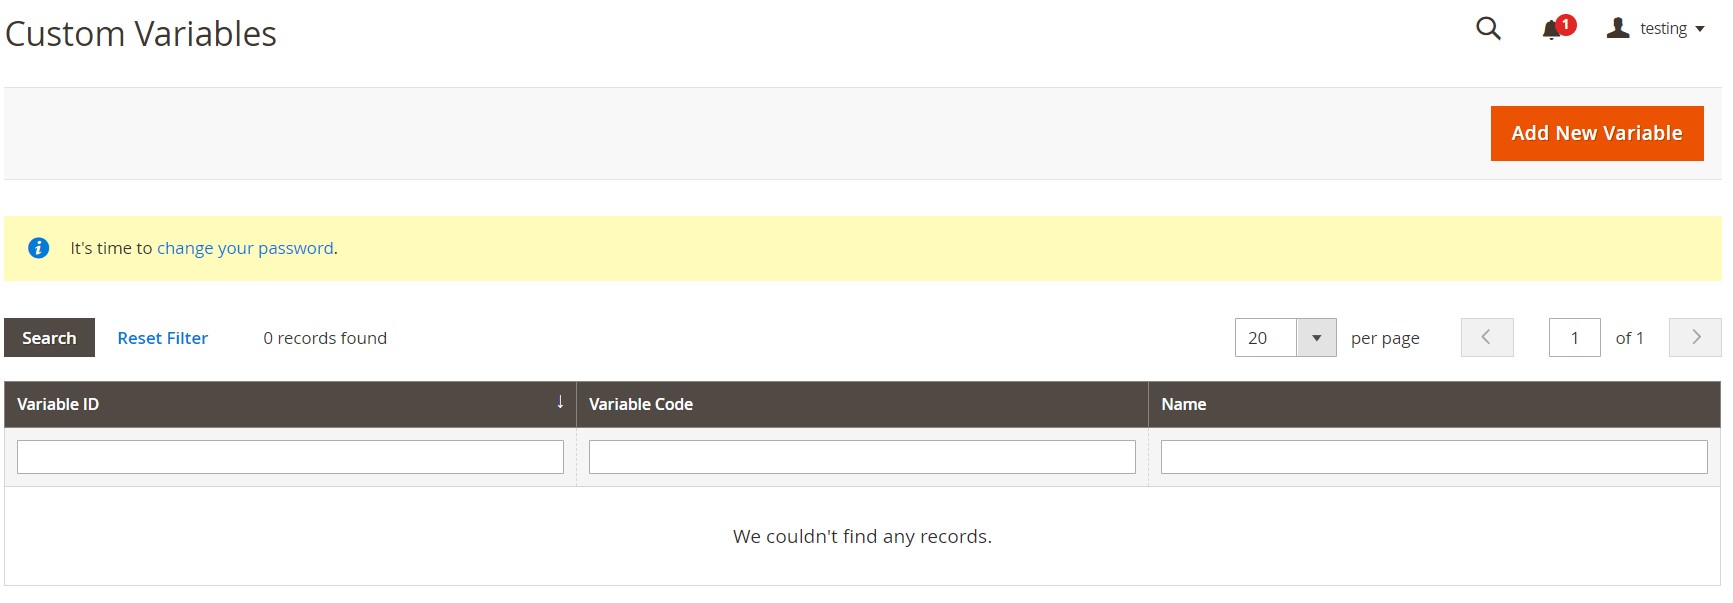
Click the Add New Variable button. The system redirects you to the following screen:
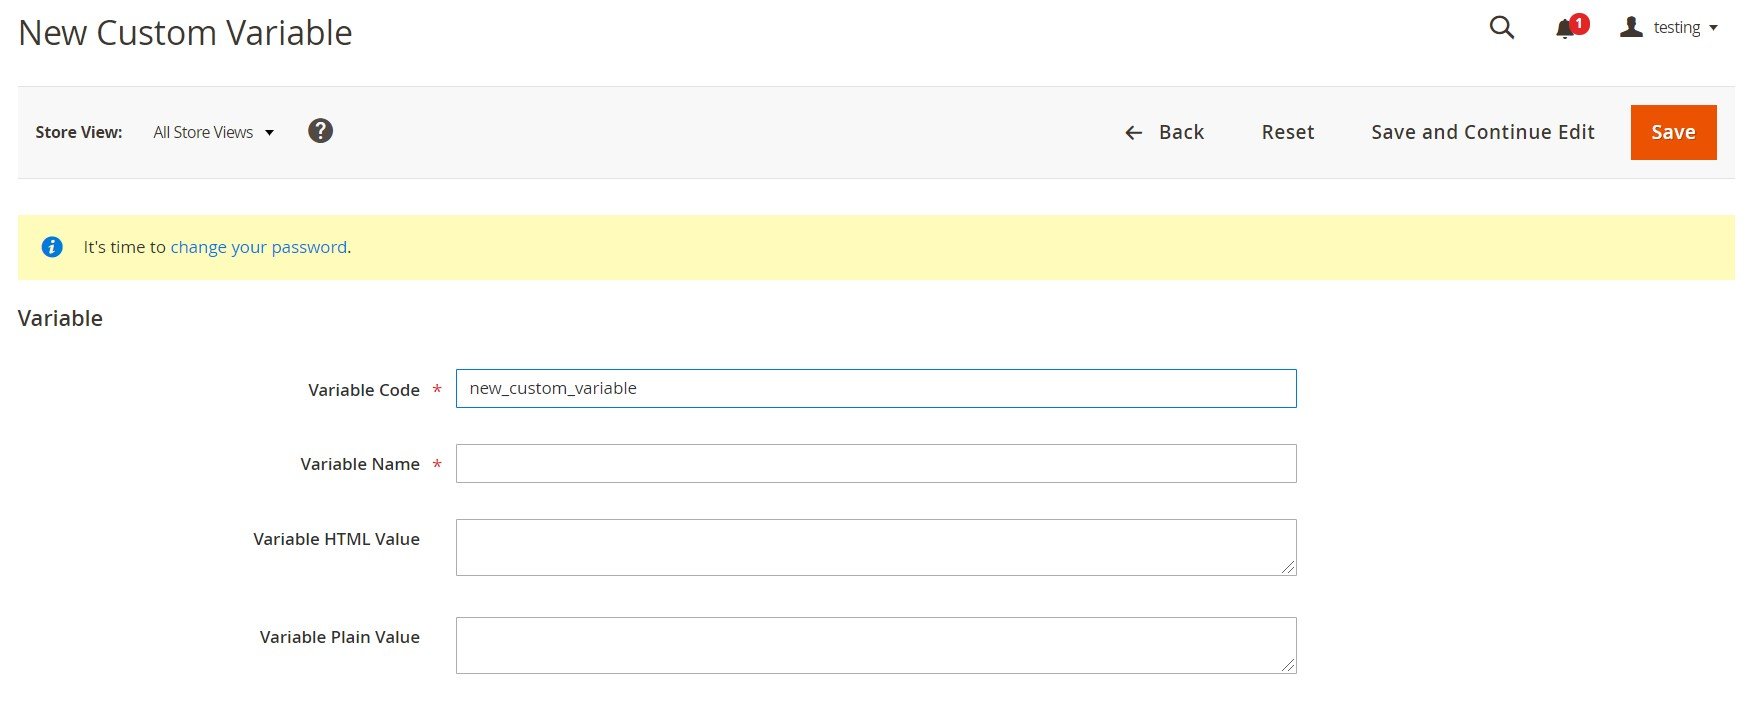
In the Variable Code field, enter an identifier. Use all lowercase characters without spaces. It is possible to replace spaces with an underscore or hyphen.
Next, specify a Variable Name. Note that it is utilized for internal use only.
After that, you can enter the value associated with the variable. Magento provides the following two options:
- The Variable HTML Value field requires entering the variable value formatted with simple HTML tags.
- The Variable Plain Value field lets you specify the variable value as plain text without formatting.
Don’t forget to save changes.
How to insert a custom variable in Magento 2
The way you insert a custom variable in Magento 2 depends on the edition you use. Therefore, we separately describe each process below.
Magento Open Source
When you add a custom variable on your Magento 2 Open Source website, go to a CMS page or block you want to modify. Scroll down to the Content section and expand it. Hit the Show / Hide Editor button to activate the HTML mode. Find the position for your custom variable and click Insert Variable. Select the appropriate option for the list.
Magento 2 encloses the command to insert the variable in curly braces and adds it to the code at the cursor location.
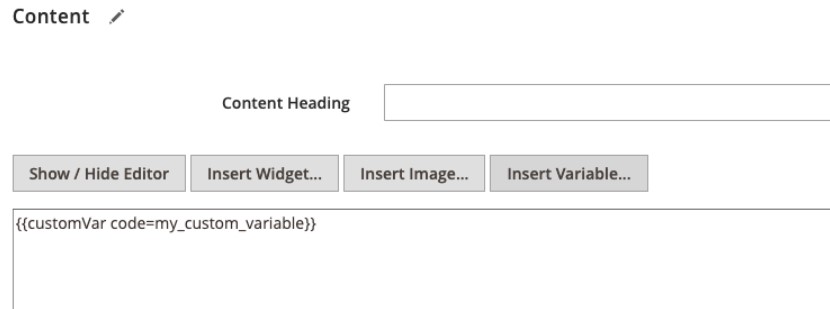
That’s it! Now, your custom variable is a part of a CMS page or block. Continue further editing and save changes.
Magento Commerce
When it comes to Magento 2 Commerce, you can insert custom variables with the help of Page Builder. You still need to open the page or block where the variable is to appear. Expand its Content section and click Elements in the left panel. Page Builder lets you click in an existing text area and drag a new Text object to a place where you want to insert the variable. Hit (x) to add a variable. The button is situated at the far right of the editor toolbar.
A dropdown with variables appears. Choose your custom one and click Insert Variable.
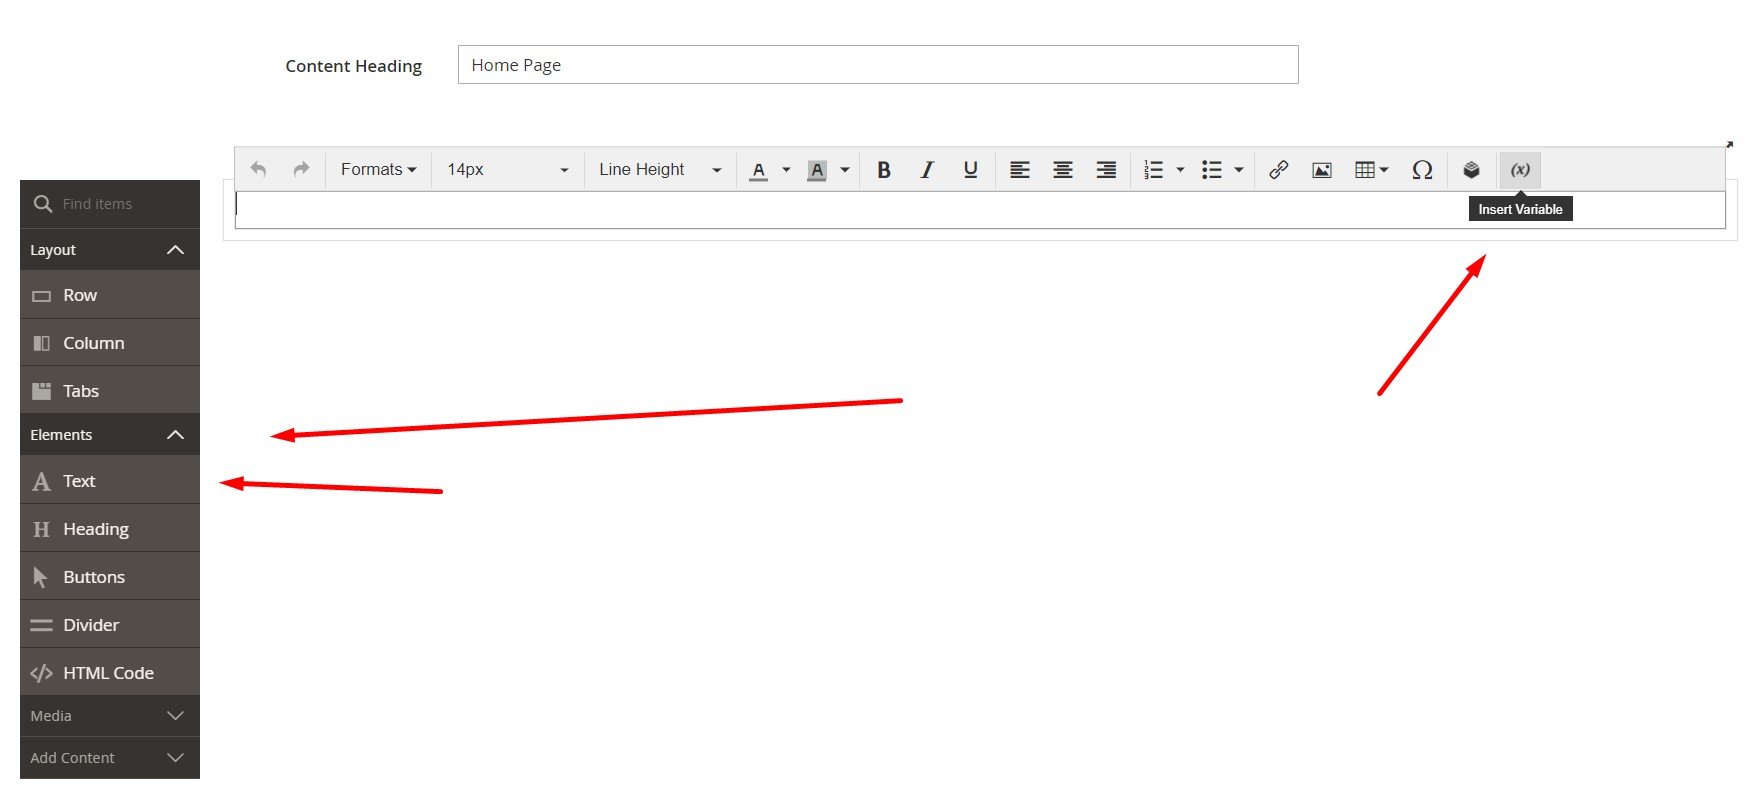
Now, you can see the variable identifier displayed as a placeholder in the editor.
Continue editing and click Save when complete
Magento 2 Encryption Key
An additional layer of protection in Magento 2 is achieved due to an encryption key. It enables more secure storing of passwords and other sensitive data. The system relies on the AES-256 algorithm to encrypt all data that requires decryption, such as credit card data and integration passwords. If any data doesn’t require decryption, Magento 2 streamlines SHA-256.
When installing Magento, you can either generate an encryption key with the means of the platform or enter your own. However, there is the Encryption Key tool developed to change the key as needed. Why should you do that?
Of course, due to security concerns. Regularly update your encryption key. Also, generate a new one when you suspect that the original key might have been compromised.
Bear in mind that every time you change the key, all legacy data is re-encoded.
How to change encryption key in Magento 2
Make sure that the following file is writable:
|
1 |
[your store]/app/etc/env.php |
Otherwise, you won’t be able to change the encryption key.
Next, go to System -> Other Settings -> Manage Encryption Key.
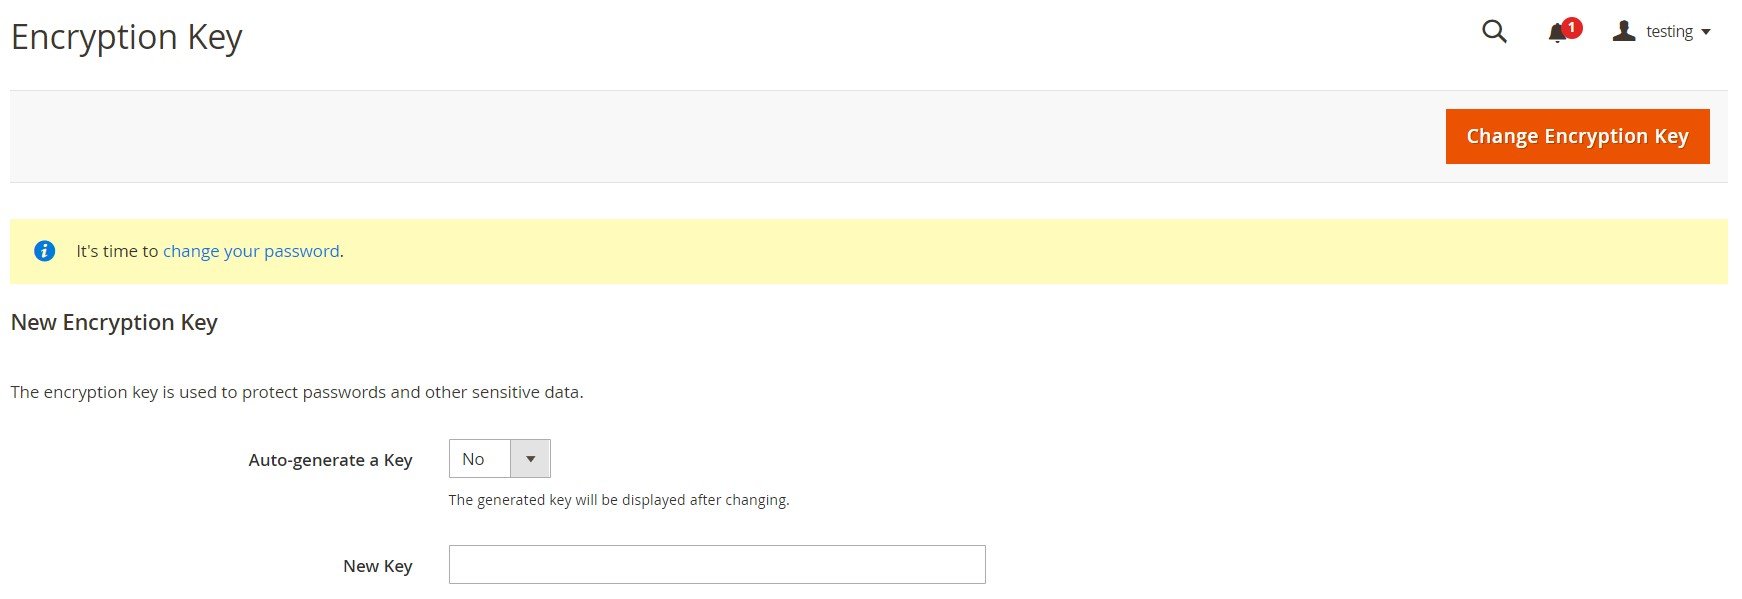
Set Auto-generate Key to Yes to generate a new key. Alternatively, you can disable this field and type a different key in the New Key field. In any case, keep a record of the new key in a secure location. Magento 2 will require it if any problems occur with your files.
When the encryption key is updated, hit the Change Encryption Key button.
Related posts
 Magento 2 Release Notes
 Magento Open Source and Adobe Commerce 2.4.7 Release Notes
 How to Import Customers & Customer Addresses to Magento 2
 Magento 2 B2B Company Guide: Revealing Company Structure & Import
 Adobe (Magento 2) Commerce and Cloud (Enterprise Edition) Specific Features
 Amasty ChatGPT AI Content Generator for Magento 2
 Shopware 6 Advanced Pricing Guide + Import Tutorial
 A Complete Guide to Shopify Customer Import