
How to Apply Default Values During Shopware 6 Export

Let’s continue our journey into the practical world of Shopware 6 export. Today, we are going to visit its tiny secret place called default values. Buckle up, because this process, while sounding a bit technical at first, is surprisingly intuitive and user-friendly, inviting us to plunge into the deep waters of export table customization, all in the name of catering to the ever-evolving external demands. We’re about to uncover why the flexibility feature is the crown jewel in the world of data management. Our spotlight shines not just on its existence, but on how it can be expertly wielded. And, of course, we’ll unveil Shopware 6’s own arsenal of default tools, meticulously designed to apply default values. But that’s not all; we’re also prepared to explore alternative routes to empower your data management journey. You will discover the best third-party tool to apply default values to Shopware 6 export.
As you scroll down, you’ll gain the knowledge and insights needed to master the export customization required to meet your unique business demands. By the time you’re through, applying default values in Shopware 6 will no longer be a mystery; it’ll be a superpower, ushering in a new era of customization, efficiency, and crystal-clear data management. You can extend your knowledge about the platform even more by following our Shopware Cookbook.

Table of contents
The Advantages of Flexible Shopware 6 Export
From the perspective of Shopware 6 data export, flexibility reigns supreme, bringing forth a host of advantages. This multifaceted dynamism unfolds across several key aspects, each playing a key role in enhancing the data management experience:
- Mapping brings in a realm of tailor-made data customization, seamlessly adapting to your import and export needs. This invaluable asset enables users to align data precisely with their unique requirements, ensuring harmonious integration with various systems and platforms. With mapping, users gain the power to link specific data points to corresponding attributes, fostering a coherent and structured output.
- Incorporating default values adds an extra layer of reliability. In scenarios where certain data fields remain empty, predefined default values step in, ensuring consistency and a standardized format in the exported data, regardless of variations in the source table.
- The customizable column order offers the freedom to arrange columns in a bespoke sequence, aligning perfectly with your distinct objectives. This feature enhances clarity and efficiency, making data interpretation a breeze for in-house teams and third-party systems alike.
- Embracing a user-centric approach, a flexible export system positions administrators at the heart of data management. It adapts to their specific needs and preferences, enhancing overall system usability and personalizing the experience.
The versatility embedded within a flexible export system prepares you for a multitude of scenarios. It caters to complex data structures, diverse business requirements, and varying data sources, serving as a universal tool that mitigates potential data management challenges.
In addition to this, a flexible system offers the ability to streamline and automate repetitive workflows, reducing the need for manual interventions. This, in turn, leads to a more efficient data management process, reducing errors and saving precious time and resources.
And the burning question is, does Shopware adhere to these standards? Indeed, it does. Shopware 6’s flexibility in export operations forms the cornerstone of effective data management, encompassing customizable mapping, default value integration, and column structuring based on user preferences. But the story doesn’t end there.
For a closer look at the default Shopware 6 export, and how to apply default values to Shopware 6 export processes, let’s dive in and explore the feature.
How to Apply Default Values to Shopware 6 Export
Let’s explore the intricacies of crafting a mapping scheme with default values for your Shopware 6 export.
Adding New Mapping
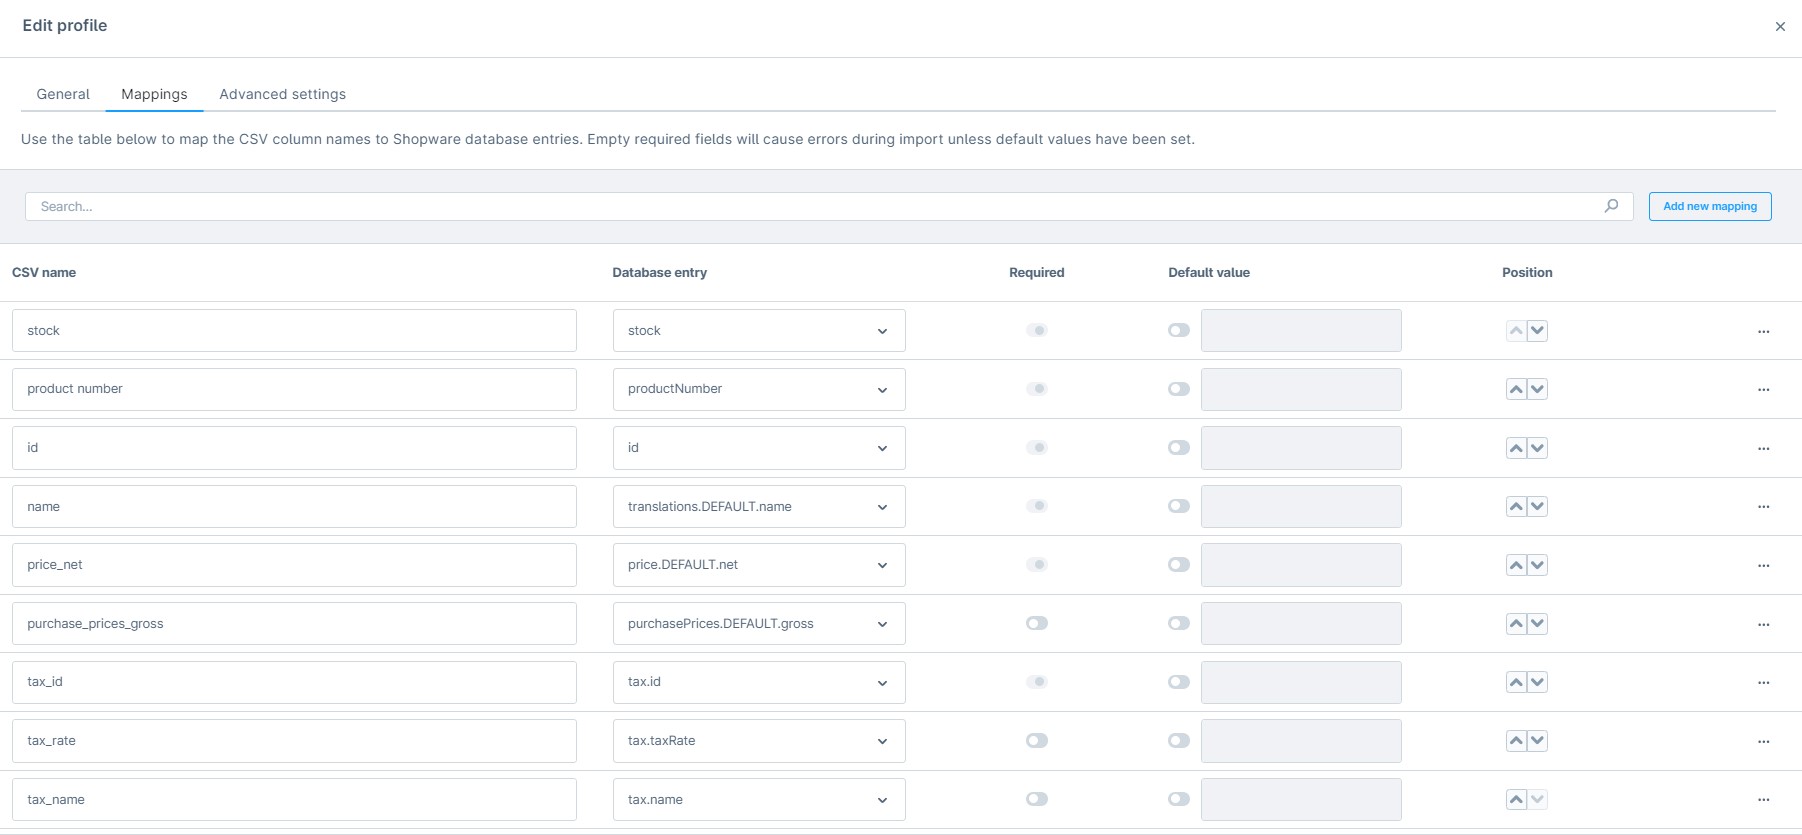
When you find yourself on a new export profile screen, shift your focus to the ‘mappings’ tab. Here, your journey commences with the simple act of clicking the “Add new mapping” button. Your task here is to align a CSV entry with its database counterpart, creating the harmony that will make your data sing. Add as many mappings as your profile requires, as each one plays a unique tune in this orchestrated data dance. For export endeavors, the system takes note of the columns specified within your profile’s mapping screen and ensures they take center stage in the resultant output.
Defining Mandatory Columns
Now, we traverse into the realm of import profiles, where the toggle marked “Required” comes into play. This switch grants you the power to declare whether a field is absolutely essential. Activate it, and that field ascends to the status of necessity. In other words, the corresponding section within your import file becomes non-negotiable. Should you neglect to honor this requirement, you’ll soon find yourself in the midst of an import error tempest.

As you can see, some fields are always default so the switch cannot be turned off.
Establishing Default Values
Shopware 6 embraces the default values functionality, providing a safety net for moments when your import file sports an empty field. These pre-defined values are akin to a contingency plan, always poised for action. And here’s the fascinating part – these default values are not limited to imports; they can be seamlessly applied to your exports as well. Just enable the corresponding toggle and deposit your desired value in the corresponding column for your chosen attribute, and voila! Your data remains safeguarded, come what may.

Determining Field Placement
Now, let’s venture into the captivating realm of Shopware 6 custom column sorting. The column you see on your mappings tab takes center stage, allowing you to dictate where a particular field finds its place within your CSV file. It’s the conductor in this symphony of organizational coherence, ensuring that every element finds its rightful place on the grand stage of your data. A simple click on the corresponding arrow moves the column up or down, orchestrating the perfect arrangement.
As you can observe, applying default values to Shopware 6 export is a straightforward ritual. However, if you’re in pursuit of an even more efficient approach, stay with us; we’re about to reveal a secret or two.
Default Values with Improved Import, Export & Mass Actions
Improved Import, Export & Mass Actions is a robust replacement for the default Shopware Import/Export interface. This app introduces numerous advantages over the built-in solution, but let’s focus on its approach to default values first.
Start a new export profile under Settings -> Improved Import, Export & Mass Actions -> Export. Hit the New Profile button to get to the Configure export screen. Learn how to configure basic export settings here: Manual for Improved Import, Export & Mass Actions.
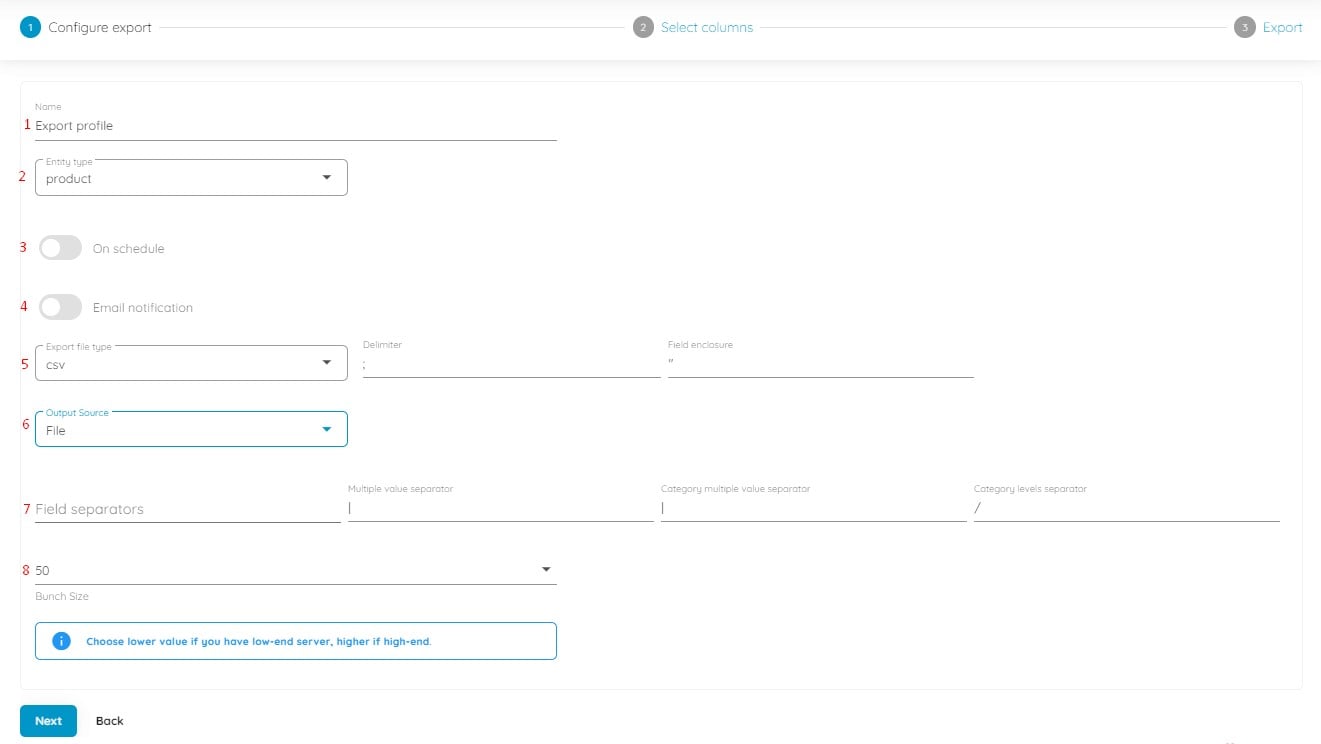
When you are ready with the first step, click Continue to proceed to the Select columns screen. It’s a place where Shopware export mapping takes place and you can apply default values.
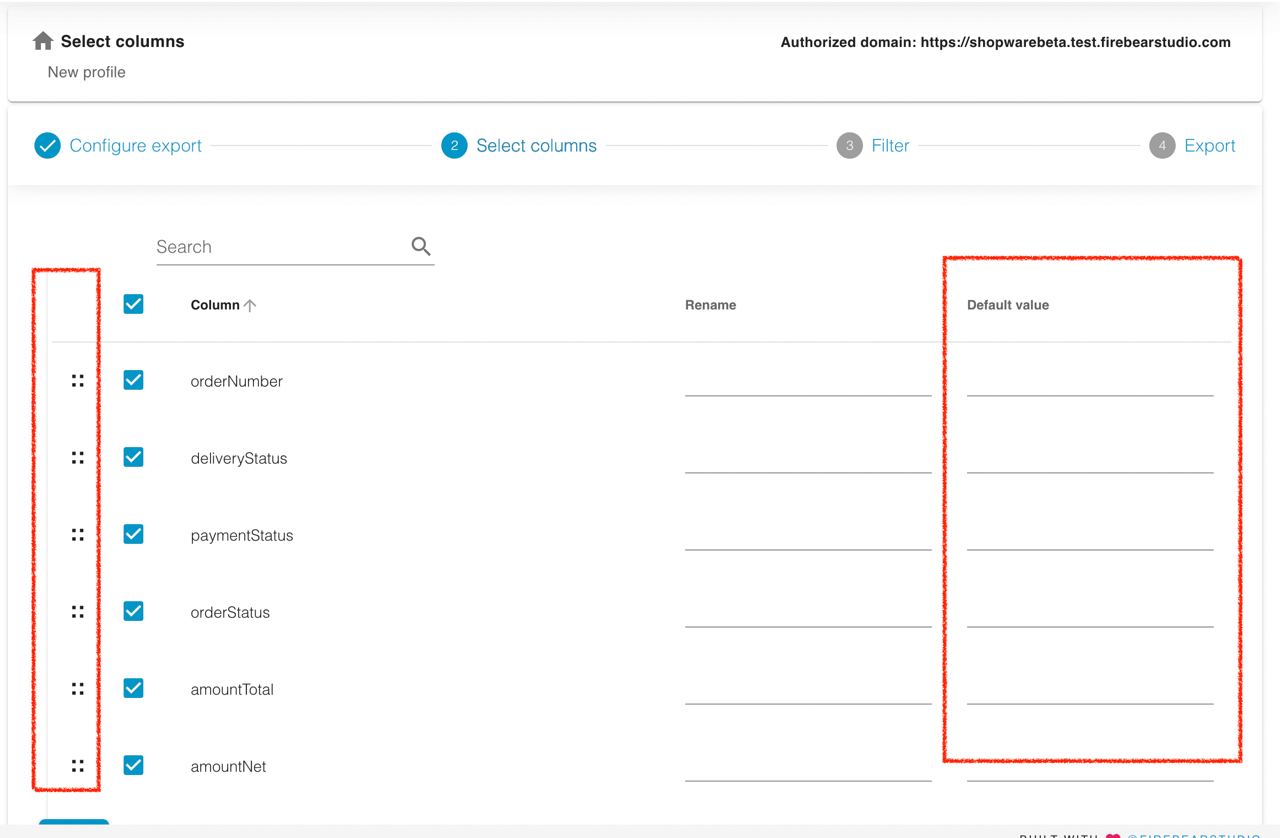
It is possible to rename the default column titles here by adding a new name (Rename) after the existing column name (Column).
Additionally, you have the flexibility to uncheck any columns you prefer not to include in the export.

Column sorting is achieved through a simple drag-and-drop interface. Just click on the column you want to move and drag it to the desired place. It is way more convenient than clicking on arrows.
Last but not least, you can include default values at this stage. This means that if a specific attribute has no value, the export file will automatically include the designated default value in its place. This simplifies data management and ensures consistency in your exports. Just place the desired value in the corresponding column like in the case of the default export.
Click Continue to proceed to the Filter screen. Create filters to narrow down the selection of records in your export table. Follow our Manual for Improved Import, Export & Mass Actions for more information about filters and other aspects of the advanced Shopware 6 export.
Key Benefits Over Shopware
Why should I use Improved Import, Export & Mass Actions instead of the default solution, you will ask, considering the fact that it implements the same approach to default values as the built-in import/export tool? Well, our app offers lots of benefits that dramatically enhance the standard Shopware 6 import and export processes:
- Automated Scheduling. Streamline your data transfers with ease by embracing automation introduced in our app. The tool lets you specify the update frequency and set precise transfer times, saving you valuable time and effort.
- Real-Time Notifications. Stay well-informed with instant alerts. The app lets you receive email notifications for both successful and unsuccessful import/export processes, allowing you to respond promptly and resolve any issues efficiently.
- Full Product Export. Ensure that every product detail, including custom properties, is included in the export, preserving the data’s integrity, while Shopware 6 forces you to export the related product data via several unrelated files.
- Export Filters. Refine your exports with precision, creating filters to narrow down your selection of records in the export table. Thus, our app lets you transfer only the specific data you require, rather than the entire database.
- Drag-&-Drop Interface. Experience the convenience of a drag-and-drop interface while efficiently rearranging your columns. Data management has never been so easy!
- Extended File Format Compatibility. Work seamlessly with XML and XLSX file formats, eliminating the need for time-consuming format conversions. This feature streamlines data management and ensures a hassle-free experience.
- Google Sheets Integration. Seamlessly connect Shopware 6 with Google Sheets, facilitating collaborative data editing and sharing.
- Versatile Data Transfer. Enhance your data management capabilities by enabling data transfers over FTP/SFTP or between your store and Google Drive.
Final Words
Our app keeps your data synchronized and ready for productive collaboration. No matter whether you need to apply default values, create custom column sorting, use filters, or automate export and import processes, the Improved Import, Export, and Mass Actions app can help with your data transfers and management.
Say goodbye to manual data handling and embrace seamless data management instead. With Improved Import, Export & Mass Actions, you will enjoy unmatched synchronization and hassle-free data exchange experiences backed by extended file format support, Google Sheets integration, and multiple versatile data transfer options. The app is your key to efficient data management and collaboration, taking your Shopware 6 experience to the next level. Learn more about our tool here:
- Firebear Improved Import, Export & Mass Actions for Shopware 6
- Firebear Improved Import, Export & Mass Actions Manual
- Contact us