
Shopware 6 Export Notifications Unveiled: Your Ultimate How-To Guide

Welcome to your ultimate guide for staying in the know when it comes to your Shopware 6 export activities. Keeping tabs on data transfers can be a challenge, but fear not – we’ve got a dependable solution that brings custom email notifications to your Shopware 6 exports. Meet the Improved Import, Export, and Mass Actions app. In the following sections, we’ll unveil the array of notification choices and guide you through the process of setting up Shopware 6 export notifications. Plus, for more invaluable tips and insights, be sure to delve into the pages of the Shopware 6 Cookbook and explore our guide to Shopware 6 import notifications.

Table of contents
The Benefits of Shopware 6 Export Notifications
While the advantages of Shopware 6 export notifications may not be as apparent as their import counterparts, they pack a punch with multiple benefits. Here’s a closer look at the perks of utilizing Shopware 6 export notifications:
- Timely Updates: Stay in the loop with real-time notifications, ensuring you’re always current with your data exports.
- Error Identification: Receive immediate alerts if any export issues or errors arise, enabling swift resolutions.
- Third-Party Communication: Easily notify third parties, partners, or collaborators about your data updates, streamlining communication.
- Efficient Workflow: Automate your export processes with notifications, saving time and effort that would otherwise be spent on manual checks.
- Data Accuracy: Gain confidence in the accuracy and currency of your exported data, thanks to notifications confirming successful exports.
- Collaborative Data Management: Share notifications with team members and stakeholders, keeping everyone on the same page regarding export activities.
- Enhanced Decision-Making: Access timely export status updates to make informed decisions and better plan your business strategies.
- Improved Customer Service: Ensure accurate and timely service to your customers when export processes impact their orders or information.
- Reduced Downtime: Address export issues promptly to minimize downtime, averting potential disruptions to your business operations.
- Seamless Integration: Seamlessly integrate export notifications with other tools or platforms, creating a comprehensive data management ecosystem tailored to your needs.
These combined advantages contribute to a more streamlined and efficient data export process in Shopware 6, ultimately bolstering data accuracy and enhancing your overall workflow.
Types of Shopware 6 Export Notifications

The Improved Import & Export Tool for Shopware 6 keeps you in the know with three types of export notifications. These notifications provide real-time updates on your data transfers, covering successful exports, failed transfers, or a combination of both. You have the flexibility to choose your notification preferences from the following options:
- Successful Jobs: Get notifications when your export jobs go off without a hitch. Stay informed when your data transfers are completed smoothly and error-free.
- Failed Jobs: Opt for notifications exclusively for export jobs that encounter issues. This option alerts you when problems or errors arise during data transfers, requiring your attention.
- Successful and Failed Jobs: Choose this option to receive notifications for both successful and failed jobs. It keeps you in the loop about all export job outcomes, providing comprehensive monitoring and proactive issue resolution.
These notification settings are customizable to match your specific needs and preferences, ensuring you receive updates that matter most for your Shopware 6 export processes.
How to Turn On Shopware 6 Export Notifications
To configure Shopware 6 export notifications, just follow these straightforward steps:
Step 1: Create a New Export Profile
Start by clicking the “New Profile” button, conveniently located under “Extensions -> Improved Import, Export & Mass Actions -> Product Export.”
Step 2: Configure Export Settings
You can set up export notifications for Shopware 6 on the “Configure export” screen. Here’s what you need to do:
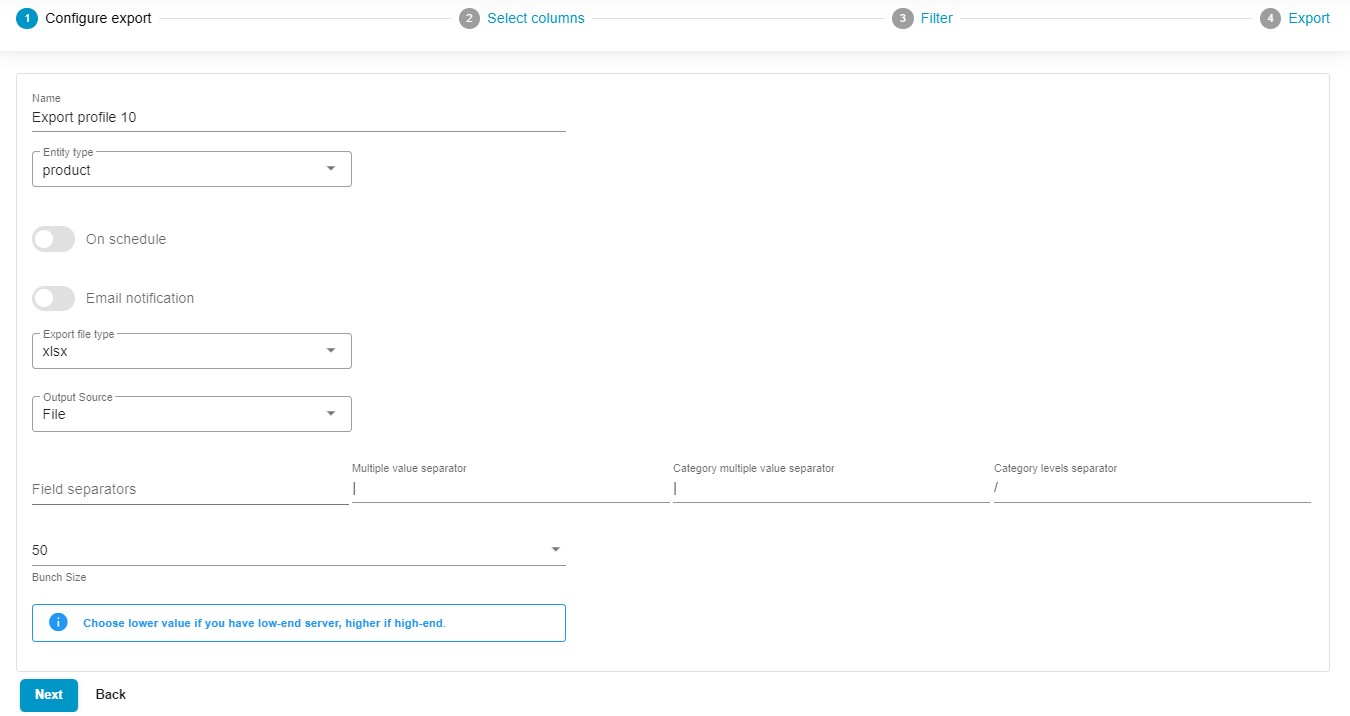
- Give your export profile a descriptive title.
- Choose the type of data you want to export, whether it’s products, orders, or customers.
- If needed, establish a schedule for automated exports from your Shopware 6 store.
- Configure email notifications to stay informed about successful, failed, or both types of export processes:

- Turn on the notification toggle.
- Select the Shopware 6 export notification type: Succeed jobs, failed jobs, or both.
- Specify the email address where you want to receive notifications.
- Choose the encryption type.
- Specify the host for your email address.
- Define the corresponding port.
- Provide the sender’s username (an email address).
- Enter the corresponding password.
- Please note that attaching job logs to notification emails is possible but may result in large email sizes.
- Click the “Test Connection” button. If Shopware 6 export notifications are set up correctly, you’ll receive a confirmation message in your provided mailbox.
- Choose your preferred file format. You have the flexibility to export in XML, XLSX, and CSV formats, or create Google Sheets spreadsheets.
- Decide on your preferred export source, whether it’s FTP, Google Drive, or Google Sheets.
- For optimal performance, especially on low-end servers, you can specify a bunch size, opting for a lower value.
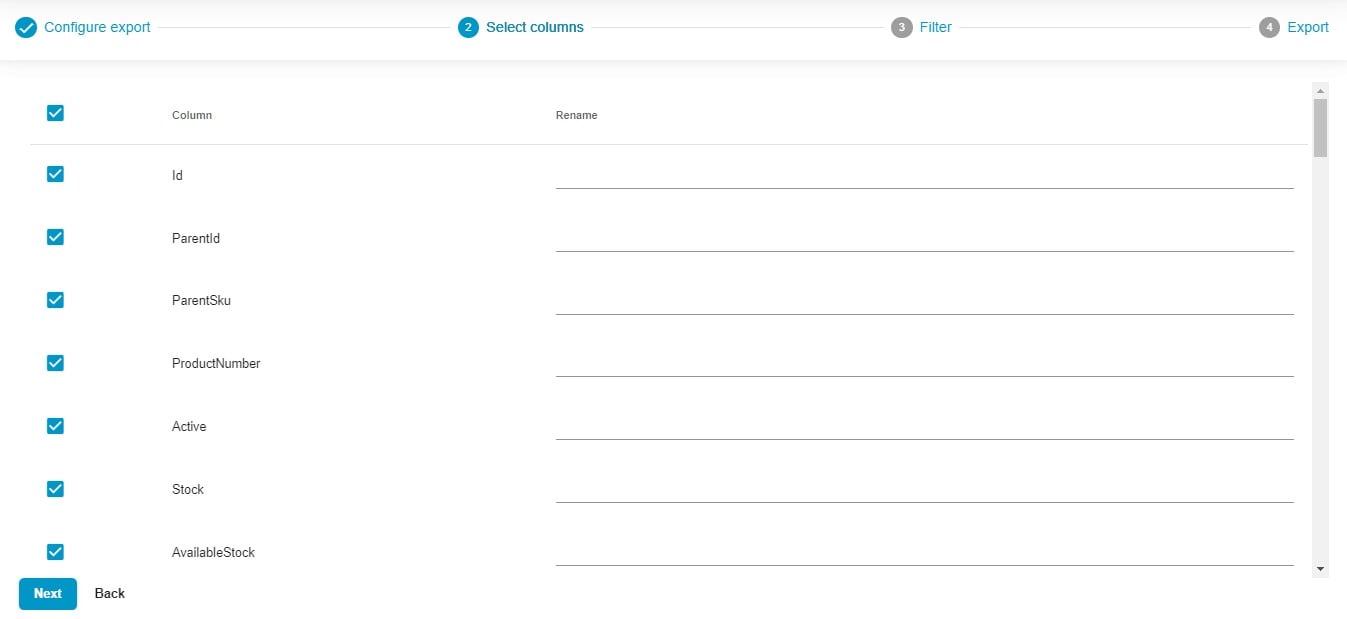
Step 3: Data Mapping (Customize Columns)
Click “Continue” to proceed to the “Select columns” screen, where you can customize the column titles to meet your partner’s specific requirements. You can easily rename default column titles by adding a new tag (“Rename“) after the existing column name (“Column“). Additionally, you have the flexibility to uncheck any columns you prefer not to include in the export.
Step 4: Apply Filters
The third screen empowers you to create filters that refine the selection of records in your output. For instance, you can export products that are currently out of stock.

Step 5: Save and Export
Lastly, click the “Save & Close” button to store your Shopware 6 export profile with notifications enabled for future use. Alternatively, if you’re ready to proceed, hit the “Export” button located at the bottom of the screen to initiate the export process immediately and get alerts on how successful it is.

By following these user-friendly steps, you can effortlessly configure Shopware 6 export notifications. For more in-depth information and detailed instructions, please refer to our Firebear Improved Import, Export & Mass Actions Manual.
Other Features
As the owner of a Shopware 6 store, you have a powerful time-saver at your disposal: the Firebear Improved Import, Export & Mass Actions application. This universal data transfer solution not only streamlines the import and export processes but also bridges the gaps left by the default Shopware 6 setup. This transformative tool redefines data management in numerous impactful ways, including:
- Full Product Import and Export: Effortlessly oversee your product data and custom properties, ensuring your catalog remains consistently up-to-date.
- Customer Data Handling: Seamlessly import and export customer details, simplifying customer relationship management for a hassle-free experience.
- Order Export: Efficiently export order data, providing valuable insights into transactions and sales analytics.
- Precise Data Mapping: Create meticulous data relationships, guaranteeing seamless integration between your Shopware 6 store and external systems.
- Flexible Scheduling: Tailor import and export schedules to your preferences, automating data updates.
- File Format Compatibility: Seamlessly work with various file formats, such as CSV, XML, and XLSX, to ensure smooth data transitions.
- Google Sheets Integration: Easily transfer data between Shopware 6 and Google Sheets for collaborative data management and other purposes.
- Direct File Uploads: Simplify data import and export with direct file uploads and downloads, streamlining the entire data management process.
- Secure FTP/FTPS Transfers: Bolster data security during import and export processes with comprehensive support for FTP/SFTP protocols.
- Google Drive Integration: Optimize data file uploads with integrated Google Drive compatibility, enhancing accessibility and convenience.
The Firebear Import & Export Tool empowers Shopware 6 store owners to efficiently manage their e-commerce operations. Whether it’s maintaining your product catalog, managing customer data, or processing orders, this application simplifies complex tasks, ultimately enhancing the overall effectiveness of your online store. For more comprehensive information about this exceptional product, please visit:
- Firebear Improved Import, Export & Mass Actions for Shopware 6
- Firebear Improved Import, Export & Mass Actions Manual
- Contact us