Exploring Shopware: Payment Methods in Shopware 6 Settings

In addition to payment methods aimed at internal purposes, Shopware 6 offers various payment methods associated with every e-commerce shop – ones that customers use during the checkout. So, your e-commerce storefront provides several ways to pay for a purchase. Store visitors can select one that is more convenient for them. In the article below, we dive deep into the Payment Methods section of Shopware 6 settings. You will learn what payment methods are situated there and how to configure them. You can enable Shopware Payments powered by Mollie or other solutions, that include Cash on Delivery, Paid in Advance, and Invoice payments. Also, we shed light on several data import/export aspects and provide answers to various popular questions associated with the Shopware platform in general and payment methods in particular.

Note that we provide Shopware integration with external platforms. Contact our support for further information or try our Improved Import & Export Extension for Shopware.
Table of contents
Payment Methods in Shopware 6 Admin
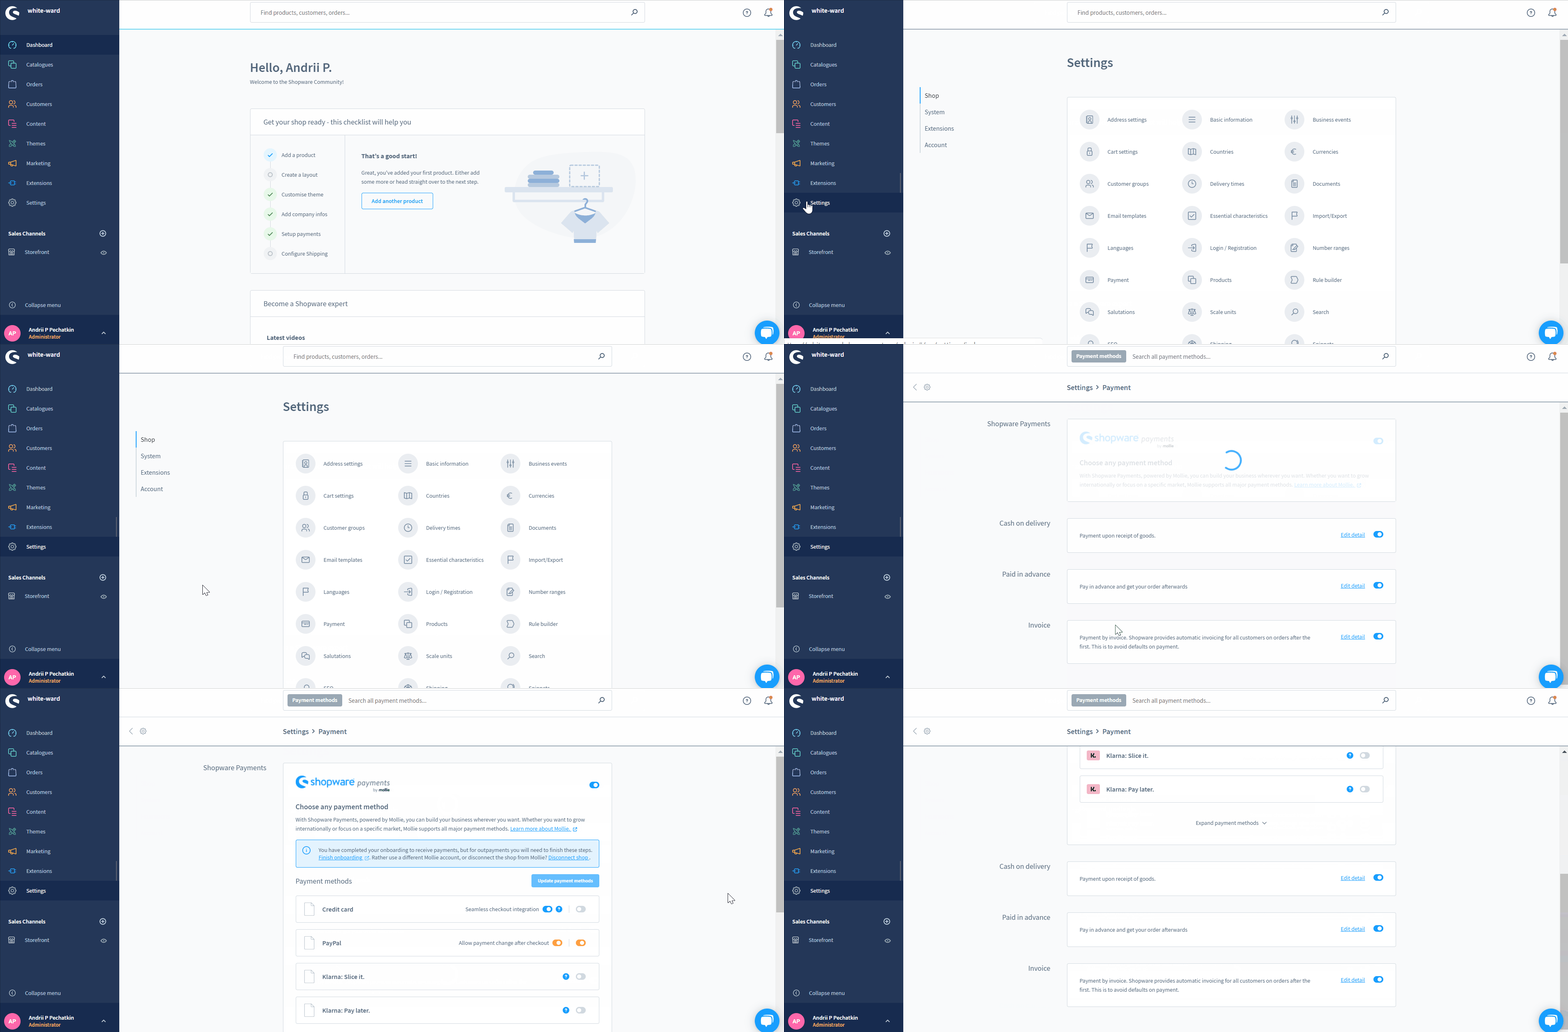
Let’s see how to find the Payment Method screen in the Shopware 6 administration:
- Go to your Shopware 6 administration;
- Open its main menu;
- Proceed to the Settings section;
- Open the Shop subsection;
- Hit the Payment Methods (or Payment) button.

As we’ve just mentioned above, you will see the following sections: Shopware Payments powered by Mollie, Cash on Delivery, Paid in Advance, and Invoice.
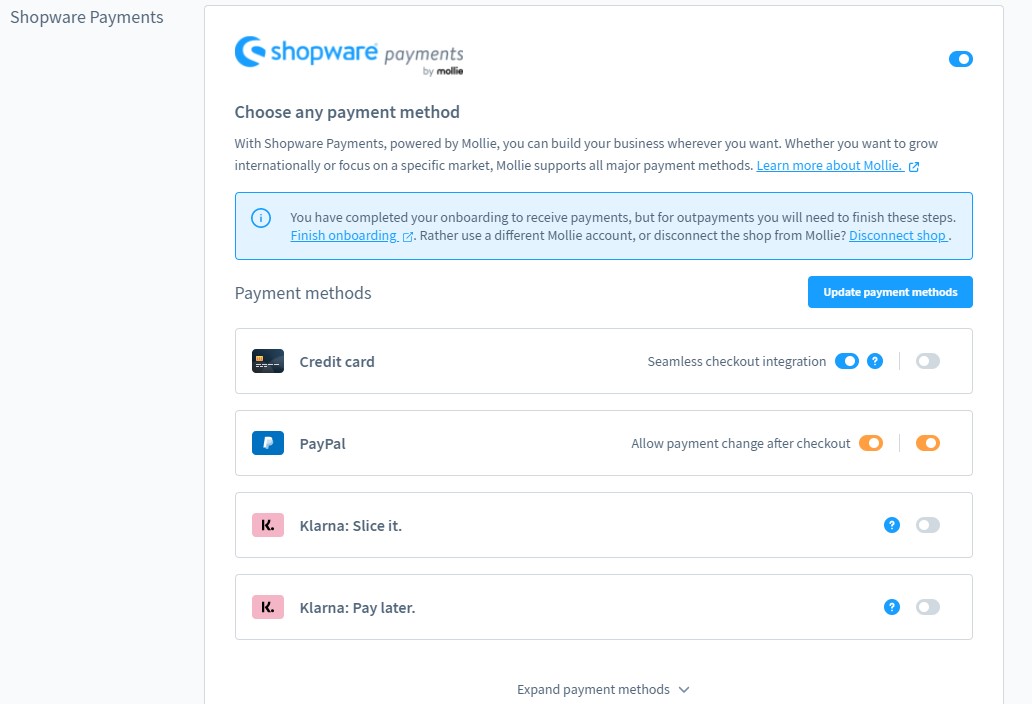
Shopware Payments powered by Mollie
The section called Shopware Payments powered by Mollie lets you enable/disable numerous payment methods on your Shopware 6 storefront. There are options aimed at international e-commerce websites as well as payment methods developed for local traders. Mollie works with all major payment methods, providing Shopware 6 merchants with a broad array of solutions. Thus, you can leverage credit card payments along with the seamless checkout integration. At the same time, Shopware 6 supports PayPal and allows payment change after checkout. Also, various Klarna payment options are at your service. Other payment methods in this section include Apple Pay, SOFORT Banking, Giropay, iDEAL, Electronic Payment Standard, Banktransfer, Bancontact, Przelewy24, KBC/CBC Payment Button, Belfius, etc.

Cash on delivery
In this section, you can turn on payments upon receipt of goods.

Paid in advance
Here, Shopware 6 offers a scheme when a customer pays in advance and gets their order afterward.

Invoice
Payments by invoice can be enabled here. Note that there is automatic invoicing for this payment method.

Edit Payment method in Shopware 6
You can edit all payment methods except the ones powered by Mollie. Each section contains the Edit detail link.

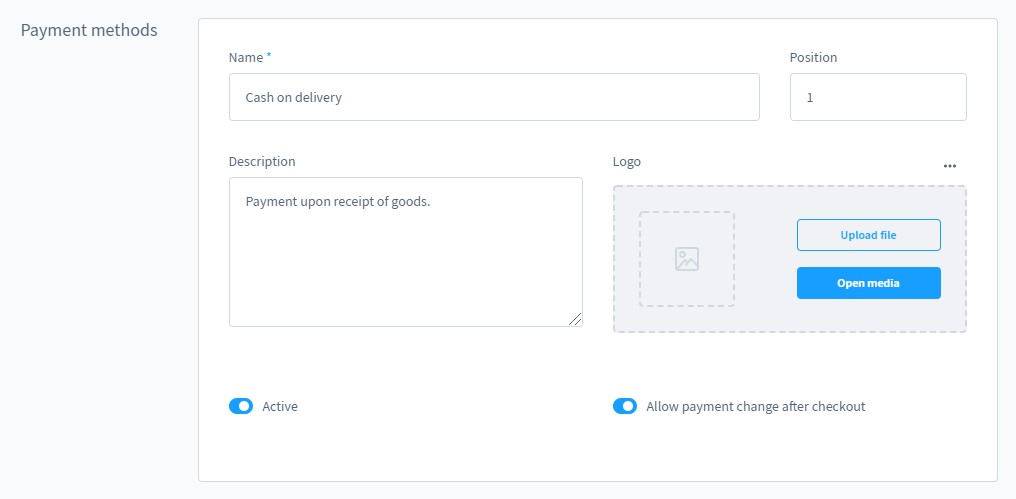
Hit it to proceed to a new screen where you can change the following information:

- The name of your payment method;
- The position of this payment method on the storefront;
- The method’s short description;
- The logo of the payment method: you can upload your custom image, choose a picture from the media gallery, or provide an URL to upload the file.
Shopware 6 let’s you enable.disable the payment method with the Active toggle. At the same time, there is an opportunity to turn on the change of payment methods after the order completion. This functionality appears within the customer account under Orders.
Availability rule
Shopware 6 lets you use the availability rule to determine the availability of your payment method on the storefront. Create rules using the Rule Builder. Alternatively, you can add new rules right from the payment method configuration page.

How to Import Orders to Shopware 6
While importing payment methods between websites seems nonsense, you may need to transfer orders to your Shopware 6 storefront or from it to an external ERP system. If you need to run one of these tasks, you’ve come to the right place. With the help of our team, there is no need to recreate multiple entities manually. You can simplify and automate this process. Contact our support for more details and try our . You can use it to import any entity to Shopware 6, including orders. The extension provides the ability to create a schedule of updates. You just need to specify when a particular import or export process should be launched. After that, the module will do all the work for you. Also, the plugin provides the ability to map external data to its place within Shopware. You not only show where to store it but also provide information on which changes to apply. Contact our support regarding these and other data transfer processes.
Shopware 6 Number Ranges FAQ
How to find payment methods in Shopware 6 settings?
You can find the Payment Methods screen in Shopware 6 settings under Settings -> Shop -> Payment (or Payment Methods).
How to add new payment methods in Shopware 6?
If we talk about Shopware Payments powered by Mollie, you should enable payment methods supported by the service provider. In other cases, hit the Add payment method button under Settings -> Shop -> Payment Methods to create a new payment method in Shopware 6.
How to edit payment methods in Shopware 6?
Go to Settings -> Shop -> Payment Methods and use the Edit detail link to adit the selected payment method.
How to enable invoice payments in Shopware 6?
To enable invoice payments, you need to turn on the corresponding payment method under Settings -> Shop -> Payment Methods.
How to enable cash on delivery payments in Shopware 6?
To enable cash on delivery payments, you need to turn on the corresponding payment method under Settings -> Shop -> Payment Methods.
How to enable paid in advance payments in Shopware 6?
To enable paid in advance payments, you need to turn on the corresponding payment method under Settings -> Shop -> Payment Methods.
Shopware 6 Essentials FAQ
How to create a Shopware account?
Visit the registration page and click the Register Now link to create a Shopware account. Fill in the form, receive a confirmation email, and follow the provided instructions.
What about a Shopware ID?
There is no need to create a Shopware ID. You get it automatically during the registration.
How to deal with Shopware master data and what is it?
In Shopware 6, master data is all the information about your company. It usually consists of such company details as physical and email addresses, phone numbers, etc. You provide it during registration.
How to add a new Shopware shop?
Adding a new shop in Shopware 6 is associated with the following steps. Go to your merchant area and click the corresponding link on the start screen’s right part. Specify the type of your new shop. It can be a cloud storefront or an on-premise installation. Provide additional information.
How to add a payment method to your Shopware account?
In addition to payment methods displayed on the checkout page, you can also add payment methods for internal purposes. Visit Basic Information -> Accounting and specify PayPal, credit card, or direct debit as your preferred way to pay for extensions and themes.
How to create a deposit in Shopware?
Buying extensions and themes for your Shopware 6 website is possible if you have a deposit. You can create it as follows. Proceed to Merchant Area -> Shops, choose a shop to provide funds to, and click Open Account Details. Note that your deposit should cover the amount of your future purchase.
How to purchase Shopware extensions?
You can purchase extensions and themes for your e-commerce website either on the Shopware Marketplace or in the Plugin Manager. Create a deposit, choose a tool you want to buy, and proceed to checkout.
How to get support in Shopware?
Try the following email and phone number if you have questions regarding accounting and financial services: financial.services@shopware.com and +49 2555 9288 510. Try these email and phone number if you have questions regarding account or license issues: info@shopware.com and +49 2555 9288 50.
How to automate import and export processes in Shopware 6?
You need the Improved Import & Export extension for Shopware 6 to automate recurring data transfers associated with your website. As we’ve mentioned above, it lets you use schedules to simplify regular data updates. With this feature, the module can launch the corresponding import and export processes according to the specified time frames without interaction on the admin side.
How to migrate to Shopware 6?
With the Improved Import & Export module, you can also migrate to Shopware 6 from your existing e-commerce website. It is possible to simplify the transfer of core entities from external systems or Shopware’s previous versions with schedules and mapping schemes. We also offer export solutions for other e-commerce platforms, such as Magento and Shopify. It means that you can simplify migration from them. Contact us for more information.
How to integrate Shopware 6 with external systems?
The Improved Import & Export extension also comes in handy when it comes to the integration with ERPs, CRMs, accounting tools, and other external systems. The module automates repetitive import and export processes and modifies data with the help of mapping presets, following the requirements of your Shopware store during import or the rules of the connected platform during export.


