Realex Payments for Magento 2 by Pronko Consulting

About Realex Payments
Realex Payments module for Magento 2 allows processing online payments on ecommerce websites easily and safely. The module was developed by specialists in Magento 2 integrations, meaning that it complies with the Magento Coding Standards. Realex Payments improves customers’ shopping experience allowing them to make payment on a website’s checkout page in a secure way. A merchant can customize the payment page to match the look of their store.

The module can be integrated with a website as a Hosted Payment Page, or API gateway. The Hosted Payment Page option provides compliance with the PCI security standards, saving merchant’s time and money on making their websites PCI DSS compliant. Hosted Payment integration is also compatible with all devices, which makes payment process seamless and increases conversion.
Realex Payments method can be enabled along with other payment plugins, providing customers with more payment options, and thus increasing customer engagement and boosting sales.
Moreover, the Realex Payments plugin allows processing mail and telephone orders (MOTO) directly from the Magento Admin, includes fraud prevention tools like 3D Secure, CVN, and AVS, and provides complete transaction management.
Main features of the Realex Payments module
As mentioned above, the Realex Payments for Magento 2 provides rich functionality for accepting payments online. Let’s have a closer look at its main features.
- Hosted Payment Page with full PCI DSS compliance
When choosing Hosted Payment Page method, at the point of purchase the Realex Payments provides a secure payment page for cardholders to enter their credit or debit card details. In this way, a merchant doesn’t have to worry about handling sensitive card data on their servers. Realex Payments hosted payment integration is fully PCI compliant, providing customers with the most secure and seamless purchasing experience. Customizable payment page gives customers the feeling like they have never left a merchant’s website.
Below is the layout showing how Realex Payments processes the payments.

Payment page can be integrated with a website in 3 ways: embedded in an iFrame, like a lightbox layer, or redirect to Realex Payments server.

- Direct API integration method
API integration method lets a merchant control the full payment process flow. When customers make a purchase, their card data is captured on the server, meaning that a merchant needs to be aware of their PCI compliance responsibilities. A merchant is also required to have their own SSL certificate for this type of integration. Cards data is passed to the Realex Payments as secure XML messages. Realex Payments responds with the result of the transaction in less than a second, at which point a customer can complete their purchase.
- Card storage and cards vault
Card tokens can be safely stored on the Realex Payments platform, delivering customers better and faster solution for making recurring payments. Customers can save their credit cards when placing an order so that they won’t need to insert their card details when making another purchase.
- Multi-currency, DCC and multi-language support
There are more than 15 languages to choose from to be available at checkout. The module also supports Dynamic Currency Conversion (DCC), allowing to reach out to potential customers in different countries.
- Fraud management
The module allows setting more than 30 fraud rules, including 3D Secure, AVS, CVV check, and more. Depending on the rules set by a merchant, transactions can be put in Pass, Hold or Block mode. Address Verification Service (AVS) is available for UK customers check.
- Diverse payment methods
With the Realex Payments module, a merchant can accept major types of credit and debit cards, such as Visa, Visa Debit, American Express, MasterCard, Discover, 3V Visa, Diners Club International, Maestro, and Switch/Solo.
- Multi-address shipping support
Customers can choose to use Realex Payment method when shipping to multiple addresses.
- Transaction management
A merchant fully controls the status of transactions from Magento Admin, efficiently managing them by inspecting and selecting the transaction status. Transactions can be sent to a bank for settle, refunded for returning funds to a customer’s card, or canceled for the void. A merchant gets notifications if there are any errors or issues when validating payment transactions.
- Transaction reports
The module provides full visibility of all transactions on one page, control over sales, reporting and security, and the possibility to export transaction reports in CSV or Excel format.
- Authorize and Capture payments
If choosing Authorize, payment is not sent to a merchant’s bank account. In case of selecting Authorize and Capture, payment is immediately transferred to the bank.
- Partial invoices and refunds
The Realex integration supports partial captures and refunds for any order. If a feature of multiple settle and refund is enabled, multiple invoices and partial refunds can be created.
- Admin order placement
Merchants can easily place orders from the Magento Admin using the Realex payment method.
The Realex Payments Magento module development team is dedicated to supporting and improving the extension, and regularly updates and releases new features to improve the user experience.
Frontend
After installing Realex Payments module, it will be shown as a payment option along with other available payment methods on a checkout page.

As already mentioned, Realex Payments allows customers to pay using major credit cards, which are listed on a checkout page. In the below example customers can choose between American Express, Visa, MasterCard, Diners Club International, and Maestro payment options.

If a merchant chooses Realex Payment direct integration with their website, the checkout page will look like this (in this example the default Luma theme is used).

Custom CSS can be used to change the look of a payment page, like in the example below.

When using secure hosted payment page integration, a new window pops up on a checkout page, where a customer will be asked to enter their payment details.
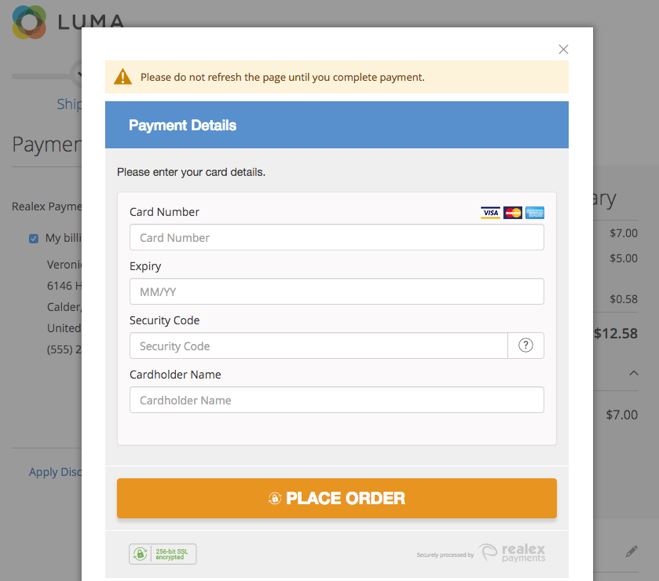
The module’s secure card storage feature allows users to choose the card they want to pay with from their card vault, as well as insert the details of a new card, and save it to use later.
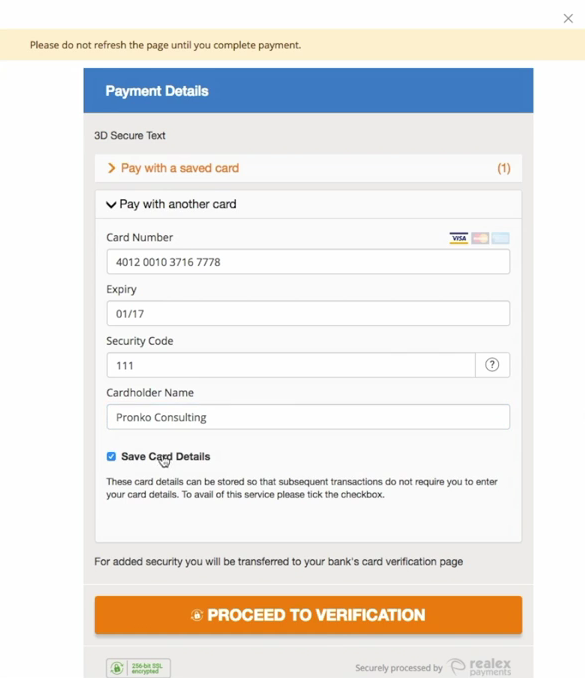
A user can see and delete their saved cards in the credit cards secure vault. To check or make the changes, they need to go to My Account section, and then choose “Stored Payment Methods”.

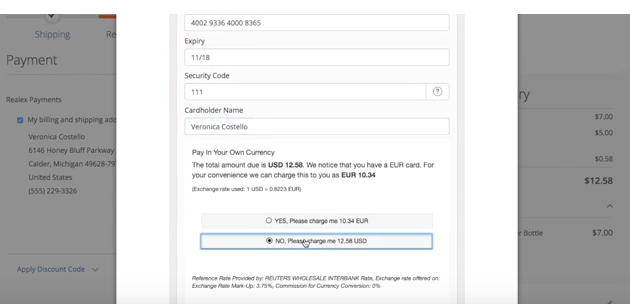
Multi-currency and DCC support of the module allows customers to choose which currency they would like to pay in. On a payment page, they will see the amount in a store currency and their currency, as well as the used exchange rate.
Realex Payments provides user-friendly validation and messaging. The module translates confusing credit card error codes into the user-friendly messages that customers can easily understand.
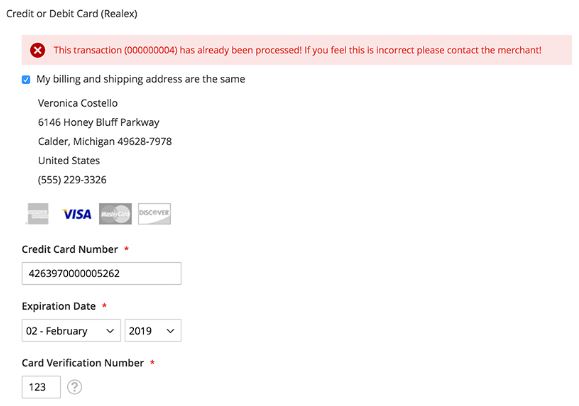
The module also supports credit card validation. The Realex integration ensures that customers fill in all required information.
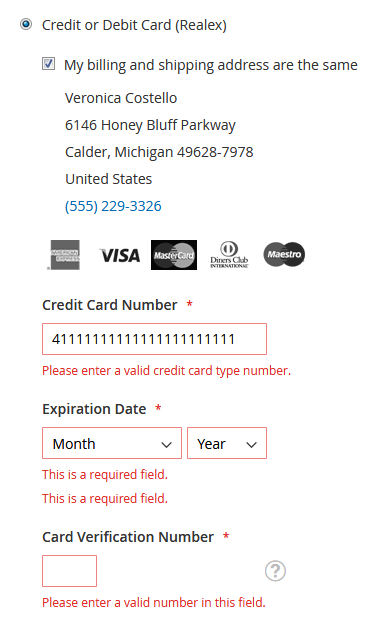
Customers can access payment information on their order by clicking on the order number on the “Thank you” page, or going to My Account → My Orders.

Backend
From the backend, Realex Payments extension can be easily configured according to the needs of your store. Here we will describe how you can do this.
First, go to Stores → Configuration → Sales → Payment Methods. You will see Realex Payments in the Other Payment Methods section.

Click “Configure” to open general configuration settings of the module. After you finish with the module configuration, you can click “Close” to reduce the window.

Next, we will have a closer look at this section settings.

To enable Realex Payments as a payment method on your store, select Yes in “Enable this Solution” field. Connection Type lets you choose the type of module integration you want to use for your store, whether Remote Integration or Hosted Payment Page. If you choose Yes in the “Debug” field, it will make all communication queries stored in the debug_realex.log file. “Environment” options change the state of the extension from staging (“Sandbox”) to production. It is recommended to use “Production” setting once the website is live. “Title” setting defines payment method title for Realex Payments option at checkout. As a Payment Action, you can select “Authorize Only” to only authorize payment amount, or “Authorize and Capture”, so that initial order payment transaction will transfer a payment amount to a merchant bank account.
Next to the Module Version, you see the number of the currently installed version of the extension. If you click on “Release Notes”, you will see the changelog of all versions in the opening window.

In the Realex Payments Account Information section, you will see the data of your account.

The information in the fields “Merchant ID”, “Account”, “Default Sub Account”, “Secret”, and “Refund Password” is provided by default. “Sub Accounts” setting allows creating alternative sub accounts. To do this, click on “Add Sub Account”, and set a sub-account name and card type.

If you choose Remote Integration in “Connection Type”, you can configure its settings in the Remote Integration section.

Here you can choose which credit cards you want to enable for payment on your store. Credit Card Types shows the selection of the supported card types. As for “CVV Verification” setting, it is recommended to enable this feature for extended transaction verification. “Switch/Solo Issue Number Enabled” can be used if you accept Maestro International card type for payments on your store. “Production Gateway URL” and “Sandbox Gateway URL” fields contain information on the URL used for communication with Realex Payment server, and normally shouldn’t be changed.
If you choose Hosted Payment Page option as your integration type, go to Hosted Payment Page section to configure its settings.

In the “Button Label”, you can insert any name you want to be displayed, e.g., “Place Order”. Hosted Payment Page can be displayed on your store as an embedded iFrame or lightbox popup, which you can enable in “Use iFrame” and “Use Popup” settings. To provide customers with the payment option in the currency of their card, select Yes in the “Dynamic Currency Conversion” field. Card Storage Enabled allows customers to create their credit cards vault without storing sensitive data on your server. When enabled, Offer Save Card will show users the option to save the details of a card they use for payment, allowing to use the card for the future payments on your store. “Production Gateway URL” and “Sandbox Gateway URL” fields normally shouldn’t be changed, as in the API module integration.
Realex Payments provides web stores with the advanced fraud checks feature. To configure this section, open the Fraud Management tab.

When you select Yes in “Enable Fraud Management”, you can configure “Fraud Filter Mode” settings.

“Off” mode turns off fraud checks, “Passive” mode sends notifications on fraud checks to a merchant, “Active” mode allows to manage transaction processing on a store. It is recommended to activate Fraud Filter to be able to check fraudulent transactions.
The Advanced Settings section holds additional settings for the Realex Payment extension.
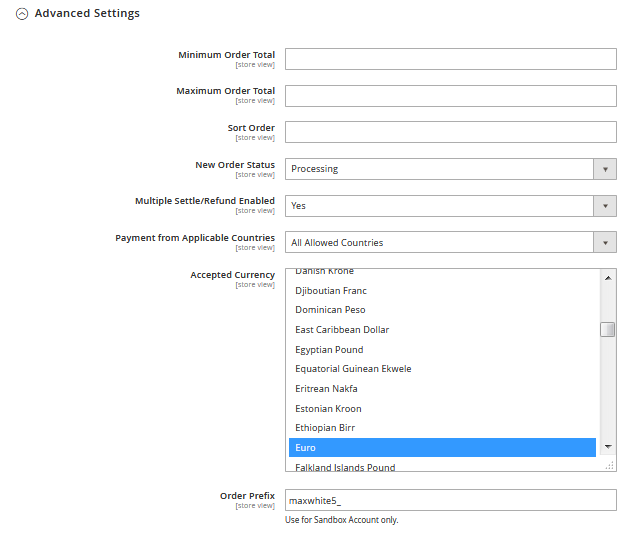
“Minimum Order Total” setting makes payment method visible only if the minimum order total reaches the specified amount. As for the “Maximum Order Total”, payment method will be shown only if maximum order total is less than the amount set. “Sort Order” shows Realex Payments method according to the sort order set, e.g., 1. New Order Status can be changed in case the existing order status assigned to order was removed or unassigned as part of the Stores → Order Status configuration.

“Multiple settle/refund enabled” setting enables or disables multiple invoices and multiple credit memos creation per order. “Payment from Applicable Countries” verifies whether the Realex Payments method should be shown if a shipping or billing country is selected. If you choose “Specific Countries”, you can specify which countries you would like to accept payments from in a drop-down menu. “Accepted Currency” allows selecting the currencies in which you would like to get payments. “Order Prefix” is used only for a Sandbox account.
The Realex Payments module allows merchants to see all the transaction details by going to Sales → Transactions. Details of each credit transaction are logged, and merchants can easily access them to confirm their results.
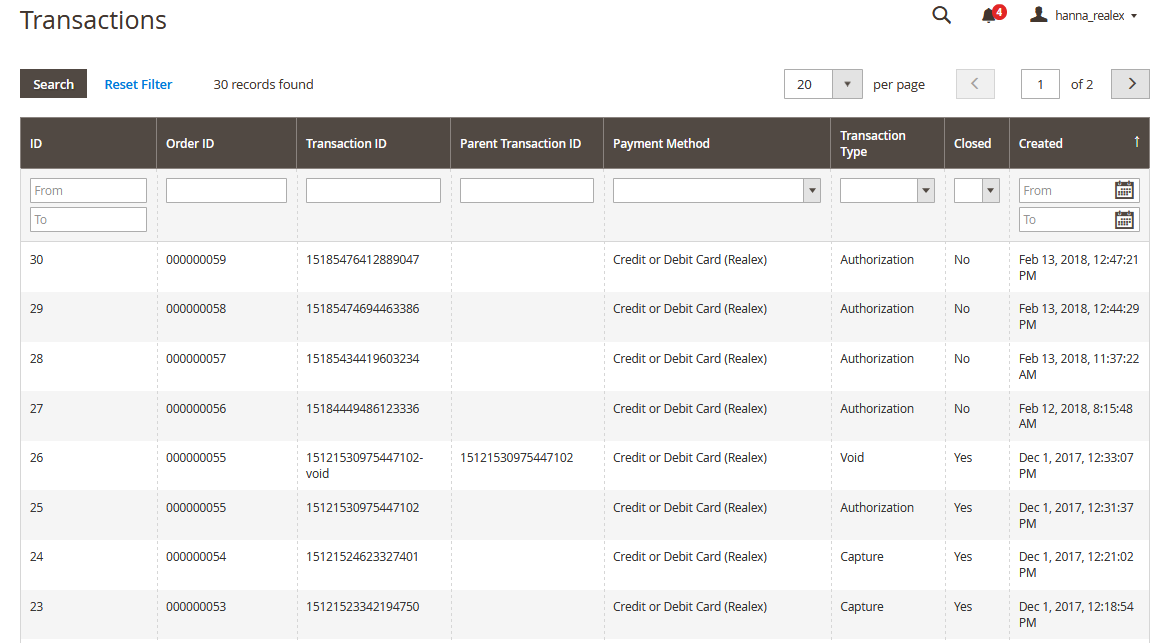
Realex Payments module comes with different types of reports which allow controlling sales transactions. Transaction management gives full control to a merchant over the status of payment transactions allowing them to send for settle, refund, and void quickly and easily from Magento Admin.
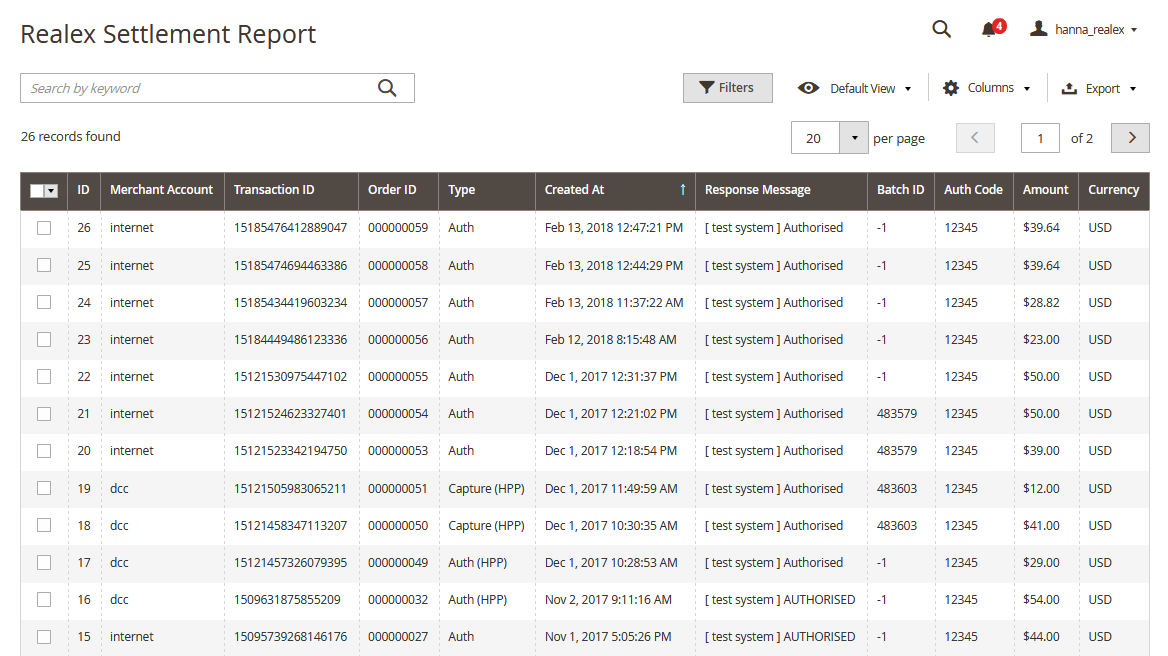
Realex Settlement Report provides merchants with the detailed information on the completed transactions. The settlement report is located under Reports → Realex Settlement menu.

The Realex Settlement Report page provides all essential functionality to analyze and make necessary actions around settlement transactions. It allows to verify status and view important information for every transaction. Realex Settlement Report has been built using the latest Magento 2 UI component which provides all features available, e.g., Search, Filter, Grid Views, Custom columns, Export, Paging, and more.
Another type of Realex reports, the support report, is generated during Realex Payments lifecycle. All communications with the Realex Payments provider are stored in a debug_realex.log file, which is used for validation and testing of a module installed. The debug_realex.log file is usually located under var/log/ directory inside Magento application.
Price of the Realex Payments module
The module can be obtained for the price of $449 as a one-time payment. Pronko Consulting doesn’t provide a trial of the module. However, you will get a money-back guarantee during 30 days. The module package also includes free plugin updates, user guides, and lifetime support.


