
How To Create Test Environment For Shopware 6
It is recommended to apply changes to the test environment of your Shopware 6 website before implementing them on a working e-commerce store. As a result, you ensure that everything runs as expected without interfering with the live system. In the following article, we shed light on creating a test environment for Shopware 6. You will learn how to generate it in the secondary directory of your live shop. Alternatively, it is possible to create a local test environment described below. You can find more Shopware 6 tutorials in our cookbook. Let’s explore how to create a Shopware 6 test environment.

Note that we provide Shopware integration with external platforms. Contact our support for further information or try our Improved Import, Export & Mass Actions.
Table of contents
- 1 Secondary Directory
- 2 Local test environment
- 3 Shopware 6 Essentials FAQ
- 3.1 How to create a Shopware account?
- 3.2 What about a Shopware ID?
- 3.3 What is Shopware master data?
- 3.4 How to add a new Shopware shop?
- 3.5 How to add a payment method to your Shopware account?
- 3.6 How to create a deposit in Shopware?
- 3.7 How to purchase Shopware extensions?
- 3.8 How to get support in Shopware?
- 3.9 How to automate import and export processes in Shopware 6?
- 3.10 How to migrate to Shopware 6?
- 3.11 How to integrate Shopware 6 with external systems?
Secondary Directory
The most simple and intuitive way to create a test environment for Shopware 6 is to copy your live shop into a secondary directory. Next, you can access the public folder in this directory through a hoster’s subdomain.
While copying the test environment to a subdirectory of the main Shopware 5 shop was usual, Shopware 6 is associated with a slightly diverse approach. The latest platform’s version differs a lot from its predecessor. Therefore, it is recommended to choose a secondary directory instead of a subdirectory. Thus, you ensure that the Shopware 6 test environment works correctly. Let’s explore the steps necessary to mirror the live shop into a secondary directory.
Copy the live system
Follow these steps to copy your live Shopware 6 system, creating its test environment:
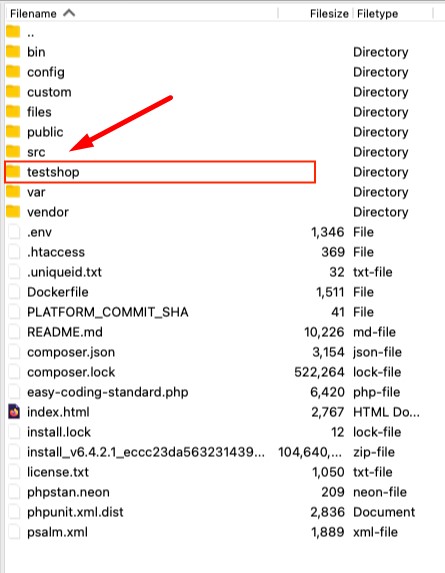
- Create a new folder next to the main store directory;
- Name it (e.g., testshop);
- Copy the files of your live environment into this folder;
- Ensure that you also copied the .env and .htaccess files.
Since their names start with “.”, they may not be displayed directly – adjust the display settings to see them.
Create a subdomain
During this step, it is necessary to work with your hoster to create a Shopware 6 test environment. Take the following actions:
- Create a subdomain of your main domain, such as https://my-shop.subdomain.eu;
- Route this domain to the newly created folder.
Note that creating a subdomain that differs from the shop domain is necessary. Otherwise, the latter will be linked to the test environment.
Create a database
Next, create a database to implement a test environment for Shopware 6. Follow these steps:
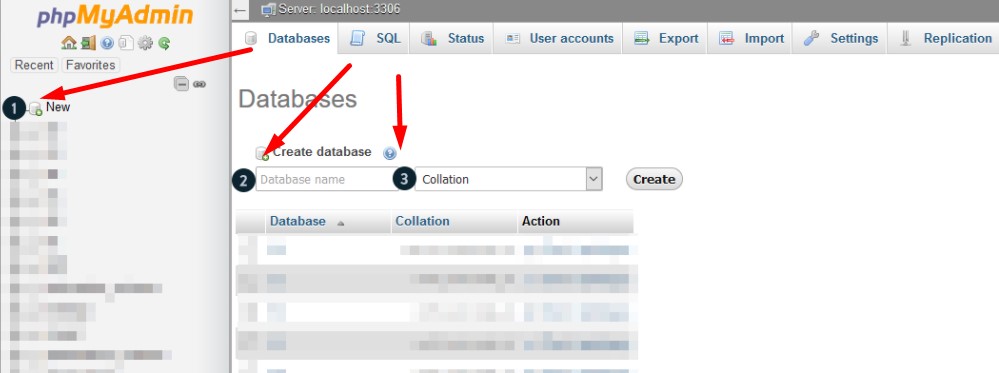
- Use phpMyAdmin or similar software to create a new, empty database for your Shopware 6 test environment;
- Open the database overview via the New (1) item. Alternatively, you can use the Databases tab;
- Enter a name (2) of your test database;
- Choose the “utf8mb4_unicode_ci” collation (3) from the dropdown.
In this example, the database is called “testshop“.
Change the .env file
Now, you need to edit the .env file situated in the root directory of your Shopware 6 test environment. It should be linked to the newly created database:
- Open the .env file;
- Find the line that begins with DATABASE_URL=
- You can see the database-related information after “=”;
- The name of the utilized database is situated after “/”. You need to specify the name of the new database here, as shown below:
1DATABASE_URL=mysql://user:passwort@localhost:3306/testshop
- Now, adjust the APP_URL entry to store the complete call for the test shop there, as shown below:
1APP_URL=http://my-shop.com/testshop/public - Note that you may also need to adjust the entry under COMPOSER_HOME if the path stored there leads to your Shopware directory.
If you locate the Composer outside of the Shopware installation, there is no need to edit COMPOSER_HOME.
Copy the live database
At this stage, you need to copy the contents of your live database to the newly created test database to create a test environment for Shopware 6. You can use phpMyAdmin. This software is often used for similar purposes since it offers import/export functionality.
Follow these steps to export a database in Shopware 6:
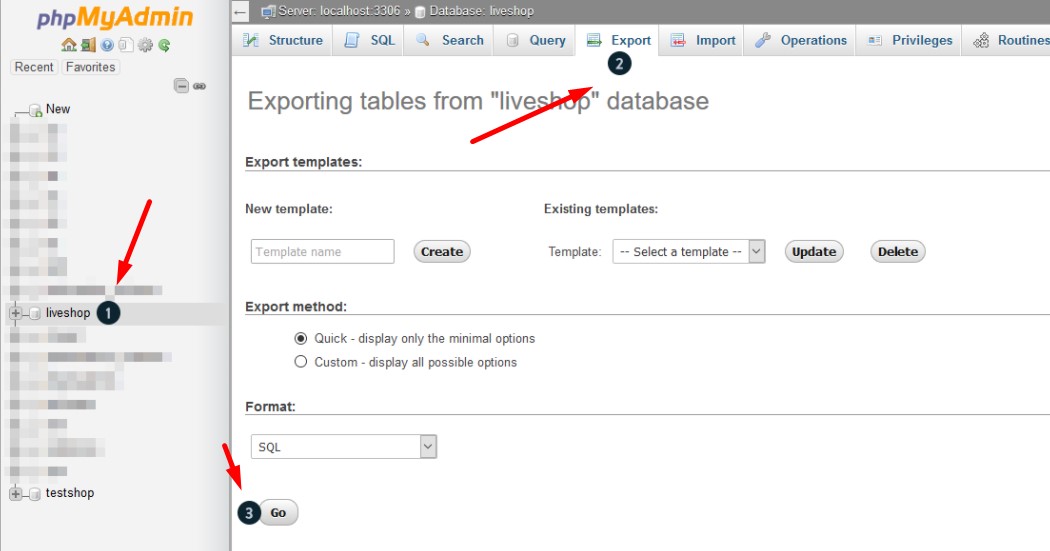
- Choose the database of the live shop (1);
- Proceed to the Export tab (2);
- Click Go (3);
- phpMyAdmin creates an SQL file with the name of your live database (“liveshop.sql” in our example) necessary for your Shopware 6 test environment.
Now, you need to import this file to the database of your test environment.
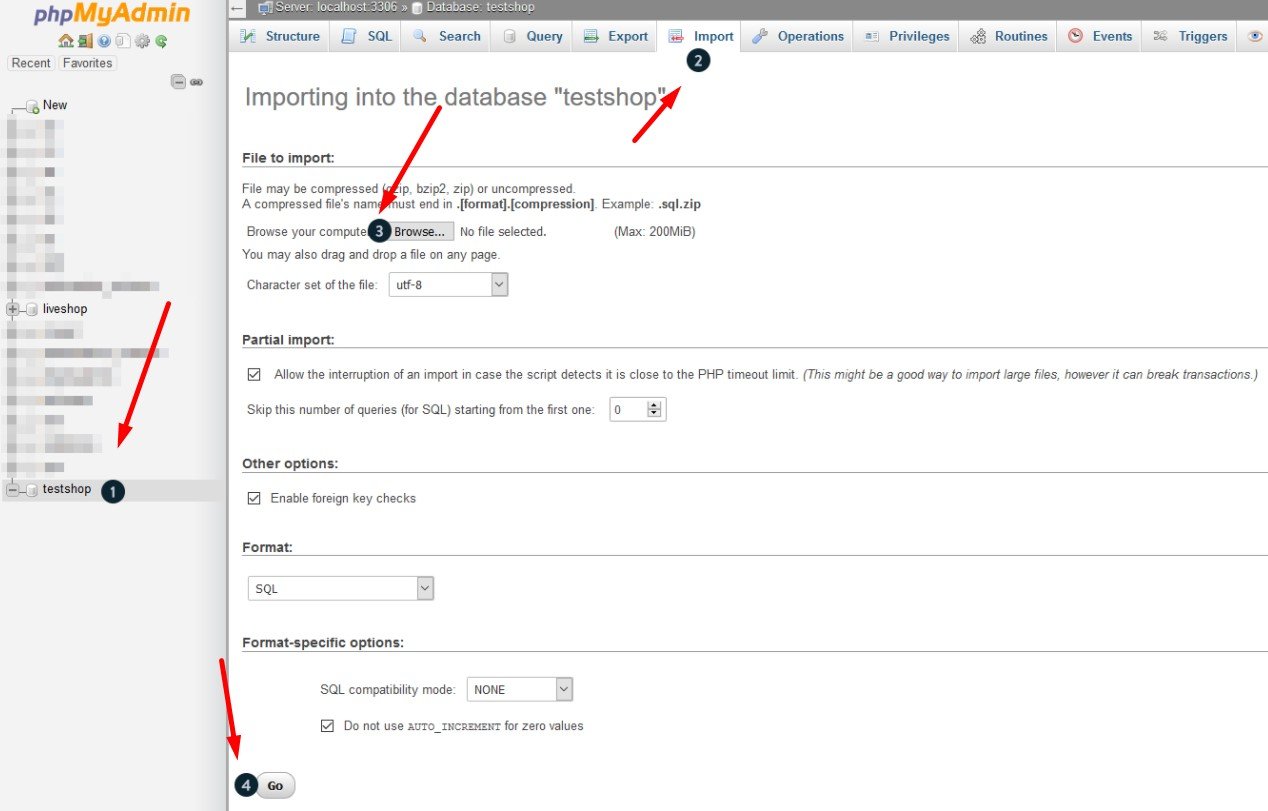
Follow these steps to do that:
- Choose the newly created database of your test instance (1);
- Proceed to the Import tab (2);
- Hit the Browse button (3) and select the exported file (“liveshop.sql” in our example);
- Hit the Go button (4) to initiate the import process and create a Shopware 6 test environment.
It may take some time to run the import process, depending on the size of the live database.
Some extensions may store APP_URL in the database with the URL of the Shopware installation, but the latter doesn’t match the URL of the test environment. As a result, you are notified that the shop domain has been changed. Reinstalling the apps usually addresses this issue, automatically adjusting the corresponding entry.
Also, it is necessary to keep in mind that some extensions incorporate subscription plans. Therefore, you should consult their manufacturers regarding avoiding situations when the database copy leads to double billing.
Customize the sales channel domain
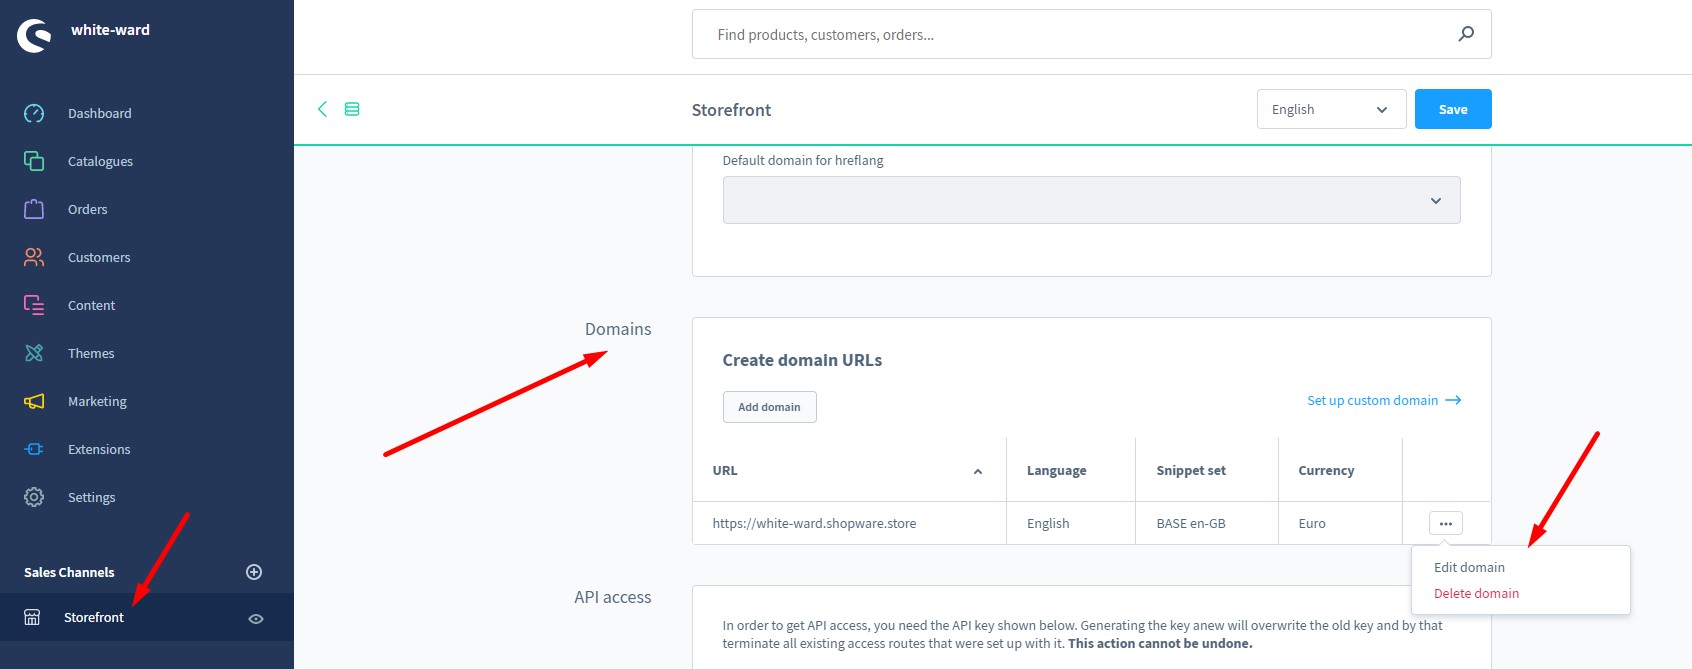
Now adjust the sales channel domain in admin to create a test environment for Shopware 6:
- Reach the admin under https://my-shop.subdomain.com/admin;
- Choose the sales channel (1) in the main menu.
- Proceed to the domain section and adjust the URL of your sales channel (2).
- Add a /testshop at the end to make the test shop accessible and create your new Shopware 6 test environment;
- Save the change and access your storefront at https://my-shop.subdomain.com.
Local test environment
Now, let’s see how to locally create a test environment for Shopware 6. Since plugins work correctly only when the test environment is accessed with the domain stored in the Shopware account, you need to perform some extra steps described below.
Also, the test environment should be able to reach the Shopware license server to perform the license comparison. And it is good to provide a stable Internet connection to get support if necessary.
Create a hosts entry
You need to create a host entry to access the Shopware 6 test environment from your computer under the URL that is stored in the Shopware account.
In the following example, we use the “my-shop.com” domain. The test environment is available under the following IP address: 192.168.0.123. Also, pay attention to whether the domain is deposited in the Shopware account with or without “www”.
Windows
The hosts file in Windows is located in the following directory:
|
1 |
C:\WINDOWS\System32\drivers\etc |
Enter the IP address of the Shopware 6 test environment along with the license domain to this file as follows:
|
1 |
192.168.0.123 my-shop.com |
Linux (Ubuntu)
As for Ubuntu, the hosts file is also located in the /etc/ directory. Enter the IP address of the test environment along with the license domain to this file as follows:
|
1 |
192.168.0.123 my-shop.com |
Note that the # lines are desirable for IPv6 capable hosts.
macOS
For macOS, the directory of the hosts file is the same. You can edit it via the terminal. Use the following command:
|
1 |
sudo nano /etc/hosts |
Enter the IP address of the Shopware 6 test environment along with the license domain to this file at a random position in a separate line:
|
1 |
192.168.0.123 my-shop.com |
Call the local environment
Now, when you’ve adapted the hosts file on your computer, it is possible to access the local environment via the live shop domain.
If your Shopware 6 local test environment can communicate with the Internet, the purchased plugins can also be used there.
It is also worth mentioning that while the hosts entry is stored for the local test environment, it is impossible to reach the live shop from your computer via URL.
Shopware 6 Essentials FAQ
How to create a Shopware account?
You need to create a Shopware account before creating a live website and a test environment. Visit the registration page, hit the Register Now link, and fill in the form to create a new account. After receiving a confirmation email, follow the instructions provided in it.
What about a Shopware ID?
You will get it upon registration automatically. Next, create a website and generate a test environment for it.
What is Shopware master data?
Shopware master data is all the information you provide about your company and business, including physical addresses, phone numbers, and emails. It is also used in a test environment.
How to add a new Shopware shop?
You need to create a Shopware shop to create a test environment. It is possible to add it in your merchant area. Click the corresponding link, choose the type of your new shop (a cloud storefront or an on-premise installation), and provide all the information the system requires.
How to add a payment method to your Shopware account?
It is necessary to add a payment method to activate the ability to purchase extensions. You can do that under Basic Information -> Accounting. Select PayPal, credit card, or direct debit as a way to transfer funds to your account.
How to create a deposit in Shopware?
You can create a deposit for purchasing extensions and themes with a working payment method. Go to your Merchant Area -> Shops, choose a shop to provide funds to, click Open Account Details, and transfer a deposit that covers the amount of your purchase. Pay attention to the nuances of installing extensions in a test environment.
How to purchase Shopware extensions?
You can purchase extensions and themes on the Shopware Marketplace or Plugin Manager. Create a deposit in advance that equals the amount of your future purchase. Next, select a tool you want to buy and complete the checkout. Don’t forget about the nuances illustrated above.
How to get support in Shopware?
For license inquiries, use the following support channels: info@shopware.com or call +49 2555 9288 50. Shopware accepts inquiries regarding accounting and financials here: financial.services@shopware.com and +49 2555 9288 510.
How to automate import and export processes in Shopware 6?
Install the Improved Import, Export & Mass Actions extension to automate recurring data transfers. Create schedules to automatically launch the corresponding import and export processes with the module’s help. Also, you can use its mapping functionality to simplify data editing.
How to migrate to Shopware 6?
The Improved Import, Export & Mass Actions tool will help you migrate to Shopware 6. It can transfer product data and other entities from your existing website to the new platform. Note that we also offer export solutions for systems like Magento and Shopify so that you can simplify your data transfers between them and Shopware. for more information.
How to integrate Shopware 6 with external systems?
Shopware 6 integration with ERPs, CRMs, accounting tools, and other similar platforms is also possible with the Improved Import, Export & Mass Actions plugin. Automate repetitive import and export processes and use mapping presets to help you modify data according to the requirements of your Shopware store during import. Also, the extension can help you follow the rules of the connected platform during export.
Related posts
 Shopware 6 Advanced Pricing Guide + Import Tutorial
 How to generate order increment IDs automatically during Magento 2 import
 How To Bulk Import Products In Shopify: CSV Description & Step-By-Step Guide
- How to update products that are not listed in a product table during Magento 2 import
 A Complete Guide to Shopify Customer Import
 Amasty ChatGPT AI Content Generator for Magento 2
 Magento 2 B2B Company Guide: Revealing Company Structure & Import
- How to Import Customers & Customer Addresses to Magento 2