Mirasvit Help Desk MX for Magento 2 and 1

The best way to prevent your ecommerce business from losing customers due to the lack of well-timed reliable support is to add a helpdesk service to the set of features already available on your website. We’ve already gathered the best helpdesk platforms in this post: Top Helpdesk Services and Tools. Today, we will provide you with a detailed description of Mirasvit Help Desk MX – one of the first helpdesk Magento 2 extensions. Below, we will show how Mirasvit Help Desk MX for Magento 2 and 1 looks from the perspective of both admins and buyers.

Table of contents
Features of Help Desk MX for Magento 2 and 1
With the help of this module (note that it is available for both Magento 2 and 1), you can provide your clients with outstanding support. The extension gathers all inquiries, emails, and offline chat messages together, so you can easily collect and process them within a user-friendly interface. Furthermore, Mirasvit Help Desk MX for Magento 2 and 1 will prevent your support team from losing inquiries by assigning each message to the right department.
The number of returning customers partly depends on the quality of support you provide. Therefore, Help Desk MX is a must-have extension for improving customer service since it lets you to:
- utilize quick replies, so you can provide customers with rapid responses, saving their time as well as your own;
- streamline the WYSIWYG editor for creating personalized messages and implementing a personal approach to each customer;
- resolve issues as soon as possible due to the support from multiple departments and managers;
- effectively manage tickets auto-resolving with the help of smart workflow rules;
- run a post-support survey, making your customer support even more user-friendly;
- evaluate your team achievements using advanced reports.
As a result, you will not only help your customers with their issues but also dramatically increase the quality of user experience.
Advantages of Help Desk MX for Magento 2 and 1
We would like to highlight the following advantages of the Help Desk MX Magento extension:
- The module is easy to use (it has intuitive customer and administrator interfaces, which we explore in more detail below);
- Various ways to contact your support team (even unregistered customers can get help);
- Attachments (customers can provide more detailed information and communicate with your support team more efficiently);
- Unlimited number of support departments (we will also look closer at this possibility in the backend overview);
- Quick replies (the feature saves both your team’s and customers’ time);
- Precise settings (the extension provides the ability to assign tickets to the most appropriate support team);
- Follow up emails (so that you can notify customers about new replies and change of status);
- Post-support surveys (it helps to improve your store user experience related to the customer support services);
- Workflow rules (the extension offers advanced rules for managing your support team’s work);
- Help Desk reports (which contribute to the evaluation of support team results).
Integration with Other Extensions
Note that Mirasvit Help Desk MX can be connected to the company’s RMA extension, allowing you to convert tickets into the RMA requests. To do this, a support manager will only have to click the Convert to RMA button.
Besides, you can connect Help Desk MX to Mirasvit Knowledge Base. As a result, your customers will be able to search for answers right in the feedback popup window before creating a ticket.
Another integration is related to Multi Search that enables users to search internal data through all sources in one place.
Backend
Tickets
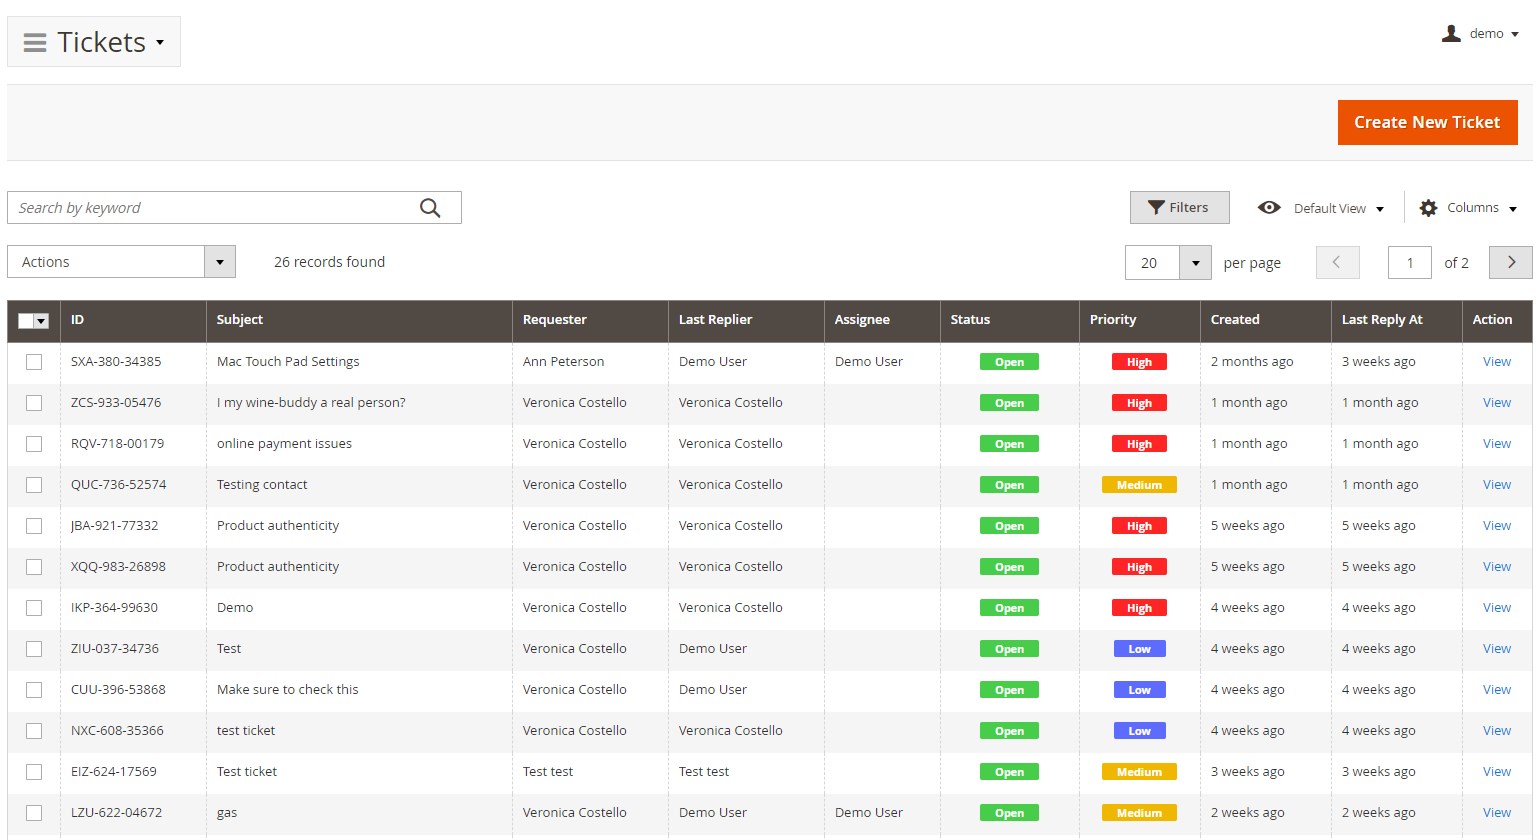
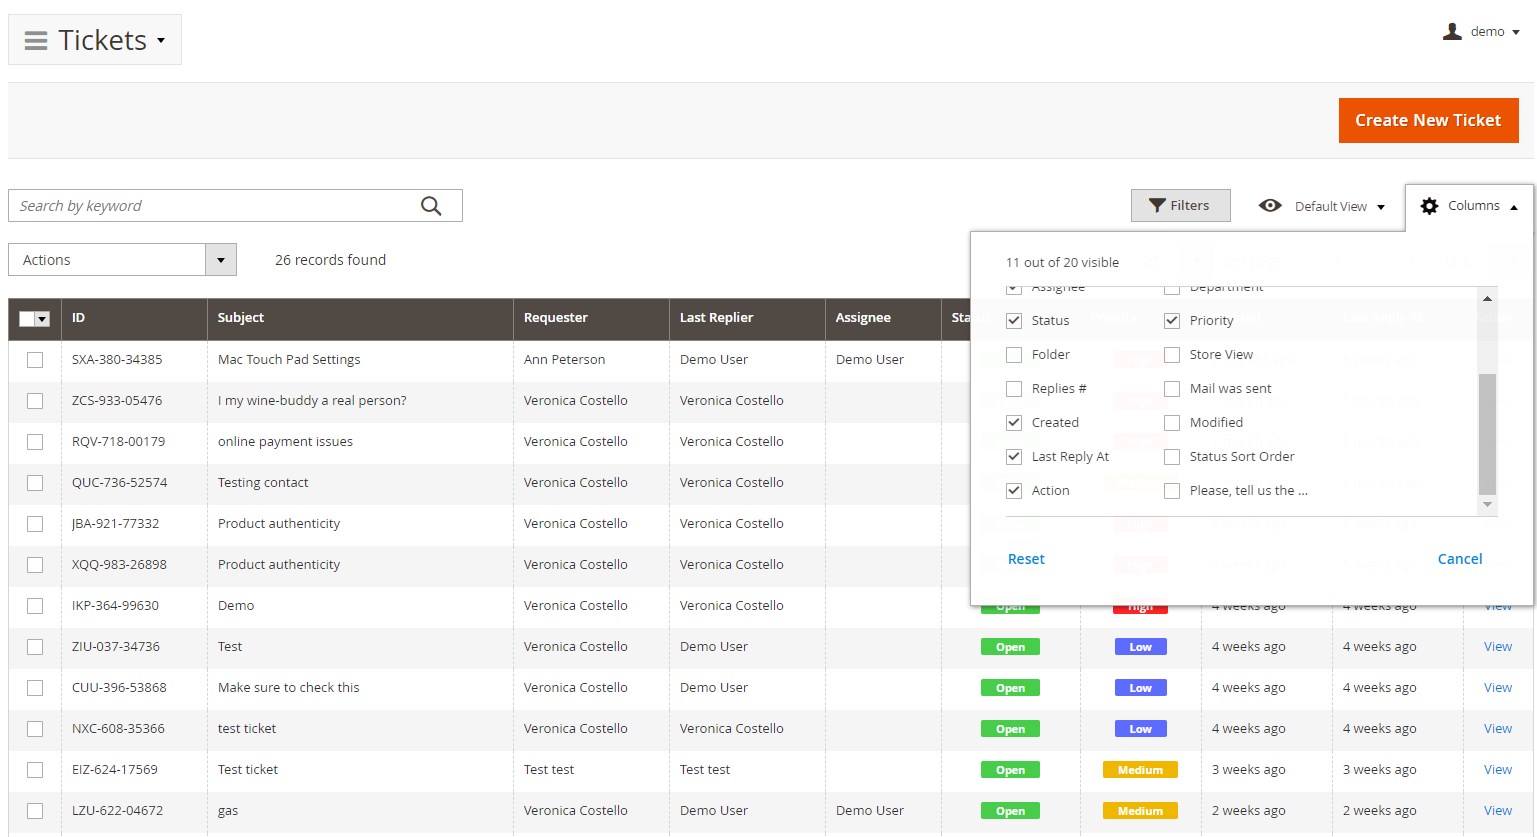
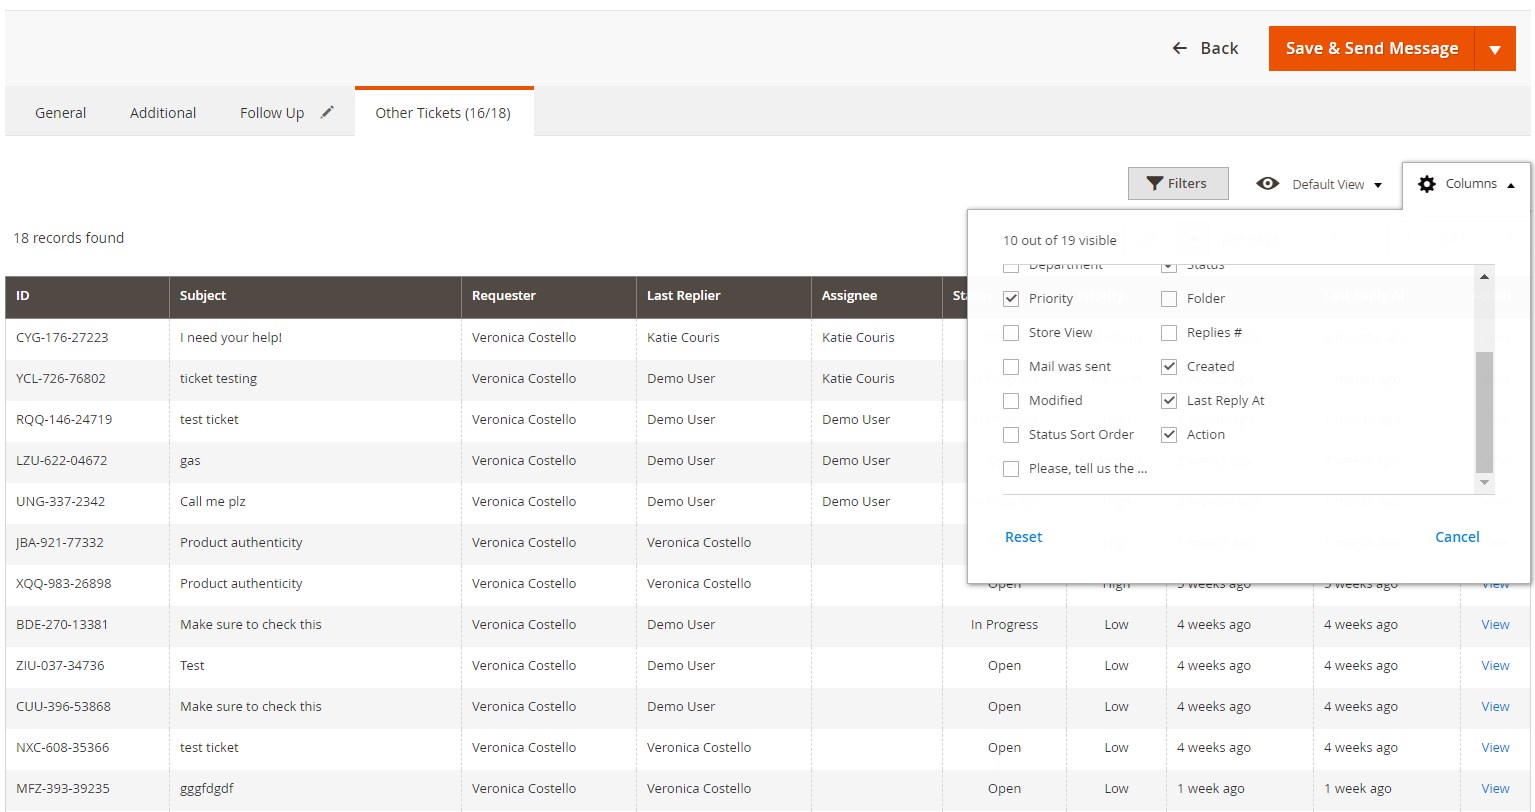
On the Tickets screen, you have a grid with all submitted tickets. You can apply filters to find specific tickets. Besides, it is possible to sort them according to the information available in each column (ascending/descending or alphabetical order depending on the content). The grid is highly customizable, so you can choose which columns should be displayed.
There are 20 columns available in total:
Now, let’s tap on a ticket to see how the ticket view page looks. At the top of the screen, you can see the ticket ID combined with its subject. Below, there are 4 tabs: General, Additional, Follow Up, and Other Tickets.

Next, the screen is divided into two columns: with general information on the left and messages on the right. You can see a field with an email address of a customer at the top of the first column, and, next to it, the area where you can leave your messages.
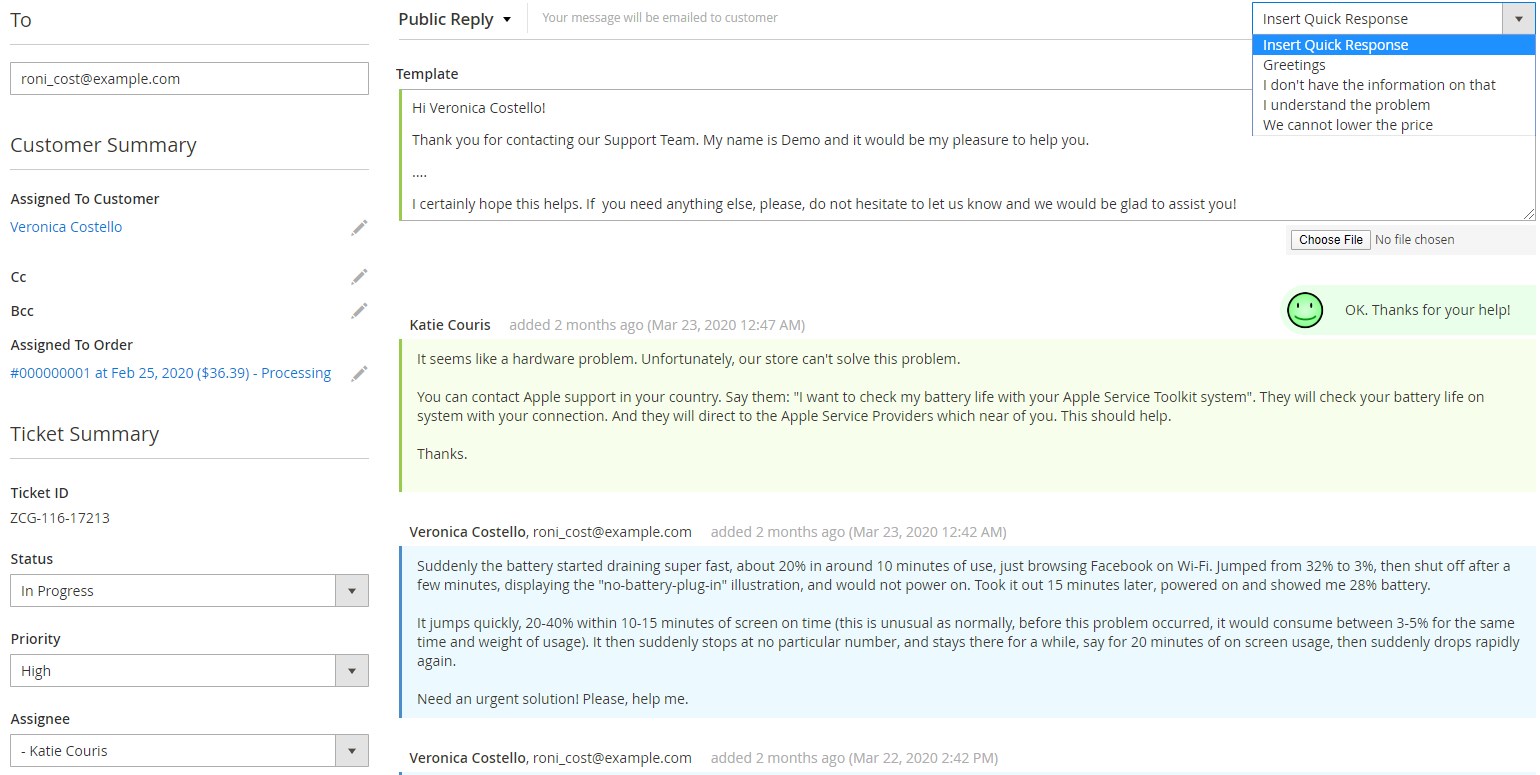
You can send a message right to a customer (as a public reply), leave an internal note (customer will not see it), send a message to a third party (customer can see it in the ticket history), or leave an internal message to a third party (customer will not see it). In case of Public Reply and Internal Note, you don’t need to enter any additional emails, but they are required if you send messages to third parties.

As mentioned above, Mirasvit Help Desk MX for Magento 2 and 1 lets you insert quick responses. You only have to choose an appropriate template from a drop-down list:

Besides, you can attach files to your messages.
Below the text field of the template message, there is the ticket history.
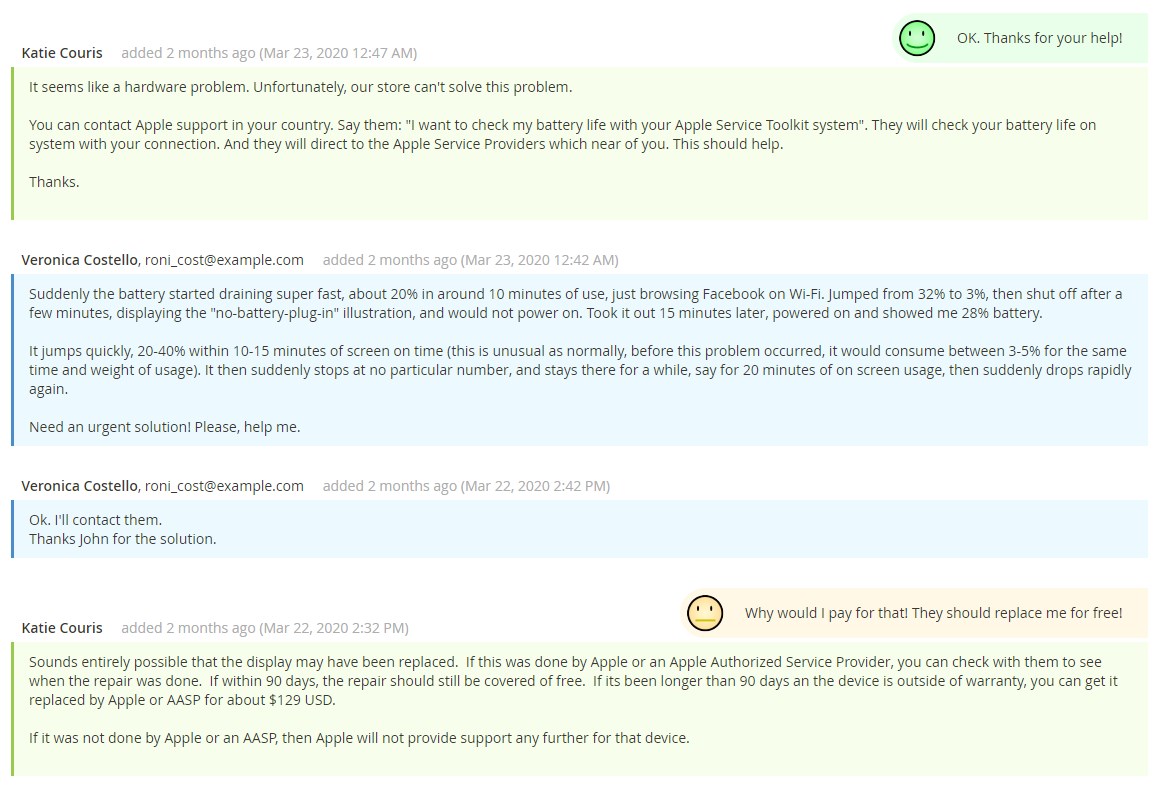
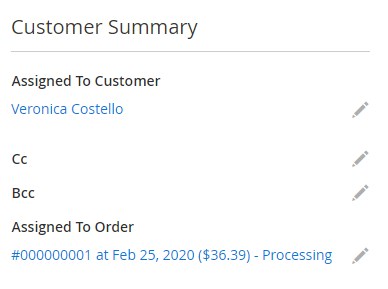
As for the column with general information, it contains the Customer Summary block with the information about a customer who submitted the ticket and an order to which it is assigned.
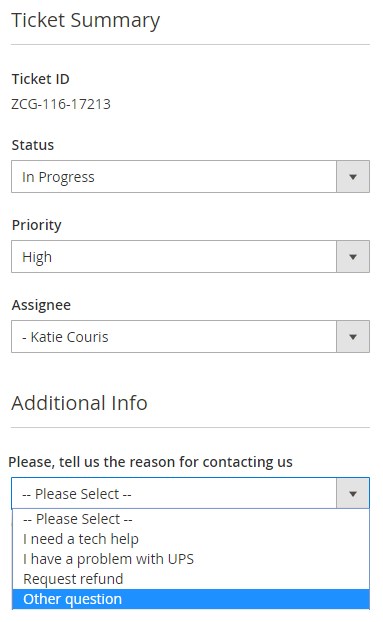
There is also the Ticket Summary section with its current status, priority, and ticket assignee name, as well as the field with additional information.
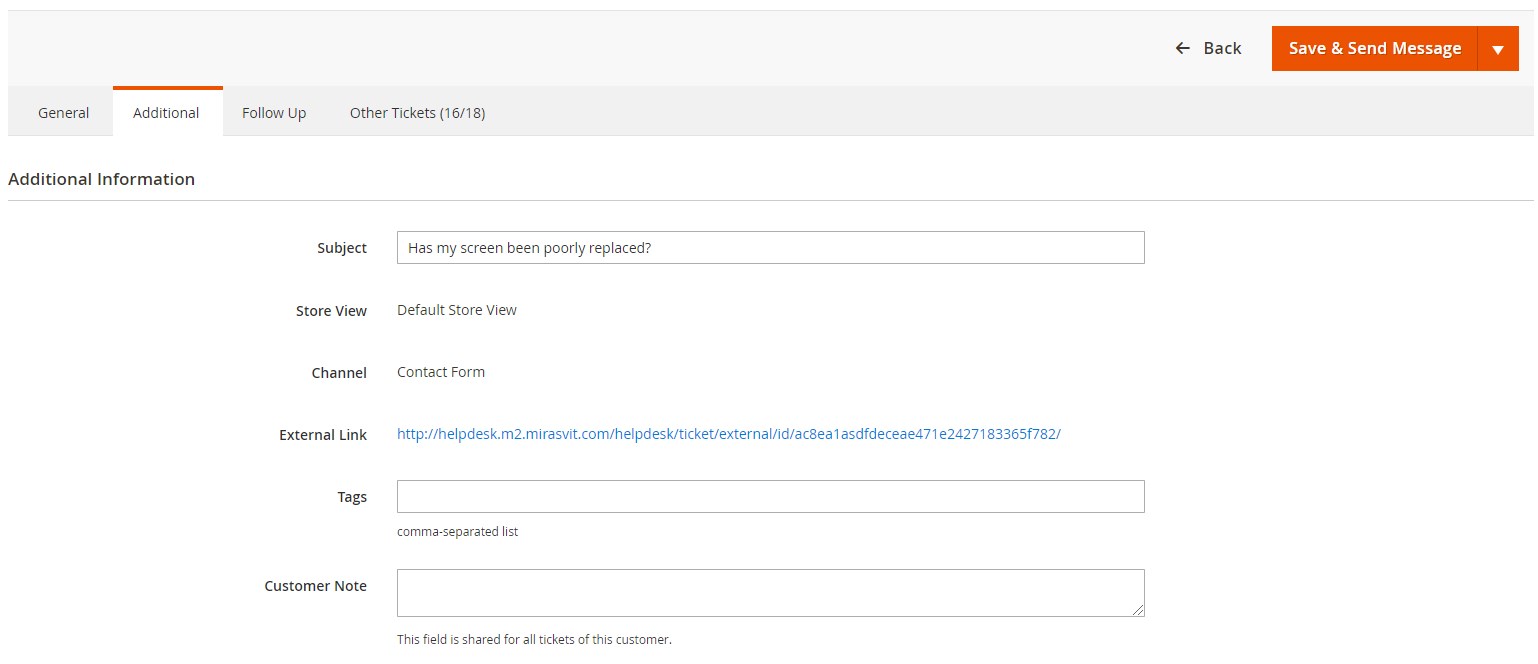
As for the Additional Information section in the Additional tab, it consists of such fields as Subject (of the ticket), Store View, Channel (from where ticket comes from), External Link (you can send it to third parties), Tags (it should be a comma-separated list), and Customer Note (shared for all tickets submitted by a customer).
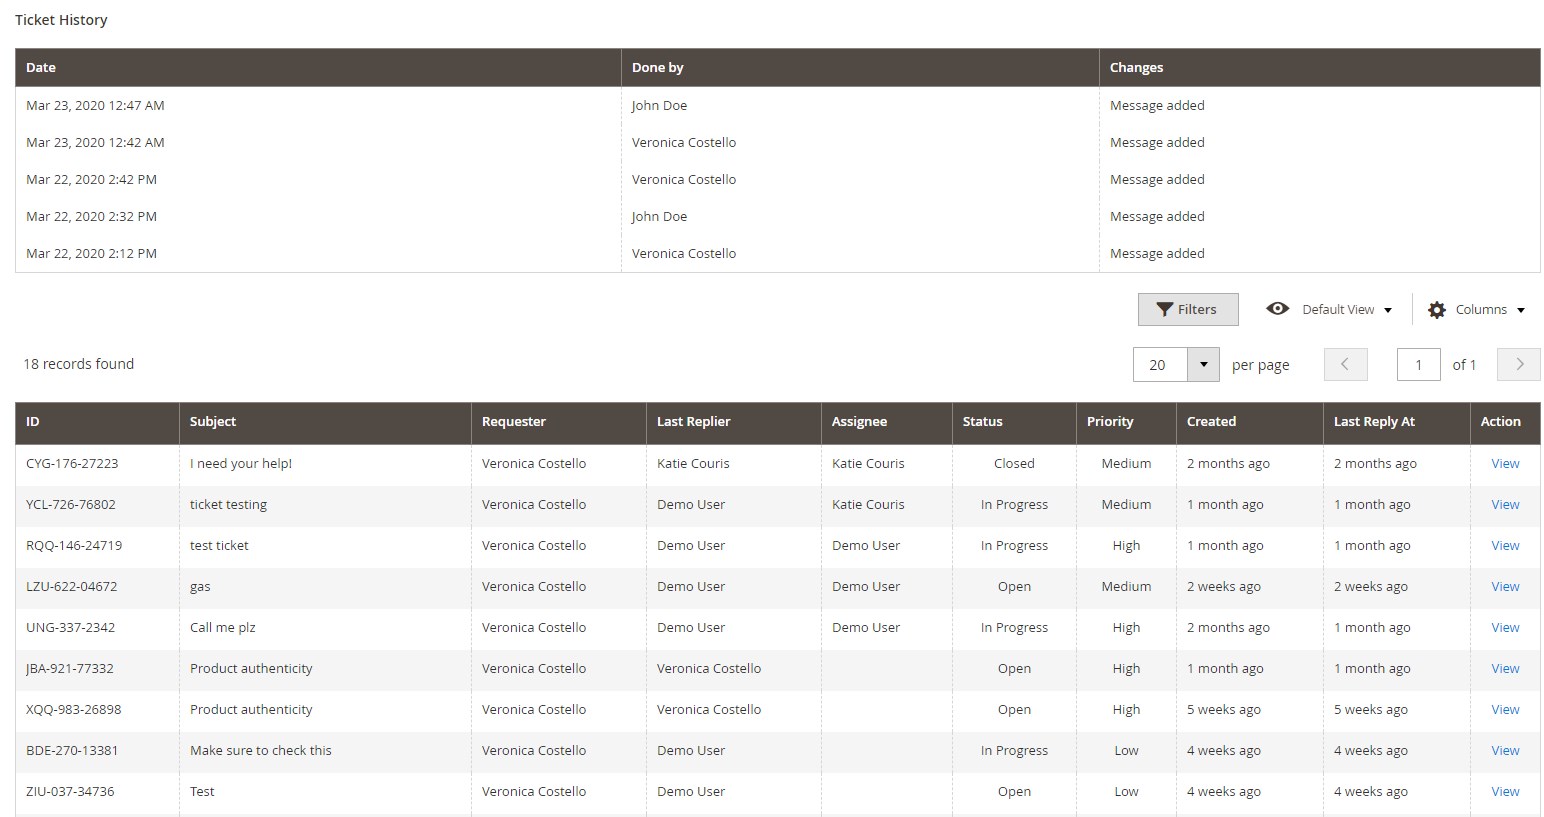
Besides, here, you will find a table that contains Ticket History.
This is how the ticket screen is designed if you use an external link to view the ticket:
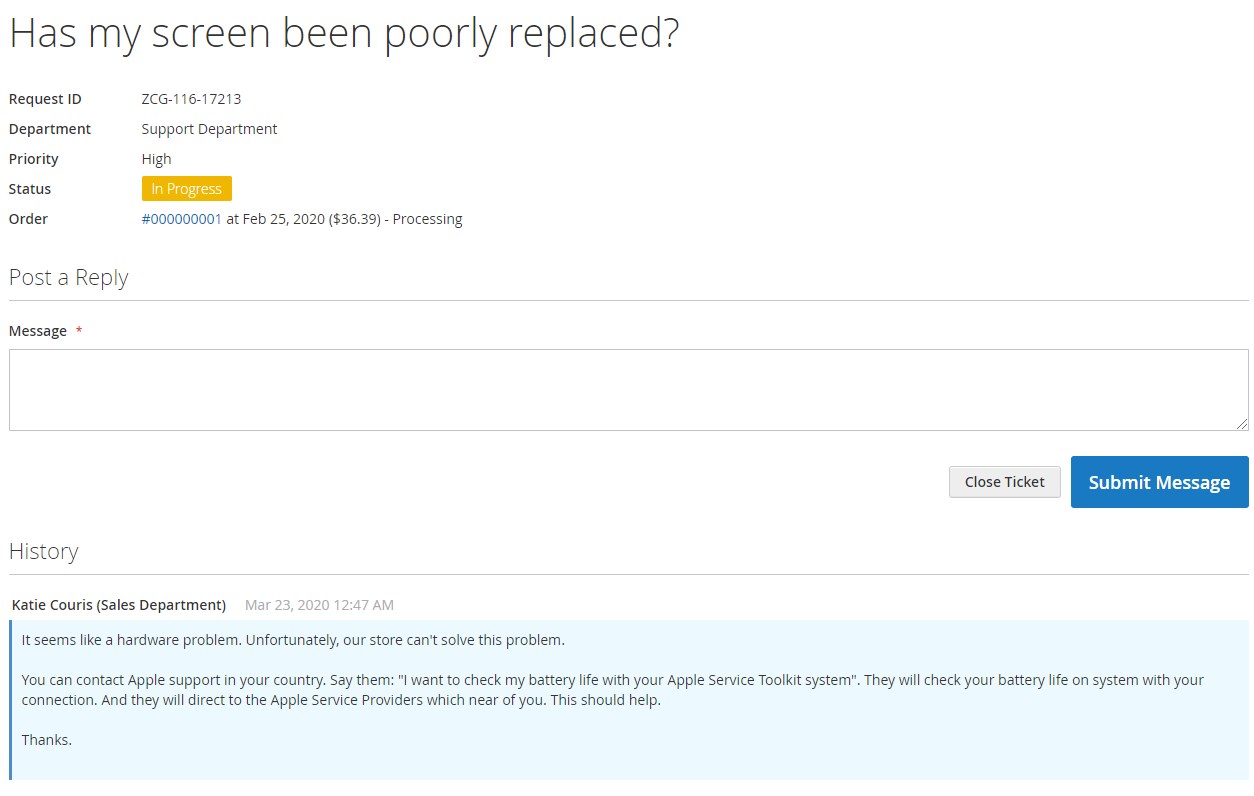
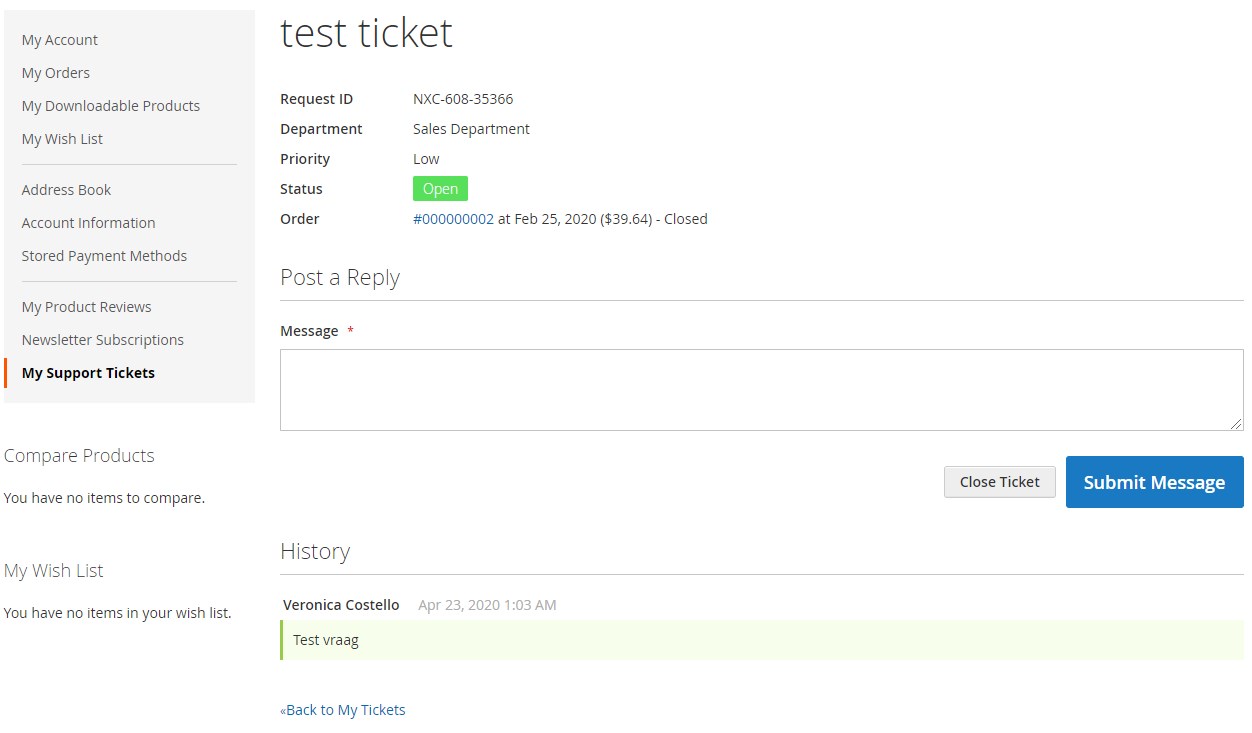
It shows the subject of the ticket, its request ID, related department, priority, status, and order. It is also possible to post a reply here attaching files to it or close the ticket. Below, you can see the history of messages related to the ticket.
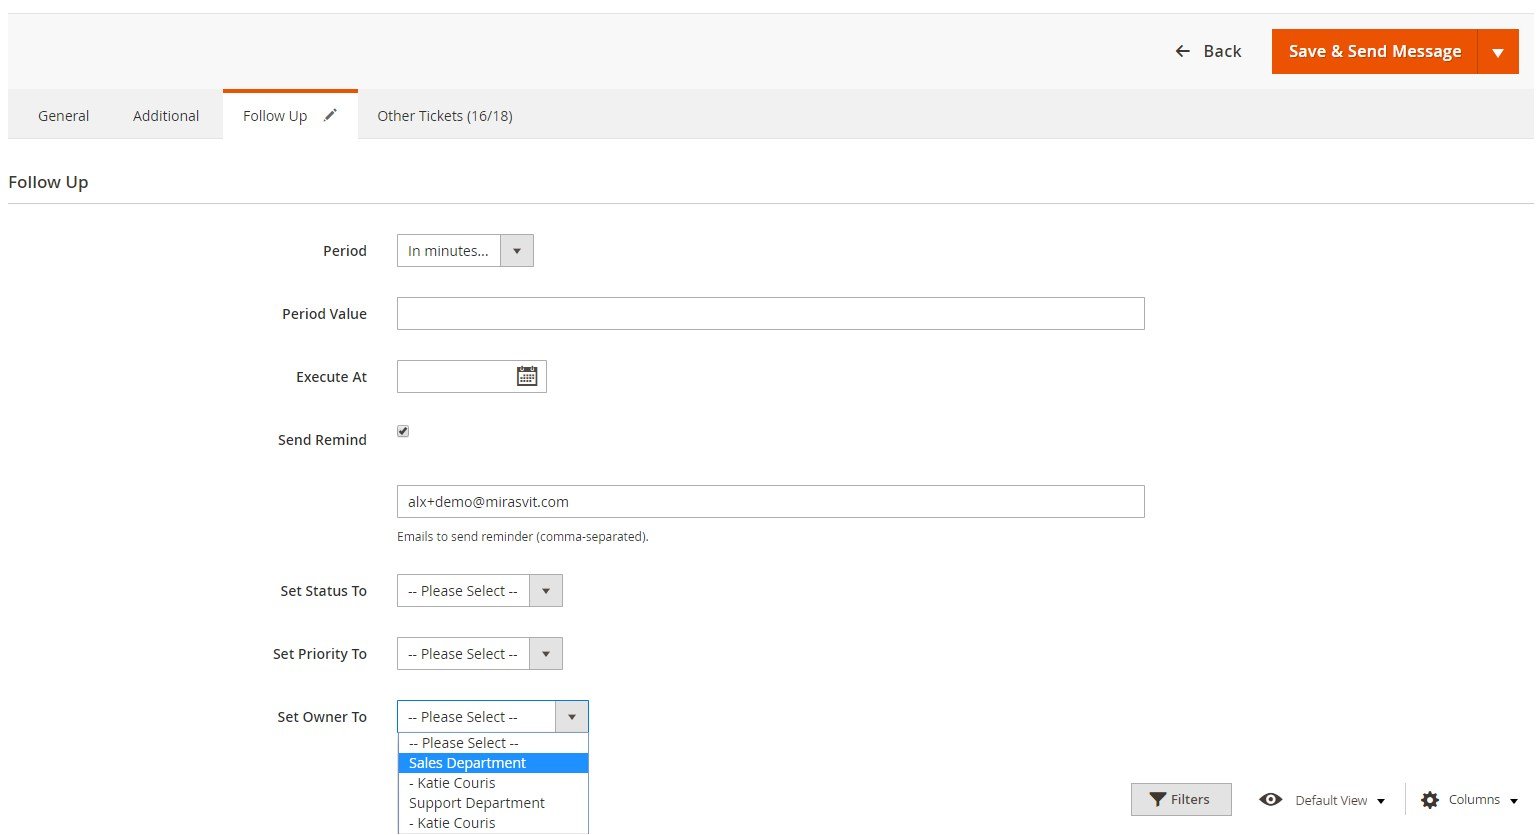
Now, let’s return to the ticket screen. In the Follow Up tab, you can set the period of follow-ups and date of their execution, activate reminders, and specify email addresses for sending them, as well as change status, priority, and owner on this tab.
The Other Tickets tab contains all tickets related to the same customer.
You can create new tickets based on the described example – just hit the Create New Ticket button on the Tickets screen.
Gateways
Email gateway is a handy feature that adds a lot of automatization to your daily helpdesk routine. Gateways provide the ability to connect email boxes of your support team to Help Desk, as well as convert email inquiries into tickets.
If you have several departments with their own email boxes for inbound inquiries, you can synchronize them with the Mirasvit Help Desk MX module. It will automatically redirect all requests converting them into tickets for the appropriate department. Furthermore, you and your admins can also reply via email, and the extension will add these replies to related tickets.
This is how the Gateways grid looks like:

To create a new gateway, you should specify a set of parameters: Title, Email, Login, and Password;

Other settings here: Status (Active – Yes/No), Host, Folder, Protocol, Encryption, Port, Fetch Frequency, Fetch Max, Fetch Only X Last Emails, and Remove emails after fetching.
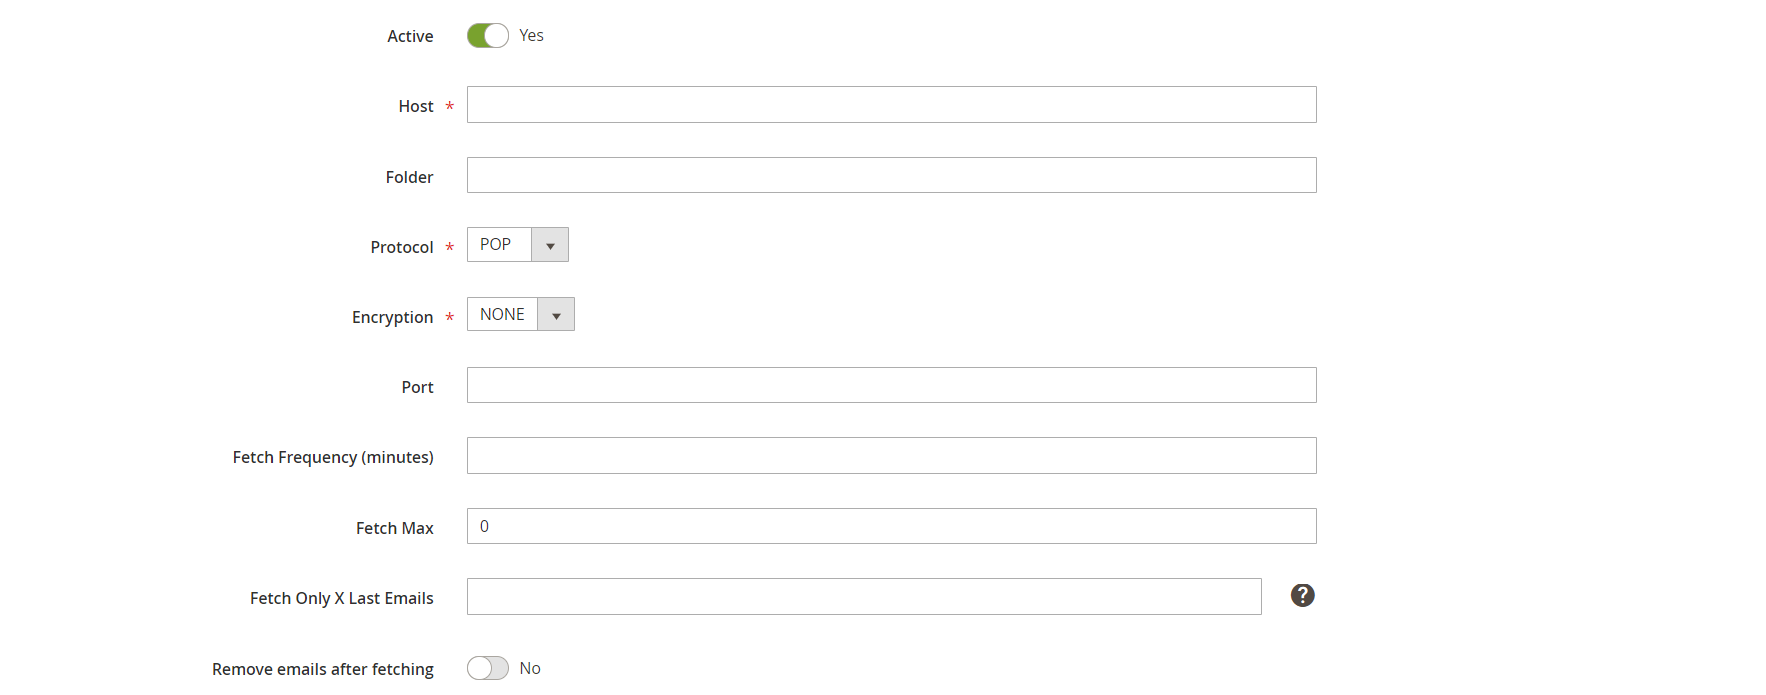
The new gateway configuration also offers you to specify the following parameters: Auto assign tickets to Store View, Auto assign tickets to department, and Notes.

Statuses
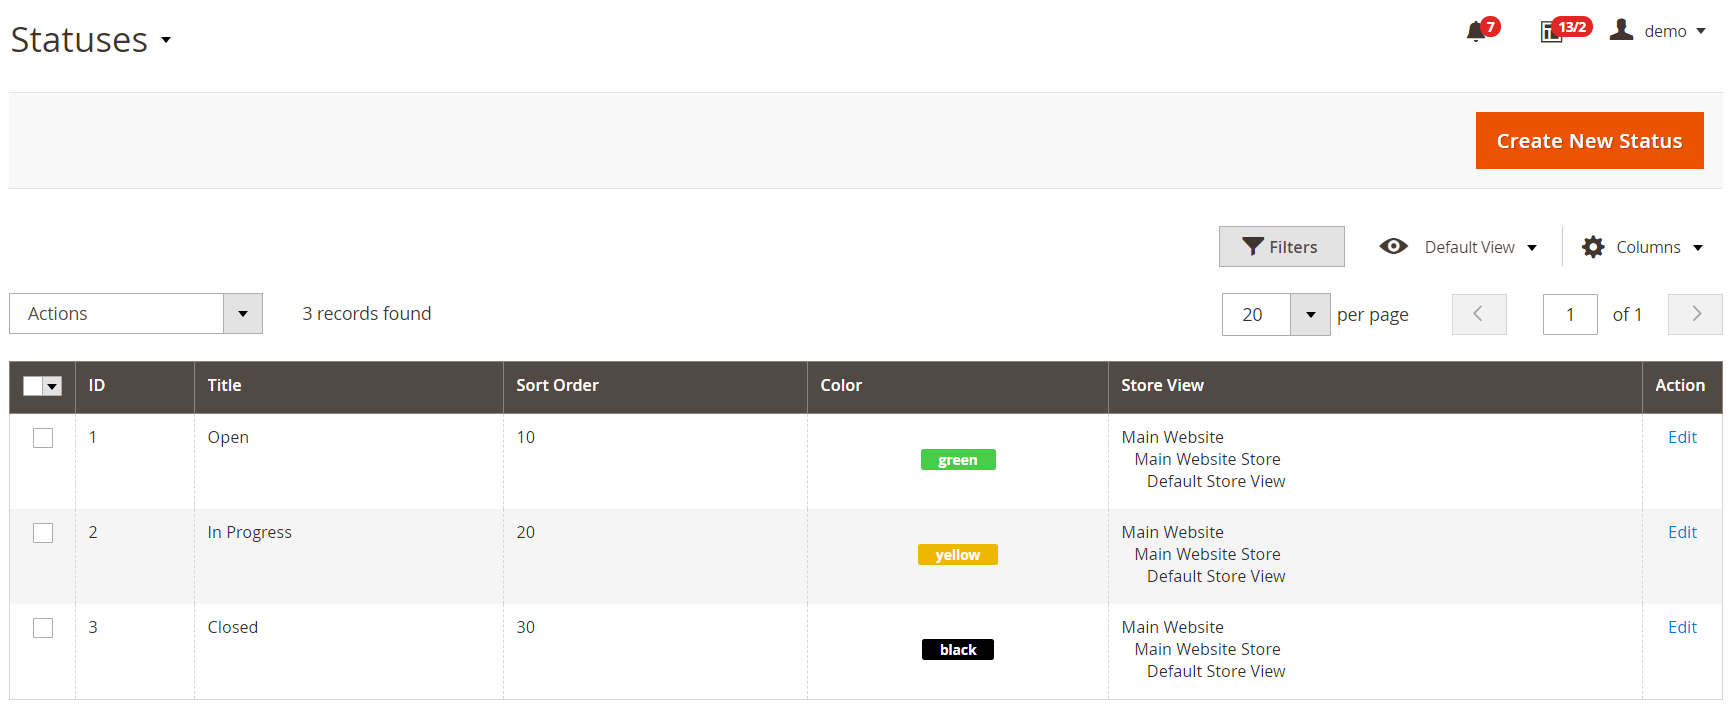
On the Statuses grid, you can add new statuses, modify the existing ones, as well as apply filtering and sorting options. The grid consists of 7 columns: checkbox, ID, Title, Sort Order, Color, Store View, and Action (Edit).
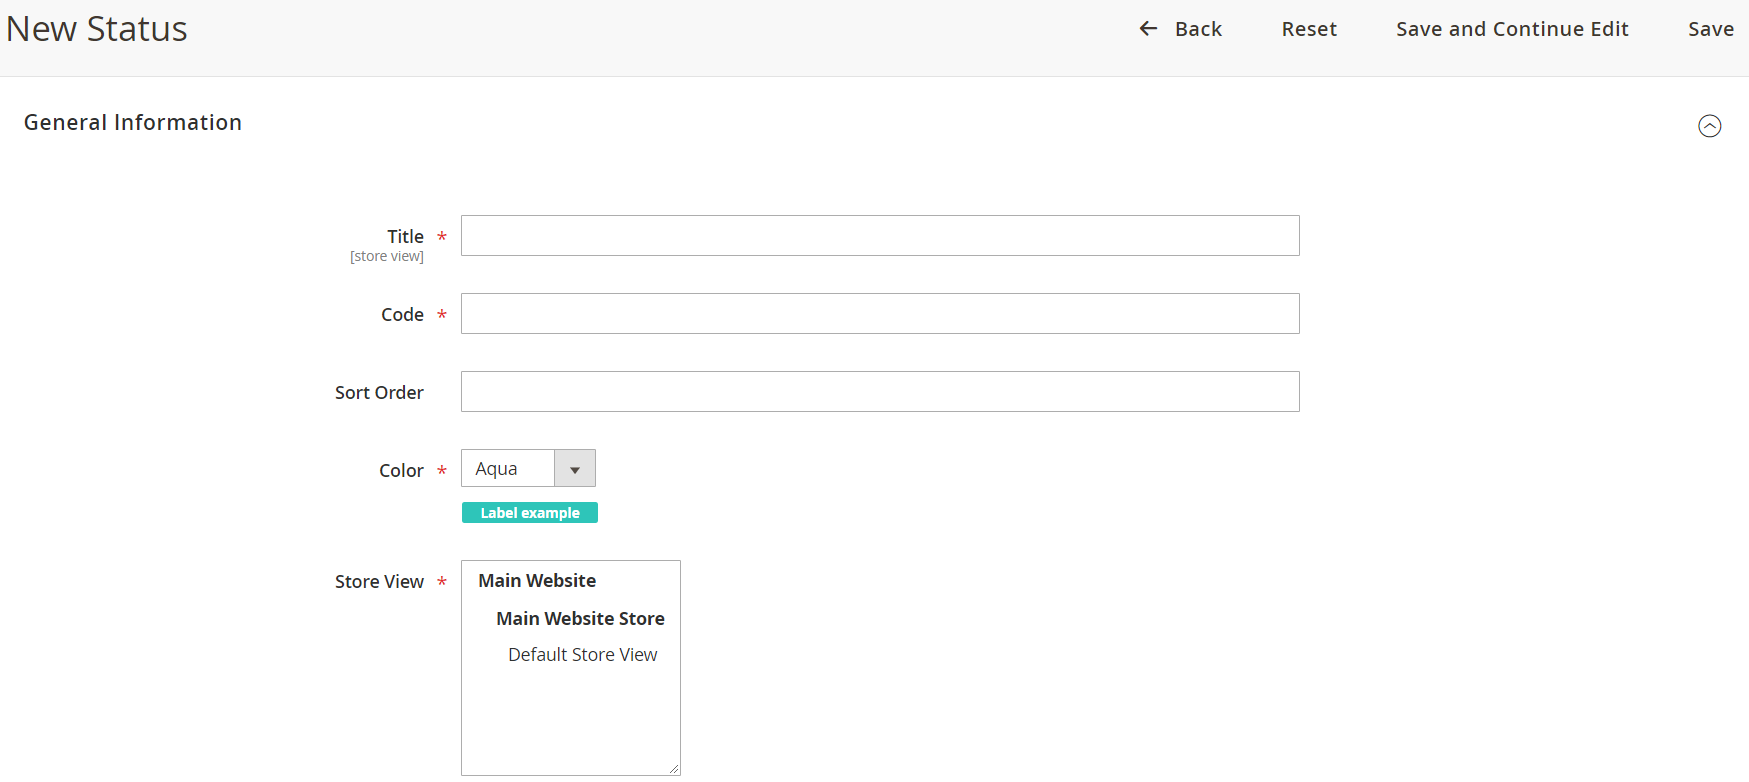
For each new status, you need to specify such information as title, code, sort order, color (there are lots of color options; label example is available below), and store view.
Custom Fields
Custom Fields is another screen available in the backend of Mirasvit Help Desk MX for Magento 2 and 1. It lets you add any custom field to your ticket form. The feature is beneficial if you want to get more information about a customer issue. You only have to ask him or her to specify details in the additional fields. Custom fields are available at the native contact form, contact tab, ticket creating interface, as well as popup contact form.
This is how the Custom Fields grid looks like:

Each custom field contains the following options: Title, Code, Type (Drop-down list, Checkbox, Date, Multi-line text, Text), Description, Options list (fill this field only for Drop-down list type), and Active (status);
Besides, you can specify a sort order, choose where to display the custom field (customer account, ticket form, contact us form), decide whether it is required for customers and staff, and set a store view.
Permissions
Mirasvit Help Desk MX for Magento 2 and 1 lets you manage permissions for your support team with a convenient interface. You can separate the roles for your support divisions so that each department will handle tickets related to their duties only.
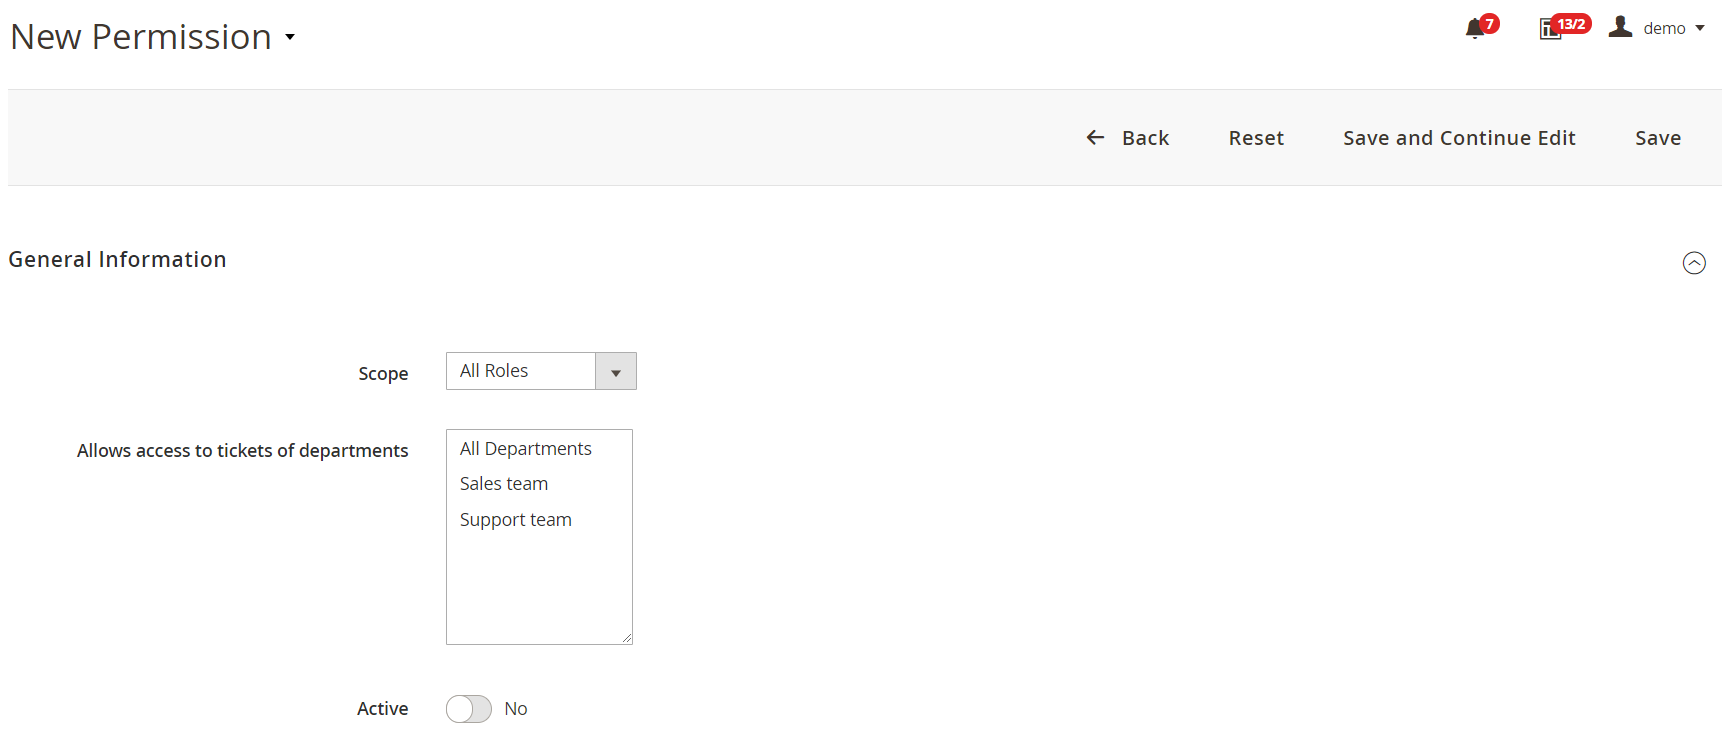
The Permissions grid looks as follows:

To add a new permission, it is only necessary to specify a role (Scope), decide to tickets of which departments access will be given, and activate/deactivate the permission.
Satisfaction Survey Results
The Satisfaction Survey Results grid has a following look:
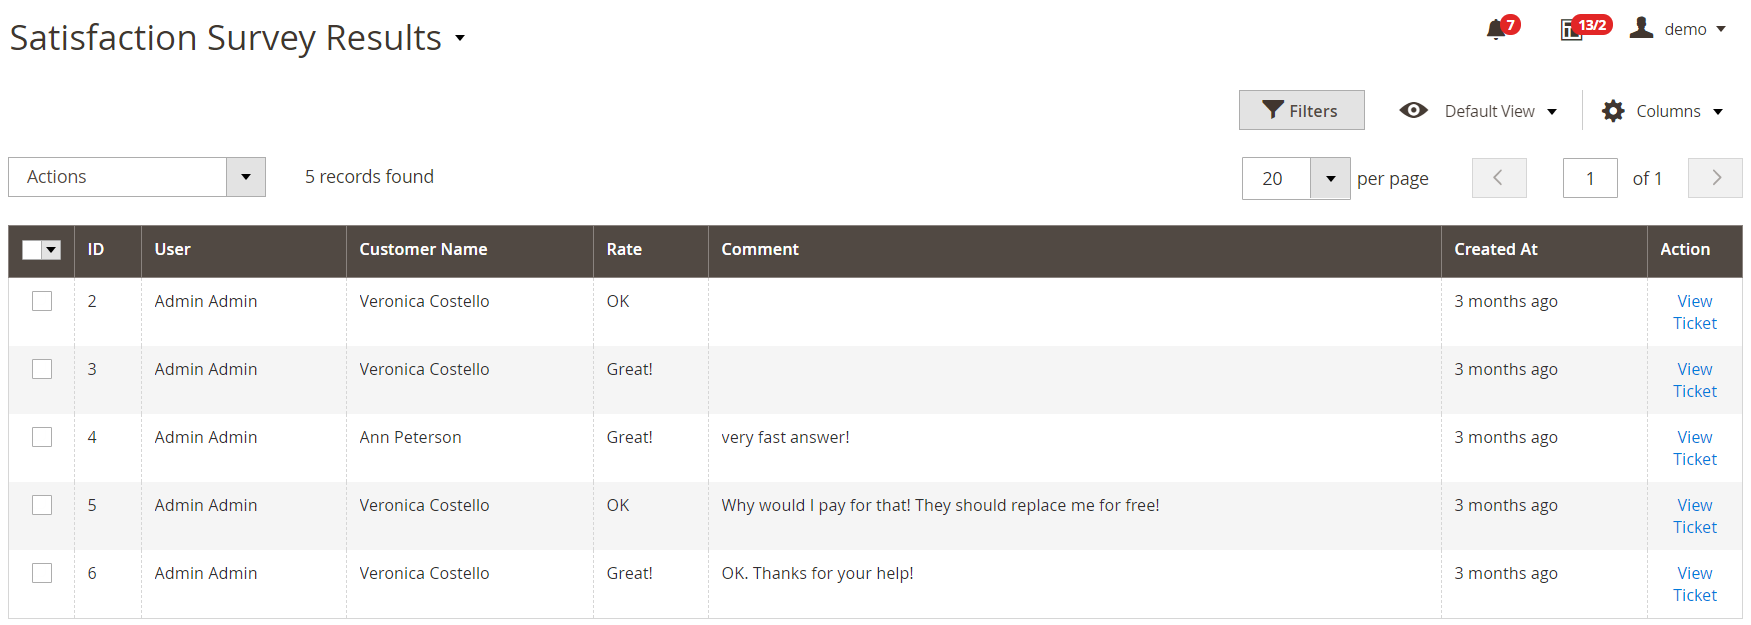
Here, you can view the result of post-service satisfaction surveys that can be inserted into the footer of email notifications. A tiny poll provides your customers with the ability to rate the quality of your support team members. Consequently, Mirasvit Help Desk MX for Magento 2 and 1 enables you to easily evaluate each employee’s performance.
Departments
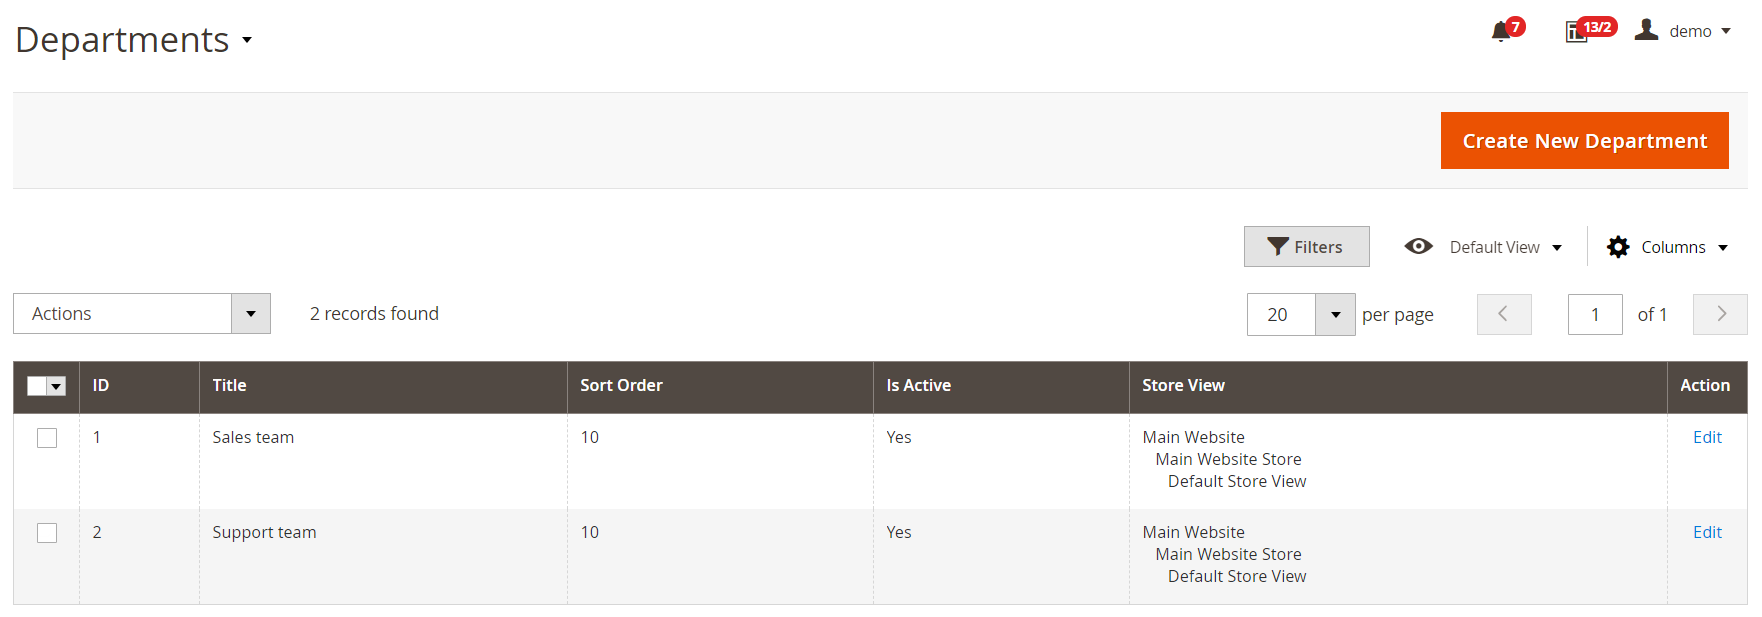
On the Departments screen, you can see all teams that can respond to tickets. The Departments grid consists of 6 columns: checkboxes, ID, Title, Sort Order, Is Active, Store View, and Action (Edit).
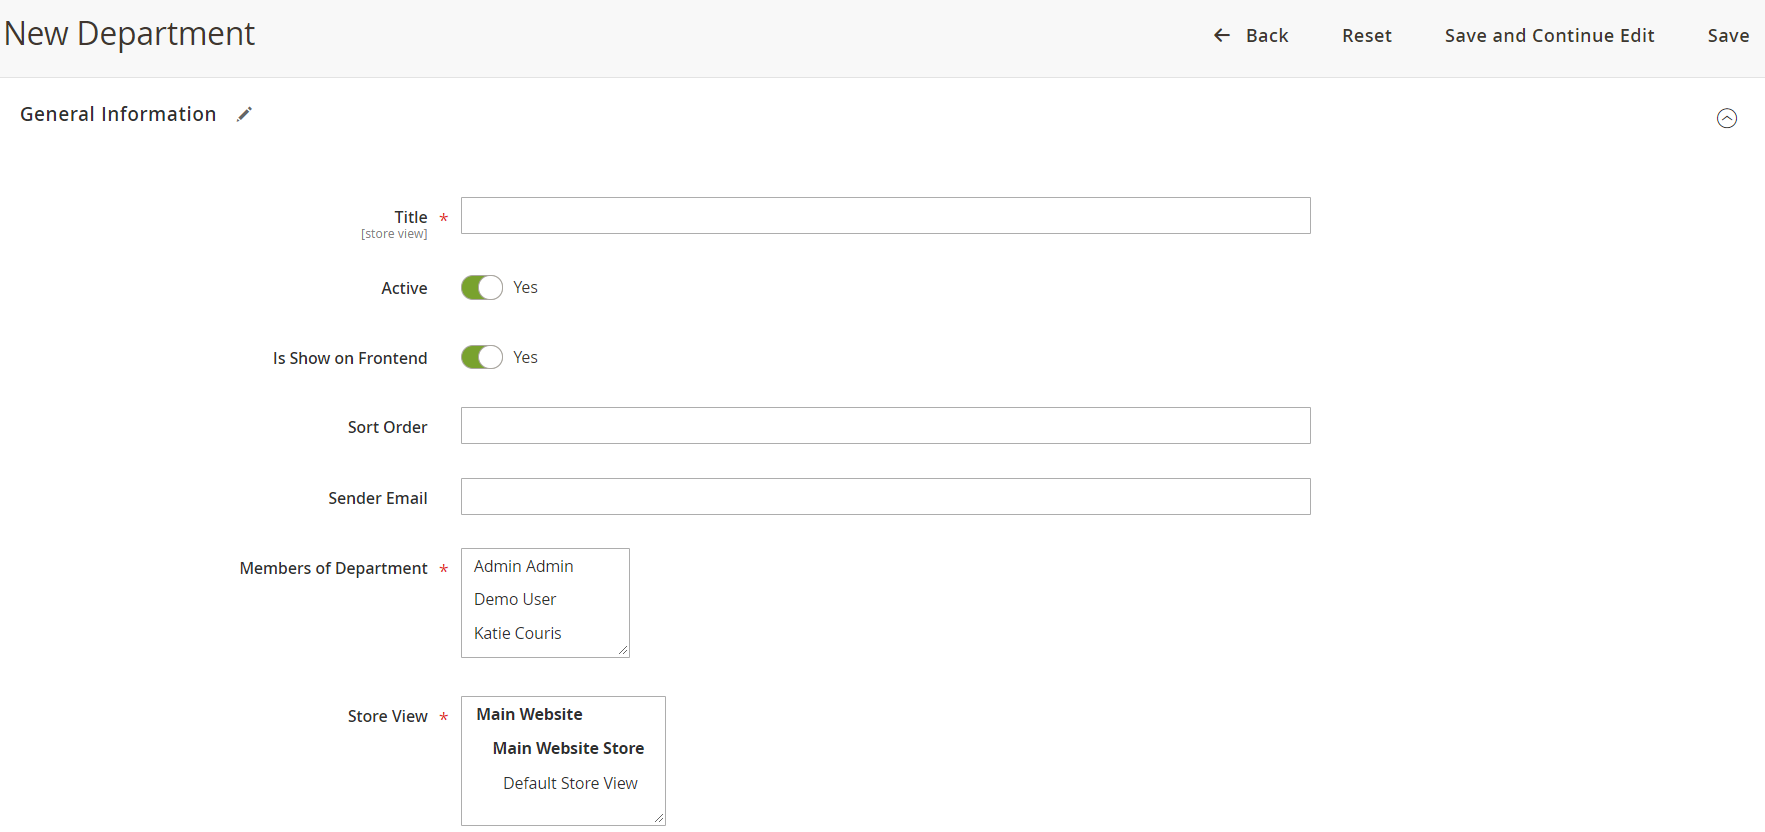
The new department screen is divided into two sections: General Information and Notification. In General Information, you specify a title, status, availability on the frontend, sort order, sender email address, responsible department members, and store view.
In Notification, you specify whether to send notifications to all department members if a ticket is unassigned or not. Besides, you can leave an email for sending unassigned tickets.

Note that the number of support departments is unlimited.
Priorities
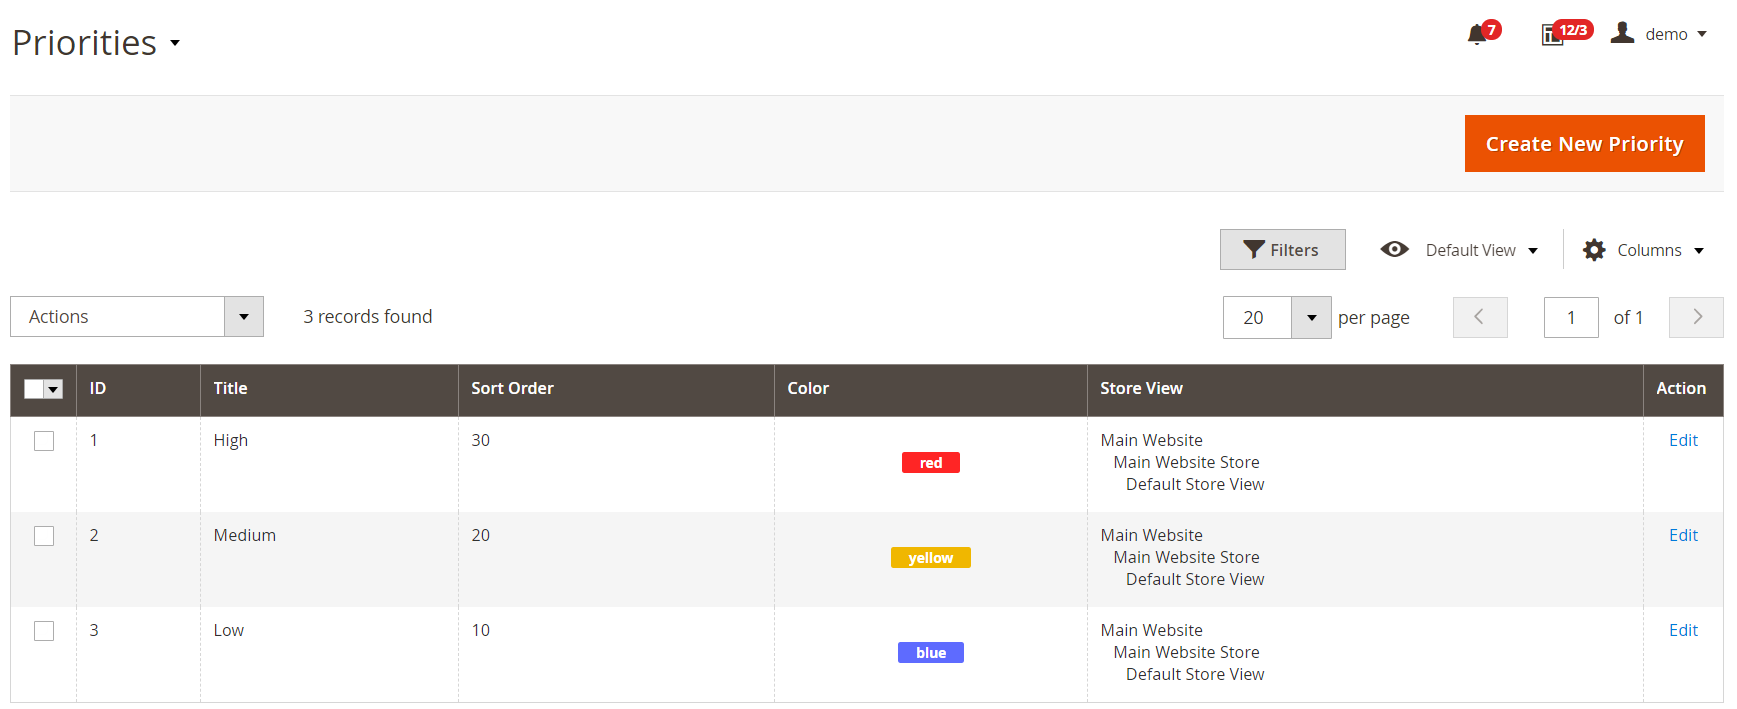
A grid with priorities is similar to the grid with statuses.
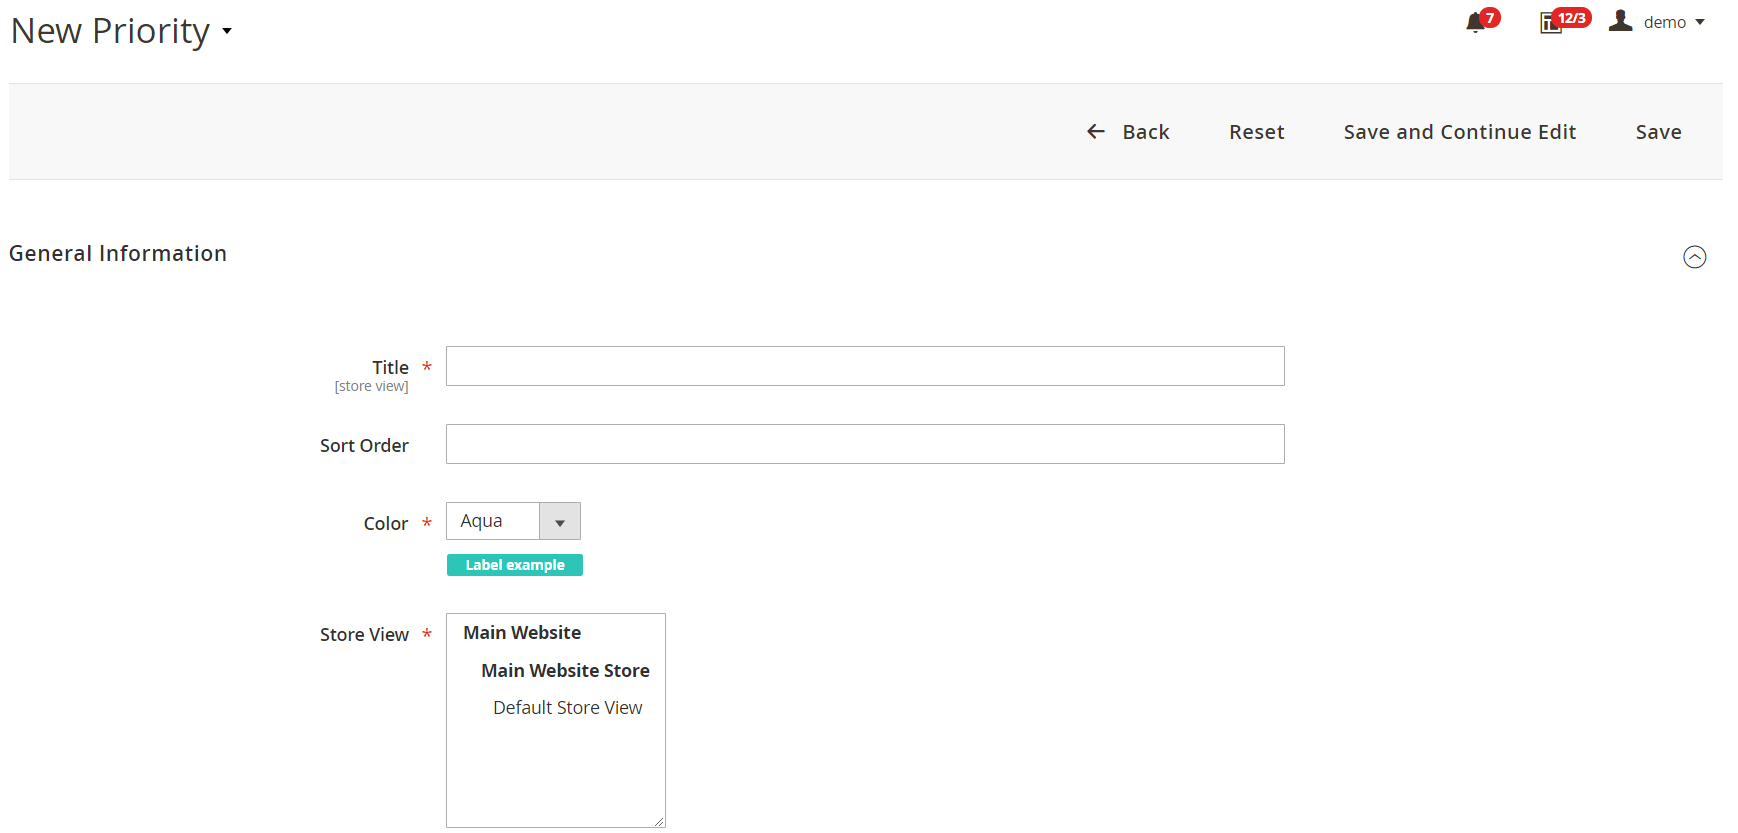
Each new priority level requires the following information to be specified: Title, Sort Order, Color, and Store View.
Quick Responses
You can manage all your premade quick responses on the following screen:
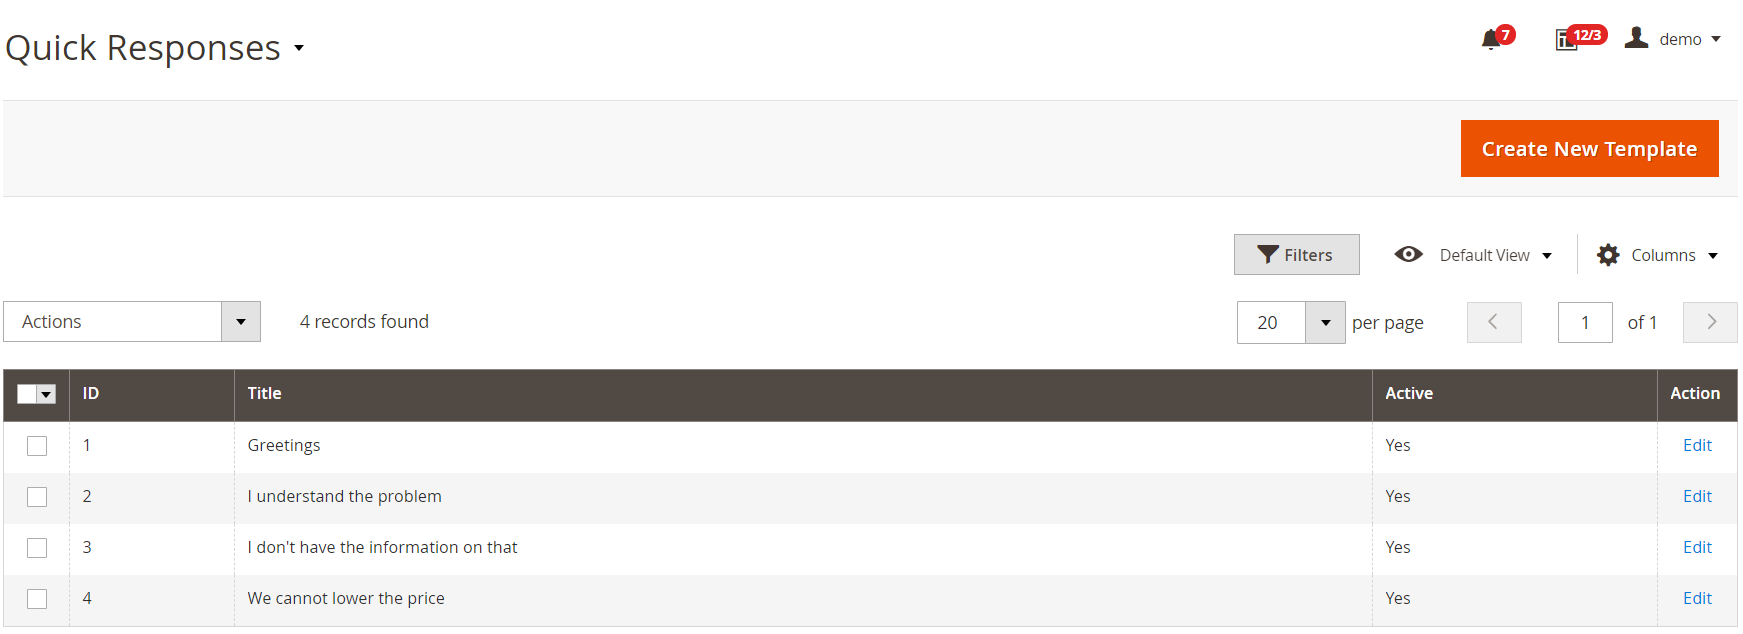
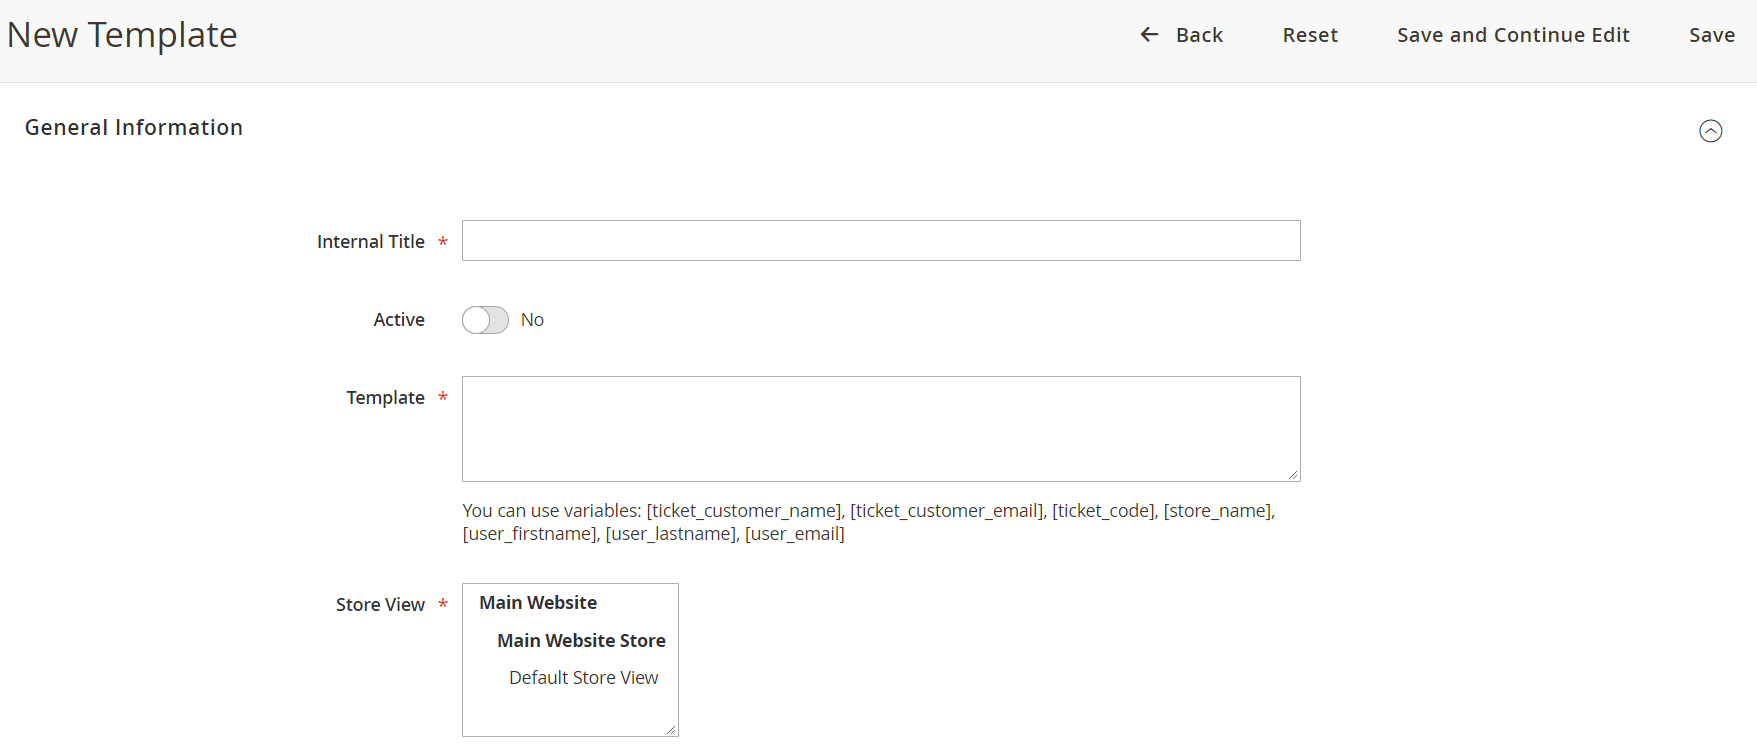
When adding a new quick reply template, specify its internal title and status (Active), create a template (note that you can use variables), and choose a store view.
SPAM Protection
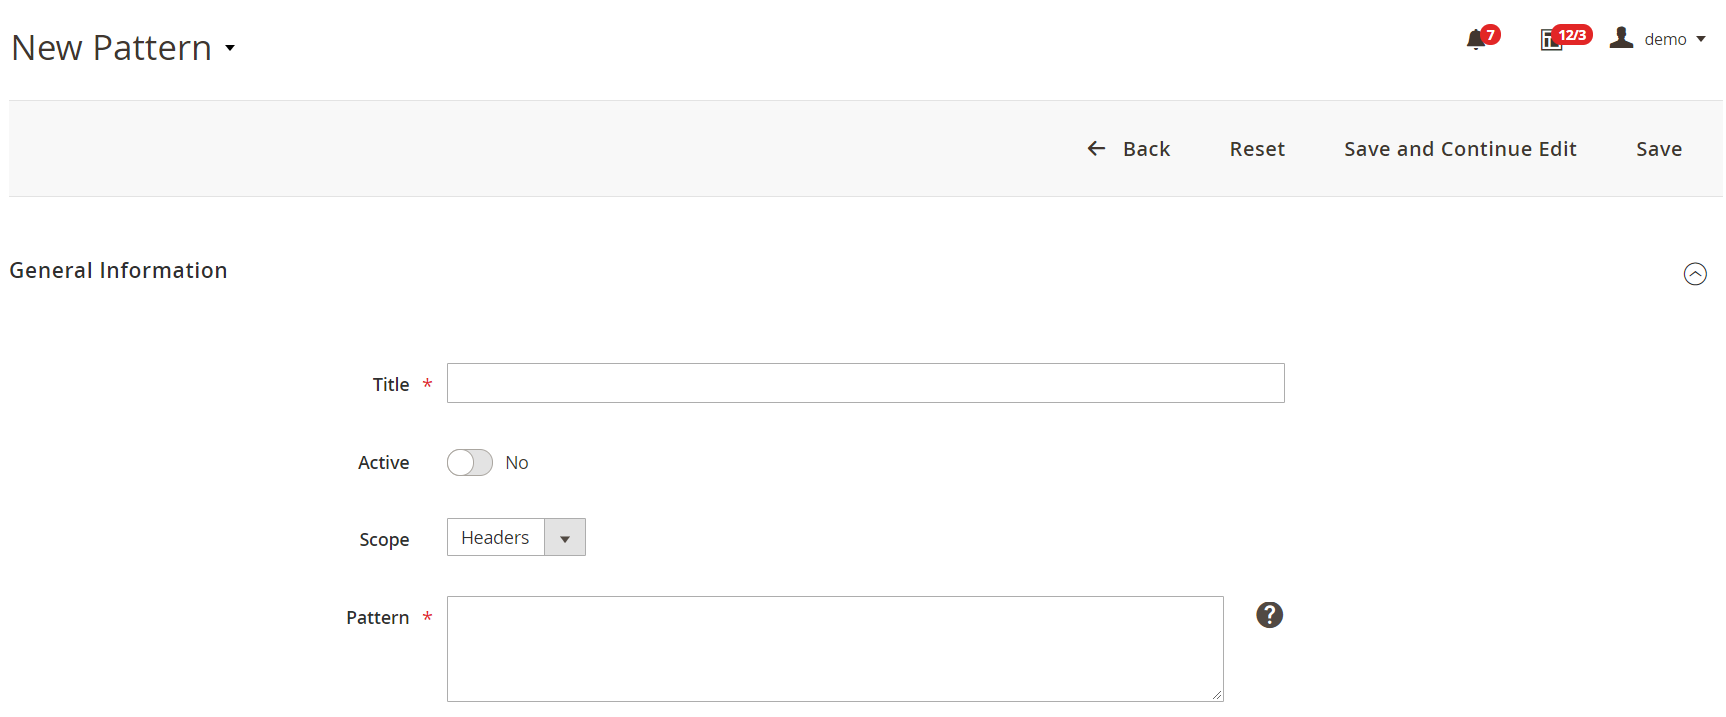
Mirasvit Help Desk MX for Magento 2 and 1 offers reliable protection against SPAM. The Magento extension enables you to create various SPAM patterns so that you can prevent yourself from receiving junk inquiries. Note that it is possible to generate any number of SPAM filters. Created filters are available on the SPAM Patterns grid:

To create a new filter, you should specify its name and status, choose where to apply the filter (Scope: Headers, Subject, Body), and create a pattern.
Workflow Rules
With the help of workflow rules, you can manage the daily routine of your support team according to your requirements. For instance, you can create a rule to automatically close the ticket after 30 days from the last customer reply or set ‘In Progress’ status after the first support team reply. All your workflow rules will be gathered on a separate grid:
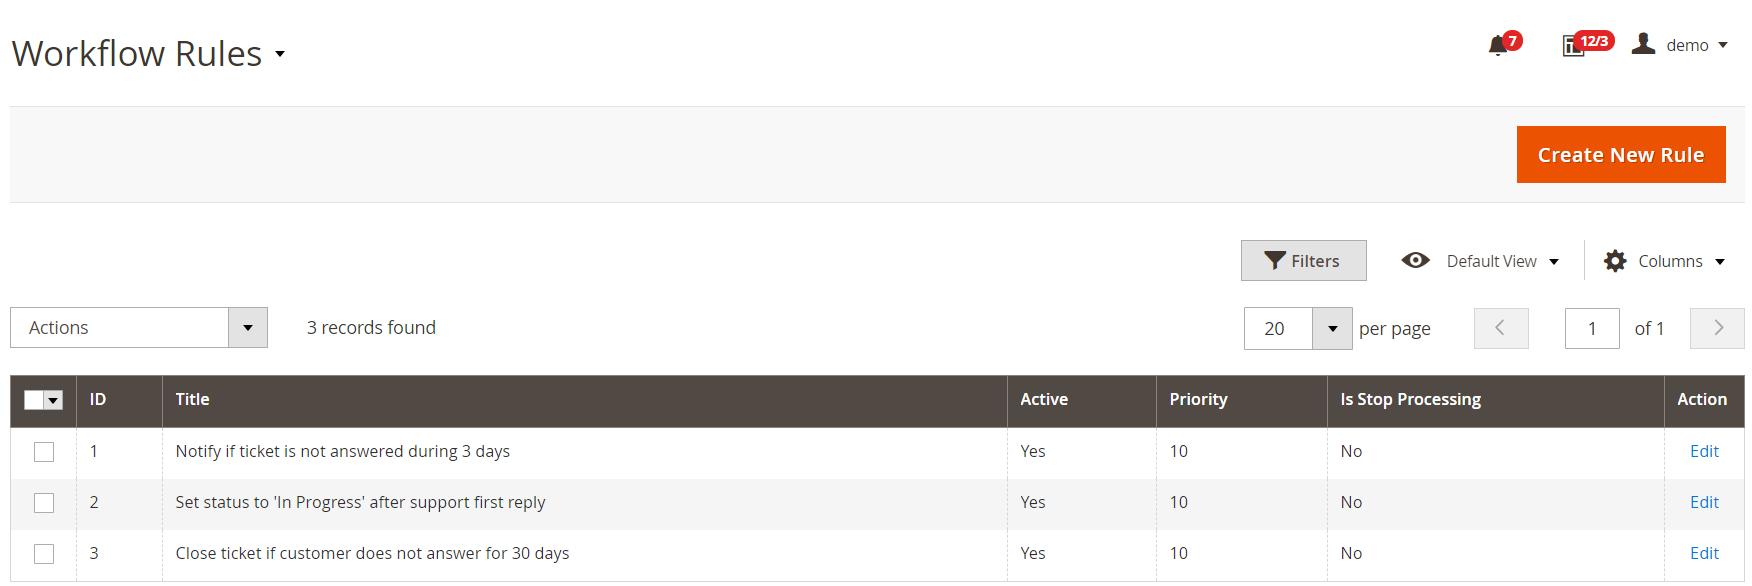
For each new rule, there are 4 sections with settings: General Information, Conditions, Actions, and Notifications. On the General Information tab, you specify a rule name, status, priority, and whether further rules processing should be stopped.

As for Conditions, you choose the event and specify conditions.

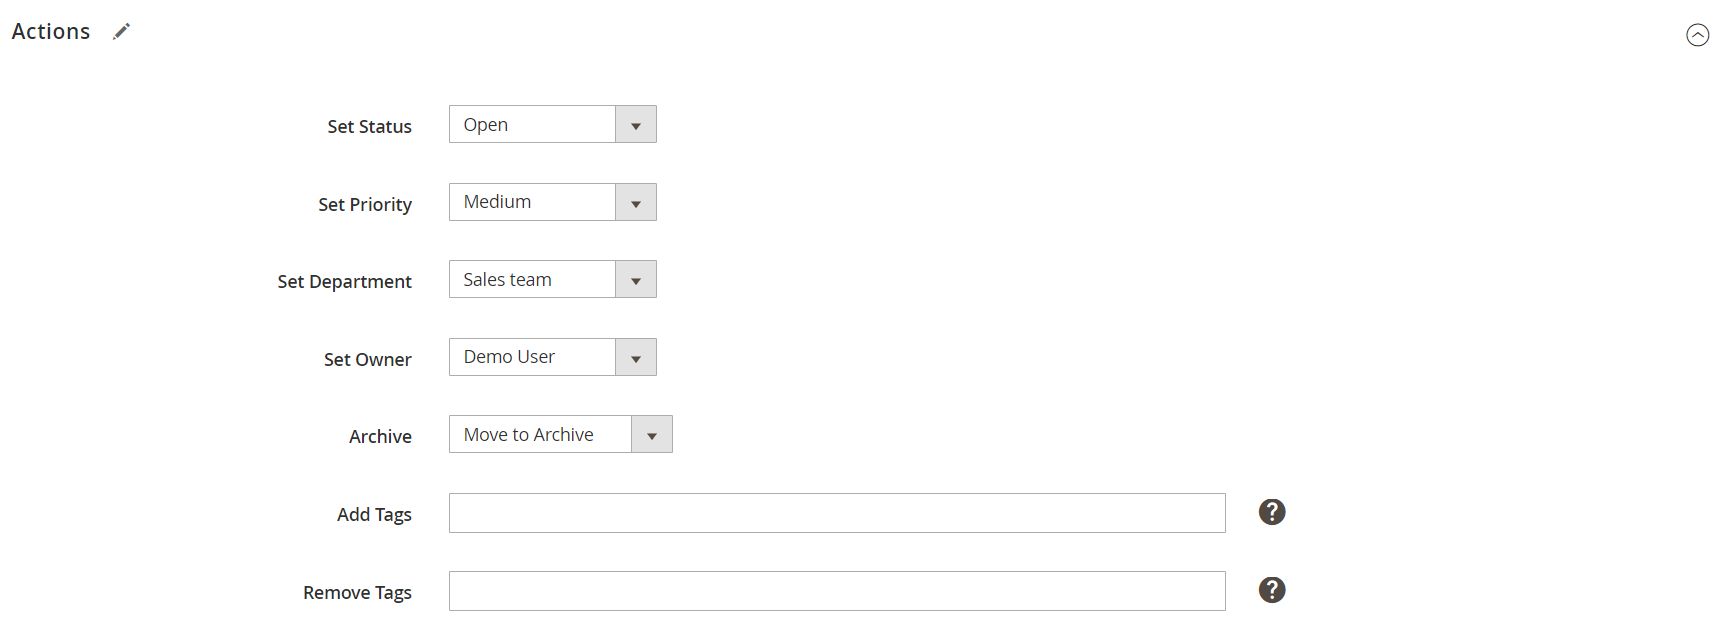
In Actions, you can select status, priority, department, and the owner that will be applied after meeting the rule conditions. Here, you also decide whether to move the ticket to or from the archive, as well as specify tags to be added or removed.
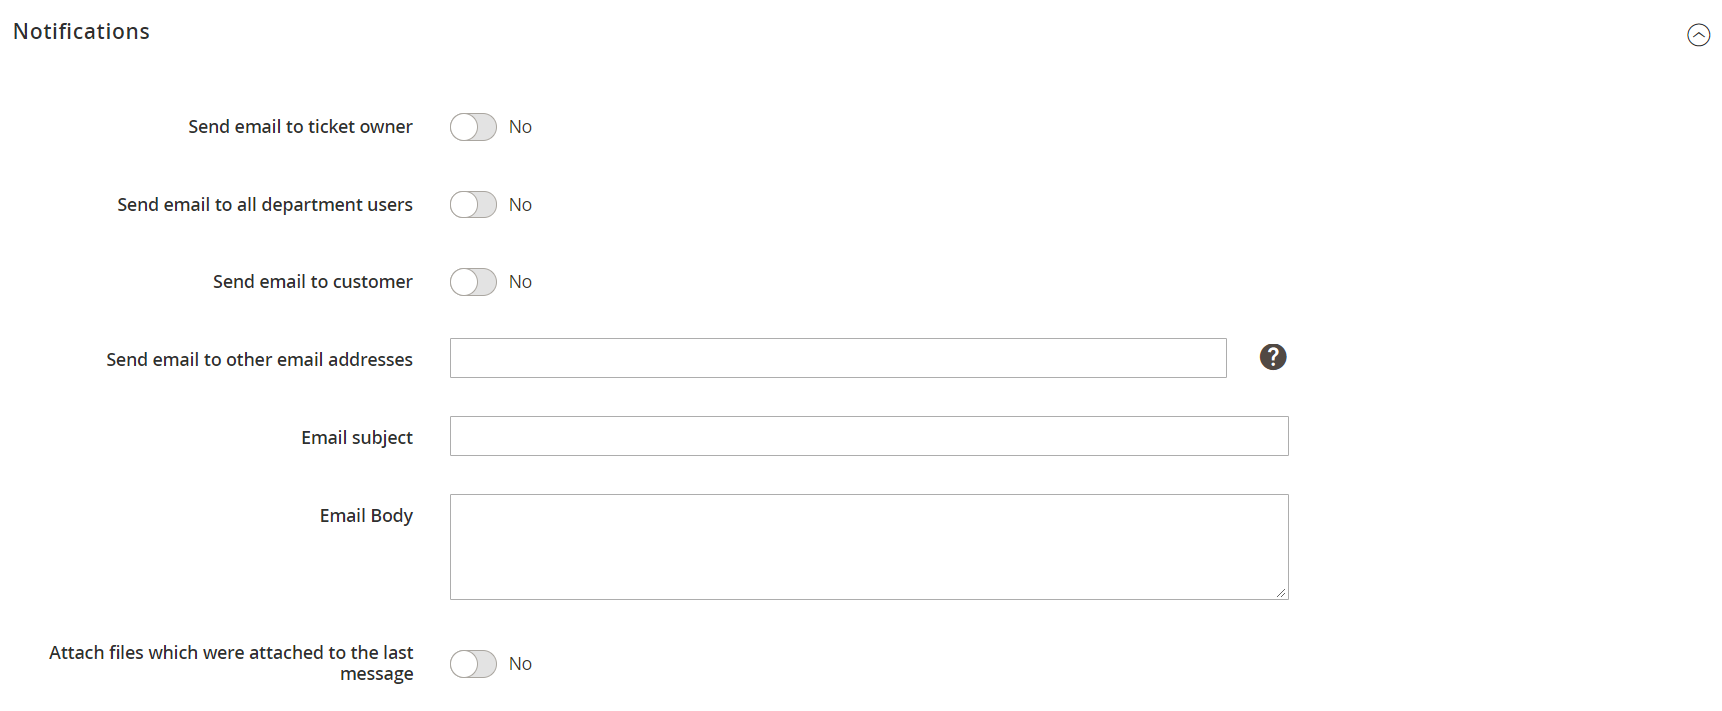
On the Notifications tab, you decide whether to send emails to a ticket owner, all department users, and customer. Besides, the extension lets you add additional email addresses to send notifications. Also, you should enter the email subject and body text here. The last option enables you to attach files that were sent in the previous message to a new notification.
Working Hours
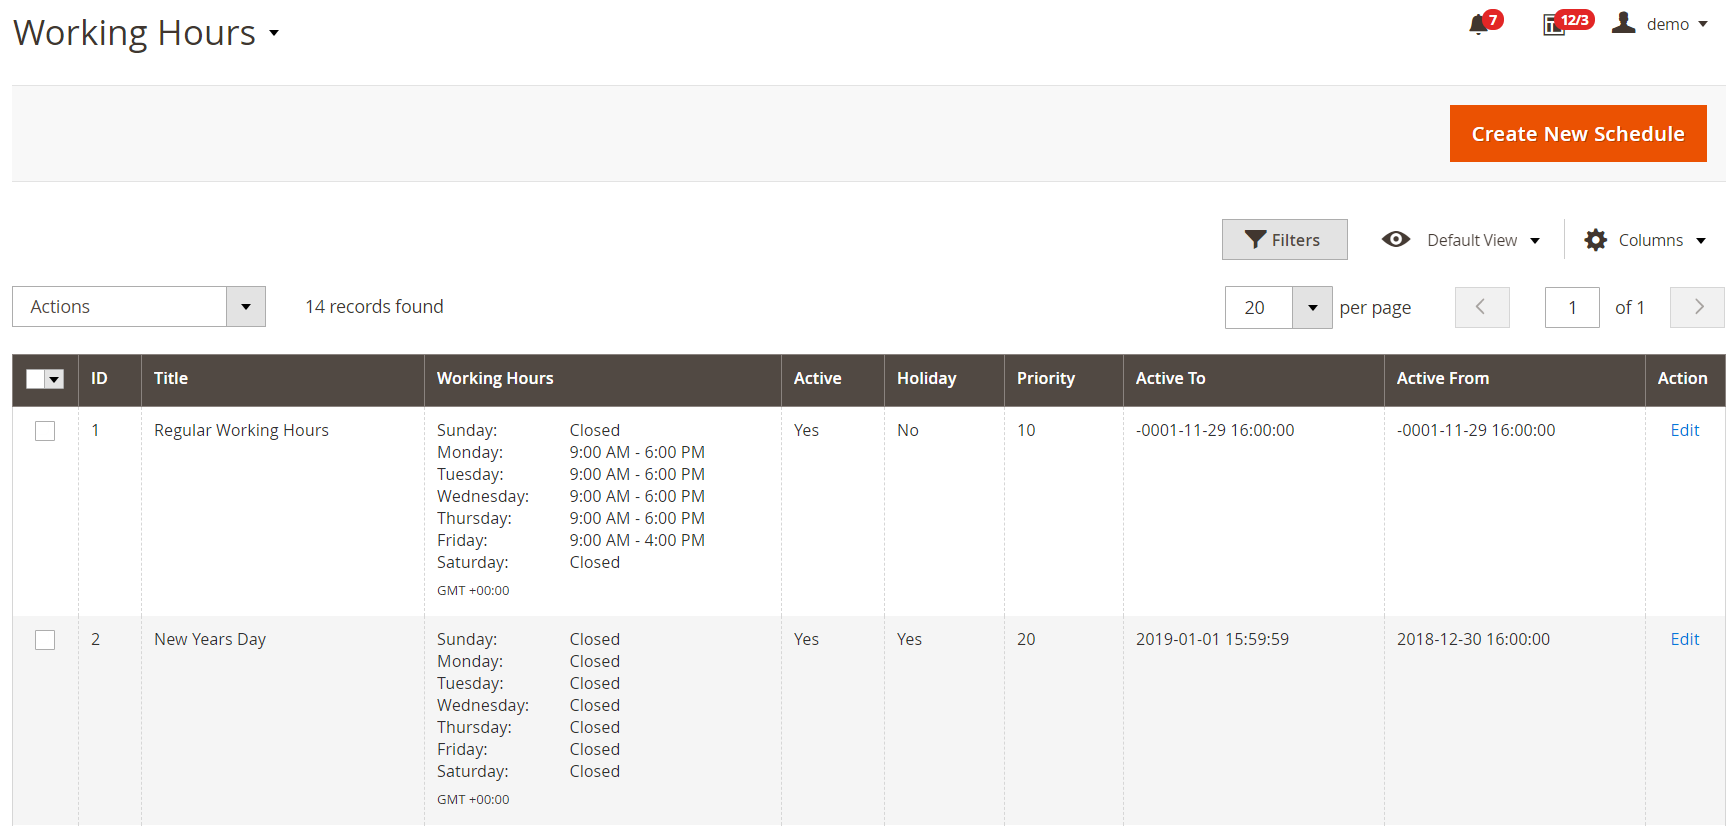
Mirasvit Help Desk MX for Magento 2 and 1 lets you create a timetable for working hours and holidays. All schedules are gathered on the following screen:
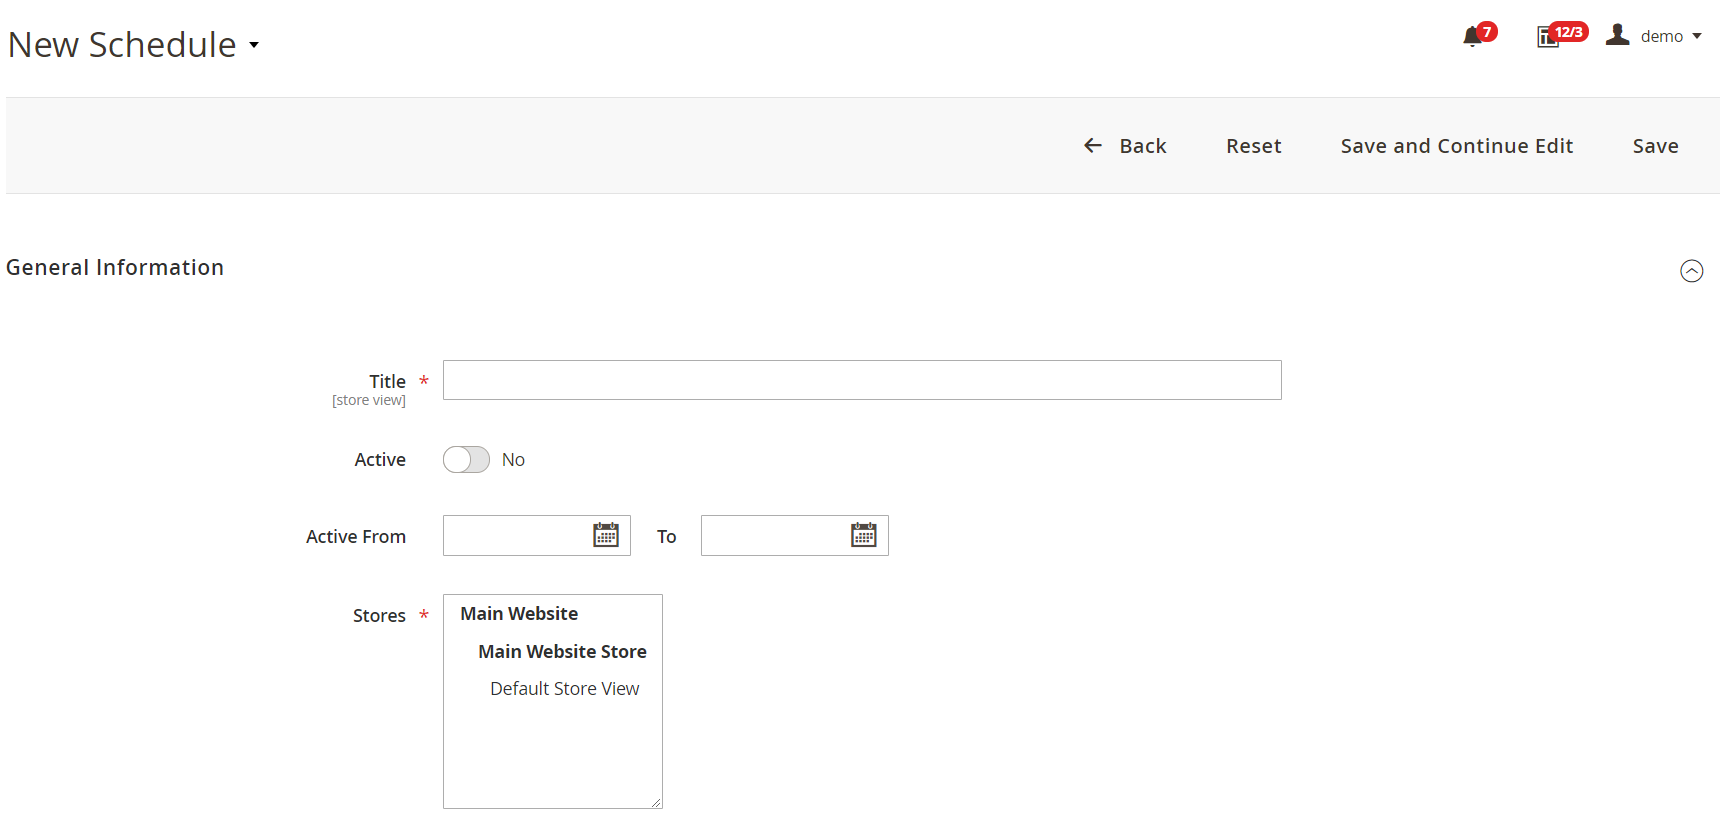
To create a new schedule, specify its title, status, periods of activity (leave Active From and Active To empty for standard workflow), and store view.
Then, set a sort order, relation to holidays, timezone, and working days/hours.
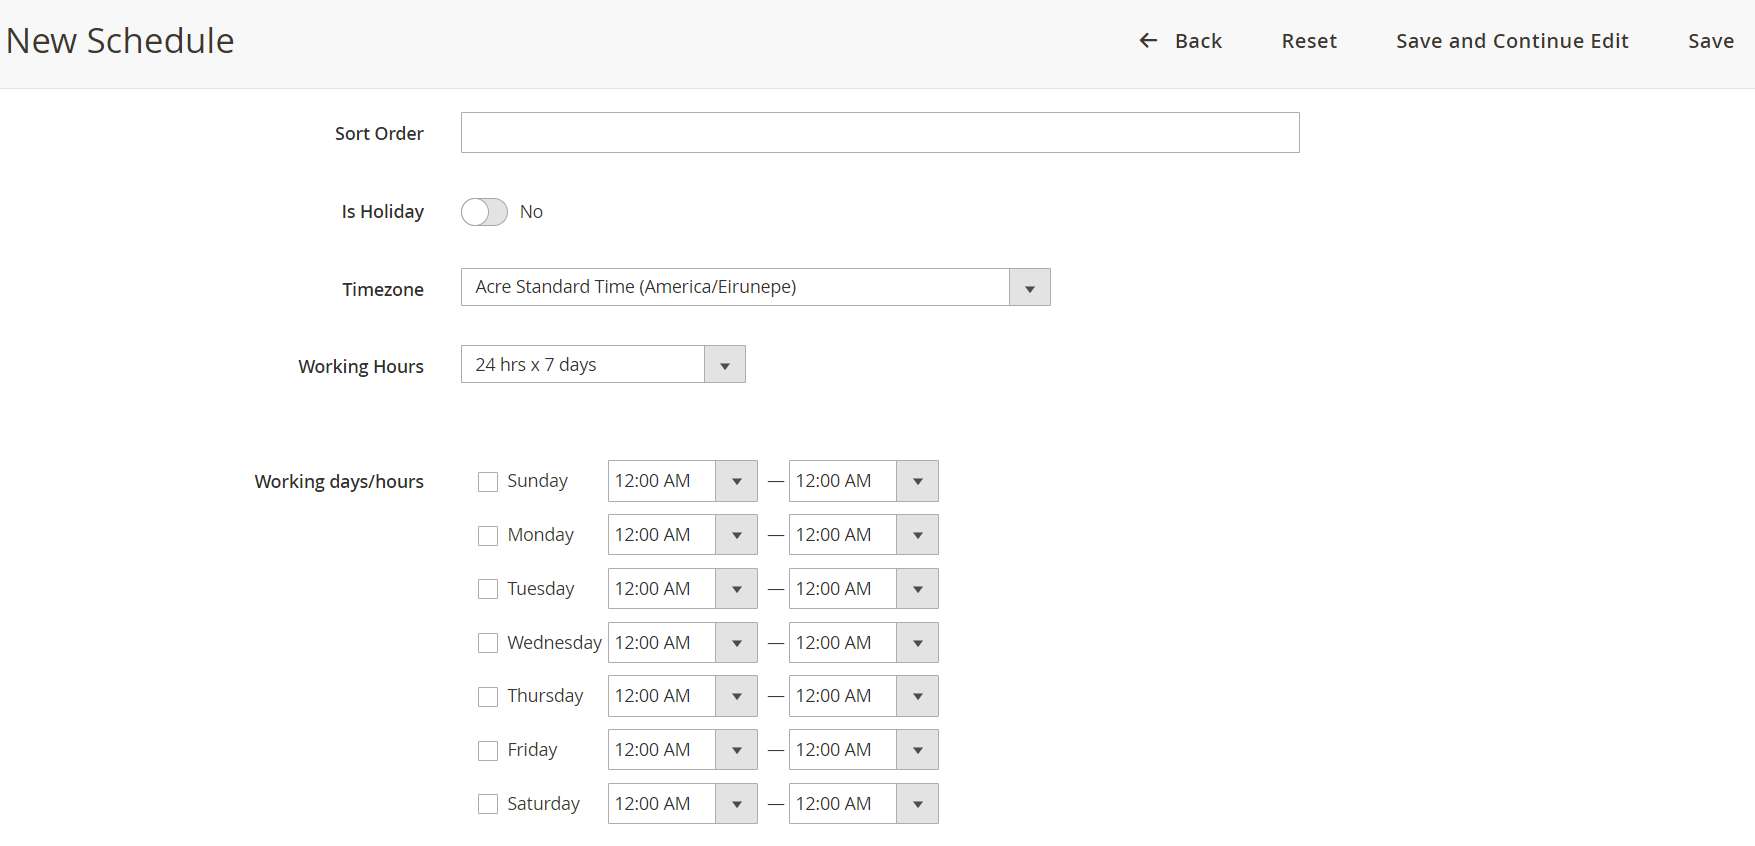
It is also possible to use variables to create open and closed messages.
Reports
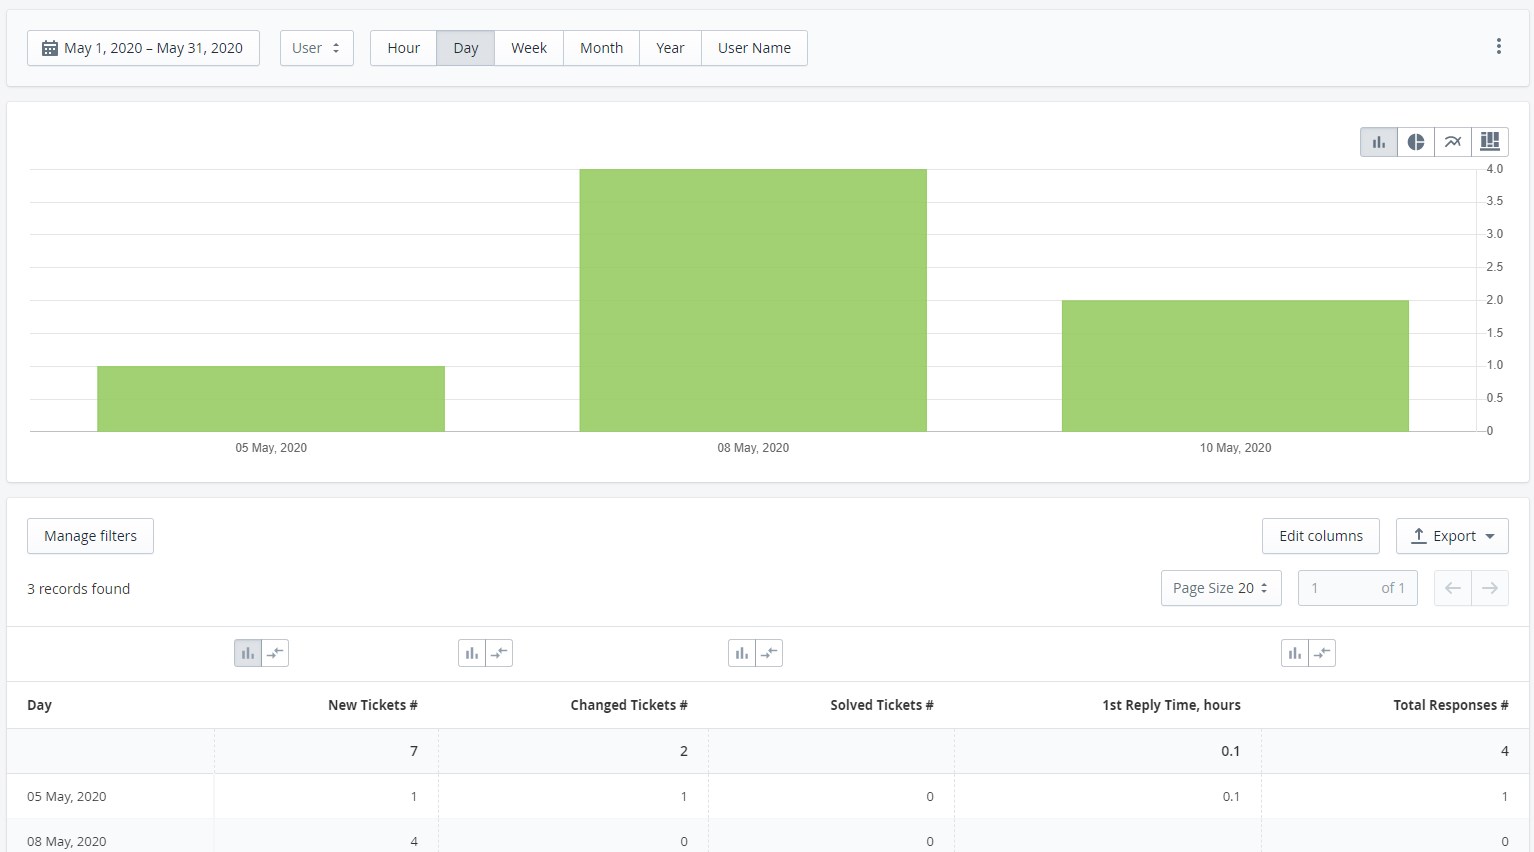
You can view and analyze data related to tickets processing on the Reports page. The screen provides a chart for data visualization and a grid with the columns that include the following information:
- Number of new tickets;
- Number of changed tickets;
- Number of solved tickets;
- Time of the first reply (in hours);
- A total number of responses.
Configuration Settings
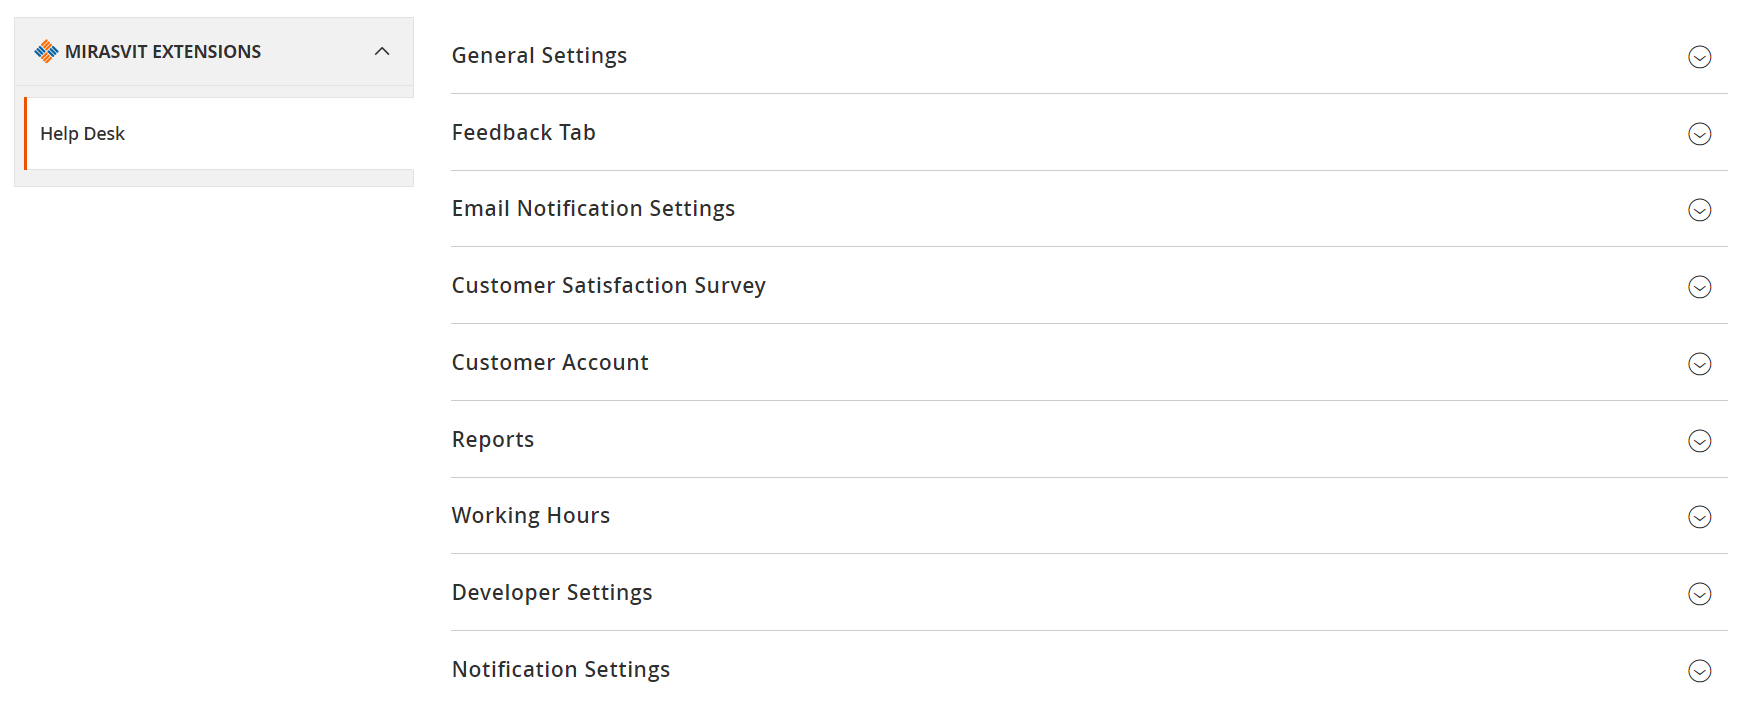
Mirasvit Help Desk MX settings are divided into 10 sections: General Settings, Feedback Tab, Email Notification Settings, Customer Satisfaction Survey, Customer Account, Reports, Working Hours, Developer Settings, Notification Settings, and Extended Settings. Thus, you can apply the most precise customizations to adjust the extension.
Frontend
From the perspective of a customer, the helpdesk screen looks as follows:
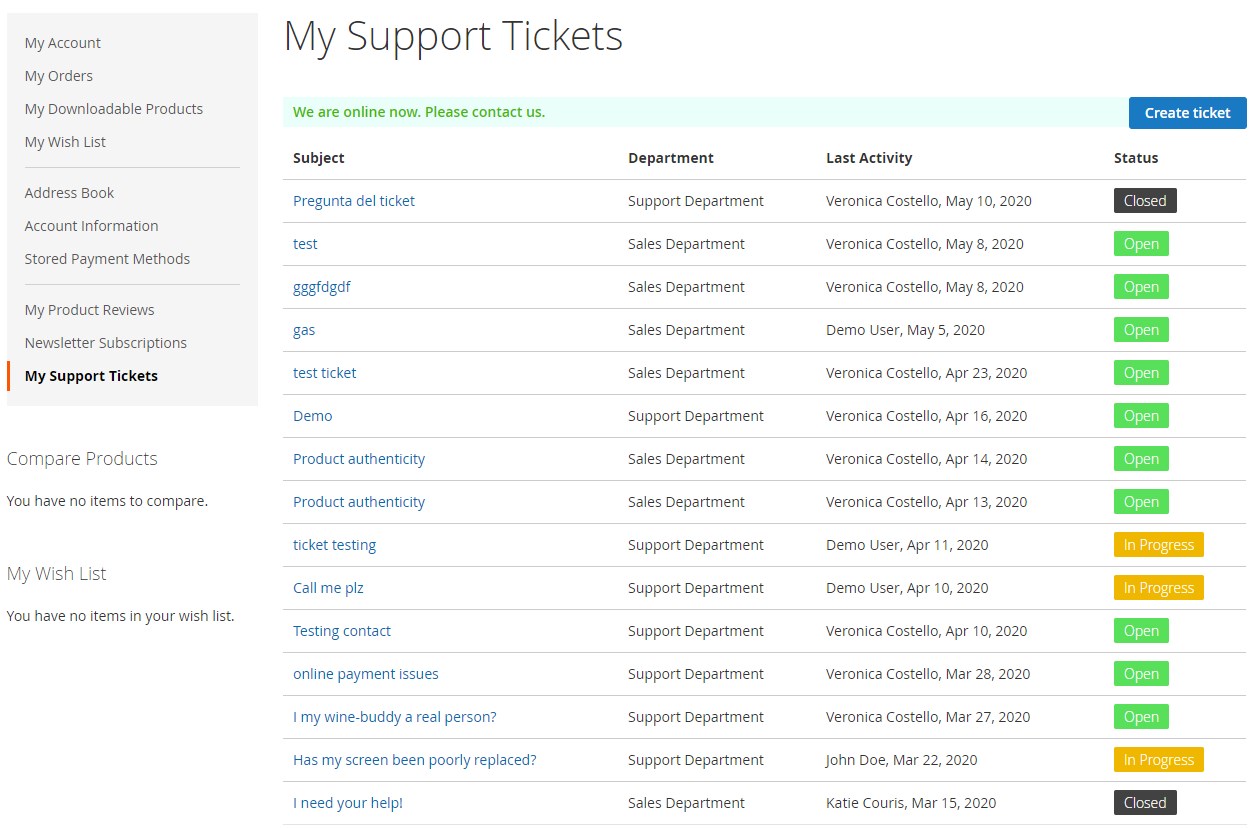
There is a list of all tickets with the information about a department to which each ticket is assigned, last activity, and status.
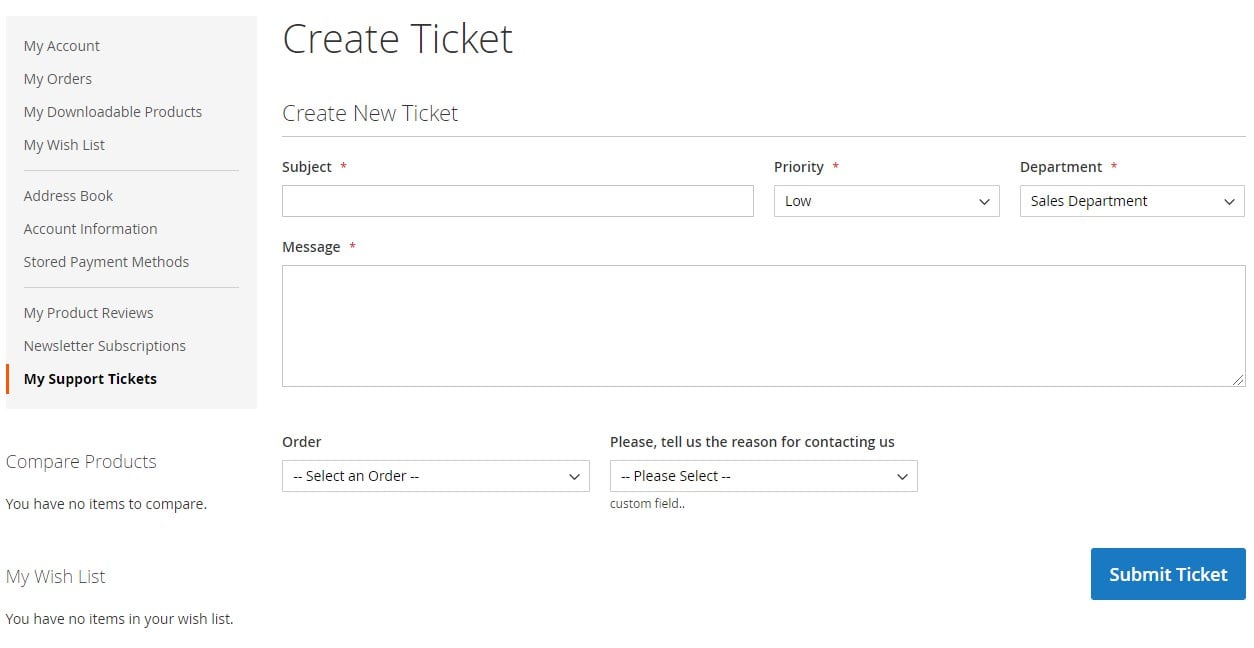
To create a new ticket, your customers need to specify its subject, set priority, select a department, and leave a message. Besides, it is possible to choose a corresponding order and specify additional information in the custom fields.
On each ticket screen, there are such elements as short information related to the ticket, a text field for messages, and communication history.
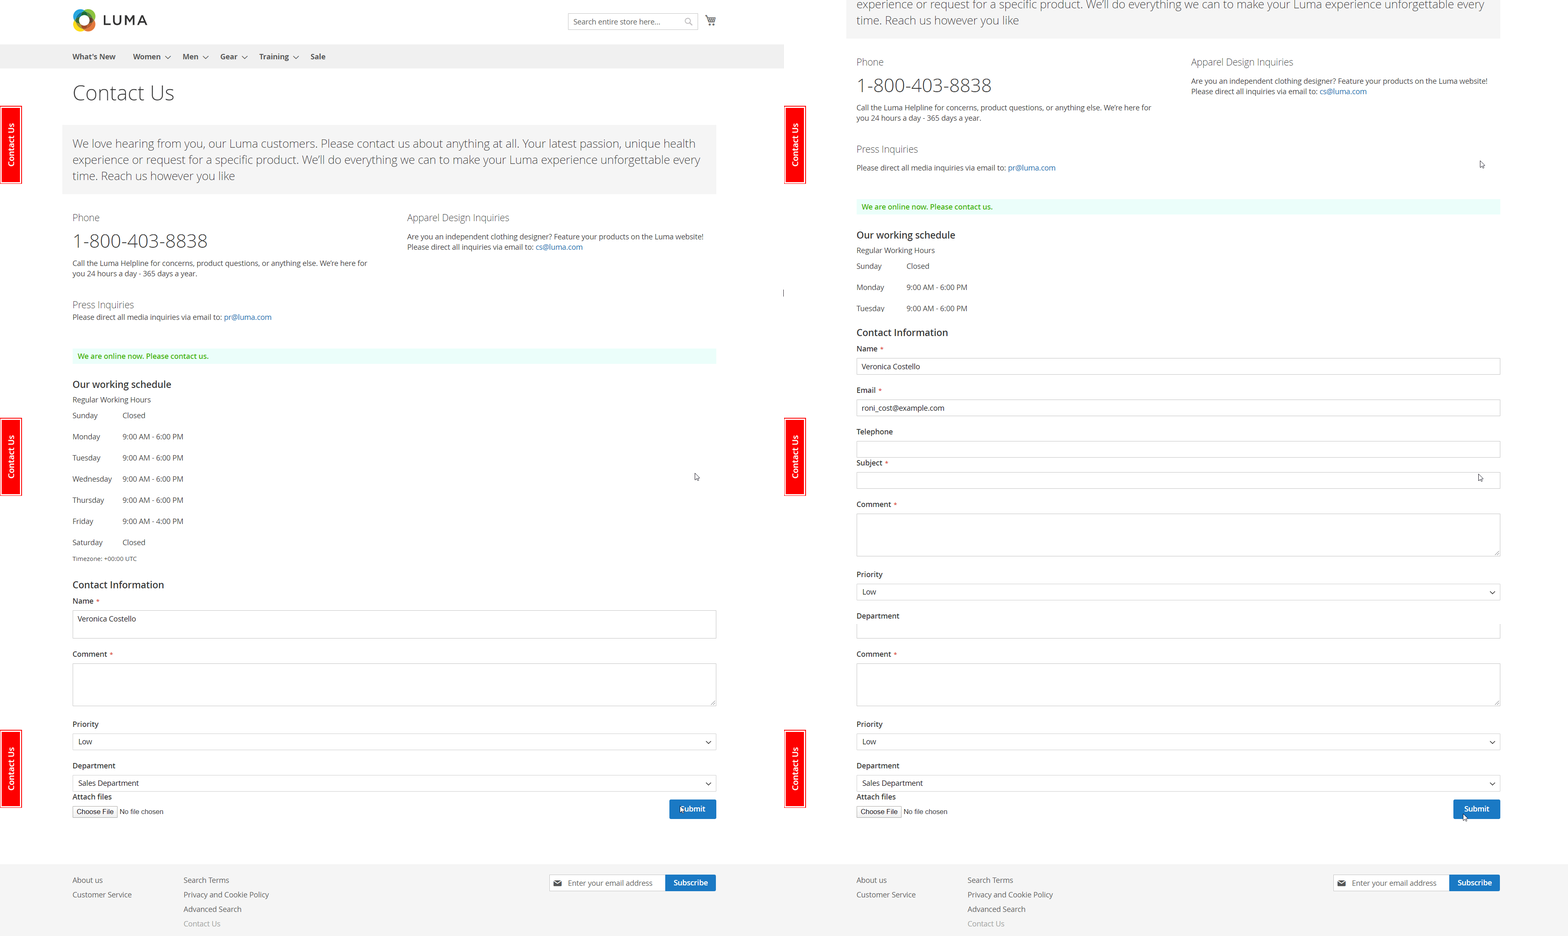
Below, we show you how the Contact Us page looks:
Ticket submission function using the Contact Us tab on the left:
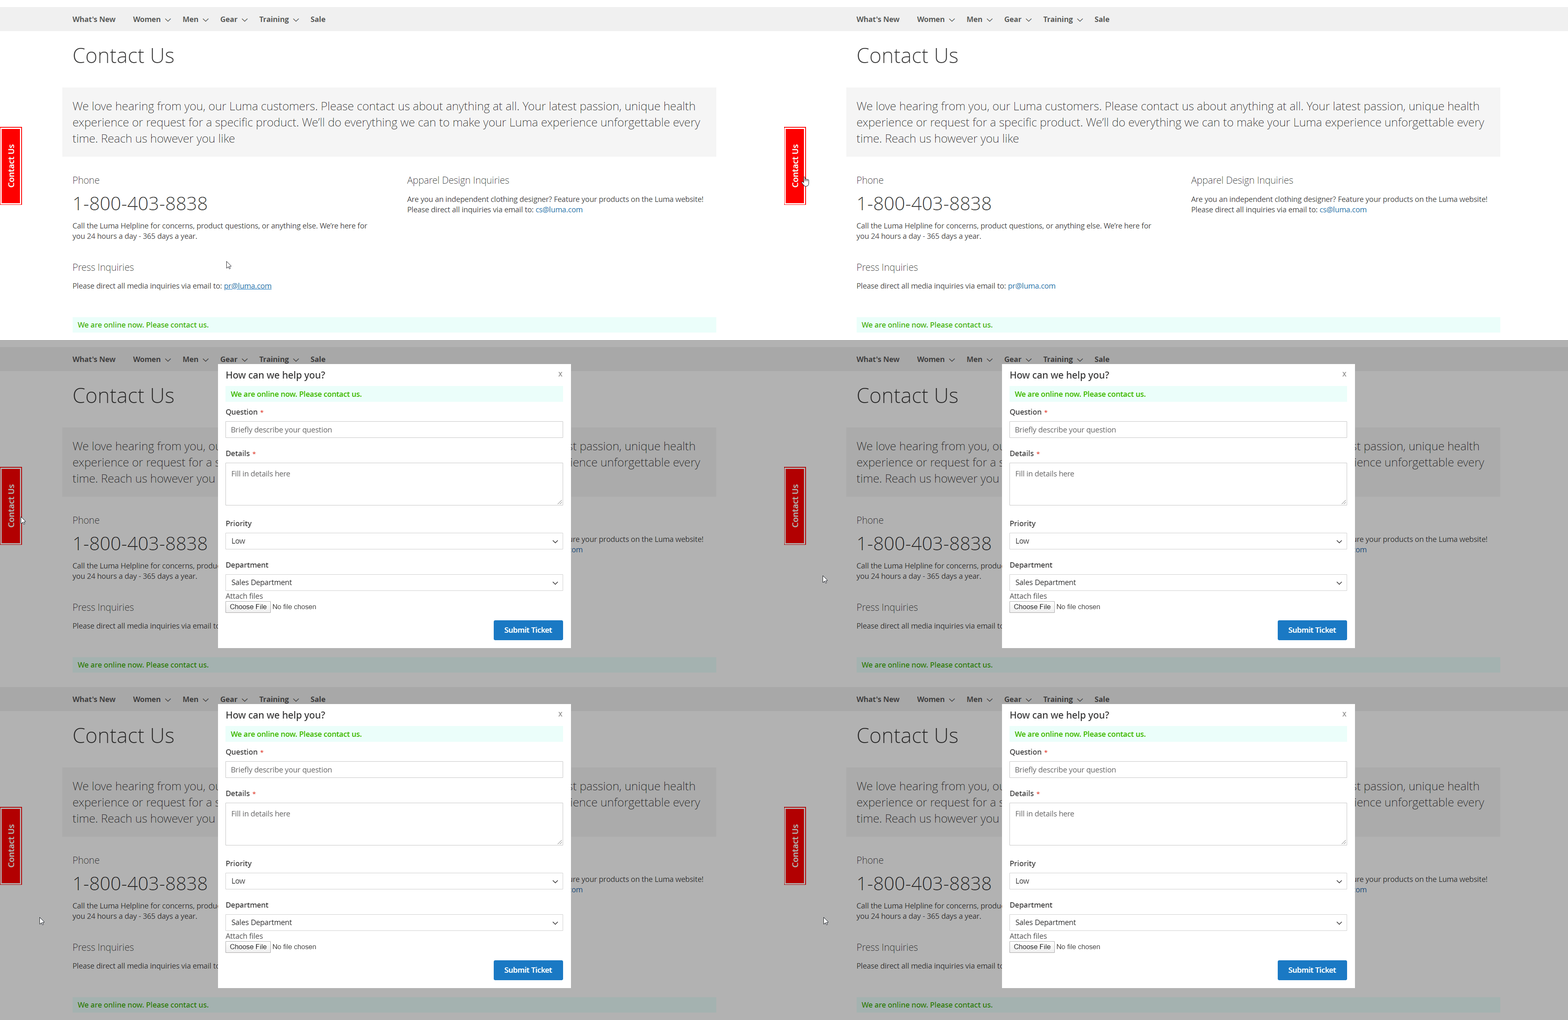
As you can see, Mirasvit Help Desk MX for Magento 2 and 1 offers an intuitive interface, so your customers can quickly get the support they need. They can even set Priority and Department for each new ticket, though you should activate both options in settings. Besides, the ability to attach files significantly improves the way buyers communicate with your admins.
Moreover, the Magento Help Desk module provides customers with simple ticket management, so they can quickly reply or close a ticket. Also, a complete ticket history is always available on the same screen.
As for guest users, they can get help via:
- Contact Us Tab on the left;
- Contact Us page;
- Email sent to the support team.
Final Words
Mirasvit Help Desk MX for Magento 2 and 1 offers a great extension that provides the ability to implement a helpdesk service right on your ecommerce website without any need to utilize third-party platforms. The module costs $169, and you can get it here:


