
How to Fix Invalidated Cache Performance (Response Time) Degradation in Magento 2

In the following material, we talk about the influence of invalidated cache on Magento 2 performance – page response time to be more specific. Since it usually slows down an e-commerce website, we also provide recommendations on how to fix that. So, let’s see how to solve invalidated cache performance issues in Magento 2. You can find more useful tips in this post: Magento 2 Cookbook.

Table of contents
The Issue Explained
According to the official documentation, the problem affects Magento Commerce and Magento Commerce Cloud 2.2.x and 2.3.x. It leads to a slow site response, which none of your customers likes.
Fast responses to the site visitors’ requests are achieved due to cache. Therefore, the invalidated or flushed cache causes long response time since there is no appropriate cache data available in Magento. As a result, the application has to fetch the data from the database. Next, Magento calculates and aggregates the necessary information. Only after that, it can store the data to the cache storage.
Such a complicated process requires additional system resources. Thus, it is not a surprise that the cache generation causes Magento 2 performance degradation, increasing total response time.
Cache Types
Magento incorporates two cache types: internal and external. The former type stores data on the server. It works with such specific data as configuration, product and category details, and so on. As for the latter one, it is usually CDN or Varnish. For instance, Magento Commerce Cloud utilizes Fastly CDN. The Magento 2 external cache stores already generated full pages, such as categories and products, etc. If any of these caches are flushed, the system has to regenerate it back, reducing the performance and degrading page response time.
How to Find Invalidated Cache in Magento 2
Now, when we’ve explained the importance of cache, it is time to describe where to look for a flushed cache in Magento 2. As you might have already guessed, the corresponding information is available in the debug.log file. Follow the steps below to find an invalidated cache in Magento 2:
- Open your debug.log file. It is situated under the following path:
1<install_directory>/var/log/debug.log - Now, look for “cache_invalidate” messages.
- Check what tag is specified in each message.
The last step requires additional explanation. Each tag indicates what the cache was flushed. However, there may be no particular entity ID specified. Such invalidated cache usually becomes a source of a significant response time degradation in Magento 2. Below, you can see several examples of tags with no IDs:
- cat_p – the entire catalog product cache is flushed;
- cat_c – the entire catalog category cache is flushed;
- FPC – the entire full page cache is flushed;
- CONFIG – the entire configuration cache is flushed.
Even if one of them is invalidated, the response of your website slows down dramatically. However, if there is an entity ID in the tag, it means that the cache for a particular product/category was flushed. For instance, category_product_15044 on the image below shows that the cache for this product category was invalidated.
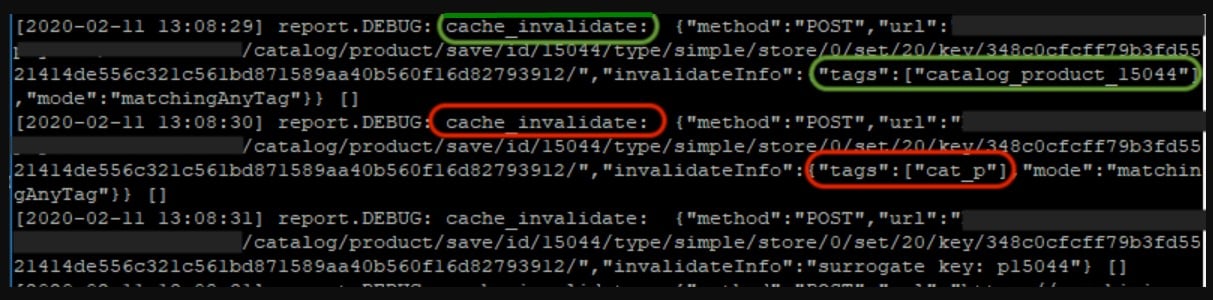
At the same time, there is a record that contains the cat_p tag. It means that the entire Magento 2 catalog product cache was flushed. It may become a potential source of performance issues. However, flushing cache for a particular product or category would not increase response time significantly.
How to Fix Invalidated Cache Performance (Response Time) Degradation in Magento 2
Several events may invalidate the cache in Magento 2. First of all, it is a full reindex. Besides, flushing cache from CLI is often a reason for response time degradation. Therefore, it is recommended to avoid cache flushing from Magento CLI. At the same time, you can configure indexers to Update by schedule instead of Update on save mode. Here is how to do that:
- Visit System -> Tools -> Index Management screen of your admin.
- Select all indexers.
- From the Actions dropdown, choose the Update by Schedule indexing mode.
- Click Submit.

That’s it! For further information, follow this link: .
Related posts
 How to Import Customers & Customer Addresses to Magento 2
 Adobe (Magento 2) Commerce and Cloud (Enterprise Edition) Specific Features
 A Complete Guide to Shopify Customer Import
 Magento Open Source and Adobe Commerce 2.4.7 Release Notes
 Reputon Amazon Importer Review: How to Connect Shopify to Amazon in a Few Clicks
 Amasty ChatGPT AI Content Generator for Magento 2
 Magento 2 B2B Company Guide: Revealing Company Structure & Import
 Magento 2 Release Notes