
Magento 2 Customer Attributes Extension by Mageplaza

It is not a secret that the more valuable information a store can collect from customers, the more deeply they can understand customers’ demands, behaviors, and expectations. As a result, it is easy and effective for store owners to develop various ideas related to customer care service and marketing strategies to improve customer satisfaction.
Unfortunately, the registration fields of Magento 2 Default hardly enrich you with the necessary information as they are only limited to name, date of birth, and tax number. Hence, it is time for you to install the Mageplaza Customer Attributes extension that allows you to add multiple customer attribute fields on the registration form or account edit page and obtain more information.

Table of contents
Why choose Mageplaza Customer Attributes for Magento stores?
Create an unlimited number of customer attributes
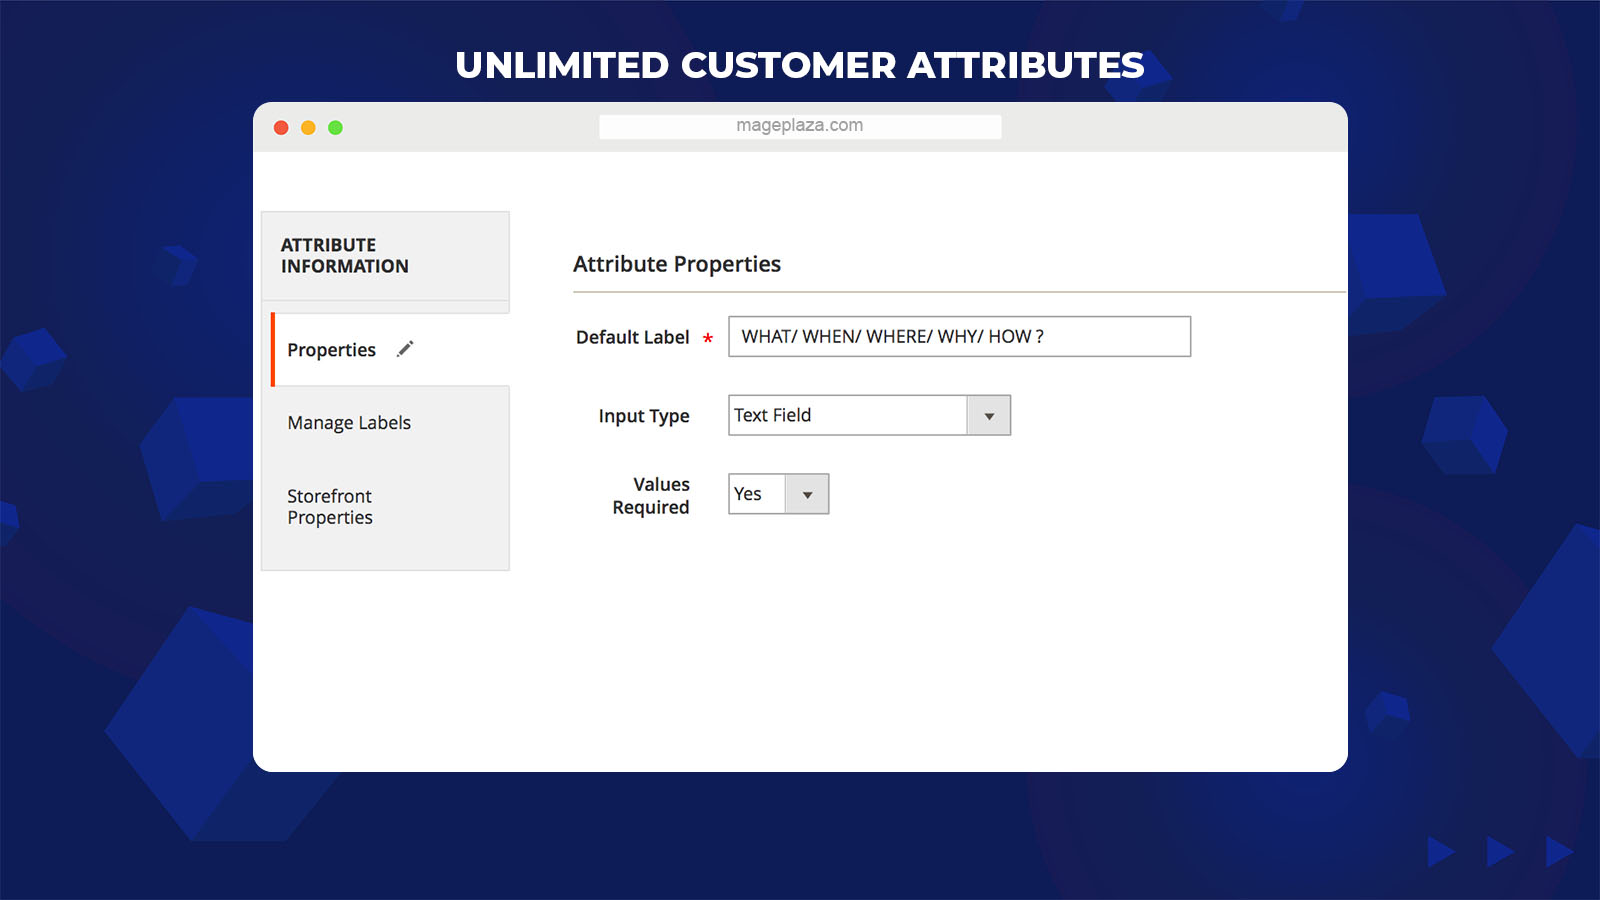
The Customer Attributes module by Mageplaza allows store admins to create extra customer attribute fields without limitation. Admins will find it simple to add these fields to the registration form and customer account edit page, which helps store admins get the valued information from newly registered customers and existing customers.
Also, admins can feel free to set up the attribute label, types of input, and other adaptive properties to a field.
Support 11 input types of customer attributes
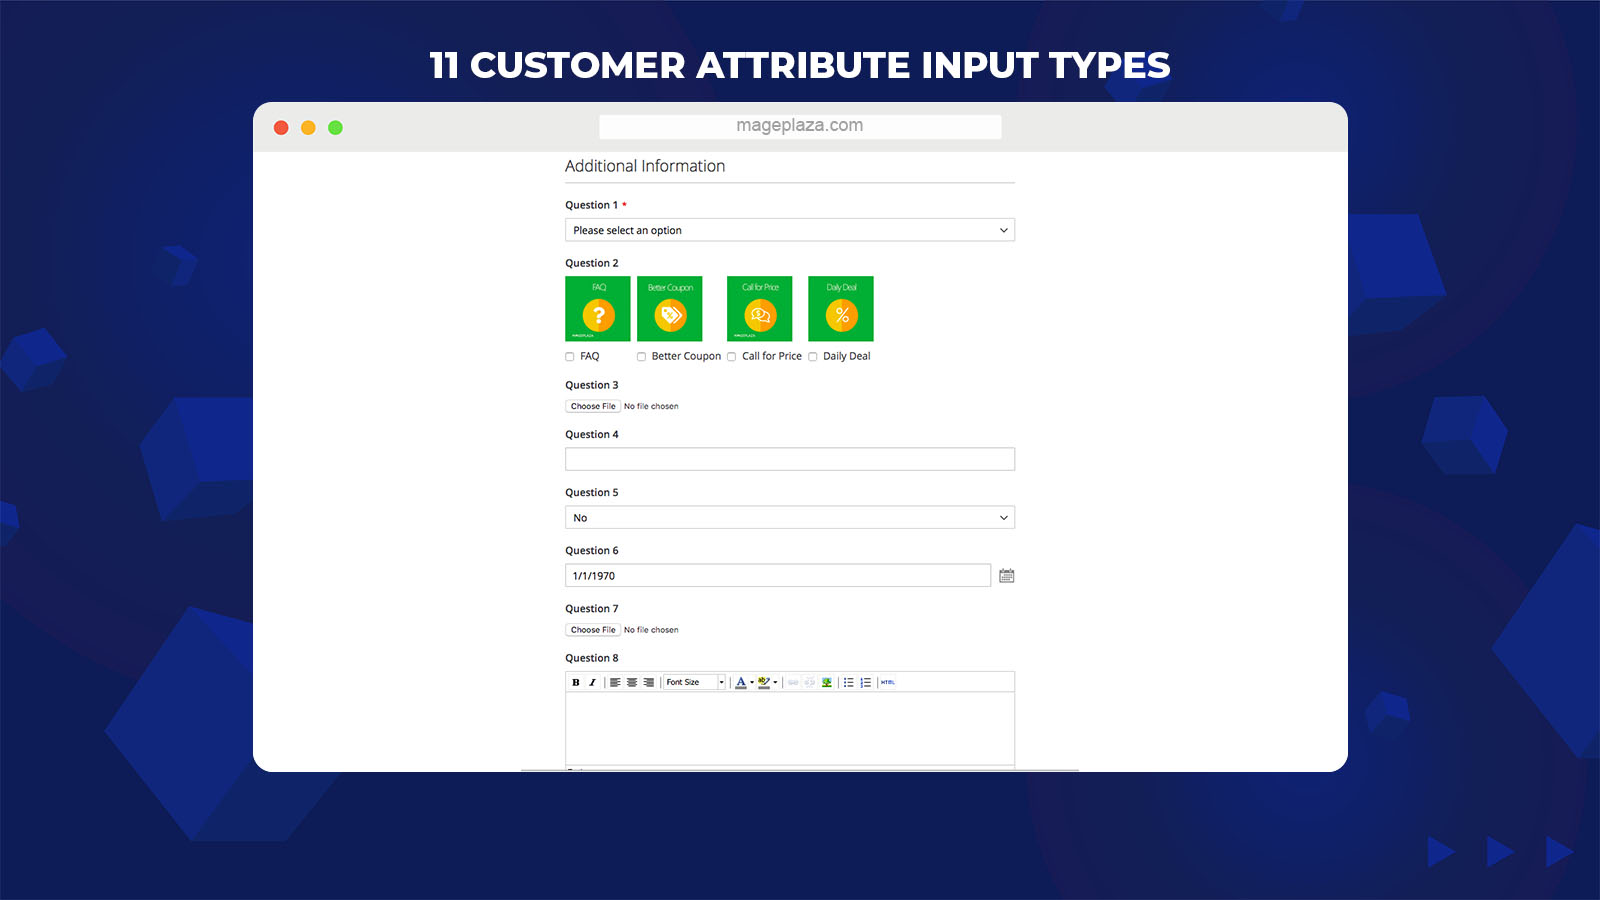
This module supports store owners to choose from a list of available input types for customer attribute fields. With the help of up to 11 options, store owners can design open or closed questions, upload additional files, and attach several images.
- Text Field
- Text Area
- Date
- Yes/No
- Dropdown
- Multiple Select
- Single-Select with image
- Multiple-Select with image
- Media Image
- Single File Attachment
- Content
This diversity provides the flexibility to collect customer insights that suit most types of products, types of businesses, and store owners’ purposes.
Allow both admins and customers to manage attributes
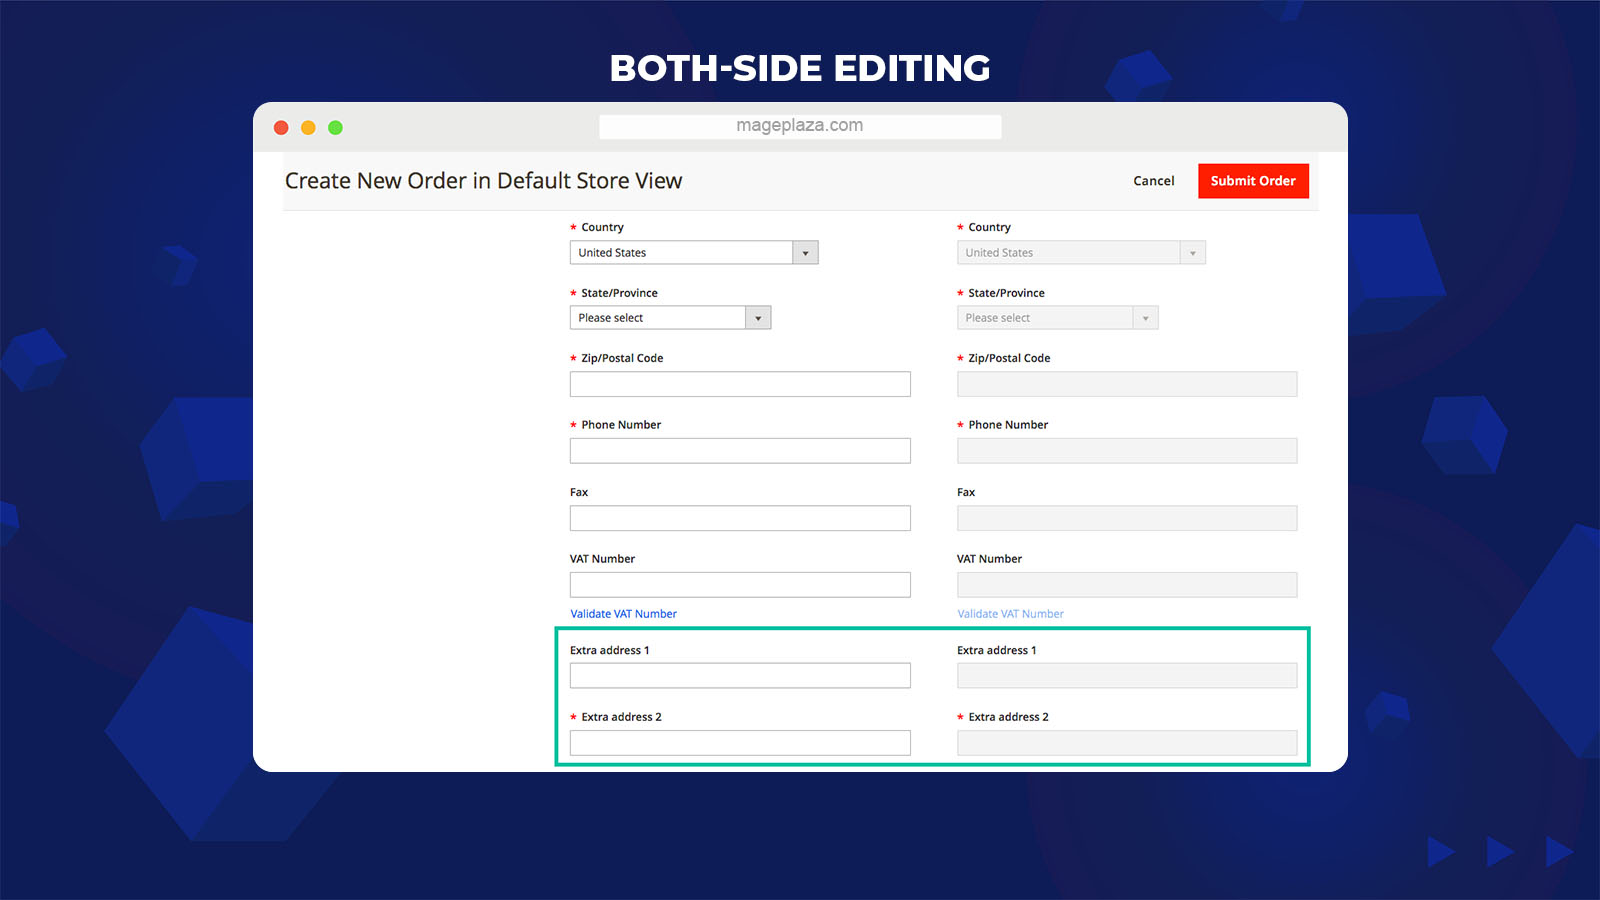
Both store admins and customers can manage and edit the information, which supports them to be active in submitting and collecting customers’ information. With customers, they can freely edit their attributes data in the Account Information section and their address attributes included in the Address Book section if any changes are possible.
Meanwhile, admins can view all of the customers’ additional information and edit them with ease from the admin panel. Once the attributes are modified, the information will be instantly updated in relevant sections on the frontend. Moreover, they can create a new customer account and fill in the attribute fields similarly.
Set input validation for customer attribute fields
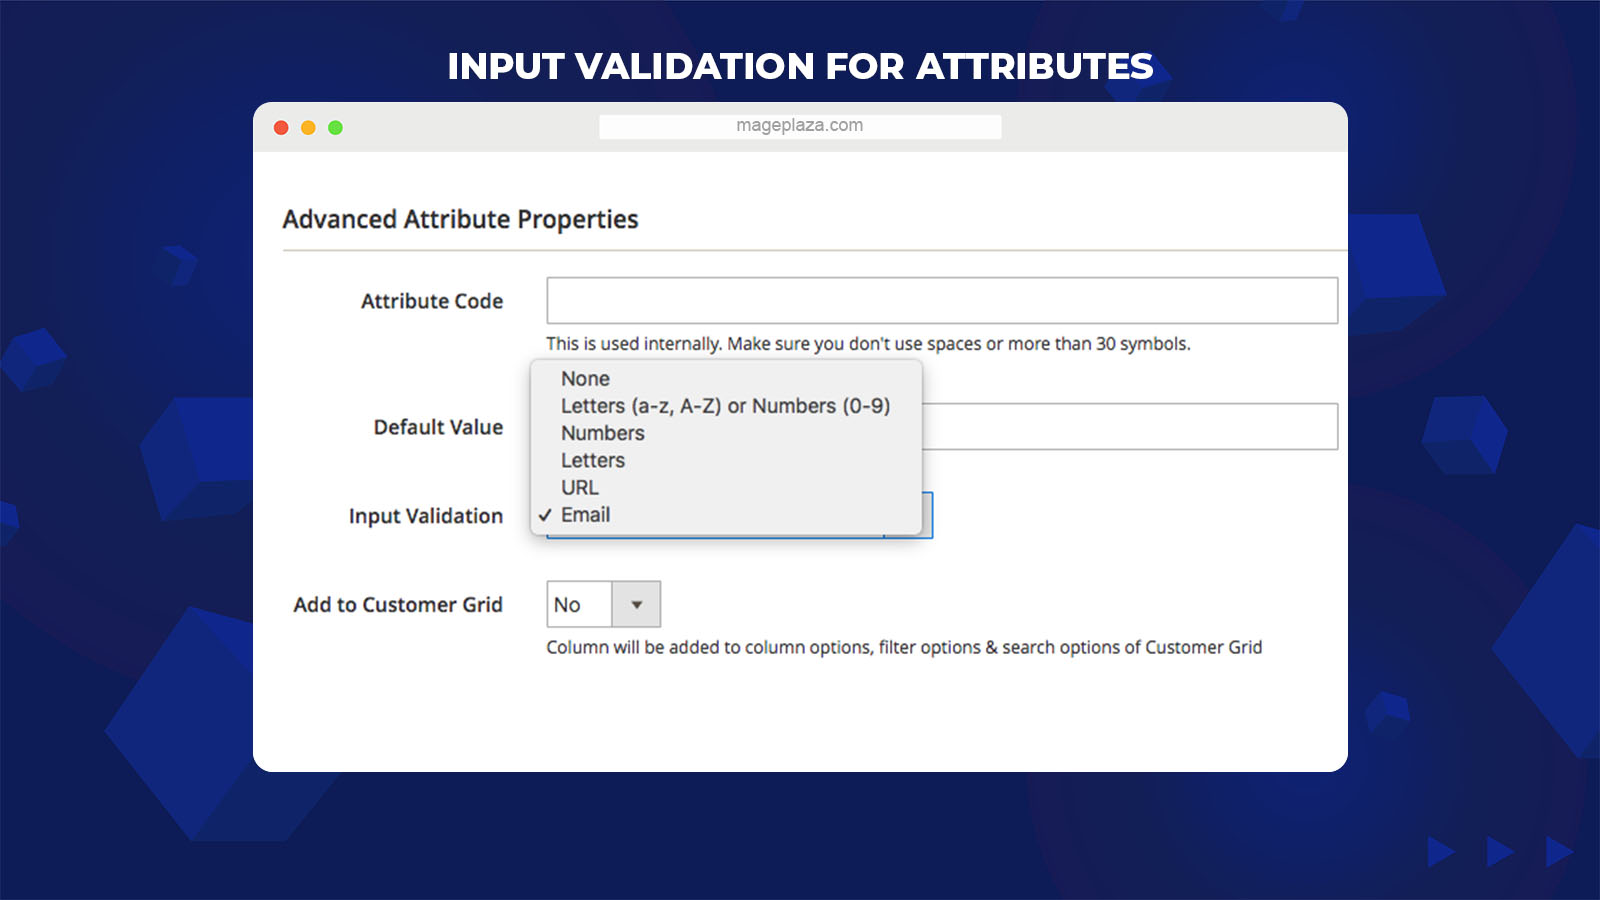
One of the advanced features of the Customer Attributes extension is the input validation, which assists store admins to prevent improperly entered data in the system. Admins will set up the parameters for automatic data verification with which customers enter the fields, including number, letter, URL, and email. As a result, store admins can obtain a great deal of useful and meaningful data for their upcoming campaigns. For example, customers are required to enter the “@” character (such as mageplaza@gmail.com) when it comes to the email address field.
Work effectively with One Step Checkout by Mageplaza
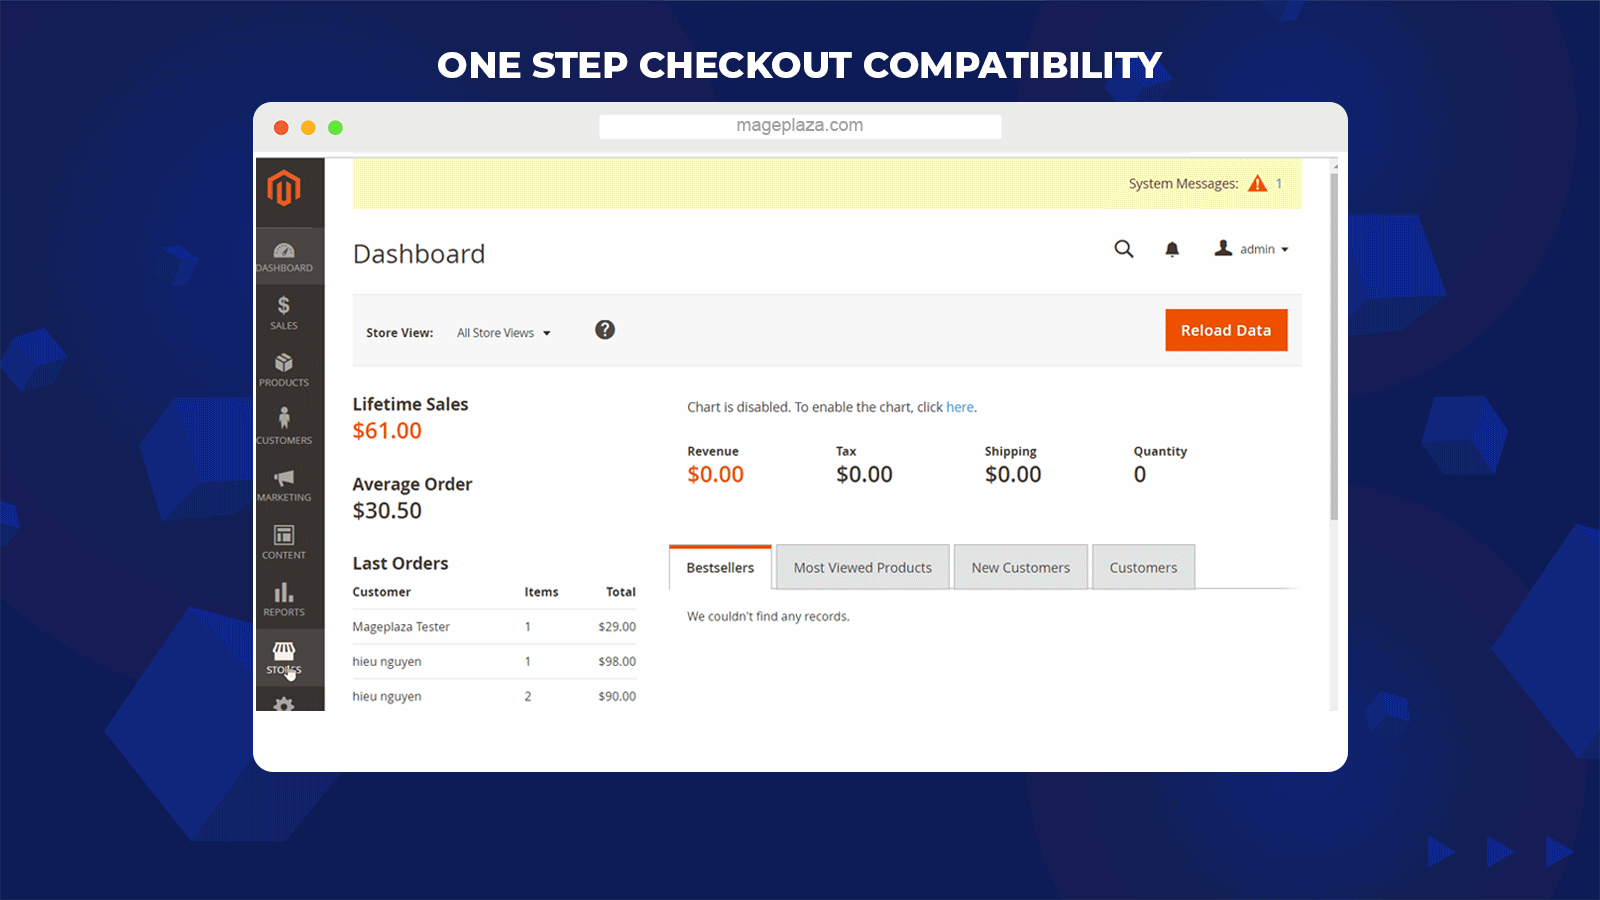
This module is properly compatible with Magento 2 One Step Checkout module by Mageplaza, allowing store admins to add the customer attributes to the checkout page right from the backend.
Admins can collect the necessary information through attribute fields during checkout to process the orders faster. Meanwhile, customers can conveniently leave their information to stores in a one-page checkout form without being redirected to other pages, which avoids cart abandonment and enhances their shopping experience.
Extra features
- Priority settings: From the admin panel, admins can easily set the display order of customer attributes in which the smaller the number is, the higher the order can be.
- Support management grid: Admins can view, manage, and edit all of the attributes created in the customer grid and sales order grid with ease.
- Export the attribute data: This module allows store owners to export the customer attribute data by standard export functionality of Magento.
- Configure visibility possibility: Store admins can set the attributes available based on customer groups or form types.
- Allow files uploading: Enable customers to upload additional files or images to the customer attribute fields.
- Create multiple dependent attributes: Allow store admins to manage the display of some attributes depending on other attributes.
Backend
To start creating new rules from the backend, you need to go to Customers > Attributes.
Customer
You can follow the below steps if you want to add new customer attributes:
- Step 1: Fill full information about customer attributes into the Properties tab.
- Step 2: Enter titles that you want to show instead of Attribute name in the Manage Labels section.
- Step 3: Fill the information into the Store Properties section to display the attributes at the position you want.
Step 1: Fill full information about customer attributes in the Properties tab
You can go to Customers > Attributes > Customer from the admin panel and click on the “Add New Attribute” button.
Attribute Properties
- Default Label: This is a required field that forces you to enter the name for attributes. If you leave it blank, a notification will be shown: “This is a required field.”
- Input Type: Choose among the variety of attribute input types, including:
- Text Field: Display the extra “Input Validation” field to verify the value entered in the “Default Value” section.
- Text Area: Show the “Default Value” section under the text.
- Date: Display the Calendar box, which allows customers to click on the Calendar icon and choose the date.
- Yes/No: The “Default Value” will show two options for selecting: Yes or No.
- Dropdown: Customers can choose one among many options set in the format of dropdown from the admin panel.
- Multiple-select: This field allows customers to choose multiple options at the same time.
- Multiple-select with image: The extra “Image” columns are available in the Manage Options section, allowing customers to simultaneously select many images.
- Single-select with image: Customers will choose one image from the Image columns in the Manage Options section.
- Media Image, Single File Attachment: These types support customers to upload the image or file attachment by clicking on the Choose File button. Besides, it is possible to limit the file size and file formats in the Maximum File Size and Allow File Formats, respectively.
- Content: Customers can feel free to enter and edit the text.
- Value Required: Choose Yes if admins require customers to fill in the attribute fields and vice versa, choose No if admins want these fields to be not needed. If it is a required field, an icon * will show in the left corner of the attribute.
Manage Options
This section only displays when the Input Types are set as Dropdown, Multiple-select, Multiple-select with image, Single-select with an image.
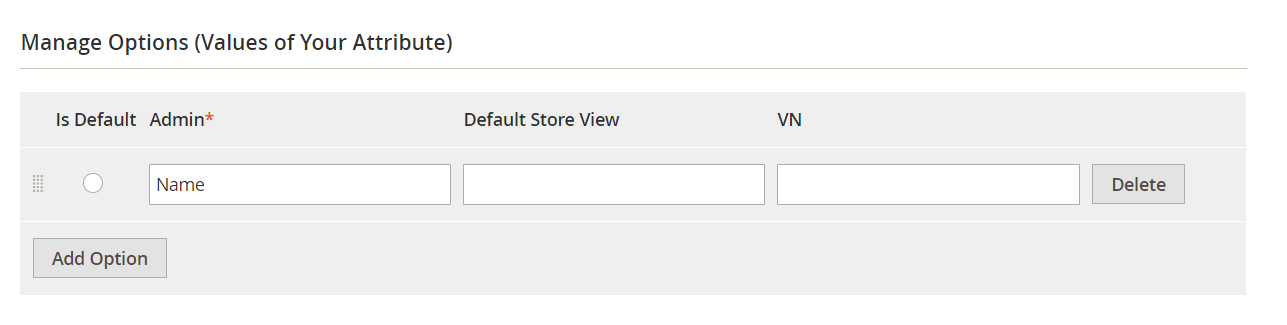
- Click on the “Add Option” button to add options that will display along with the attributes. If you want to remove any options, choose the “Delete” button.
- You can fill the title into the Store View field to replace that option.
Advanced Attributes Properties
- Attribute Code:
-
- Enter the attribute code for internal use. Each code must be unique with no space and less than 30 characters.
- If you leave the field blank, it will be based on the “Default Label” field.
- Default Value:
-
- The value entered in this field will be shown together with the Attributes created in the “Customer Account Create” section.
- The selection of the Input Type field will decide the display of this field.
- Input Validation:
-
- Only display when the Input Type is Text Field.
- Aim to validate the value entered in the Default Value field. You can choose among the options such as letters, numbers, URL, email.
- Add to Customer Grid: Select Yes to add the attributes to the customer grid so that admins can view, manage and update these attributes. The columns can be added to Column Options, Search Option, and Filter Option of Customer Grid.
- Add to Sale Order Grid: Choose Yes to display the attributes in the Sale Order Grid so that admins can process the orders faster. The columns can be added to Column Options, Search Option, and Filter Option of Sale Order Grid.
Depend Field
- Select Field Depend:
- To create a dependent field, you need to choose the parent field with the Input Types as Dropdown and Single-select with an image. You can display this field on the frontend, admin customer form, and admin checkout.
- Some available attributes are gender, customer groups, and so on.
- Value Depend:
- Choose the value for the “Value Depend” field.
- The attribute will be displayed when customers choose the selected option for the parent attributes of the Select Field Depend field.
Step 2: Enter titles that you want to show instead of Attribute name in the Manage Labels section.
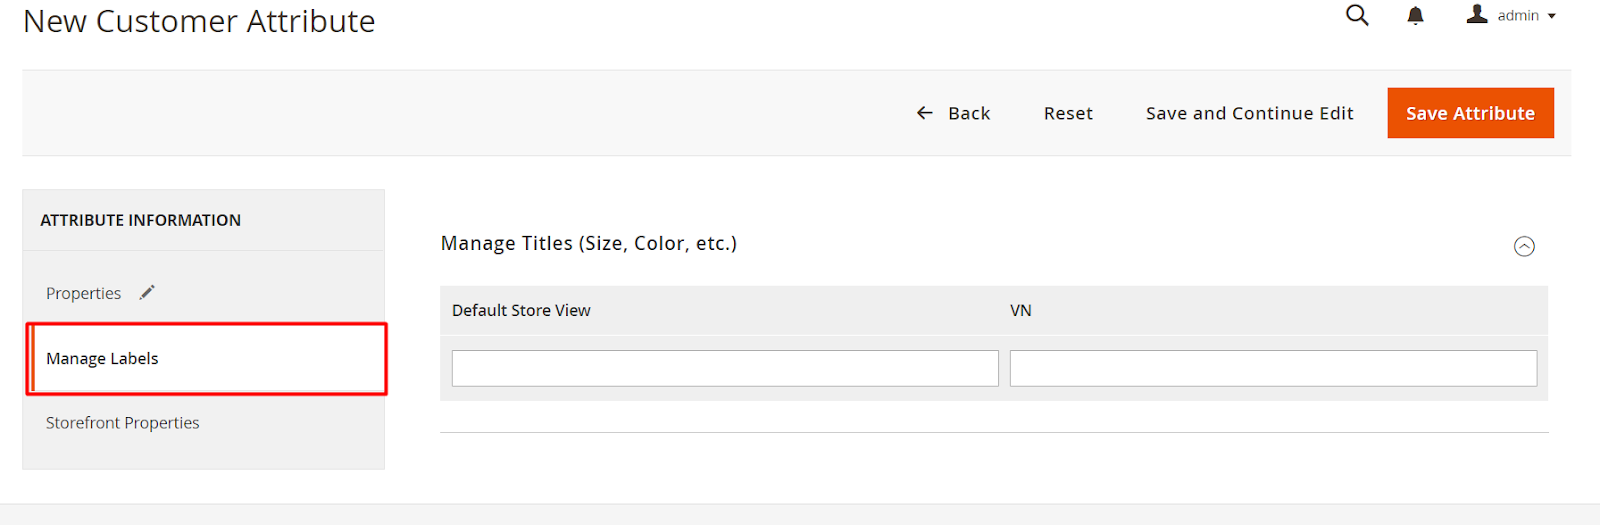
Enter the titles that you want to display on each store view, which replaces the Attribute name created. If left blank, the default attributes name is what you filled in the Default Label field.
Step 3: Fill the information into the Store Properties section to display the attributes at the position you want.
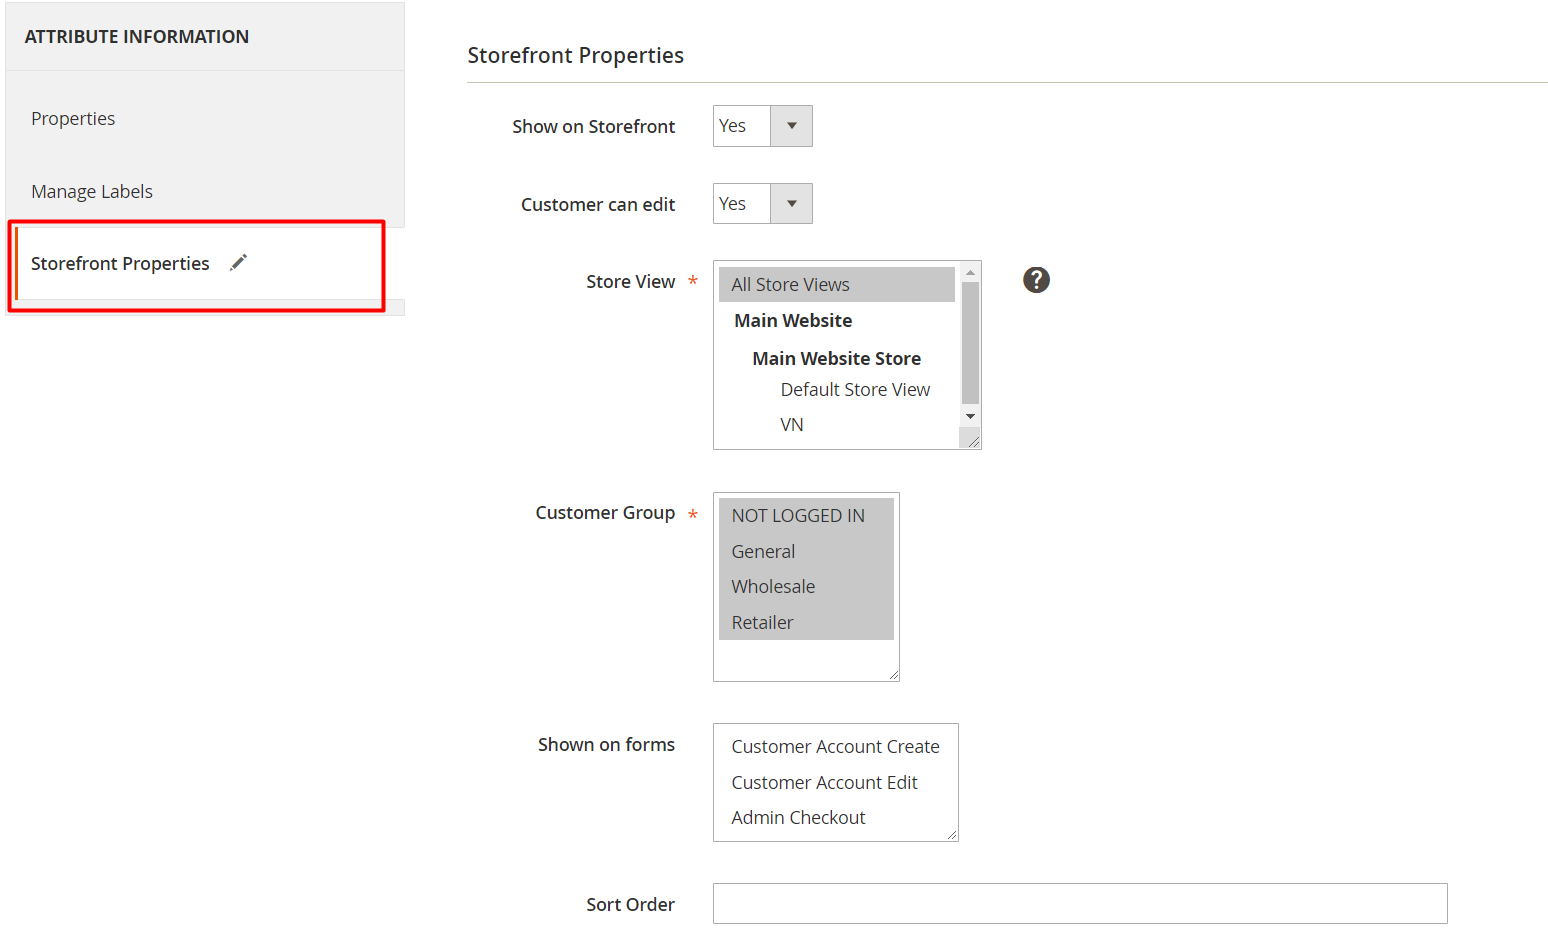
- Show on Storefront: Choose Yes to display the attributes on the frontend and vice versa. However, for the attributes included in the system, it is impossible to edit available fields in the Storefront Properties section.
- Customer can edit: Admins can decide whether customers can edit the attribute information or not by selecting Yes and vice versa.
- Store View: Choose store views where the attributes can be shown.
- Customer Groups: Admins can select to limit customer groups who can view and fill in the attributes.
- Show on forms: Choose the forms you want to display the attributes, including Customer Account Create, Customer Account Edit, and Admin Checkout.
- Sort Order:
- Set the order number for sorting the attributes. If left blank, the default order number is 0.
- The smallest number will represent the highest priority.
Customer Address
The following steps can help you create new customer address attributes:
- Step 1: Fill full information about customer address attributes into the Properties section.
- Step 2: Enter titles that you want to show instead of Attribute name in the Manage Labels section.
- Step 3: Fill the information into the Store Properties section to display the attributes at desired positions.
Step 1 and step 2 are similar to the step 1 and step 2 above. You can refer for more information.
Step 3: Fill the information into the Store Properties section to display the attributes at desired positions.
The only point that makes the difference between Customer Address and Customer feature is that in step 3, the “Show on forms” field has different display options. The remaining fields will follow the guide “How to create a customer attribute” above.
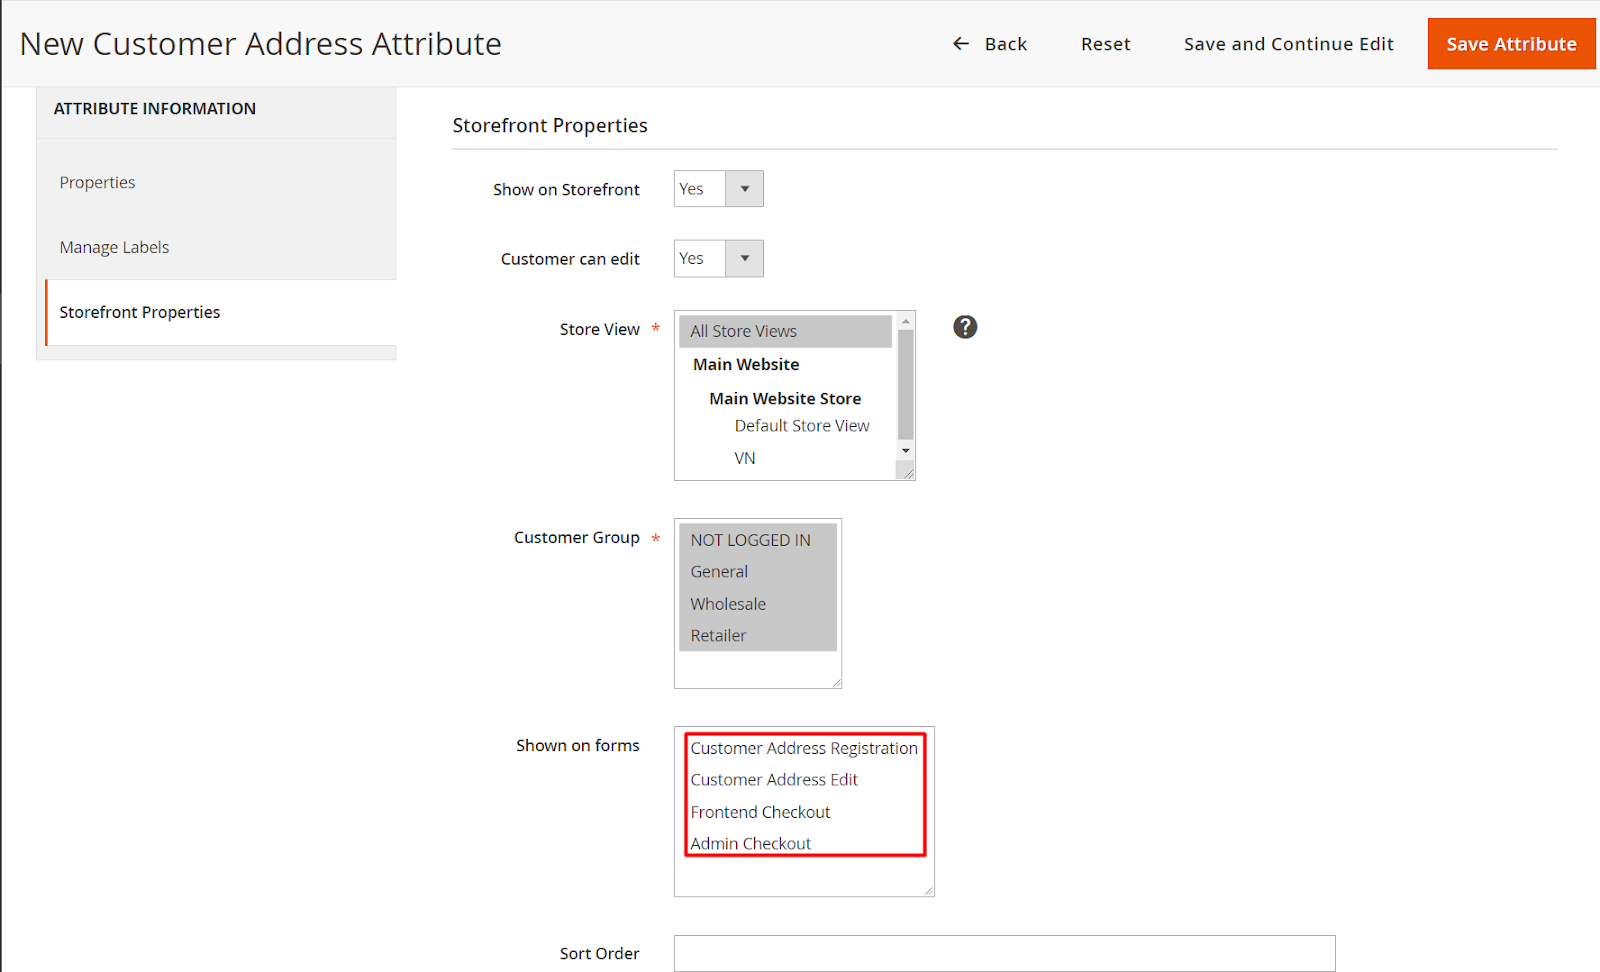
- Show on forms:
- Choose the forms that you want to display the attributes. There are four options for you to select: Customer Address Registration, Customer Address Edit, Frontend Checkout, Admin Checkout.
- Also, suppose you have installed the One Step Checkout module by Mageplaza. In that case, you can display the attributes you want on the one-page checkout form by going to Stores > One Step Checkout > Manage Fields and dragging attributes into the Sorted Fields column.
Rest API
Customer Attributes extension by Mageplaza supports users to take actions on the attributes through the REST API: admins can get the information about the customer attributes and customer address attributes while customers can feel free to upload files or images if required.
Conclusion
Obviously, with plenty of advanced features, Magento 2 Customer Attributes by Mageplaza is a perfect tool for merchants, helping provide the necessary information to facilitate the order management process and customer management. As a result, store owners can efficiently run focused marketing campaigns and boost sales significantly.
10% Discount: Use coupon code FIREBEAR to get 10% OFF on all extensions while shopping at Mageplaza store.
Related posts
 How to Migrate Orders from Magento 1 to Magento 2: Complete Guide with Improved Import & Export
 Export Products from Magento 1 to Magento 2 Easily: Full Migration Tutorial for 2025
 Magento AI Extensions to Unlock Smarter Search, Support & Content Creation
 What is Magento AR? Exploring Augmented Reality & Top Magento 2 AR Extensions
 E-Commerce Impulse Buys Guide: Boost Your Sales with Effective Strategies and Smart Tools
 Magento 2 Bundle Product with Custom Options: Complete Guide to Benefits, Limits & Import
 Mastering Shopify Collective: Guide to Platform’s Collaborative Commerce Tool for Retailers & Suppliers
 solution25: Your Trusted Shopware Agency in New York & Germany