Magento 2 Countdown Timer Extension by Mageplaza
If there is one thing marketers could never miss in order to generate in their target customers, it must be a sense of urgency. One of the most common sales tactics that marketers regularly use to create this sense of urgency in customers’ minds is the countdown timer.
Understanding the necessity of countdown timers to eCommerce businesses, Mageplaza Countdown Timer is designed to help e-stores add countdown clocks to particular items or offers right from the backend via simple actions.
At the same time, this module also supports store owners in optimizing their countdown timers to maximize the conversion rates.

Table of contents
Why does countdown timer matter for eCommerce businesses?
A sense of urgency is proven to be a fantastic marketing method that pushes shoppers into marketing faster purchasing decisions. To create this sense of urgency, a countdown timer is the most widely used strategy due to its effectiveness.
Here are some main reasons why countdown timer is so popular:
- A product next to a real-time countdown clock can attract customers’ attention easier than ones’ without
- A campaign that uses countdown timers is more compelling and exciting to the customers
- Countdown timers easily create a sense of urgency for a deal, so that motivate purchasers to make quick decisions of the purchases they are considering
- Create satisfaction for the customers when making purchases as you make them believe that they get their wanted products at a special price
Why choose Mageplaza Countdown Timer for Magento 2?
Support 2 automatic types of Countdown Timer
As online shoppers, it’s regular for us to see the presence of countdown timers on Amazon, one of the giants in the eCommerce industry. Apparently, a countdown timer is an effective way for sales campaigns to be more attractive to customers.
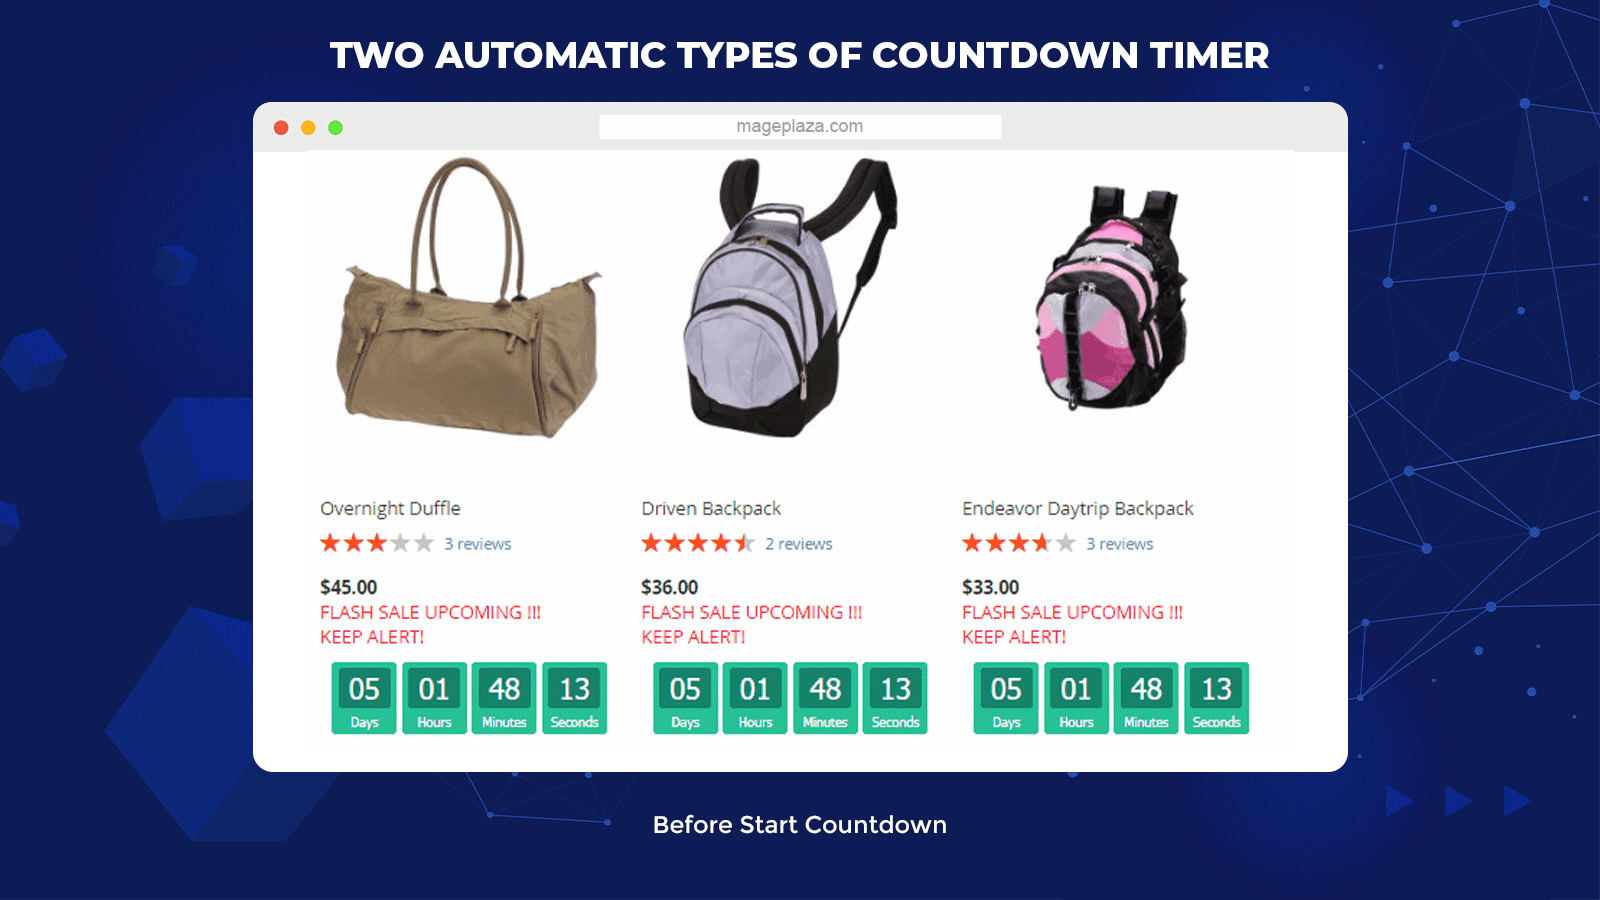
Understanding this, Mageplaza Countdown Timer for Magento 2 offers its users 2 types of clock timer to use for different promotional campaigns:
- Countdown clock display before the sales campaign starts
- Countdown clock display during the campaign and show the time remaining until the end of the campaign
They will be activated automatically according to the configured countdown time that the admin set up at the backend.
Display countdown timers by conditions
As the countdown timer application is totally automatic, the admins need to set up the corresponding conditions to activate the countdown timer in online stores’ real situations.

To satisfy the needs of e-stores, Magento 2 Countdown Timer optimizes the number of condition types that the admin can configure from the backend with 4 primary cases:
- All products with special price: The countdown timers will appear next to all the products in sales or with special price at the stores
- Specific products with special price: The countdown clocks will be displayed besides specific items applied in particular conditions (i.e., the items with special prices at the Dresses Category and with black color will be applied to the Countdown Timer)
- Inherit conditions from catalog rules: The countdown clocks will apply to the products in the specific catalog price rules)
- None Product Base: The system will activate the countdown timer without depending on the special price product (Often used in occasions such as coming-soon items or upcoming events at the store)
Provide 5 pre-made templates
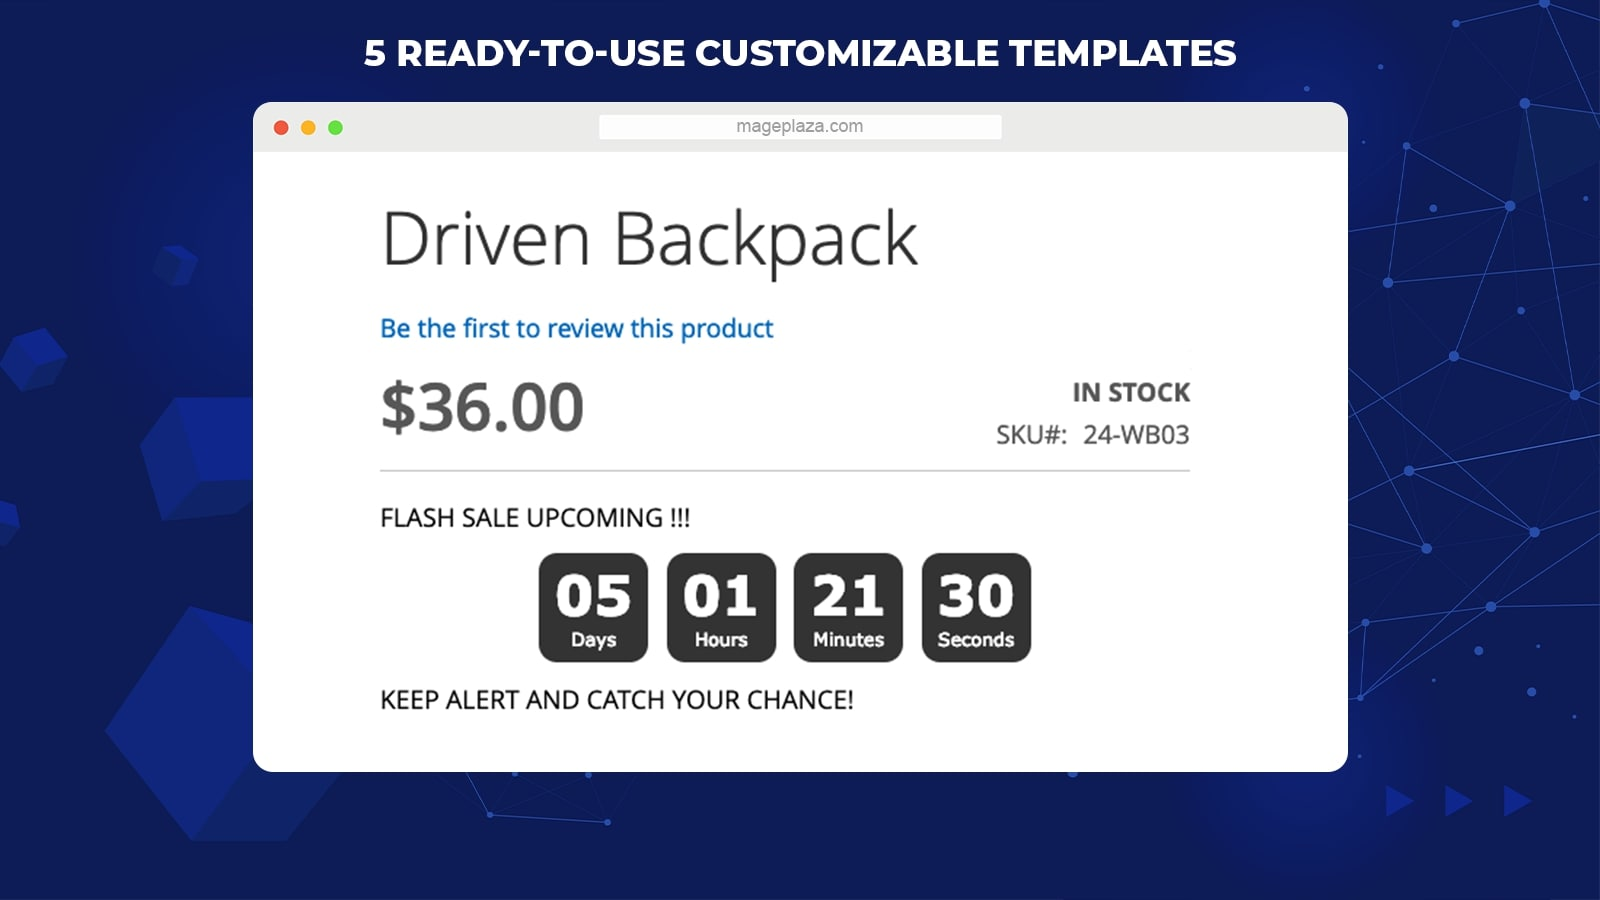
The greatest thing about this extension is that it allows you to freely select your favorite clock styles with 5 ready-to-use samples.
Most importantly, all the elements of a clock template (color, shape, text, etc.) can be customized to:
- Meet the needs of store owners and serve different promotional campaigns for special occasions like Christmas or Thanksgiving
- Make the clocks match perfectly with the store themes
Schedule to display the countdown timer

As mentioned earlier, store owners can set application conditions to activate countdown timers, customize different clock types using Megaplaza Countdown Timer.
However, that is not enough as this module even lets you set schedules for any countdown clock, including the start date and end date.
This feature is necessary if store owners want to apply the countdown clock on specific time frames. Then the product prices are no longer suitable to be the application conditions of the clocks.
Extra features
Apart from the features above, Magento 2 Countdown Timer also offers:
- Support Widget: With Widget, the admin can place the countdown clocks in any position on store pages
- Support Snippet: Allows store owners to show the countdown anywhere easier
- Grid management: Support the countdown timer grid where you can view, edit all the countdown timer rules
- Set rule priority: When having several rules at once, the admin can set the priority level for each rule to let the system define which rules are more important
Backend
General configuration
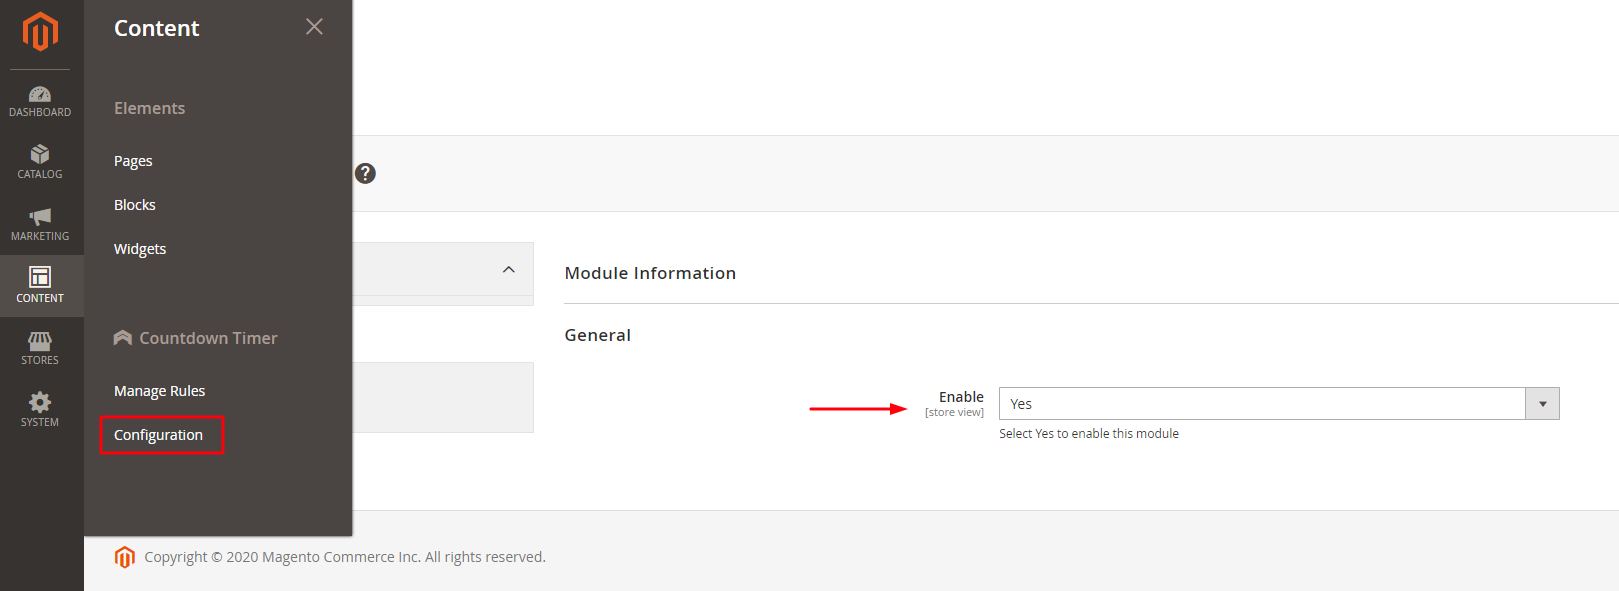
To turn on the Countdown Timer:
- From the Admin Panel, choose Content > Countdown Timer > Configuration > General
- Select Enable = Yes
Countdown Timer
For countdown timers created in the past, admins can set the edit and change their statuses to serve different campaigns.
In order to open the Countdown Timer grid, go to Content > Countdown Timer > Manage Rules. Here, all the primary information of the Countdown Timer, including ID, Name, Status, Customer Groups, Store View, Priority, Action will be displayed on the Countdown Timer grid.

For the Action selection, if you choose:
- Action = Delete: The system will delete the information on the Countdown Timer page
- Action = Change Status: Choose this if you want to change the status of the Countdown Timer
- Action = Edit: Admins will be navigated to the previous Countdown Timer Information page for editing actions
Furthermore, the admin can Filter, Change Store View, Hide / Display Columns.
New/Edit Countdown Timer
After entering the Manage Rules, please click on the Add New button to create a new countdown timer.
General configurations for new rule creation
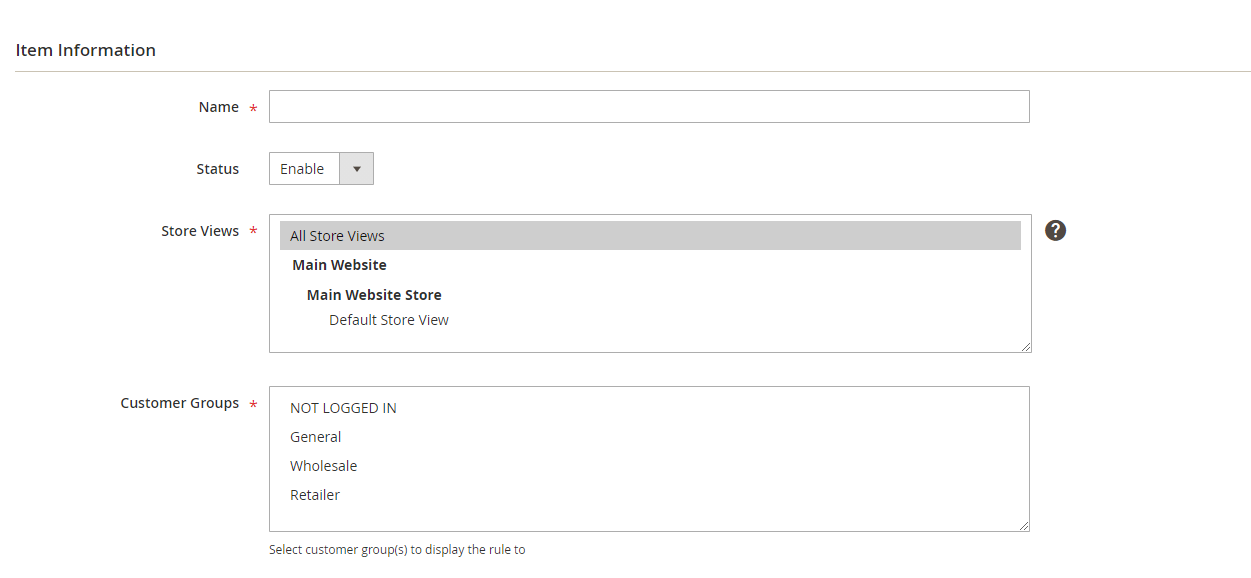
- Name: Set the name for your Countdown Timer (Required field)
- Status = Enable to show the Countdown Timer in frontend
- Store View(s): Choose the store view in which the Countdown Timer will be applied (the admin can select multiple stores at once)
- Customer Group(s): Select the customer group to display the Countdown Timer (The admin can select various customer groups)
- Priority: Set the priority level for each Countdown Timer created (Default is 0. The rule with the lower number will get the higher priority)
The Apply for allows the admin to create application conditions for the Countdown Timer for particular products with different prices.
- Apply for = Specific Products with Special Price: The Conditions selection will appear. Here is where admins can set specific requirements for the product pages that display Countdown Timer.
- Apply for = Inherit condition from Catalog Rules: A new field (Select Catalog Price Rule) appears, and the application rules for Countdown Timer will inherit all the requirements from Catalog Rules
Display setting
For the Display On, the system offers the store admin 2 positions to display the Countdown in the frontend:
- Category Page
- Product Page
Below the Snippet Code field are 3 different codes that allow store admin to show their wanted Countdown Timer block at any position in the store.
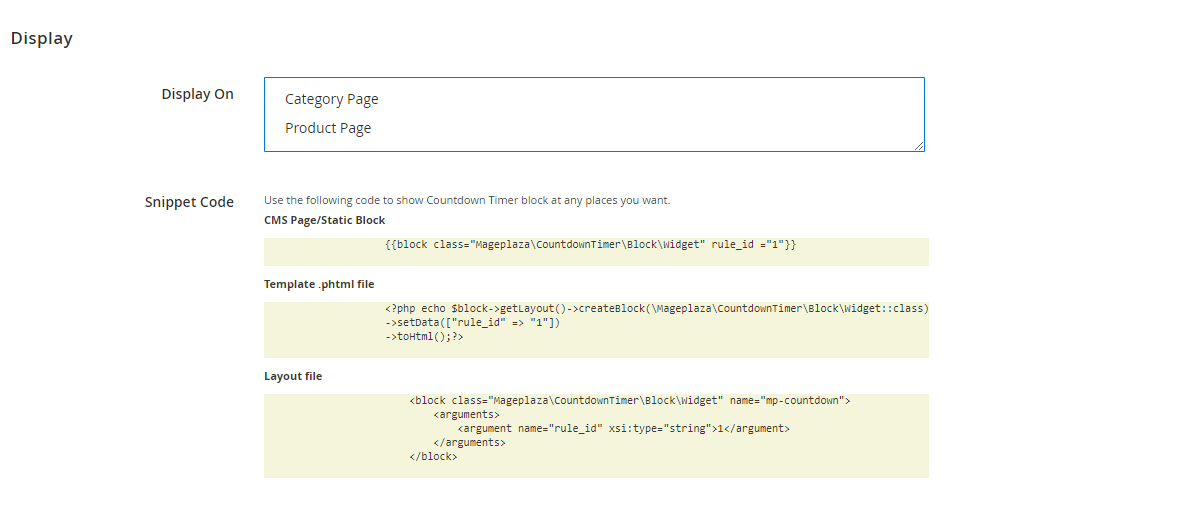
- CMS Page/Static Block: Copy and insert the code into the page where you want to show the Countdown Timer block
- Phtml file: You need to copy and paste this code into the .phtml file where you want to display Countdown Timer
- Layout file: Copy the code and paste the code into Magento’s .xml file or other extensions in which the Countdown Timer will be displayed
For the Before Starting Countdown, choose to Enable = Yes to set the Countdown Timer to appear before a promotion campaign starts

- Clock Style: Select the clock style for the countdown timer, including Modern, Simple, Stack, Circle, and Square
- Title Color: Pick the title color you like to show above the clock
- Message Color: Insert the color code to set the color for the message displayed below the countdown timer
- Clock Background Color: Choose the inside background color of the clock
- Number Color: Choose the number of colors
- Text Color: Insert the color code of the color you want for the text inside the clock
- Template on Product View: By inserting the variables {{clock}}, {{save_amount}} & {{save_percent}}, the system will display the countdown timer at Product View before sales
- Template on Category View: By inserting the variables {{clock}}, {{save_amount}} & {{save_percent}}, the system will show the countdown timer at Category View before sales
Configurations for the Time Remaining Countdown are the same when you set up the Before Starting Countdown. The only difference is that the countdown timer will apply for products on the discount program in the Time Remaining Countdown section.

Widget configuration

Store owners can place the Countdown Timer in any position using Widget. To create a Widget for the countdown timer, you need to go through 6 steps below:
- Go to Content > Elements > Widget > Add New Widget
- Choose Type = Mageplaza Countdown Timer and select the theme you want for the new Widget at the Design Theme field. Then, click on the Continue button
- Fill in all the required information in the Storefront Properties section
- Go to the Layout Updates and choose the position you want to display Widget
- In the Widget Options, select the rule to apply the newly created Widget
- Click on the Save button to save the Widget and check the countdown timer on the storefront
Frontend
The Countdowns display on the Catalog

The Countdowns display for none product
This is how to Countdown clock will be displayed for the Non-Product Based selection at the backend
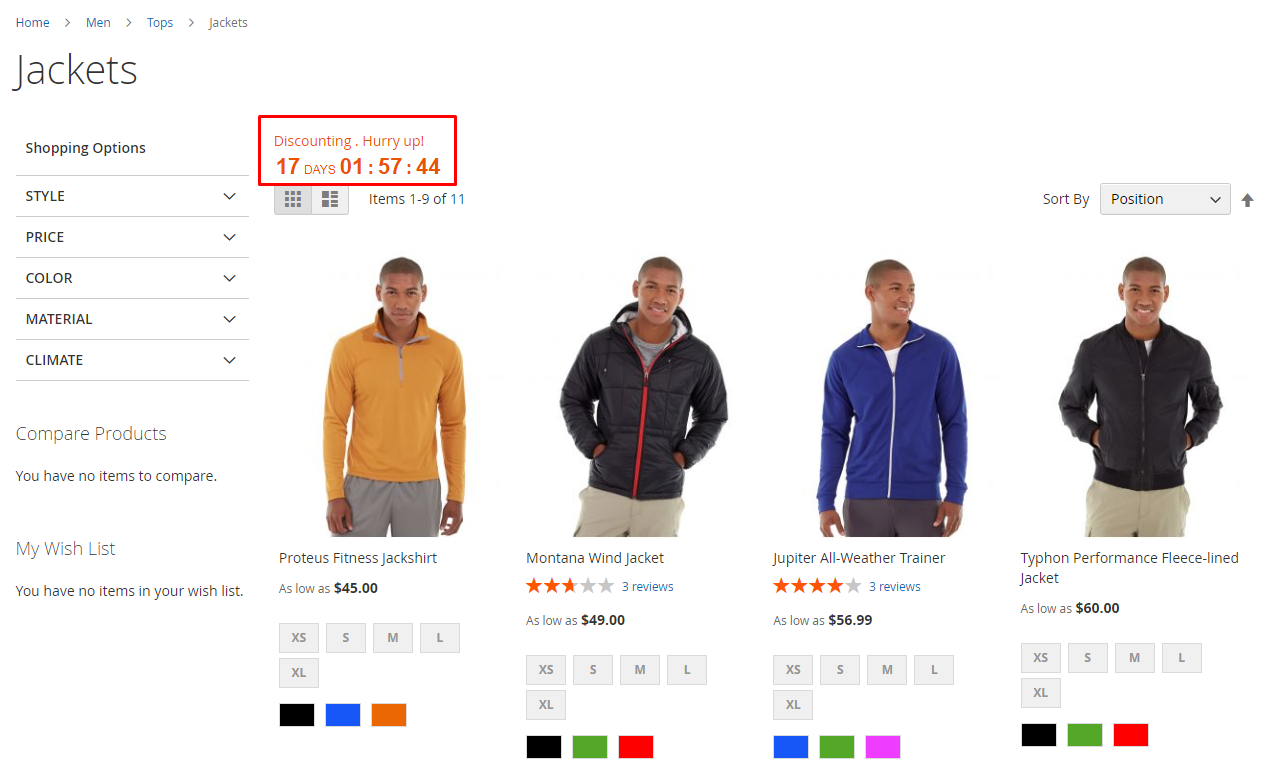
5 types of clocks supported


Wrap up!
Apparently, using a countdown timer on product pages is not a new tactic but still extremely useful in delivering cut-off times to make your promotions more compelling.
Mageplaza Countdown Timer for Magento 2 comes with all the features you need to create attractive countdown clocks for specific or use them on different time-limited sales events.
HOT DISCOUNT: Use coupon code FIREBEAR to receive a 10% discount when purchasing.


