Magento 2 Reward Point Extension by Landofcoder
Anton Kuratov, the Co-founder at Rechemco.com supposed that around 90% of shoppers spend their reward points in transactions when they check out. Have you exchanged your reward points to purchase products? If yes, store owners’ loyalty program works. Because of reward points, customers are willing to turn back to the stores for another purchase. As merchants, we assure that you are eager to engage a majority of customers and enhance their loyalty to your website. Magento 2 Reward Point Extension by Landofcoder is created as a useful tool to help you carry out any desire.

LOF Reward Point Extension for Magento 2 is considered a magic marketing tool to draw customers’ attention and optimize loyalty programs. By giving to your clients a lot of benefits from reward points, you can not only engage new customers but also keep your old ones for future transactions. As a result, you can easily boost your sales and raise your website’s ranking. Below, we offer you some core features which can benefit store owners and customers. Besides, we give you useful usage tutorials in the backend of Magento 2 Reward Point Extension.
First, let’s explore a ton of outstanding features LOF Magento 2 Reward Point Extension provides to you.
- Visitors can be rewarded for multiple ways
- Earn point by referring to friends
- Earn points right after placing orders
- Spending points with ease
- Track points balance, transaction, history at once in “My account”
- Add reward points for any specific & multiple products
- Freely set different spending & earning point rates
- The product-based, cart-based, behaviour-based, and catalogue-based rule
- Manage point transactions
- Set max points received or spent per product
- Refund by points & advanced report
- Export points easily by CSV, Excel XML file
- How to gain points & pay points guide
- Get discount code if customers don’t have an account
- Send notification email & auto-update information if anything changes
- Create orders using points for customers in the backend
- Create expiry & set duration for points
- Hide the price for a specific product
- Speedy with Magento Block Caching
Thanks to the Magento Block Caching, the module can help you save a lot of time and effort. After installation, both admins and customers can manipulate fast and smoothly.
Table of contents
How can Magento 2 Reward Point Extension benefit sellers and buyers?
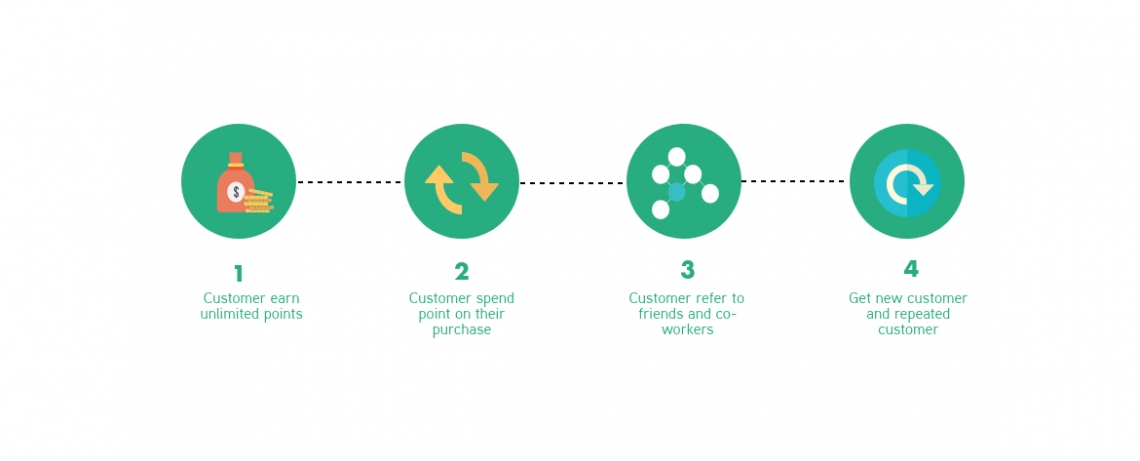
For customers, it is effortless for them to earn, spend and manage their reward points. Right after ordering products or service from Magento 2 Reward Point Extension, customers will receive points. In particular, one of the most effective ways for shoppers to gain unlimited points is referring to their friends. Also, they can spend reward points with ease by choosing the number of points they want to pay when conducting a transaction. Notably, the extension enables purchasers to earn and spend reward points at the same time. They also can track their points in a blink of eyes in ‘’My Account’’.
For admins/store owners, they are enabled to create some basic earning rules to control clients’ activities such as product-based rule, behaviour-based rule, cart-based rule, and catalogue-based rule. To inspire customers’ taste, admins also can add earning and spending points by creating various point rating types for a specific product or multiple products. Beside setting rewards, admins can manage and configure points easily and conveniently in the backend.
Backend
In the backend, we focus on guiding you configure . To make it optimized we provide you with the answers of 5 crucial questions: how to set reward points, how to produce point earning rates, how to create point spending rates, how to manage customers’ transaction, and how to manage customers’ points.
How to configure reward points
There are 4 main sections that you need to configure: general configuration, earning points configuration, spending points configuration, and notification setting.
1.1. General configuration
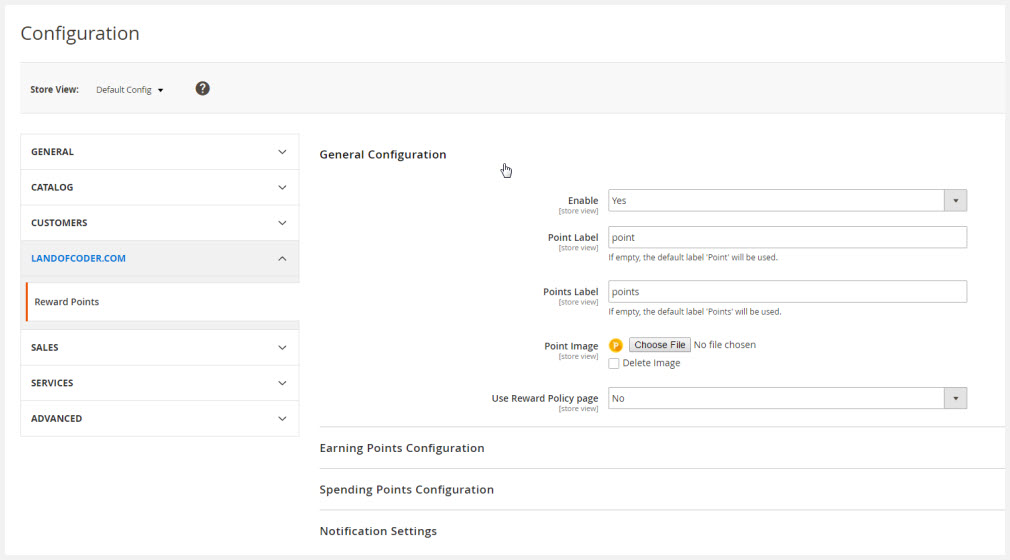
First, please go into Admin Panel -> Stores -> Configuration -> LandOfCoder -> Reward Points -> General Setting.
For General Configuration, to optimize the module, choose ‘’Yes’’ and your Magento 2 Reward Point Extension will be enabled. Next, if you want the default label ‘’Points’’ to be displayed in store view, let ‘’Points Label’’ empty. To make the reward points more eye-catching, upload the point icon in ‘’Point Image’’. Finally, if you want to show reward policy page for your customers so that the extension can be well-operated, set ‘’Yes’’ in ‘’Use Reward Policy Page’’.
1.2. Earning points configuration
For Earning Points Configuration, store owners are supported to set earning points so that they can easily manage to gain rewards of shoppers.
- Rounding method: You are free to choose round down to decrease or choose round up to increase the number to the nearest whole number, or the nearest number ending in zero.
- Points expire after: You can set the time (days) after the transaction date when the point can no longer be used.
- Approve earned points on the invoice: To allow customers gain points during the invoice process, you should set ‘’Yes’’.
- Approve earned points on shipment: It’s similar to ‘’Approve earned points on invoice’’, you should set ‘’Yes’’ to allow points to be made during the shipping process.
- Maximum earning points per order: You can set the maximum points that your shoppers could get for each request. If you let it empty or zero, there is no limitation on the number of earning points.
- Allow to earn points from tax: One of the outstanding configurations is you can set ‘’Yes’’ to allow customers to take points from products and tax fee.
- Allow to earn points for shipping fee: Your customers are allowed to collect points from products and shipping fee if you say ‘’Yes’’.
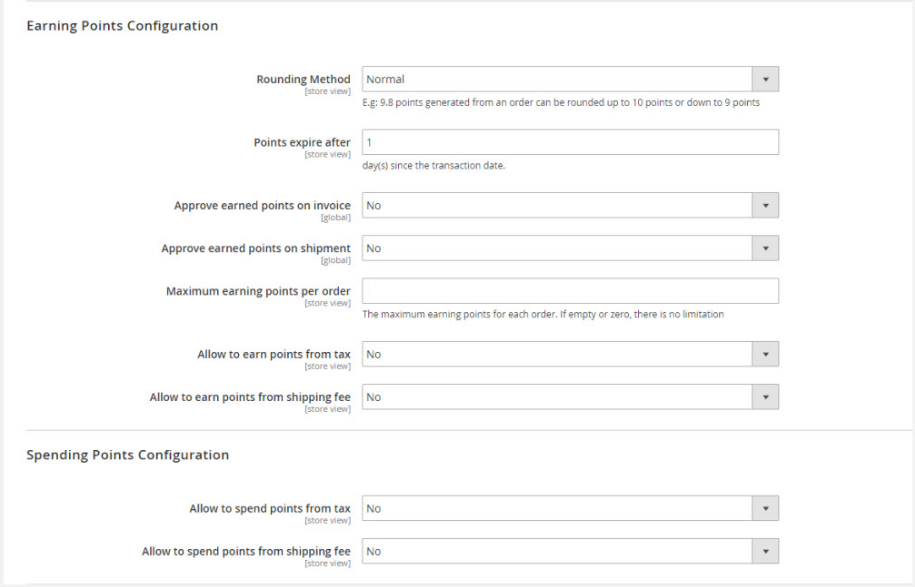
1.3. Spending points configuration
For Spending Points Configuration, you just need to configure 2 sections.
- Allow to spend points from tax: If you set ‘’Yes’’, your clients can pay reward points for their products and tax fee.
- Allow to spend points on shipping fee: To let your customers pay points for their products and shipping fee, please set ‘’Yes’’ for it.
1.4. Notification settings
For Notification Settings, it will be easier for store owners and their purchasers to track all new information if there are any changes. Admins can set email notification which helps to connect them with their customers.
- Email sender: You can decide the sender you like and enter it.
- Balance update email: In case of changes, you can choose an email template in the list to send notification for your shoppers.
- Points expire email: A notification email will be automatically sent before the expiry date of points.
- Send notification before points expiring (by day): You need to decide how many days the notification will be sent before points expire. If you don’t want to send a reminder email, just let it empty or zero.
- Points expired email: A notification email will be sent to the expiry date of points.
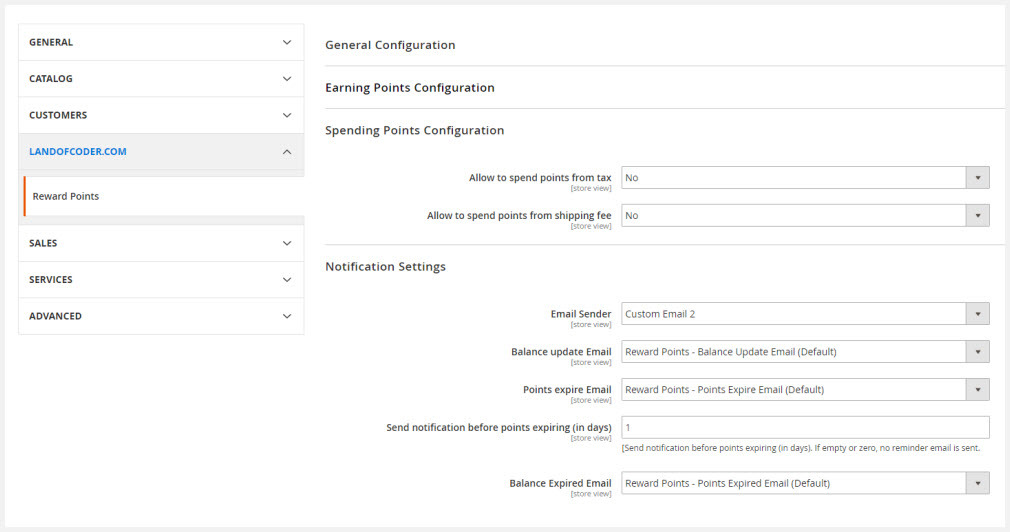
How to create point earning rates
Please go to Admin Panel -> Reward Points -> Earning. Then, you will see two sections you need to configure in the backend: Earning Rates and Product Earning Points.
2.1. Earning Rates
The first step, go to Admin Panel -> LOF Reward Points -> Earning Rates. Then, click to ‘’Add new rate’’ to create a new point earning rate for your store.
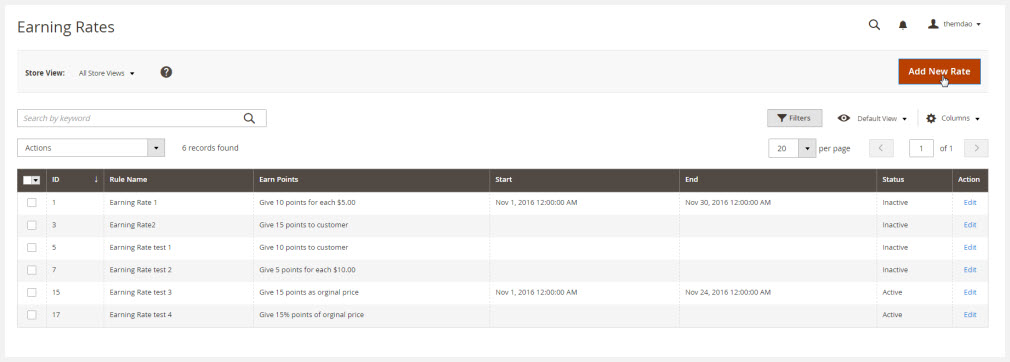
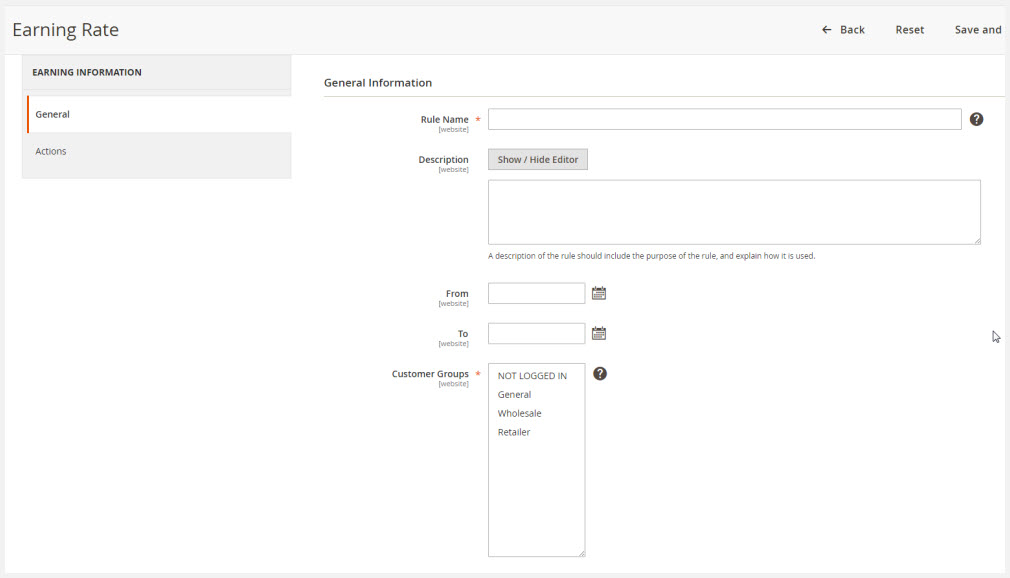
In General tab, a list of required information will appear. What you need to do is entering details into these sections to configure the general settings.
- Rule Name: You should set the name of your new earning points rate.
- Description: By adding the description of the new earning rate, you can show the rule’s purpose, and explain how it is used so that your customers will comprehend and easily spend it.
- From: You are enabled to set a beginning date for the new rate.
- To: You also can set an ending date for the new rate.
- Customer Groups: Depending on your purpose, you can choose one of these customer groups.
- Priority: You can define a number to set the priority.
- Status: You can decide the status of the rate by choosing ‘’active’’ to enable it.
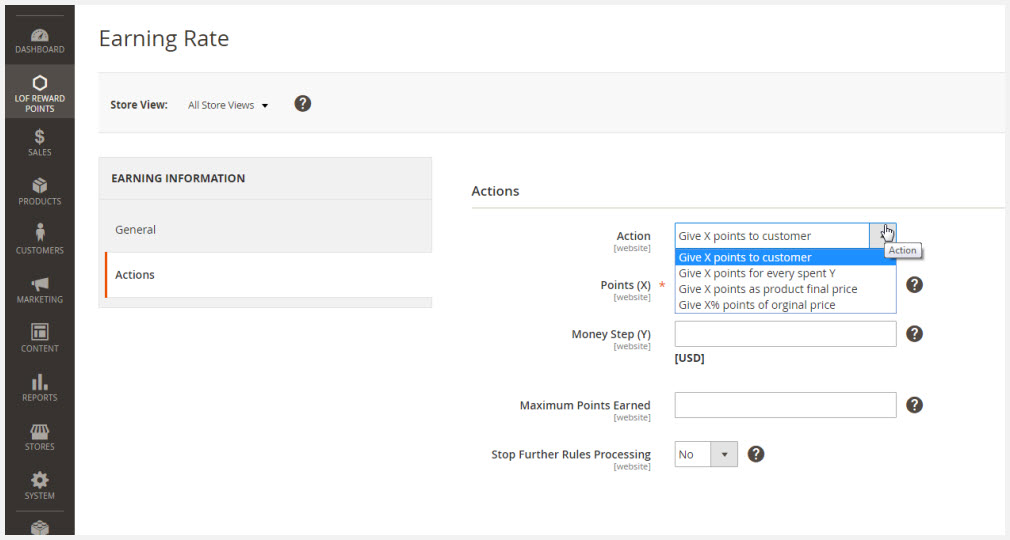
After you configure general information of the new earning rate, let’s move to set Actions. In this part, Magento 2 Reward Point Extension provides you various choices of earning rating types. Let’s choose the type which is suitable and useful for you.
- Give X points to customers: You can fix a certain number of points given for each product.
- Give X points for every spent Y: You can set points you will give to your customers when they spend an amount of money. For example, you can set that “10 points for every $5 spent”. It means that if your shoppers spend $5 for any products, they will gain 10 points at once. In this case, X (points) = 10 points, and Y (money step) = $5
- Give X points as final product price: When setting this type, your purchaser will earn some points equal or over the price of the purchased product. For instance, when you set X = 30 points, your customers will get 30 points if the price of the product is equal or over $30.
- Give X% points of original price: It means that you will give your clients a certain percentage according to the product price.
Next, you should define others actions as below.
- Points (X): You can set some given points for your shoppers.
- Money Step (Y): You also can decide how much money your customers spend to get that points.
- Maximum Points Earned: You can define the max points a customer can earn or limit the number of points made for a specific product.
- Stop Further Rules Processing: If you want to run this point rate first, set ‘’Yes’’.
2.2. Product earning points
To set earning points for products, go to Admin Panel -> Reward Points -> Earning -> Product Earning Points.
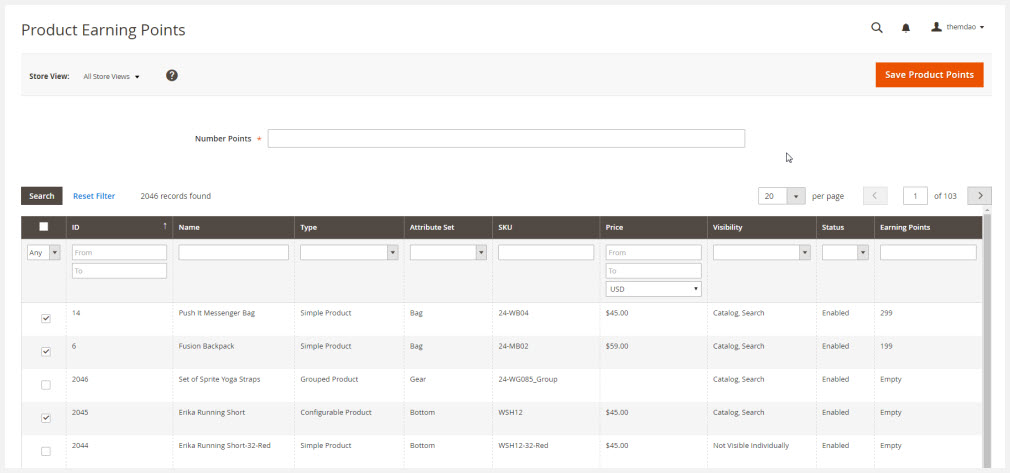
In this section, it is effortless and fast for admins to add any products and give them some points. What products can be added or how many points can be given entirely depend on your decision.
How to create point spending rates
Please reach Admin Panel -> Reward Points -> Spending. Then, you need to set two sections: Spending Rates and Product Spending Points.
3.1. Spending Rates
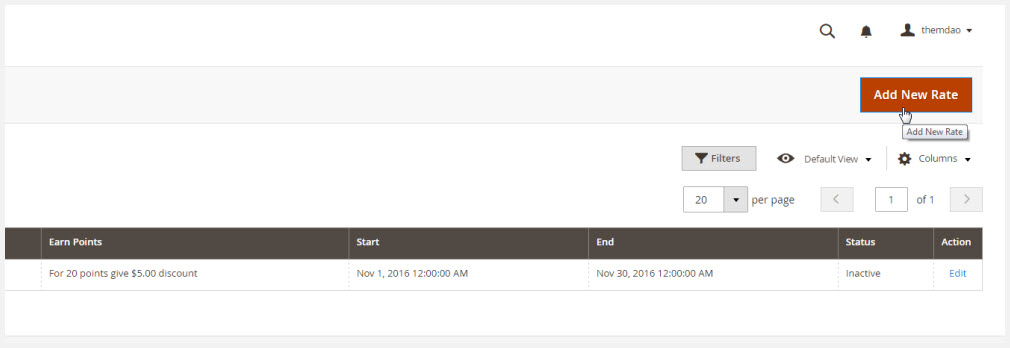
To generate a new spending rate, please hit the button ‘’Add New Rate”.
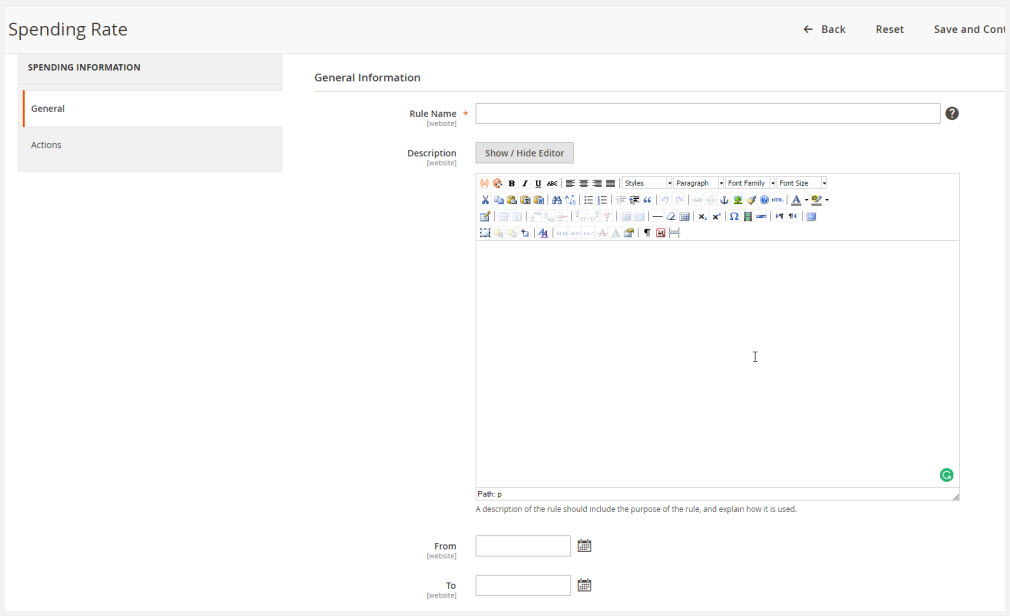
In General section, it is similar to the configuration for general settings of a new earning rates. You need to set the same required information (Rule Name, Description, From, To, Customer Groups, Priority, Status).
To make the new spending rate work well, you continue to configure Actions. In this part, you can choose one of these spending rating types. They are similar to earning rate types.
- Give X points to customers
- Give X points for every spent Y
- Give X points as final product price
- Give X% points of original price
Then, you need to set the rest of sections (Points X, Money Step Y, Spending Minimum, Spending Maximum, Stop Further Rules Processing).
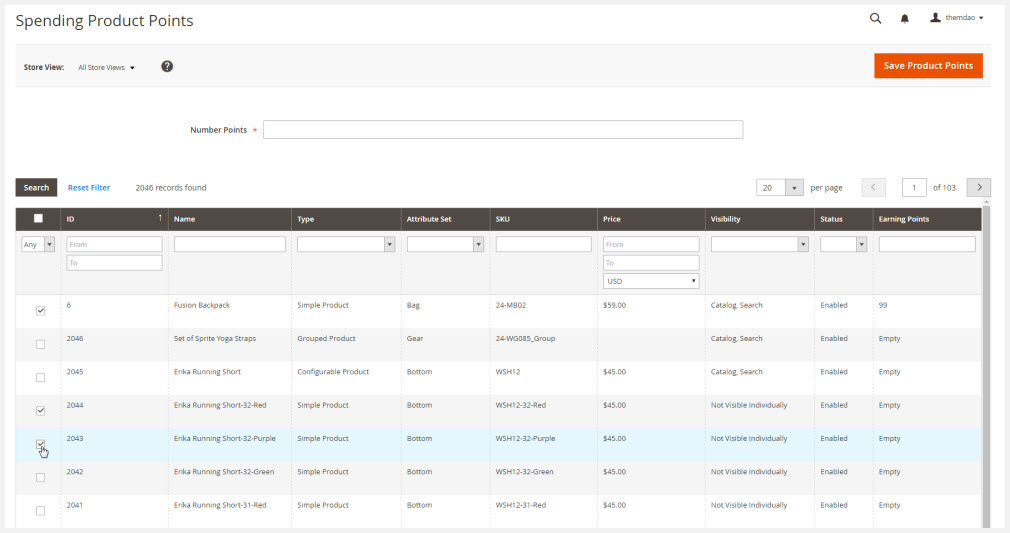
3.2. Product spending points
To configure in the backend, go to Admin Panel -> Reward Points -> Spending -> Spending Product Points.
In this section, you can choose any products to add and insert some points you want your customers can spend when they check out.
How to manage customers’ transactions
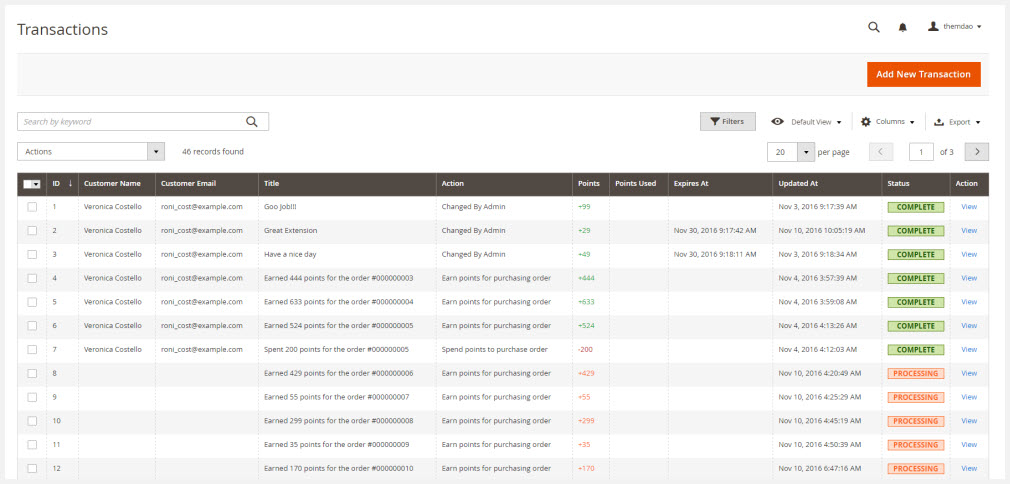
Go to Landofcoder -> LOF reward point -> Transactions -> Manage Transactions, you can track transactions of customers.
Store owners can quickly follow and manage the status of customers’ transactions in a few seconds. Clients’ purchases can be completed, processing or cancel.
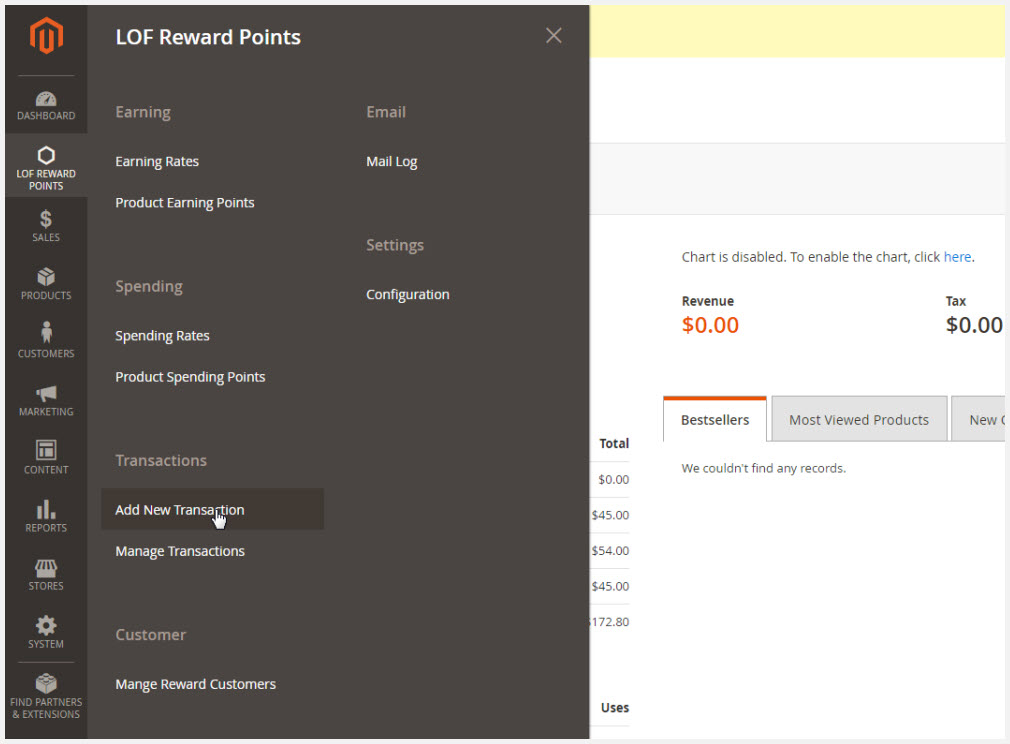
Besides, the extension also supports admins to add a new transaction for your customers if necessary. Go to Admin Panel -> LOF Reward Points -> Transactions -> Add New Transaction.
How to manage customers’ points
To track customer’ points, please go to Admin Panel -> LOF Reward Points -> Customer -> Manage Reward Customers.
Next, you need to choose customers you want to view and manage their point information.

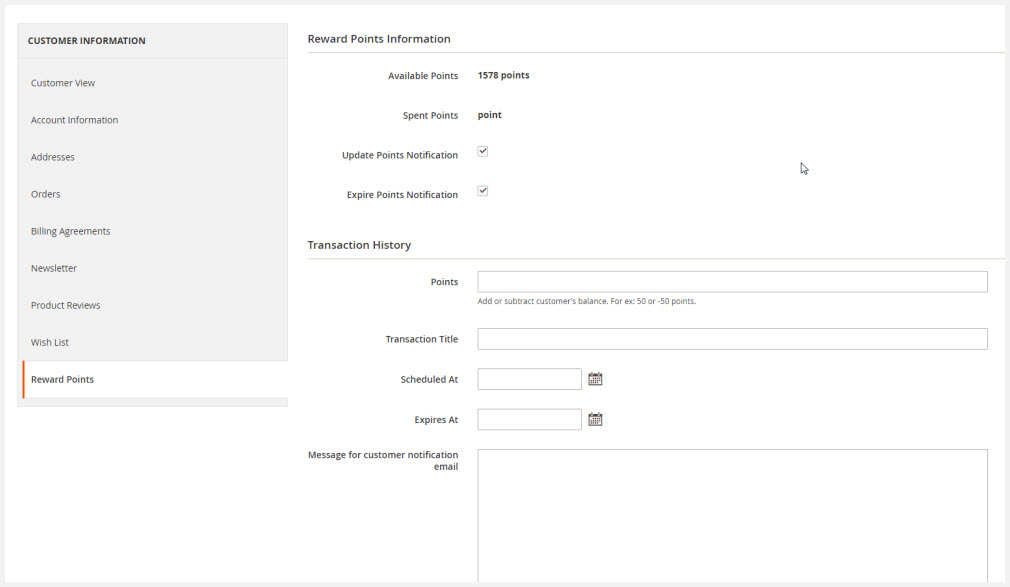
You can view customer’s point balance, and customers’ spent points. Moreover, you are allowed to add or subtract customer’s balance.
Final Words
LOF Magento 2 Reward Point Extension is one of the must-have modules for store owners who want to attract and increase the number of customers as well as keep their loyalty to the website. With only $149, you will get a fantastic extension, free installation, and professional support team.


