
Magento 2 Categories Import & Export Guide: CSV, Product Positions, Store View-Specific Names & More
Managing your Magento 2 categories import and export process efficiently is crucial for keeping your product catalog organized and your store running smoothly. However, Magento 2 doesn’t support native category import and export features, making it difficult to transfer category trees, product positions, or store view-specific category names. That’s where the Improved Import & Export extension comes in — a powerful solution that unlocks the ability to import categories to Magento 2, export them with full attributes, and even manage product positions within each category.
In this article, we’ll walk you through everything you need to know about Magento 2 export of categories and the corresponding import workflows. You’ll learn how to transfer your entire category structure via CSV, configure advanced attributes, map data from external platforms, and streamline the import of product positions within categories. We’ll also show you how to manage category transfers per multiple store views — all with the help of a reliable automation tool. Whether you’re performing your first Magento import categories operation or looking to optimize bulk updates across stores, this guide has you covered. Let’s dive in.

Table of contents
- What Are Magento Categories?
- Why Exporting & Importing Categories in Magento 2 Matters
- Sample CSV for Magento 2 Categories Import
- How to Export Categories in Magento 2
- Magento 2 Categories Import: Step-by-Step Guide
- Magento 2 Categories Import Use Cases & Best Practices
- How to Import Magento 2 Product Position in Category
- How to Import Magento 2 Categories for Multiple Store Views
- Final Words: Enable Magento 2 Categories Import & Export with Firebear
- Magento 2 Categories Import & Export FAQ
What Are Magento Categories?
Magento categories are the backbone of your store’s product organization and a key factor in creating a smooth shopping experience. They group related products into logical sections, helping customers find what they’re looking for quickly, whether by product type, function, brand, or another defining characteristic. More than just a navigation tool, Magento categories also play a significant role in Magento 2 SEO, giving you the ability to optimize category pages with targeted keywords, unique URLs, and compelling content.
Let’s break down how categories work in Magento:
- Category Hierarchy & Structure: Magento uses a flexible tree-based structure to organize products. You can create main (parent) categories and multiple levels of subcategories. For instance, a root category like “Electronics” might include subcategories such as “Laptops,” “Smartphones,” and “Accessories.” This hierarchical layout not only keeps your catalog organized but also makes bulk operations like Magento 2 categories import more manageable.
- Assigning Products to Categories: Each product can be assigned to one or several categories, allowing you to cross-promote items in different store sections. For example, a Bluetooth speaker might appear under both “Audio Equipment” and “Gifts.” This flexibility becomes especially useful for Magento import of products assigned to categories.
- Boosting Store Navigation: Well-structured categories form the basis of your storefront’s navigation menus. They reduce reliance on search and guide shoppers intuitively toward the products they need, improving user experience and conversion rates.
- SEO Optimization Benefits: Every category page can have its own SEO-friendly URL, metadata, and rich content. Optimizing these pages for keywords like “gaming laptops” or “wireless headphones” can significantly boost your organic rankings. A properly implemented Magento export of products by category helps you analyze and adjust content and performance for each segment.
- Dynamic Visual Content: Magento lets you enhance categories with custom banners, CMS blocks, or promotional images. These visuals not only reinforce brand identity but also draw attention to seasonal offers or featured products, driving deeper customer engagement.
Whether you’re managing a small store or a vast catalog with thousands of SKUs, Magento categories provide the structure, scalability, and SEO potential to support your business growth. And when paired with a powerful solution like Improved Import & Export, handling category data becomes even more efficient, especially when automating Magento 2 categories import or exporting product-category relationships. Let’s say a few more words about the importance of these processes.
Why Exporting & Importing Categories in Magento 2 Matters
Efficient category management is essential to running a scalable and organized Magento store. When your catalog grows, so does the complexity of keeping your categories structured and synchronized. That’s where the ability to import categories in Magento 2 becomes a game-changer.
By using Magento categories import, you can eliminate time-consuming manual tasks and build a well-organized product hierarchy in just a few clicks. Whether you’re launching a new store or updating an existing one, importing categories from a CSV file allows for bulk edits, making it easy to restructure your catalog or introduce seasonal changes without touching each category manually.
Category imports are especially important for teams working across multiple environments, such as development, staging, and production, where syncing the category tree between systems is critical. Without the option to import categories in Magento, replicating your structure across environments would require significant manual effort and increase the risk of errors or inconsistencies.
Additionally, importing categories helps streamline onboarding when migrating from another platform or integrating product data from external sources like ERPs or PIMs. Instead of rebuilding category trees by hand, you can automatically align data structures using a well-formatted CSV and an import tool designed to handle Magento-specific logic.
Ultimately, automating Magento import of categories improves speed, consistency, and accuracy — all while saving time and reducing the risk of broken navigation or lost SEO value due to misconfigured category URLs. If you don’t know where to start, let’s begin with the CSV structure.
Sample CSV for Magento 2 Categories Import
Reviewing a Magento 2 categories import CSV will help you understand which attributes are required, what values to use, and how your category tree should be structured for a successful import.
We provide two convenient sources for sample import tables:
- GitHub Repository — Visit the to download sample CSV files for different entity types, including categories.
- Google Sheet Master Table — Since the Improved Import & Export extension supports Google Sheets, we’ve created a that includes sample values, attribute descriptions, and formatting tips for all importable entities, including categories. You can copy it to your Google Drive and start customizing right away.
Both sample formats have been tested with the Improved Import & Export extension and are ready for production use. Use them as-is or modify them to match your store’s needs.
Magento 2 Categories Import Table Format
Before importing, make sure your CSV file is correctly formatted. The Improved Import & Export extension supports both CSV and XML file types. For CSV specifically, we recommend the following format:
- Character Set: UTF-8 (Unicode)
- Field Separator: Comma (,) or Tab (\t)
- Text Delimiter: Double quotes (“)
Consider using TSV (Tab-Separated Values) for better readability if your data contains commas. The extension also supports flexible field mapping, so if your CSV uses different delimiters or column names, you can still import it by configuring mappings in the import profile.
Magento 2 Category Attributes Explained
Here’s a detailed overview of the key attributes used in a Magento import categories CSV file. This table explains each field’s purpose, expected values, and examples.
| Attribute Name | Reference | Values | Value Example |
| entity_id | The identifier for categories within Magento 2.
You can find a category ID next to the category name at Catalog > Categories |
Numeral value | 12 |
| name | Category name. The category name contains the full category path, including all parent categories | For example:
If you have a category named ‘Third’ which is nested under the ‘First’ and ‘Second’ categories, the name value will look like this: First/Second/Third Use ‘/’ to separate category names |
Default Category/First test category |
| store_view | Defines the store view where the category is displayed under the current name.
Store View Code can be found under Stores > All Stores > next, click required store view and check the “Code” column. |
Can contain letters and numerals with spaces and hyphens | eng-store
English Store |
| image | The main category image and its path | Should be uploaded to /pub/media/import.
The path of /sample_data/m/b/mb01-blue-0.jpg has the following structure: /pub/media/import/ In addition, you can use a direct URL of an image, such as http://site.com/images/ |
/pub/media/import/ category_images/ image1.png |
| url_path | Category URL path at the front end. This attribute creates a URL rewrite to compose the end category URL | The end category URL is composed of the following pattern:
yourstore.com/index.php/ For example: If you want the category path to include category1 and category2. In this column, you need to enter: category1/category2/. Use / to separate categories. In this case end category URL will look like this: yourstore.com/ |
test_parent_category/ test_sub_category |
| available_sort_by | Category option Default Product Listing Sort By. Which defines which sorting options are available at the category page | Available values:
blank – all values position – product position name – product name price – product price Multiple values should be separated by a comma. For example, if you want only position and price sorting available the value should look like this: position,price |
position,name,price |
| custom_apply_to_products | Category option Apply Design to Products. Defines if the custom category design should also be applied to the products belonging to the category | Available values are:
Yes – Apply Design to Products enabled No – Apply Design to Products disabled Leave blank if no custom design is applied |
Yes |
| custom_design | Category Design > Theme option. Defines the theme that should be applied to the category | The value should be the required theme name. Leave blank if no design updates are required, and the category should be displayed in the default theme applied to the store | Magento Luma |
| custom_design_from | Defines from what date the custom design should be applied to the category | The date should be in the following format:
mm/dd/YY For example: If you want a custom design applied from the 10th of July 2019, the value should look like this: 7/10/19 |
2/1/18 |
| custom_design_to | Defines to what date the custom design should be applied to the category | The date should be in the following format:
mm/dd/YY For example: If you want a custom design applied to the 10th of July 2019, the value should look like this: 7/10/19 |
2/28/18 |
| custom_layout_update | Category Design > Layout Update XML option | The value should be in readable XML if you want any XML layout updates applied | <referenceContainer name=\catalog.leftnav\” remove=\”true\”/>” |
| custom_use_parent_settings | Category Design > Use Parent Category Settings option. Defines whether the category should copy parent category design settings | Available values:
Yes – the category will copy parent design settings No – the category will have a unique design |
No |
| default_sort_by | Category option Default Product Listing Sort By. Defines which sorting order should be applied to the products by default | Available values:
Position – the products will be sorted depending on their position in the category. Product Name – the products will be sorted in alphabetical order. Price – the products will be sorted from lowest to highest and vice versa price |
Product Name |
| description | Category description | Supports simple HTML formatting | <p>Category description</p> |
| display_mode | Category option Display Mode. Defines which entities should be displayed at the category page | Available values:
Static block and products – both static blocks and products displayed Static block only – only static blocks displayed Products only – only products displayed. Only a single value can be entered at a time. No multiple values allowed |
Static block and products |
| filter_price_range | Category option Layered Navigation Price Step. Defines the price step which will be used in the layered navigation | Only numerals allowed | 10 |
| include_in_menu | Category option Included in Menu. Defines if the category should be included in the main category menu | Available values are:
Yes – category included in the menu No – category is not included in the menu |
Yes |
| is_active | Category option Enable Category. Defines if the category is active or disabled | Allowed values are:
Yes – the category is enabled at the frontend No – the category cannot be found at the frontend |
Yes |
| is_anchor | Category option Anchor. Defines if the category is an anchor category or not | Available values are:
Yes – the category is anchor No – the category is not anchor |
Yes |
| landing_page | Category option Add CMS Block. Defines which CMS block should be included in the category | The value should be the name of the CMS block. Only a single CMS block can be included. Multiple values are not allowed | Contact us info |
| meta_description | Meta description of the category | Can contain any symbol | Category meta description |
| meta_keywords | Meta Keywords of the Category | Can contain any symbol. Multiple values are separated by a comma | category,meta, keywords |
| meta_title | Meta Title of the category | Can contain any symbols | Category meta title |
| page_layout | Category option Layout. Defines the layout of the category | Available values are:
blank – no layout updates Empty 1 column 2 columns with left bar 2 columns with right bar 3 columns |
3 columns |
| position | Category position in the parent category. From top till bottom. The lower the value the higher the category’s position.
Affects the order in which categories are displayed on the menu |
Numeric value | 10 |
| url_key | Category option URL Key. Defines the URL of the category | All characters and symbols that can be used for URLs | test_category_path |
| group | String or integer same for a group of categories per store view.
Use the attribute to create a new category during the import |
Numerals | 1039 |
This CSV structure is the foundation of a successful Magento 2 categories import. Whether you’re creating new categories, updating existing ones, or syncing data across environments, understanding each attribute and its role ensures a smooth process. With the Improved Import & Export extension, you also gain the flexibility to import from various sources, map fields on the fly, and automate category management across your Magento ecosystem. Let’s see how to export categories from Magento 2 first.
How to Export Categories in Magento 2
Before you begin the Magento import categories process, it’s best to start with a working example. The most reliable way to get a properly structured CSV file is to export categories from your Magento 2 store. This gives you a real-world reference with accurate attribute names, formatting, and values already aligned with your catalog setup.
Steps to Export Categories from Magento 2
To generate a CSV with your existing category tree, follow these simple steps using the Improved Import & Export extension:
- Go to System > Improved Import / Export > Export Jobs in your Magento 2 admin panel.
- Create a new export job and assign a name and schedule if you plan to automate it.
- Select the entity type as Categories — this tells Magento to export all category-related data.
- Choose the file format — options include CSV, XML, Excel, or JSON. You can also define custom field separators (e.g., comma, semicolon, tab) depending on your preferences or external requirements.
- Set the export destination — whether you’re exporting to Google Drive, FTP/SFTP, Google Sheets, or downloading the file manually.
- Apply attribute mapping and filters if you need to customize which columns to include or exclude specific categories.
Once configured, click ‘Save and Run’ in the top-right corner. Then, press the ‘Run’ button to begin the export process.
What You’ll Get: A CSV with Your Category Tree
The Magento 2 Improved Import & Export extension will generate a CSV file that includes your entire category structure, along with all related metadata, display settings, and SEO fields. This exported file is perfect for reviewing the attribute structure or using it as a base template for Magento 2 categories import. So, what comes next?
Magento 2 Categories Import: Step-by-Step Guide
Importing categories in Magento 2 is easier than you think — especially with the Improved Import & Export extension. This powerful tool lets you bulk import a well-structured category tree with just a few clicks, saving hours of manual work. Here’s how to complete a Magento 2 categories import from start to finish.
Step 1: Create a New Import Job and Configure General Settings
Start by navigating to System > Improved Import / Export > Import Jobs in your Magento admin panel. This section lets you manage all your import jobs. Click ‘Add New Job’ to begin.
Under the General Settings tab:
- Name your import job for easy identification.
- Set a schedule if you want to automate recurring imports (daily, weekly, etc.).
- Select the store view locale where the categories will be imported.
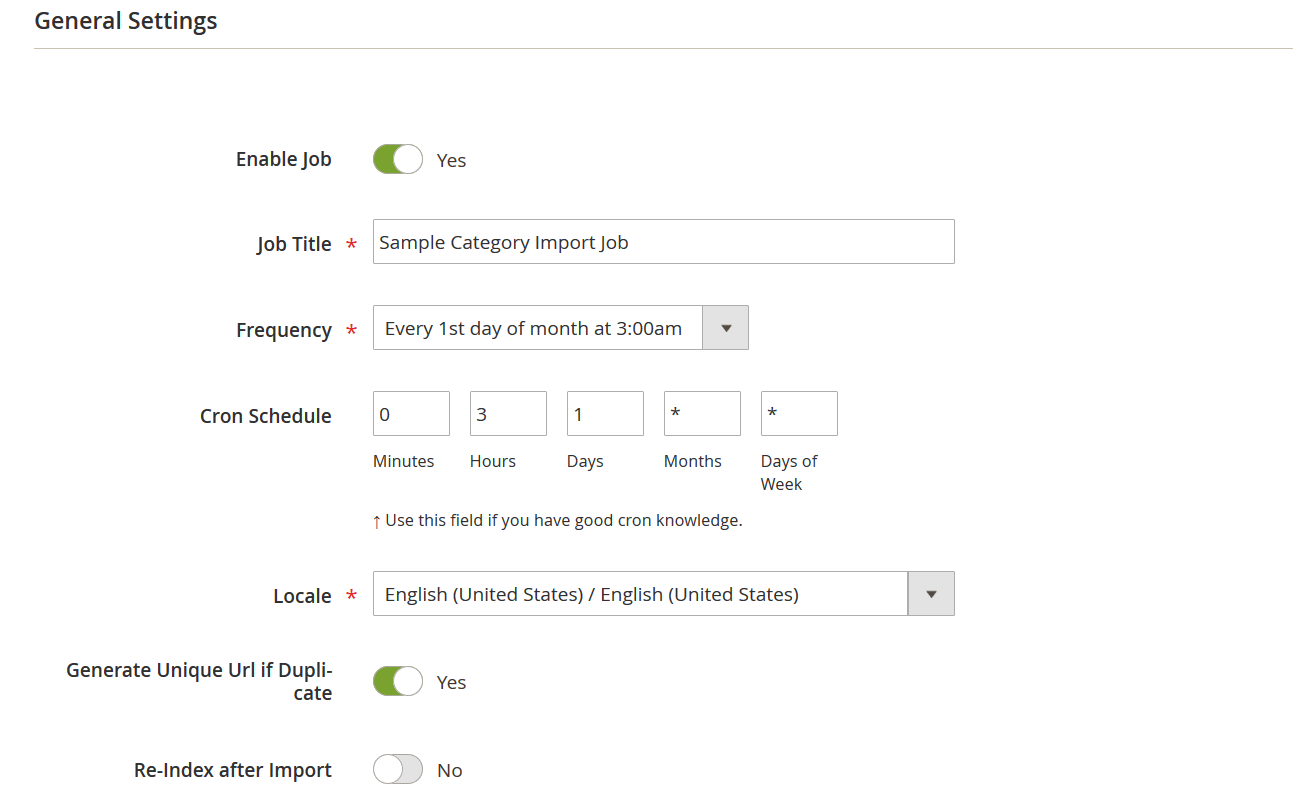
Two key toggles to pay attention to:
- Generate Unique URL if Duplicate — Ensures that Magento appends suffixes to duplicated URL keys automatically.
- Re-Index After Import — Triggers re-indexing to reflect the changes instantly on the storefront.
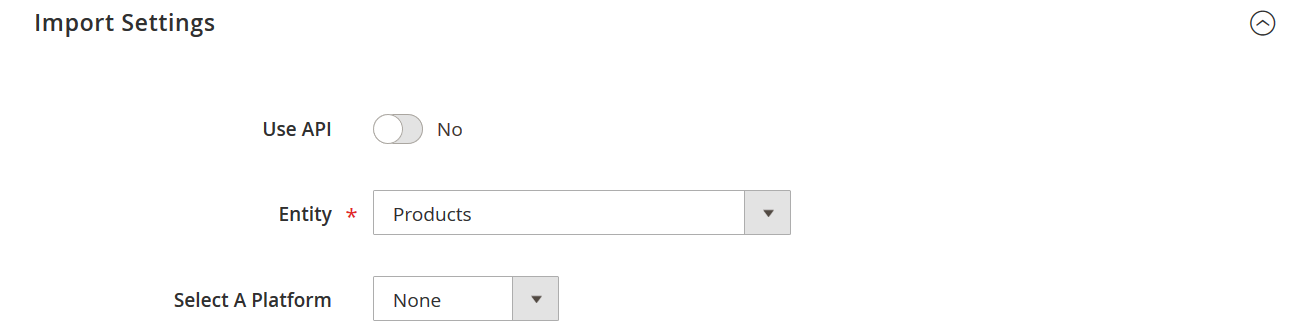
Step 2: Select ‘Categories’ as the Import Entity
In the Import Settings, select Categories from the Entity Type dropdown.

Next, choose the import behavior:
- Add/Update — Add new categories and update existing ones.
- Replace — Overwrite existing categories entirely.
- Delete — Remove categories that match those in the import file.
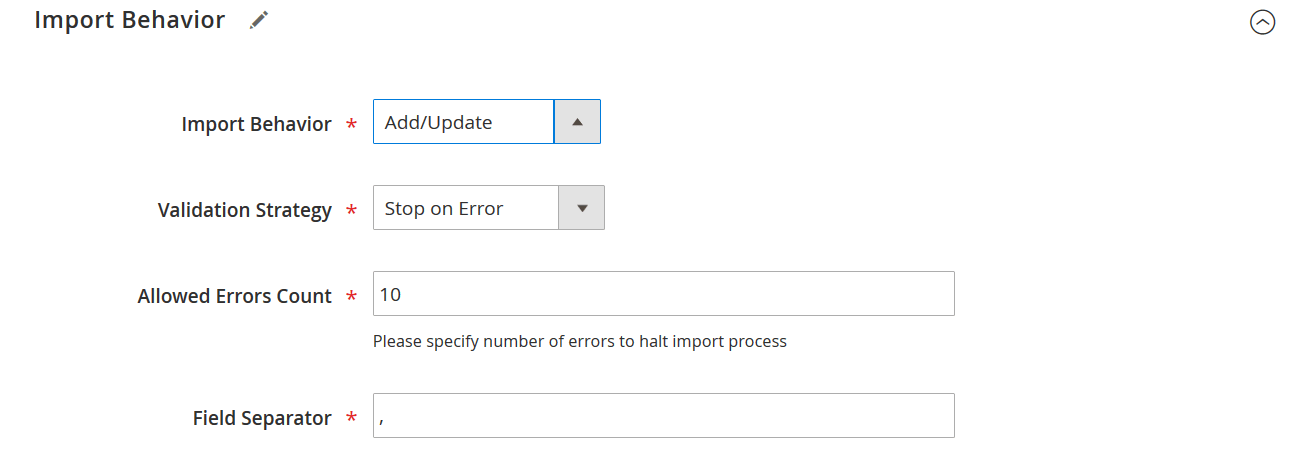
You can also define your error-handling strategy: skip problematic rows or stop the entire import if issues arise.
🔍 Pro Tip: Use the ‘Categories separated by’ and ‘Category levels separated by’ settings to define how categories are structured in your CSV file. For example:
- Use commas to separate multiple category paths: Electronics, Home, Books
- Use slashes to define subcategory levels: Electronics/Smartphones/Android
This flexibility ensures that you can import deeply nested categories even if your data uses non-standard separators.
Step 3: Choose Your File Format and Import Source
Head to the Import Source section and specify:
- File format: CSV, XML, Excel (XLSX), JSON, or ODS.
- Import source: Options include Google Sheets, direct file uploads, FTP/SFTP servers, Dropbox, APIs, and more.
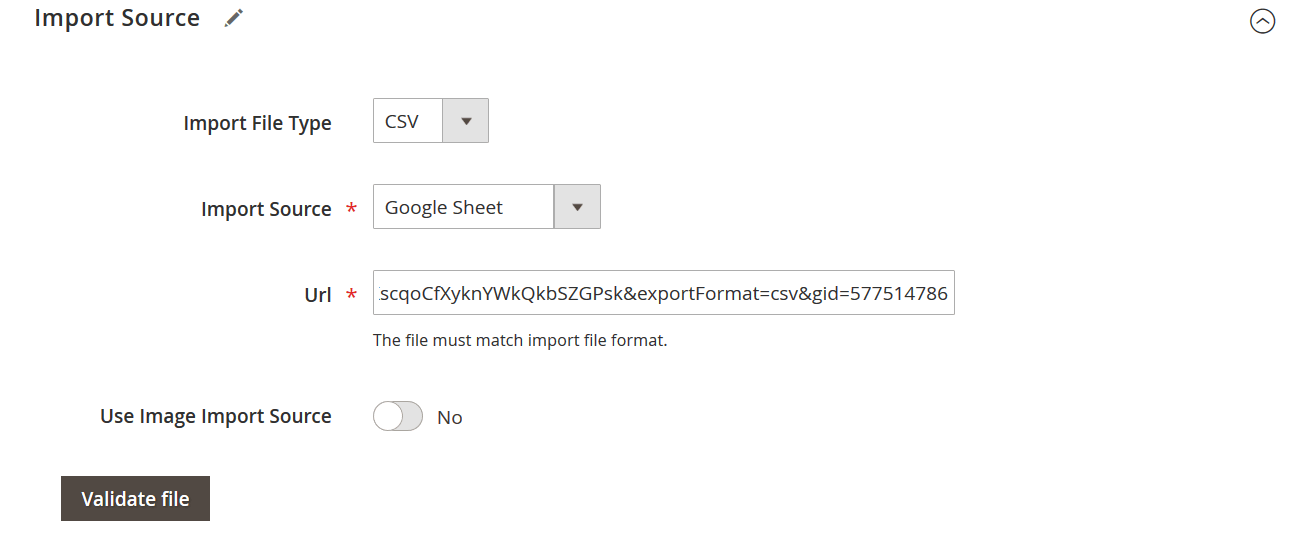
Once you’ve selected the file and source, click ‘Validate File’. The extension will check for errors and confirm whether the import table is ready.
Step 4: Map Attributes to Match Magento Category Schema
After validation, move to the Map Attributes screen.
Here, you can connect column headers in your file with the correct Magento 2 category attributes. This is especially helpful if your import file uses custom naming conventions or originates from another platform.
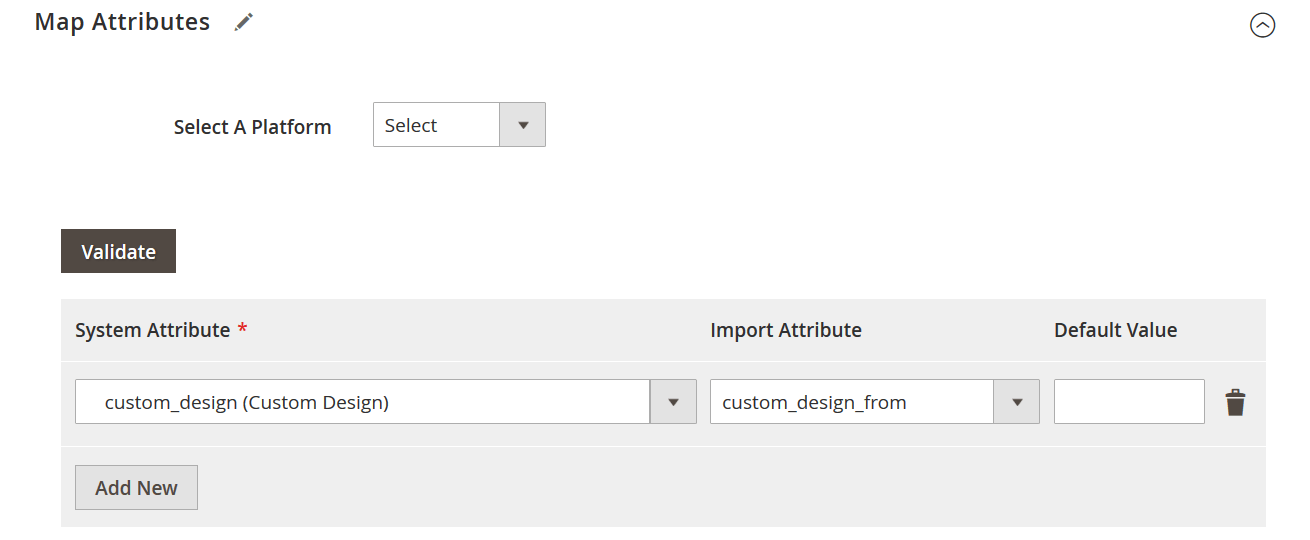
For example:
- cat_name → name
- shop_view → store_view
You can also save these mappings for future use, streamlining your Magento 2 categories import process.
Step 5: Run the Import and Review the Results
Click ‘Save & Run’, then press the ‘Run’ button to launch your import. The extension will display a real-time log showing import progress, success messages, or any errors that occur, allowing you to troubleshoot immediately if needed.

Congratulations — you’ve just completed a full Magento import categories operation using the Improved Import & Export tool!
Magento 2 Categories Import Use Cases & Best Practices
Beyond basic imports, the extension supports a range of powerful use cases to streamline your catalog management:
🔁 Automatic URL Key & Path Generation
If your import file doesn’t include url_key or url_path, the extension will generate them automatically based on the category name. For example:
- “New Category” becomes new-category.
- Duplicate entries are resolved with suffixes: new-category1, new-category2, etc.
🌍 Store View–Specific Category Imports
You can import categories for individual store views — perfect for multi-language catalogs. Use the group attribute to define variations, and ensure entity_id values match existing categories for accurate targeting.
🆔 Auto-Assign Category IDs
When creating new categories, simply leave the entity_id field blank. Magento 2 will auto-generate unique IDs, streamlining initial imports without manual tracking.
🛠 Updating Existing Categories
Need to edit existing categories? Start by exporting them first. Then modify your CSV and keep the original entity_id values to ensure accurate updates. Never change these IDs unless you’re intentionally overwriting the category.
However, these are not the only use cases for the Magento 2 category import. With the Improved Import & Export Extension, you can do many more. Let’s explore a few more things the module lets you do when importing categories to Magento 2.
How to Import Magento 2 Product Position in Category
Want to fine-tune the order in which products appear within categories on your storefront? With the Improved Import & Export extension, you can do exactly that by importing product positions in Magento 2 categories using a custom attribute called categories_position.
This functionality is exclusive to the Improved Import & Export extension — the native Magento 2 import tool doesn’t support importing product positions within categories.
What Is categories_position & How Does It Work?
The categories_position attribute works alongside the standard categories attribute in your product import file. While categories assigns products to specific category paths, categories_position lets you define the exact position of a product within each category, helping you control visual merchandising and product display order.

Here’s how it works:
- Standard category path example: Default Category/Gear/Bags
- With position assigned using categories_position: Default Category/Gear/Bags=5
This format tells Magento to place the product at position 5 within the “Bags” subcategory of “Gear.” You can repeat this pattern for multiple categories if the product belongs to more than one.
Where to Use categories_position
To import product positions in categories:
- Add the categories_position column to your product import CSV.
- Use the same category paths as listed in the categories column, but append the position using =position_number.
- Set ‘Products’ as your import entity when creating the import job.
- Proceed with your usual product import setup in the Improved Import & Export interface.
⚠️ Important: This attribute is not supported by Magento’s native import tool. It will only work when using our extension.
Why Import Product Positions?
Organizing products manually within each category is time-consuming, especially for large catalogs. Automating this process:
- Saves time for your merchandising team
- Ensures consistent product visibility across updates
- Enhances the user experience by controlling what appears first in each category
Whether you’re running a seasonal promotion or reordering your catalog based on performance data, importing Magento 2 product positions in categories gives you full control at scale. Follow our Magento 2 Product Position in Category guide for more information.
How to Import Magento 2 Categories for Multiple Store Views
When working with multilingual or multi-brand storefronts in Magento 2, it’s important to customize category names for each store view. The Magento 2 categories import functionality provided by the Improved Import & Export extension makes this process seamless, but it requires a slightly different approach from standard imports.
Why Import Categories for Different Store Views?
Each store view in Magento 2 can have its own language, branding, and customer preferences. That’s why category names often need to be localized or adapted per store view. For example, your “Men’s Shoes” category in English may appear as “Chaussures Homme” in French or “Herrenschuhe” in German.
Instead of identifying categories by their default name attribute, you can use a combination of the name, store_view, and store_name attributes to assign unique names across store views.
📥 Importing Categories for Secondary Store Views
To import localized or alternative category names per store view:
- Use the name attribute to define the full path of the category you’re working with.
- Set the store_view to the store code (e.g., French, German, English).
- Add the store_name attribute to specify the name of the last category in the path for that specific store view.

Example:
You’re importing the following path:
Default Category/Category A/Subcategory A/Subcategory B
If you want to rename “Subcategory B” for the French store view, use:
- name: Default Category/Category A/Subcategory A/Subcategory B
- store_view: French
- store_name: 1 Première Catégorie
This will rename “Subcategory B” only in the French view. To rename “Subcategory A” instead, shorten the path in the name field and adjust the store_name accordingly.
🔁 How to Rename Categories in the Default Store View
Renaming a category in the default store view is just as simple. The only difference? Leave the store_view field empty. Magento will apply the new name globally.
Follow These Steps:
- Export your categories using the Improved Import & Export extension.
- Open the file and add a store_name column (its position doesn’t matter).
- Fill in the desired name in the store_name column for the category you want to rename.
- Leave the store_view column blank for that row.
- Import the updated file back into your Magento 2 store.

After import, Magento will replace the original name of the last category in the path with your updated value, but only if the row is correctly formatted.
✅ Key Tips for Multi-Store Category Imports
- Only the last category in the name path is affected by the store_name value.
- Always define store-specific names using the correct store_view code.
- If both store_view and store_name are empty, Magento will skip the row without making changes.
- Use the Improved Import & Export extension to enable this functionality — native Magento tools do not support localized category name imports.
With this setup, you can easily manage multi-language catalogs, regional branding, and store-specific category structures using a single import job. Whether you’re optimizing for international SEO or tailoring the customer journey, importing Magento 2 categories for different store views puts full control in your hands.
Final Words: Enable Magento 2 Categories Import & Export with Firebear
While neither Magento 2 categories import nor the corresponding export processes are available out of the box, enabling this functionality is simpler than ever with the help of the Improved Import & Export extension. This powerful tool transforms category management from a manual chore into an automated, scalable process, allowing you to import a full category tree, assign product positions within categories, and manage unique category names per store view with ease.
Whether you’re launching a new store, maintaining a multi-language setup, or updating existing categories across multiple environments, our solution gives you complete control over your data. You can even rename Magento categories on the fly during import, define product visibility within categories, and map complex attribute structures from external systems — all in one flexible interface.
The Improved Import & Export extension goes far beyond categories. It also supports importing and exporting products, customers, orders, CMS pages, and more, with automation, scheduling, and API integrations designed to fit any business workflow.
If you’re ready to streamline your Magento 2 import processes, optimize catalog management, or need help tailoring the import setup to your store’s needs, get in touch with the Firebear team. Our experts are here to guide you every step of the way — from setup and configuration to advanced automation and data migration.
👉 Visit the extension page to learn more, and let’s simplify your data management together:
Explore the Improved Import & Export Extension for Magento 2
Want to master Magento 2 import from A to Z? Explore our complete guide and unlock step-by-step tutorials, tips, and expert tools.
👉 Go to the Full Magento 2 Import & Export Guide
Magento 2 Categories Import & Export FAQ
Can you import and export categories in Magento 2 by default?
No, Magento 2 does not provide built-in functionality for importing or exporting categories. However, you can unlock this capability using the Improved Import & Export extension by Firebear Studio. It allows you to easily manage Magento 2 categories import and export processes, including multi-store setups, product positions, and SEO data.
How do I import a category tree into Magento 2?
To import a full category tree, you can prepare a structured CSV file with attributes like name, parent_id, is_active, and position, then use the IIE extension to upload and map the data. This approach supports nested category paths and preserves the hierarchy automatically.
Can I import product positions within Magento 2 categories?
Yes, the Improved Import & Export extension introduces a custom attribute called categories_position, which allows you to define the order of products within each category. This feature is not supported by the native Magento import system and is exclusive to IIE.
Is it possible to import categories for different Magento store views?
Absolutely. With IIE, you can import unique category names for each store view using the store_view and store_name attributes. This is particularly useful for multilingual Magento 2 stores or when customizing categories for different markets.
How do I rename a Magento category using import?
You can rename an existing category by exporting your category list, editing the store_name field, and re-importing it using the Improved Import & Export tool. For renaming in the default store view, simply leave the store_view field blank during import.
Can I automate Magento 2 categories import jobs?
Yes, IIE lets you schedule import jobs to run at specific intervals — daily, weekly, or custom. This automation is ideal for syncing categories between development, staging, and production environments or integrating with external PIM/ERP systems.
What file formats are supported for Magento 2 category import and export?
The Improved Import & Export extension supports multiple file formats, including CSV, XML, JSON, Excel (XLSX), and ODS. You can also import data directly from Google Sheets, FTP/SFTP servers, Dropbox, APIs, or via manual upload.
Does the IIE extension validate category data before import?
Yes, the extension includes a validation feature that checks your import file for formatting errors, missing attributes, or invalid values before processing. This ensures your Magento 2 categories import is successful and avoids partial updates.
Can I export categories with all related data, like images and SEO metadata?
With IIE, you can export Magento 2 categories complete with associated attributes — including images, meta titles, meta descriptions, layout updates, and CMS blocks. This is ideal for backups, migrations, or SEO audits.
Where can I get a sample Magento 2 categories import file?
Firebear provides sample CSVs via GitHub and a Google Sheets Master Table. These templates are formatted to work seamlessly with the Improved Import & Export extension and serve as reliable starting points for your own Magento 2 categories import.
Related posts
 Mastering Magento 2 Upsell Products: Setup, Management, Import & Export Guide
 Magento 2 Cross-Sell Products Guide: Manual Setup, Bulk Import & Cart Optimization Tips
 How to Import & Export Shopware 6 Advanced Prices as Separate Entity
 How to Fulfill Dropshipping Orders on Shopify When Your Supplier Has No Integration
 How to Boost Sales with Shopware 6 Cross Selling: The Ultimate 2025 Guide
 Magento 2 Export Customers Tutorial: Export Customer Data with Ease
 How to Export Metafields in Shopify: A Complete Guide
 AI Revolution in Shopify Imports: Smarter, Faster, Better