
Magento 2 Import Made Easy: Features, Limitations & Best Alternative in 2026

Managing data in Magento 2 can quickly become overwhelming — especially when your catalog spans thousands of products, customers, or categories. The built-in Magento 2 import feature is designed to help merchants move data in bulk, but its functionality is limited and often creates more bottlenecks than solutions. In this guide, we’ll explain how the default Magento import process works, explore its features and limitations, and show you how to run imports step by step for different entity types.
However, relying solely on the native Magento 2 importer isn’t always enough. It lacks automation, flexible mapping, and support for multiple file formats — critical capabilities for modern e-commerce operations. That’s why we’ll also introduce the Improved Import & Export extension, a robust replacement that transforms Magento 2 import routines into a scalable, automated workflow. By the end, you’ll know exactly how to streamline your data management, avoid common pitfalls, and choose the right approach for your store in 2026.

Table of contents
- Understanding Magento 2 Import Functionality for Products, Customers, and More
- Key Types of Data You Can Import into Magento 2 by Default
- Magento 2 Import Requirements: File Size, Attributes, and Product Images
- How to Use the Default Magento 2 Import Tool: Step-by-Step Guide
- Tracking and Managing Magento 2 Import History
- Common Magento 2 Import Errors and How to Fix Them
- Drawbacks of the Default Magento 2 Import and the Best Replacement for 2026
- Final Words: Future-Proof Your Magento 2 Import in 2026
- Magento 2 Import FAQ
Understanding Magento 2 Import Functionality for Products, Customers, and More
Magento 2 includes a built-in import tool that helps merchants upload and update essential store data without manual entry. With this functionality, you can bring in products, customers, stock data, and advanced prices directly into your store from a CSV file. For many businesses, this feature is crucial when migrating data from another platform, maintaining an up-to-date product catalog, or performing large-scale updates across an e-commerce website.
Although the Magento 2 import system covers the basics, its scope is limited compared to the real needs of modern online stores. In this section, we’ll explore what entities can be imported by default, what requirements you must follow to ensure successful imports, and where the built-in importer falls short.
Key Types of Data You Can Import into Magento 2 by Default
The default Magento import process supports only a few types of entities, leaving many important data sets outside its reach. By default, you can transfer the following information:
- Advanced Prices — including tier pricing and customer group-specific prices.
- Products — such as simple, configurable, and virtual products with their basic attributes.
- Customers — customer account details, billing addresses, and shipping addresses.
- Stock Sources — sync product quantities between different inventory locations (via MSI).
- Tax Rates — manage regional tax rates for different store views (via a separate import tool).
These entities address fundamental catalog and pricing needs, but they don’t cover everything. A typical Magento 2 store also relies on additional entities like CMS pages, categories, product attributes, or even customer reviews — all of which cannot be handled natively by the built-in importer. We’ll return to this limitation when discussing the drawbacks of the default Magento 2 import later in the guide.
Magento 2 Import Requirements: File Size, Attributes, and Product Images
To run a successful Magento 2 import, your data must meet several technical requirements. Failing to follow them usually leads to errors or incomplete imports. Let’s break them down:
- File Size Limit — The default maximum file size is 2 MB, which is very restrictive for larger catalogs. You can increase this limit by editing the php.ini configuration on your server. The current file size allowance is always displayed in a system message on the Import page.
- Special Characters — Certain characters (such as =, <, >, “, \, |, &) may cause problems during import if not properly escaped. To avoid errors, enclose values with quotes. For example, the string code=”lght1″, code=”lght2″ should be written as “code=”lght1″, code=”lght2″” so Magento correctly interprets the nested double quotes.
- Attributes and Values — Every CSV must include the correct attribute names and values. If they don’t match Magento’s expected structure, the import will fail. To simplify this, you can consult our Magento 2 Import Guide List or the , where we provide ready-to-use attribute references for all entities.
- Product Images — When importing products with images, you need to provide the correct file path in your CSV. Images must either be uploaded to the var/import folder on your Magento server or linked via a direct URL. Without the correct path, images won’t appear in your storefront.
Following these rules ensures that the Magento 2 import runs smoothly. However, as you’ll see later, even with correct formatting, the default importer still has major limitations when it comes to flexibility, automation, and supported entities.
How to Use the Default Magento 2 Import Tool: Step-by-Step Guide
Now that you know which data types can be imported and what requirements apply, let’s walk through the Magento 2 import process itself. The native tool is located in the admin panel under System → Data Transfer → Import. While straightforward, each step requires careful configuration to avoid errors and ensure your products, customers, or prices are imported correctly.
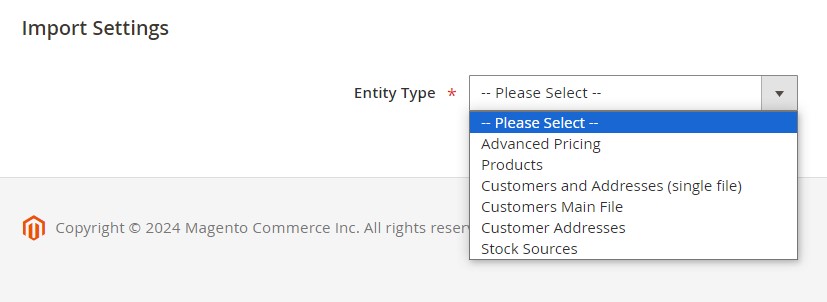
Step 1: Prepare Your Data and Select the Entity for Import
Before uploading, double-check that your CSV file meets all Magento import requirements: correct attributes, valid SKUs, and proper image paths. Once validated, follow these steps:
- Go to System → Data Transfer → Import.
- Under Import Settings, select the Entity Type you want to upload — for example, Products, Customers, Advanced Pricing, or Stock Sources.

Each entity has its own rules for formatting, so preparing your CSV carefully is essential for a successful Magento 2 import.
Step 2: Set the Magento 2 Import Behavior
The next step is to define how Magento processes the imported data. In the Import Behavior dropdown, you can choose from:
- Add/Update — Add new entities or update existing ones. For products, all fields can be updated except for the SKU, which must remain unique. Learn more about SKUs here.
- Replace — Overwrite existing database records with the new data.
- Delete — Remove entities from the database if they are present in the import file.

Choosing the correct behavior is critical. For most scenarios, Add/Update is the safest option, while Replace and Delete should be used with caution to prevent data loss.
Step 3: Choose a Validation Strategy for Error Handling
Data imports often contain formatting mistakes or missing fields. Magento allows you to decide what should happen when errors are encountered:
- Stop on Error — The process halts immediately when the first error is found.
- Skip Error Entries — Invalid rows are skipped while valid ones are processed.

You can also set the Allowed Errors Count, which defaults to 10. If the number of errors exceeds this threshold, the Magento 2 import will be canceled. This setting helps balance efficiency with accuracy, especially when handling large datasets.
Step 4: Configure Separators and Field Enclosures
CSV files use commas by default, but depending on your data source, you may need to adjust separators:
- Field Separator — Default is , (comma).
- Multiple Value Separator — Default is , (comma).
- Empty Attribute Value Constant — Default is _EMPTY_VALUE_.
- Fields Enclosure — Check this option to wrap values in quotes, ensuring special characters (like =, “, &) are interpreted correctly.
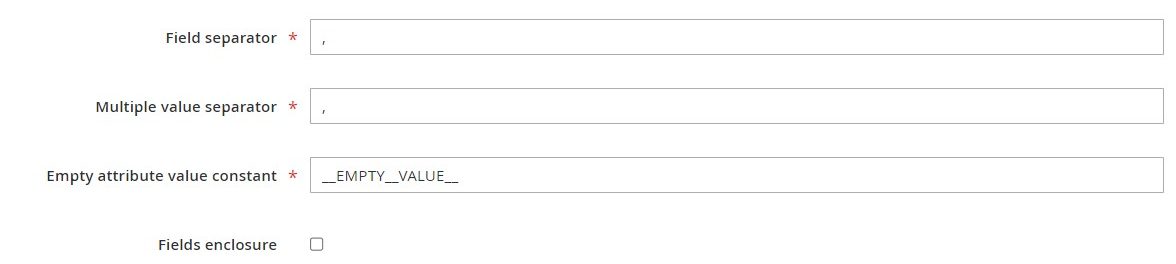
If you prefer another separator (such as ;), make sure your CSV file matches the chosen character to avoid parsing errors during Magento import.
Step 5: Locate and Upload the Import File
After configuring separators, it’s time to upload your data file:
- Click Choose File.
- Locate your prepared CSV file on your computer.
- Click Open to attach it to the import job.
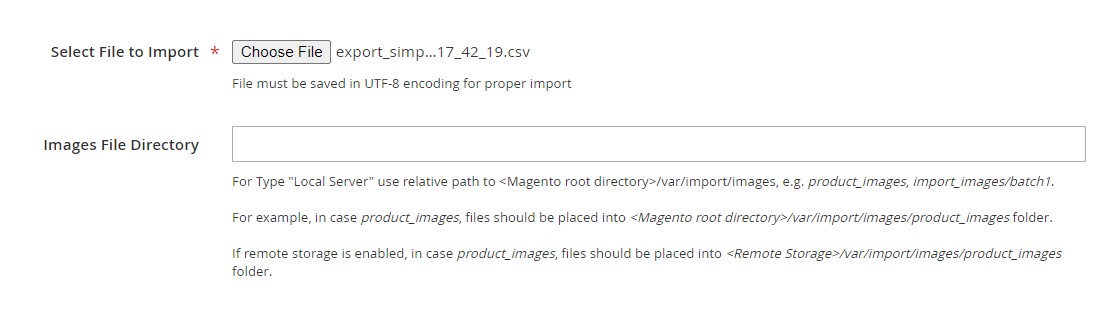
Pro Tip — Product Images: For product imports, specify the relative path to your images in the Images File Directory field. For example:
product_images if your images are stored in <Magento-root-directory>/var/import/images/product_images
Without a correct path, Magento won’t display product images after import. For more details, check our full Magento 2 product import guide.
Step 6: Validate and Run the Magento 2 Import
Before Magento processes the file, it validates the data:
- Click Check Data in the top-right corner.

- If no errors are found, you’ll see a confirmation message and can proceed by clicking Import.

- If the data is invalid, Magento will display error messages in the Validation Results section. Correct the problems in your CSV and try again.
Once validated, the Magento 2 import will start, and your new or updated entities will appear in the store.
Tracking and Managing Magento 2 Import History
Every successful (or failed) import leaves a digital footprint in your Magento 2 backend. To help merchants keep track of these operations, the platform includes an Import History feature. You can access it by navigating to System → Data Transfer → Import History.
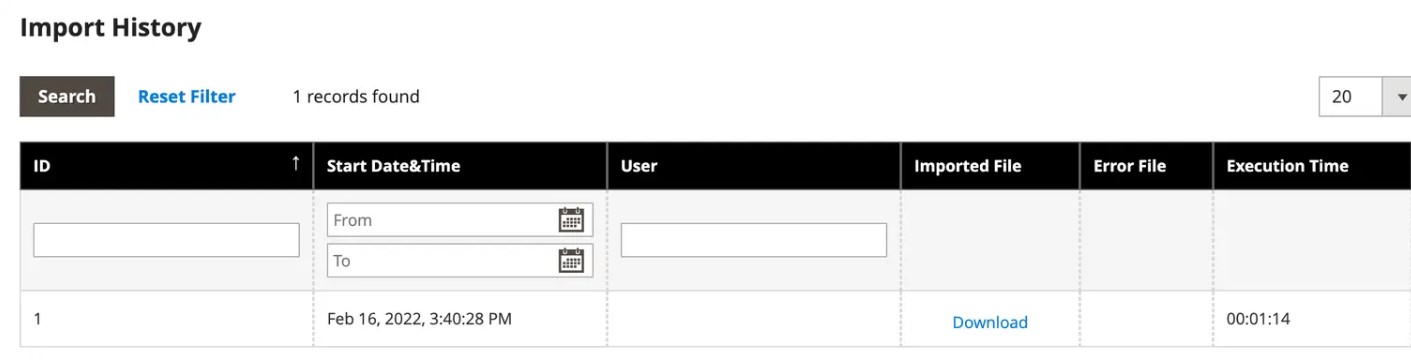
This section acts as a detailed log of your Magento 2 import activity, allowing you to review past uploads, verify results, and troubleshoot errors without re-running the process blindly.
What You’ll Find in Magento 2 Import History
The Magento import history grid provides several key details for each job:
- Start Date and Time — See exactly when the import began, helping you track scheduled jobs or identify peak workload times.
- User — The admin account that initiated the import, useful for team accountability in multi-user environments.
- Execution Time — How long the import took to process, which helps you monitor performance and spot bottlenecks in larger jobs.
- Imported File — A direct link to the CSV file that was used, letting you re-check or download the data for auditing and troubleshooting.
- Status Messages — Validation results, errors, or confirmations that show whether the import was completed successfully.
This information is essential not only for troubleshooting Magento 2 import errors but also for ensuring compliance with internal data handling policies.
Why Magento Import History Matters for Store Management
While at first glance it may seem like a small feature, the Magento 2 import history plays a big role in maintaining smooth workflows:
- Error Diagnosis — If an import fails, you can quickly locate the file and cross-check it with validation errors.
- Team Transparency — With multiple admins running imports, the history log helps track who imported what and when.
- Performance Monitoring — Regularly reviewing execution times can highlight when it’s time to optimize CSV formatting, server performance, or consider a more advanced import tool.
- Audit Trail — Import logs provide a basic compliance record, which is valuable for merchants working with sensitive product or customer data.
Limitations of Default Magento Import History
Although useful, the built-in Magento import history has its limitations:
- It only tracks imports made through the default Magento 2 tool — if you use external scripts or APIs, those actions won’t appear here.
- It lacks advanced reporting, filtering, or export options, making large-scale audits cumbersome.
- There’s no automated notification system — admins must manually check the logs for issues.
This means that while Magento 2’s import history is fine for small stores or occasional jobs, it falls short for merchants managing complex, high-volume Magento imports.
Common Magento 2 Import Errors and How to Fix Them
Even if your CSV file looks perfect, it’s common to run into problems during the Magento 2 import process. These issues can block your data upload, cause products to appear incomplete, or even break your catalog structure. Understanding typical Magento import errors — and knowing how to fix them — will save you hours of troubleshooting and prevent costly downtime.
Invalid Value for Attribute
Error example:
Invalid value for attribute: color
Why it happens:
Magento validates attributes against predefined values. If your CSV contains an attribute value that doesn’t exist in your store (e.g., entering “blue-light” when “Light Blue” is the correct option), the system will reject it.
How to fix it:
- Double-check that all attribute values in your CSV exactly match the options defined in your Magento 2 backend.
- Use the Magento 2 CSV validation tool in Improved Import & Export to highlight mismatches before the file is uploaded.
URL Key Already Exists
Error example:
URL key for specified store already exists
Why it happens:
Every product in Magento 2 requires a unique URL key. If your import file includes duplicates, the system won’t allow the import to proceed.
How to fix it:
- Clean your CSV and ensure all products have unique URL keys.
- Use suffixes or auto-generated keys when importing bulk products.
- The Improved Import & Export extension includes a mapping feature to automatically resolve URL conflicts.
Missing SKU Reference
Error example:
Product with SKU “ABC123” not found
Why it happens:
SKUs act as unique identifiers in Magento 2. If your file refers to SKUs that don’t exist (for related products, configurable product links, etc.), the import will fail.
How to fix it:
- Confirm that all SKUs in your CSV already exist in the catalog before linking them.
- Standardize SKU formats across your entire catalog to avoid mismatches.
- If migrating from another system, use attribute mapping in Improved Import & Export to align SKU structures.
Image Path Issues
Error example:
Imported product images not found in the directory
Why it happens:
Magento 2 requires an exact file path or URL for every product image. If the path is missing, incorrect, or the images were not uploaded to the right folder, they won’t appear on the storefront.
How to fix it:
- Upload images to the var/import/images directory or specify a full URL in the CSV.
- Double-check that the file names in your CSV match the actual image files.
- Use Google Drive or Dropbox connections via Improved Import & Export to simplify image imports.
Row Format and Special Character Errors
Error example:
Data format invalid at row 65
Why it happens:
Improperly formatted CSV rows or unescaped special characters can break the import process.
How to fix it:
- Enclose values containing special characters in double quotes.
- Validate your CSV using a text editor or spreadsheet software before uploading.
- Use the Magento import troubleshooting logs to identify problematic rows.
In addition to these Magento 2 import errors, you may also face the limitations of the default tool. Let’s describe them and provide a solution.
Drawbacks of the Default Magento 2 Import and the Best Replacement for 2026
Now that we’ve reviewed the basics of Magento 2 import functionality, it’s time to look at its limitations. While the built-in importer helps merchants handle core data like products, customers, and advanced pricing, it quickly shows its weaknesses when you need to manage a growing catalog, migrate from another platform, or automate repetitive updates. Below, we’ll outline the most critical drawbacks of the native Magento import tool and explain why merchants increasingly turn to the Improved Import & Export extension as the best replacement in 2026.
Limited Number of Entities Supported by Magento 2 Import
The most significant drawback of the default importer is its narrow scope. By default, you can import products, customers, advanced pricing, tax rates, and a handful of stock-related entities. But modern e-commerce workflows often require much more.
- No category tree import — You cannot import a full category structure into Magento 2. While Magento creates categories on the fly if a new category path is specified during a product import, building an entire category tree this way is inefficient and error-prone. Merchants migrating from Magento 1 or another platform must rebuild their catalog structure manually — a time-consuming task. Learn more about category imports here.
- No order import — Magento 2 does not support importing orders out of the box. This becomes a major obstacle when you need to sync order data between your Magento admin, POS system, or other sales channels. Without order import, you must recreate each order manually. With Improved Import & Export, you can import orders in bulk into both Magento Open Source and Adobe Commerce. Explore order imports here.
These are just two examples — but as the comparison below shows, the native tool falls far behind when measured against real-world merchant needs.
Comparison of Supported Entities
| Entity | Default Magento 2 Import | Improved Import & Export |
| Products | ✅ | ✅ |
| Categories | ❌ | ✅ |
| Customers and Addresses | ✅ | ✅ |
| Customer Main File | ✅ | ✅ |
| Customer Address | ❌ | ✅ |
| Advanced Pricing | ✅ | ✅ |
| Tax Rates | ✅ | ✅ |
| Attributes | ❌ | ✅ |
| Orders | ❌ | ✅ |
| CMS Pages | ❌ | ✅ |
| CMS Blocks | ❌ | ✅ |
| Cart Price Rules | ❌ | ✅ |
| Catalog Price Rules | ❌ | ✅ |
| Gift Cards | ❌ | ✅ |
| Reviews | ❌ | ✅ |
| URL Rewrites | ❌ | ✅ |
| Search Terms | ❌ | ✅ |
| Search Synonyms | ❌ | ✅ |
| Page Hierarchy | ❌ | ✅ |
| Newsletter Subscribers | ❌ | ✅ |
| Stock Source Qty | ❌ | ✅ |
| Stock Sources | ✅ | ✅ |
| Total | 6 | 22 |
As the table shows, the default Magento 2 import tool supports just six entity types. In contrast, Improved Import & Export expands this to 22, covering virtually every data set you might need for migration, daily operations, or third-party integrations.
File Format and Source Limitations in Magento 2 Import
Another major drawback of the default Magento 2 import tool lies in its strict file format and source restrictions.
- File format — Magento only supports CSV by default. If your data comes in XML, JSON, XLSX, or ODS format (as is common with ERP or CRM exports), you must manually convert it to CSV before importing. This not only wastes time but also increases the risk of formatting errors.
- File sources — The built-in importer accepts files from the local server only. That means you can’t pull data directly from external sources such as Google Sheets, cloud storage, or APIs. In practice, this forces you to download, reformat, and re-upload files for every update — a process that is unsustainable at scale.
In contrast, the Improved Import & Export extension eliminates these bottlenecks by:
- Supporting multiple formats — CSV, XML, JSON, XLSX, and ODS — without manual conversion.
- Accepting data from a wide range of sources, including FTP/SFTP servers, Dropbox, Google Drive, Google Sheets, direct URLs, and even API integrations.
- Automatically unpacking compressed archives for large imports.
For merchants managing dynamic catalogs or integrating Magento with other business systems, these capabilities turn data import from a manual chore into a streamlined, automated workflow.
No Data Mapping or Attribute Matching
The default Magento importer is also known for its lack of data mapping. If your CSV contains attribute names or values that don’t match Magento’s structure, the import will fail — forcing you to edit the file manually. This not only consumes time but also increases the risk of human error.
With Improved Import & Export, you can:
- Use a visual mapping interface to match external attributes with Magento attributes in just a few clicks.
- Apply mapping presets for popular platforms (Magento 1, Shopify, WooCommerce, etc.), saving hours of manual editing.
- Normalize values automatically during import — for example, converting “blue-light” into “Light Blue” to match Magento’s attribute set.
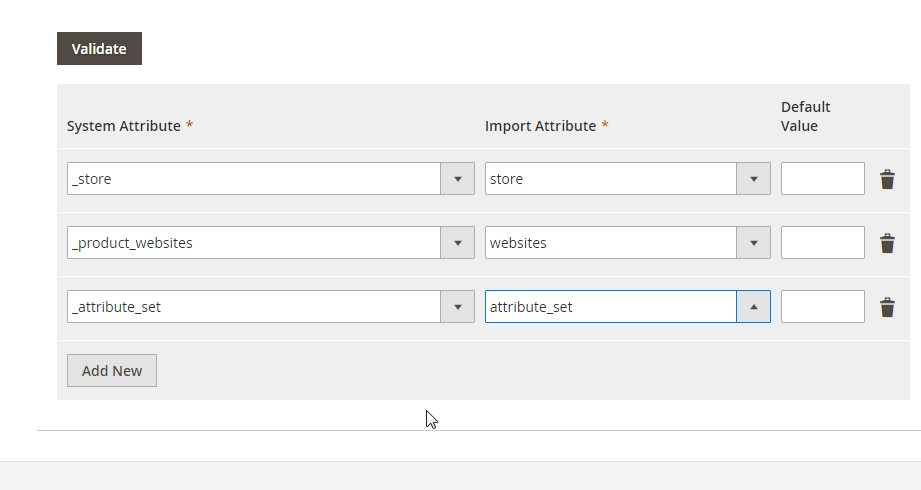
This feature alone can cut down preparation time dramatically and make Magento import troubleshooting much easier.
Lack of Automation in Magento 2 Import
Automation is essential for modern e-commerce, but the native Magento 2 import tool lacks scheduling features in Magento Open Source. Scheduled jobs are available only in Adobe Commerce, and even then, they remain basic.
With Improved Import & Export, merchants can:
- Set up automated import schedules using cron jobs directly from the admin panel.
- Run imports daily, weekly, or at custom intervals without any manual involvement.
- Automate imports from multiple sources, including Google Sheets, Dropbox, FTP/SFTP, or direct API connections.
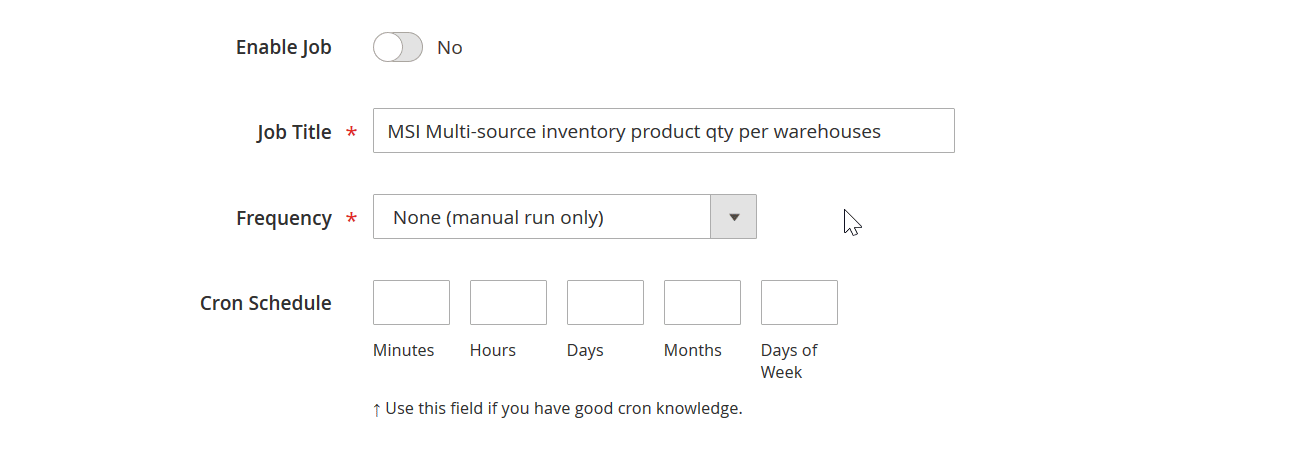
This transforms Magento 2 import from a repetitive manual task into a scalable, automated process that grows with your store.
Magento 2 Import vs. Improved Import & Export: Side-by-Side Comparison
| Feature | Default Magento 2 Import | Improved Import & Export |
| Supported Entities | 6 | 22 |
| Data Mapping | Absent | Advanced, user-friendly |
| Mapping Presets | Absent | Prebuilt + custom |
| Third-Party Integrations | No | Extensive (ERP, CRM, PIM) |
| Scheduled Imports | No (Adobe Commerce only) | Yes, in all editions |
| Supported File Formats | CSV only | CSV, XML, JSON, XLSX, ODS, etc. |
| Supported File Sources | Local server only | Local server, FTP/SFTP, Dropbox, Google Drive, Google Sheets, direct URLs, APIs |
| Data Validation | Basic | Advanced |
| Error Handling | Minimal error messages | Detailed logs, troubleshooting |
| Import Speed | Moderate | Optimized, faster |
| Ease of Use | Basic | Intuitive + powerful |
Why Improved Import & Export Is the Best Magento 2 Import Replacement in 2026
The Improved Import & Export extension solves every major weakness of the native tool. It supports more entities, adds advanced data mapping, enables full automation, and integrates Magento with external systems without custom development. In 2026, where automation, scalability, and flexibility define e-commerce success, relying on the default Magento 2 importer is no longer enough.
By switching to Improved Import & Export, merchants can:
- Reduce manual work and errors.
- Sync Magento with external platforms in real time.
- Automate updates for products, categories, customers, and orders.
- Manage large catalogs and migrations without downtime.
In short, if you want to future-proof your store, streamline data management, and maximize efficiency, the Improved Import & Export extension is the best replacement for the default Magento 2 import tool.
Final Words: Future-Proof Your Magento 2 Import in 2026
Choosing the right Magento 2 import method is more than just a technical decision — it defines how efficiently you can scale, migrate, and maintain your store in 2026 and beyond. The default Magento import tool is adequate for small catalogs and simple updates, but its limitations quickly surface when you need to import orders, categories, attributes, CMS pages, or when automation and integrations become essential.
That’s where the Improved Import & Export extension becomes indispensable. It extends Magento 2’s basic import capabilities with advanced features such as:
- Support for 20+ additional entities (orders, categories, attributes, CMS pages, reviews, and more).
- Flexible data mapping with presets for external systems like Magento 1, Shopify, and WooCommerce.
- Automation via scheduled imports and exports with full cron support.
- Compatibility with multiple file formats (CSV, XML, JSON, XLSX, ODS) and sources (Google Sheets, Dropbox, FTP/SFTP, direct URLs, APIs).
- Detailed error logs and troubleshooting tools to make Magento import errors easy to fix.
Whether you’re migrating from another platform, syncing data with ERP/CRM systems, or simply tired of reformatting CSV files, Improved Import & Export helps you cut manual work, reduce risks, and future-proof your business operations.
👉 Explore the Improved Import & Export Extension to see how it can replace Magento’s default importer and unlock automation, scalability, and integrations.
👉 Need expert guidance? Contact the Firebear team for a personalized consultation and let us help you build a seamless import workflow tailored to your business.
Don’t let the limitations of the default Magento 2 importer slow you down — take control of your data and make imports a strategic advantage, not a bottleneck.
Magento 2 Import FAQ
How to import a file in Magento 2?
To import data, go to System → Data Transfer → Import. Select the entity type (products, customers, advanced pricing, etc.), set the import behavior, choose a validation strategy, configure separators, and upload your CSV file. After running the Check Data function, click Import if validation passes.
How to add a custom import in Magento 2?
Magento 2 does not support custom imports by default. To achieve this, you must either develop a custom module or use a third-party extension like Improved Import & Export, which allows you to configure custom rules, mapping, and scheduling.
How to import categories in Magento 2?
By default, Magento 2 only creates categories on the fly if they are specified in the product’s category path during a product import. However, importing a full category tree is not possible without third-party tools. The Improved Import & Export extension supports category tree imports in bulk.
How to import orders in Magento 2?
The default Magento 2 import tool cannot import orders. To bring order data from external systems (POS, ERP, marketplaces), you’ll need an advanced solution like Improved Import & Export, which supports order imports for both Magento Open Source and Adobe Commerce.
How to import customers in Magento 2?
Magento allows importing customer accounts and addresses via CSV. However, the process is limited in flexibility. For advanced use cases, such as importing segmented customer data, updating addresses in bulk, or syncing with CRMs, Improved Import & Export offers automated workflows and mapping presets.
What file formats does Magento 2 support for import?
By default, Magento 2 only supports CSV files. If your data is in XML, JSON, XLSX, or ODS, you must convert it manually. Extensions like Improved Import & Export remove this limitation by supporting multiple formats natively.
Where do I upload product images for Magento 2 import?
When importing products, image paths in your CSV must point to either the /var/import/images directory on your Magento server or a full external URL. With Improved Import & Export, you can also import images directly from Google Drive, Dropbox, or other sources.
How to fix common Magento 2 import errors?
Typical errors include “Invalid value for attribute”, “URL key already exists”, and missing SKU references. Fix them by validating attributes, ensuring unique URL keys, and double-checking SKUs. Using the Improved Import & Export extension simplifies troubleshooting with advanced error logs and automatic data mapping.
Can I automate imports in Magento 2?
Automation is not available in Magento Open Source by default. Only Adobe Commerce offers limited scheduling. The Improved Import & Export extension enables full automation for both editions, allowing you to schedule recurring imports from multiple sources.
What is the best Magento 2 import extension?
The Improved Import & Export extension by Firebear Studio is widely considered the most comprehensive Magento 2 import tool. It supports 20+ entities, multiple file formats, mapping presets, third-party integrations, and automated imports from sources like Google Sheets, FTP/SFTP, Dropbox, and APIs.