SAP Business One In-Depth Review: Inventory (Warehouses, Sublevels, Multi-Bin, Cycle Count, Inventory Tracking, Pick & Pack)
Below, we explore SAP Business One inventory tools and mechanisms. You will discover the inventory valuation methods used within the system, run through the warehouse setup, learn about cycle count and inventory tracking of SAP B1, explore the basics of pick and pack processes, and peruse pricing schemes associated with SAP Business One.
With SAP Business One, you get the ability to monitor your inventory in real-time. Every time you add a new transaction, the system updates your quantity levels in a corresponding warehouse. For the perpetual inventory, the update also covers the appropriate monetary values.

Table of contents
- 1 Perpetual Inventory in SAP B1
- 2 SAP Business One Warehouse Setup
- 3 Pick & Pack Process
- 4 Pricing Essentials
- 5 How to integrate SAP Business One with external systems
- 6 SAP Business One Integration FAQ
- 6.1 How to connect SAP Business One to Magento 2?
- 6.2 How does the integration work?
- 6.3 Is the Magento 2 SAP Business One integration connector an open-code solution?
- 6.4 Does it offer real-time synchronization?
- 6.5 Can I manage Magento 2 data in the SAP Business One UI?
- 6.6 Which SAP entities can be synchronized with Magento 2?
Perpetual Inventory in SAP B1
The SAP Business One perpetual inventory is an additional complex of tools that help you control not only quantity levels but also monetary values.
How to Enable Perpetual Inventory in SAP Business One
You can enable Perpetual Inventory in SAP Business One as follows:
- Go to the Administration -> System Initialization -> Company Details -> Basic Initialization tab.
- Activate the Use Perpetual Inventory checkbox.
- Choose the default valuation method. SAP Business One offers the following three options: Moving Average, Standard, or FIFO (we explore them below).
- Enable/disable the Manage Item Cost per Warehouse feature.
- Specify the default valuation method for serial and batch-numbered items. SAP Business One lets you choose between by item group or by serial/batch valuation method.
- Accommodate automatic postings to the G/L. You need to define the primary inventory accounts:
- Go to Administration -> Setup -> Financials -> G/L Account Determination.
- Open the Inventory tab.
- Apply the necessary changes.
Also, note that it is a good idea to configure the system behavior when inventory goes below minimum quantity levels. You can configure the corresponding options under Administration -> System Initialization -> Document Settings -> General tab. The Warning Only option lets you identify users with extra abilities. Firstly, they can confirm the quantity level warning. Secondly, they can add the document using the General Authorizations.
Valuation Methods
In SAP Business One, different valuation methods provide different impacts on your accounting system. Since it is necessary to calculate the monetary value of your inventory in the warehouse at the end of the year, it is vital to understand how each valuation method works. Note that it is a little bit more sophisticated than the summary of all your purchases since a particular item may be purchased at different prices throughout the year.
Therefore, SAP Business one leverages valuation methods or the Cost of Goods Sold for determining the actual price of the items sold. The following four options are available in SAP Business One.
- Moving Average. According to this valuation method, SAP Business One calculates the item cost by dividing the total inventory value by the on-hand quantity.
- FIFO. According to this valuation method, SAP Business One calculates the item cost as the cost of the oldest unit on hand.
- Standard Cost. According to this valuation method, SAP Business One lets you determine the unit cost manually when you set up the item. The system records variances that occur due to a different purchase price to a variance account, providing no impact on the unit cost.
- Serial/Batch Valuation Method Cost. According to this valuation method, SAP Business One assigns the item cost to the individual serial or batch number unit and uses it when the unit appears in a sales document.
Although the valuation method selected in the System Initialization serves as the default for new item groups, you can apply a different setting for them if necessary. SAP Business One incorporates the assigned item group to determine the correct valuation method automatically. However, you can always override it manually.
Note that valuation methods can be changed only if the following two conditions were adhered to:
- The item is not available on hand;
- No open documents for the item exist.
Follow these steps to override the default valuation method in SAP Business One:
- Proceed to Inventory;
- Choose Item Management;
- Go to Inventory Valuation Method;
- Choose the range of items;
- Set up the new valuation method.
The system displays a qualifying list of items. You can update the valuation method here.
Also, note that SAP Business One offers Inventory Revaluation. With this tool, you can re-evaluate your item costs and inventory values. At the same time, there is no need to change quantity levels. The feature is mostly used for managing the year-end closing processes. You can enable it under Inventory -> Inventory Transactions -> Inventory Revaluation.
The following video sheds light on the valuation methods used in perpetual inventory in SAP Business One:
SAP Business One Warehouse Setup
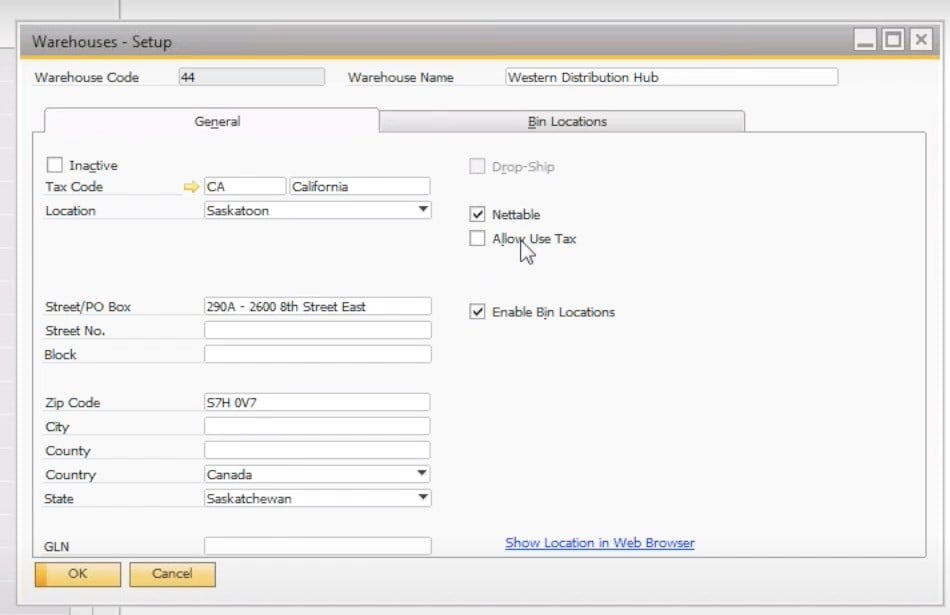
According to SAP, warehouses are key building blocks of your company database. Of course, if you don’t rely on the dropshipping business model (but even in this case warehouses are important). For all other businesses, it is important to know which items are in stock in what quantities and locations. To help you with this information, SAP Business One offers warehouses that represent physical locations. As for the dropshippers mentioned above, they can rely on warehouses as virtual locations that represent vendors. In the following article, we shed light on various nuances of warehouse management in SAP Business One. Let’s start with the most evident topic:
How to Create Warehouses
To begin your work in the area of item stocks, you need to create a warehouse in SAP Business One:
- Visit your Administration;
- Open the Setup section;
- Proceed to Inventory;
- Choose Warehouses;
- Add a new warehouse here: specify its code, name, location, and other parameters. You can identify whether your new warehouse is used for dropshipping. Besides, it is possible to automatically include it in the MRP run. You can find the detailed description in the video below:
Although SAP Business One creates warehouse 01 by default, you can also define a default warehouse for the company under Administration -> System Initialization -> General Settings -> Inventory tab.
The same tab lets you specify whether to add all warehouses to new and existing items automatically. If you deactivate this feature, no warehouses are displayed on the Inventory Data tab of the items’ master data. In this case, it is necessary to provide this data manually, which is useful for a large number of warehouses with different assortments.
Multi-Bin Functionality
SAP Business One lets you simplify your routine with warehouse management even more. The system lets you divide each warehouse into several sublevels (up to 4). Each sublevel can be used to identify a bin location. But what is a sublevel actually?
When you define a sublevel in SAP Business One, it can be related to an aisle, zone, area, or shelf. Warehouse and its sublevels have specific codes that are reflected in bin location codes. Let’s see how to set up bin locations to illustrate the multi-bin functionality of SAP Business One:
- Go to the Warehouse Setup window;
- Activate bin locations;
- Enable up to 4 sublevels in the Bin Location Field under Administration -> Setup -> Inventory -> Bin Locations;
- Define up to 10 attributes, such as size and bin content, for your bin locations;
- Set up Bin Location Attribute Codes;
- Provide Warehouse Sublevel Codes to name your sublevels, identifying the details that match your warehouse. Utilize the Warehouse Sublevel Code Management tool to generate, update, or delete warehouse sublevel codes.
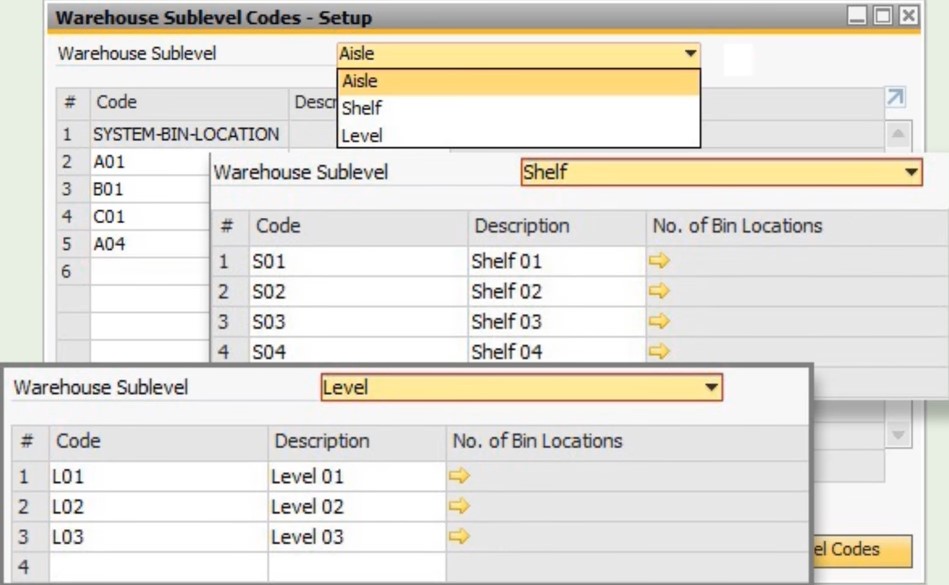
The following video describes how to use bin locations with warehouse sublevels in SAP Business One:
After primary codes are set up, you can generate the actual bin master data. You can do that under Inventory -> Bin Locations -> Bin Location Management. Here, SAP Business One lets you generate bin locations automatically. Deleting bin locations is possible here too.
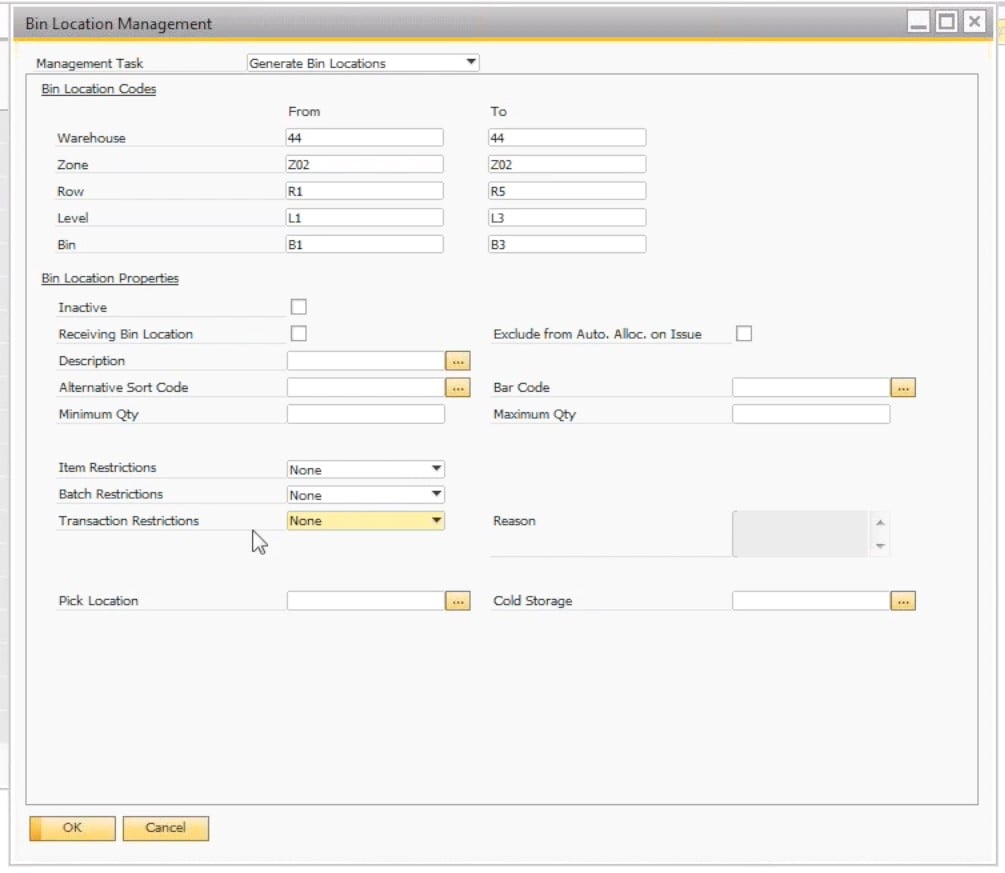
Fill in the details and click OK to display a list of suggested bin locations. Now, you can generate them. Updating bin location codes is also possible via the Bin Location Code Modification window.
If you want to work with bin locations via master data, you can open the corresponding window under Inventory -> Bin Locations.
SAP Business One bin locations let you specify a default bin location for both the warehouse and the item. The system provides the ability to allocate quantities to bin locations automatically. Furthermore, you can define numerous parameters associated with this process. Specifying the default bin location takes place on the Inventory Data tab of each item master record. Here, you can also view the first bin location used for this item.
As for the Bin Location Content report, it offers a list of all bin locations containing information about the items, quantities, and serial/batch numbers per bin.
Watch this video for further information on SAP Business One Multi-Bin Functionality:
Cycle Count and Inventory Tracking
Having a warehouse is tightly connected with periodical cycle counts. You have to conduct them to verify that the quantities in SAP Business One are similar to the corresponding physical on-hand quantities. You can assign cycle codes to each item and warehouse to conduct a periodical cycle count under Administration -> Setup -> Inventory -> Inventory Cycles. You can also create a system of alerts here:
- Create a new inventory cycle code;
- Set its recurrence (monthly, quarterly, yearly, etc.);
- Specify its end date and time.
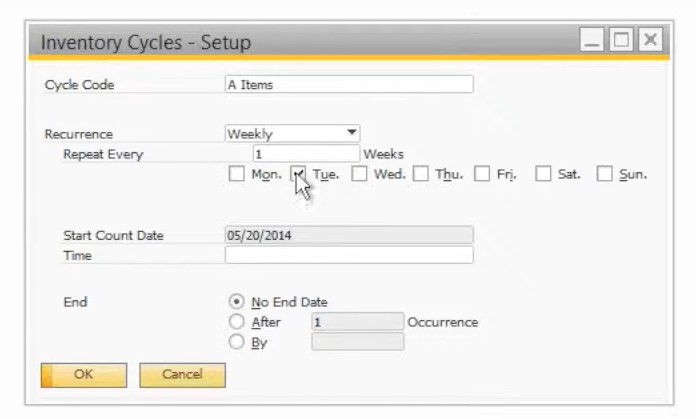
Now, you can assign your new inventory cycle to the item master data for each warehouse. Use the Inventory Data tab.
Alternatively, it is possible to use the Cycle Count Determination window. Here, SAP Business One provides the ability to assign inventory cycles by such parameters as an item group or bin location. Note that drop ship warehouses do not appear in the list. It is also worth mentioning that the enabled bin locations let you additionally see the warehouse sublevels in the list.
After you set up the cycle count timing, SAP Business One updates new and existing items with the appropriate cycle count code, alert, and other parameters. You can apply changes to them in the item master data.
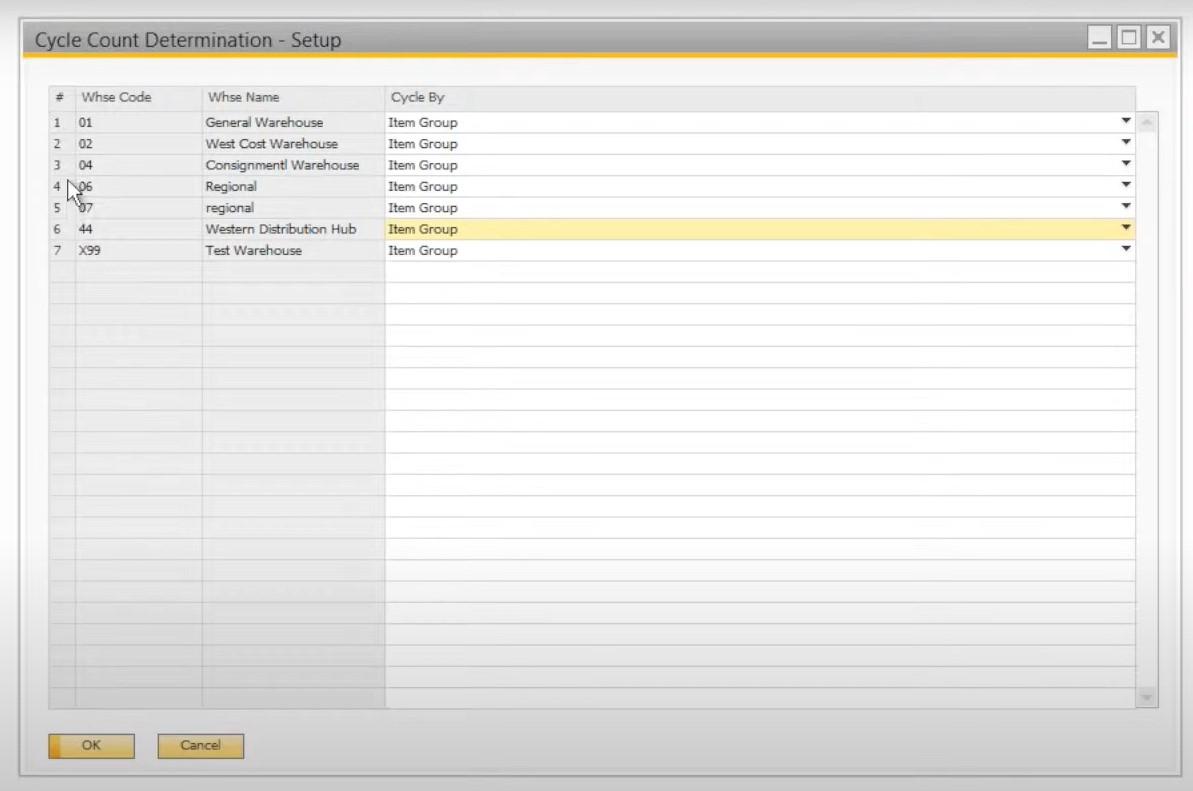
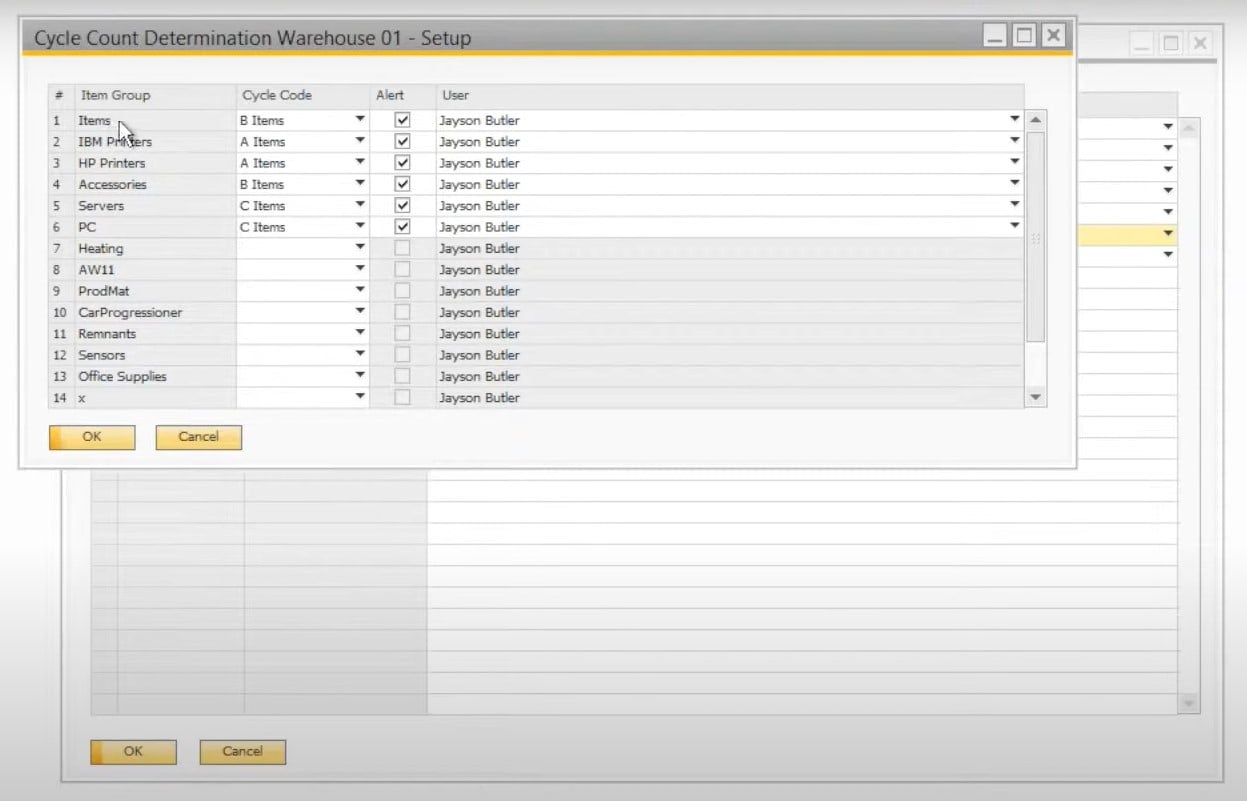
Now, let’s say a few more words about cycle count alert. When you receive a corresponding message, SAP Business One lets you view all items that are due to be counted in the Cycle Count Recommendations report. You get the ability to choose items that should be counted. After that, click the Inventory Counting button to open the counting documents. By default, SAP Business One offers two counting document types:
- Inventory Counting. Such documents list items to be counted and identify the users performing the count. There is even a possibility to freeze the items for the count so that they cannot be issued. Another opportunity is associated with printing a count sheet to perform the count. After the count, you can enter the quantities into the Inventory Counting document. If you don’t want to do that manually, SAP Business One offers the ability to import the corresponding data from MS Excel.
- Inventory Posting. These documents are used to eliminate the difference between the counted quantities and the stock quantities specified within the system. Inventory posting documents help to provide the item cost data and post the difference to edit your inventory. Save the inventory posting to deblock the frozen item. The system then determines the next inventory count date, following the item cycle count code.
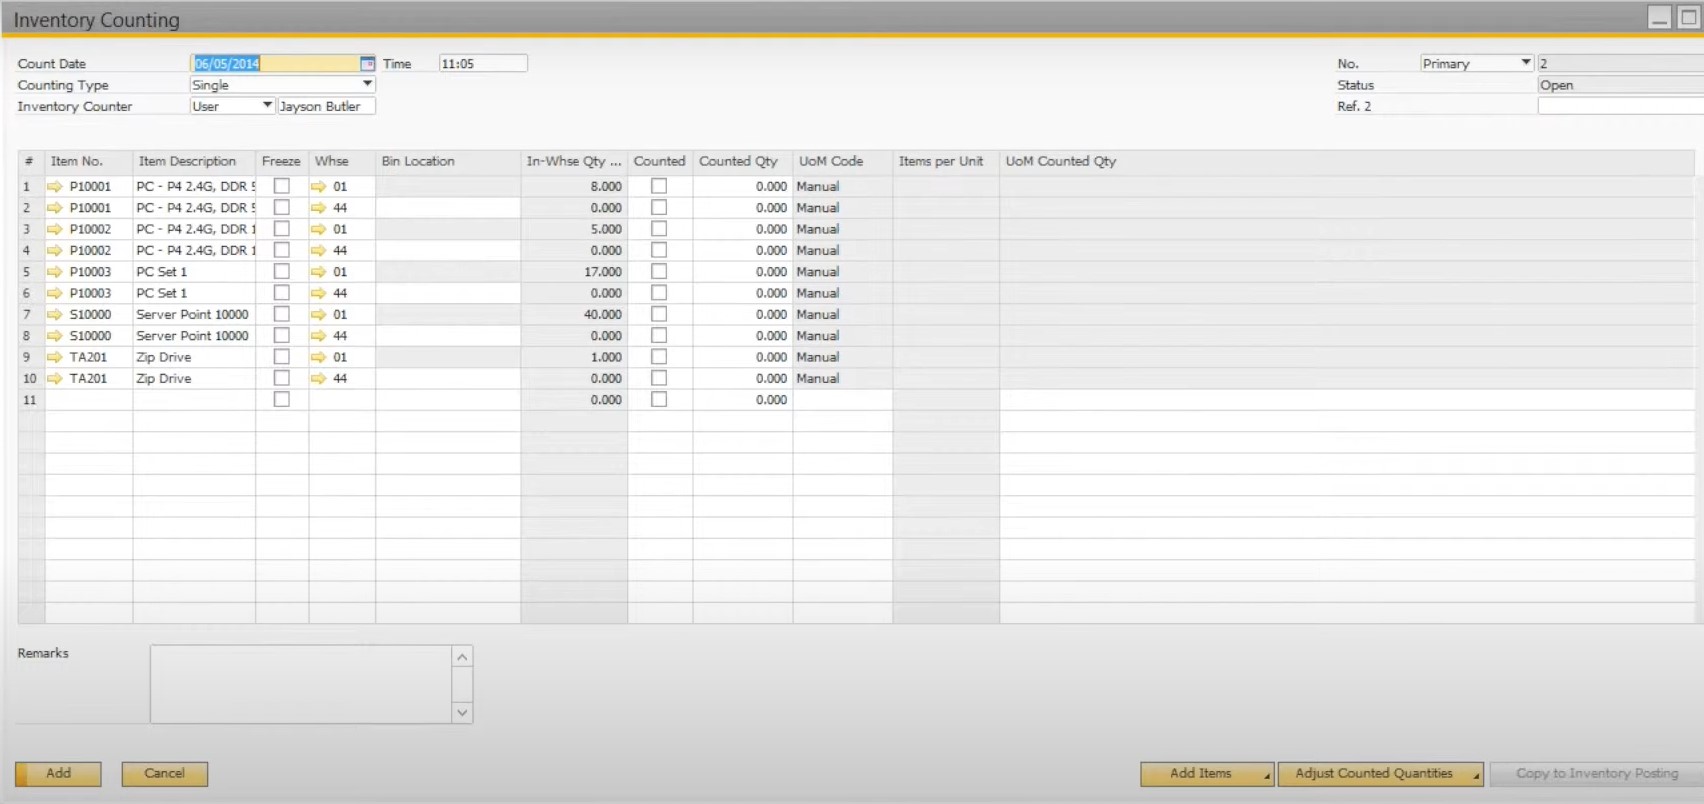
Also, pay attention to backdating inventory count. It happens if you conduct the count at the end of the year; however, the corresponding information is provided to the system at a later date. In this case, it is vital to specify the actual count date. Thus, the inventory counting document will backdate your inventory level, posting the correct differences.
Watch this video for more information on SAP Business One Cycle Count:
Pick & Pack Process
SAP Business One offers an optional step in a sales cycle associated with your inventory. The system provides the ability to incorporate the pick and pack process. The corresponding tools are developed for big companies with huge warehouses. If you have dedicated personnel for collecting items and then packing and shipping them, use the SAP Business One pick and pack manager. What’s the tool’s sphere of application?
The SAP B1 pick and pack manager scans the system looking for the following open documents:
- Sales orders;
- Production orders;
- Inventory transfer requests;
- Reserve invoices.
Next, it sorts them by requested delivery date and priority, showing the accumulative quantities available for picking and shipping. If enough quantity is not available, the To Release column is blank. However, you can configure the system so that it lets you release a picklist for quantities that are not available.
In SAP Business One, the pick and pack manager is available under Inventory -> Pick and Pack -> Pick and Pack Manager. It relies on the following three steps:
- Release to Pick List:
- Go to the Open drawer;
- Select the orders you wish to pick;
- Press Release to Pick List;
- The system generates a list of the selected items that you can print.
- Update picked quantities:
- Click the Released drawer;
- Drill down to the picklist updating the picked quantities;
- Delete item rows if they were selected by mistake;
- The system displays the items in the Open drawer.
- Create follow-up docs:
- Go to the Picked drawer;
- Choose items;
- Click the Create button;
- The system generates such documents as an A/R invoice, Inventory Transfer, Issue for Production, etc.
Note that it is possible to deselect picked items in the pick and pack manager. Open the pick list and choose Clear All. Alternatively, you can apply changes by specifying the new picked quantity individually. Note that all the cleared items reappear in the Released drawer.
To skip the first two steps, choose the items in the first or second drawer and hit the Create button. Thus, you will deliver the items immediately.
It is also possible to generate a pick list from a sales order, production order, reserve invoice, or inventory transfer request:
- Open the context menu;
- Select the Generate Pick List option;
- Right-click to View Pick Lists;
- Specify the picked quantity;
- Create the follow-up documents.
Watch this video for a more detailed description of SAP Business One Pick & Pack Processes:
Pricing Essentials
SAP Business One lets you set predefined prices for selling and buying items. You can assign prices to price lists. At the same time, using business partners is possible for this purpose. It is also possible to create a relationship between pricing levels. This feature provides the ability to update prices automatically when changes are applied.
However, it is just the basic price list functionality introduced in SAP Business One. Also, the system lets you add discounts based on various parameters, such as a percentage, date, or quantity.
Another vital aspect of SAP B1 price management is that every company gets 10 default price lists. You can set them up as follows:
- Add or remove price lists under Inventory -> Price Lists -> Price Lists;
- Base a price list on another price list with the help of a factor (e.g., 20% margin is achieved with a purchasing price list with a factor of 1.2);
- Set a primary currency for each price list;
- Consider all entered prices gross prices (with tax) if necessary;
- Create a validity date range per price list – it will expire on a set date;
- Open a price list by double-clicking on the row number to enter prices (prices that are calculated by using a factor are highlighted);
- Set an indicator to remove items without prices from the price list (go to its general settings);
- Set manual price updates if necessary;
- Specify prices in the primary currency along with two additional currencies;
- Configure prices by units of measure if your items are associated with a defined UoM group.
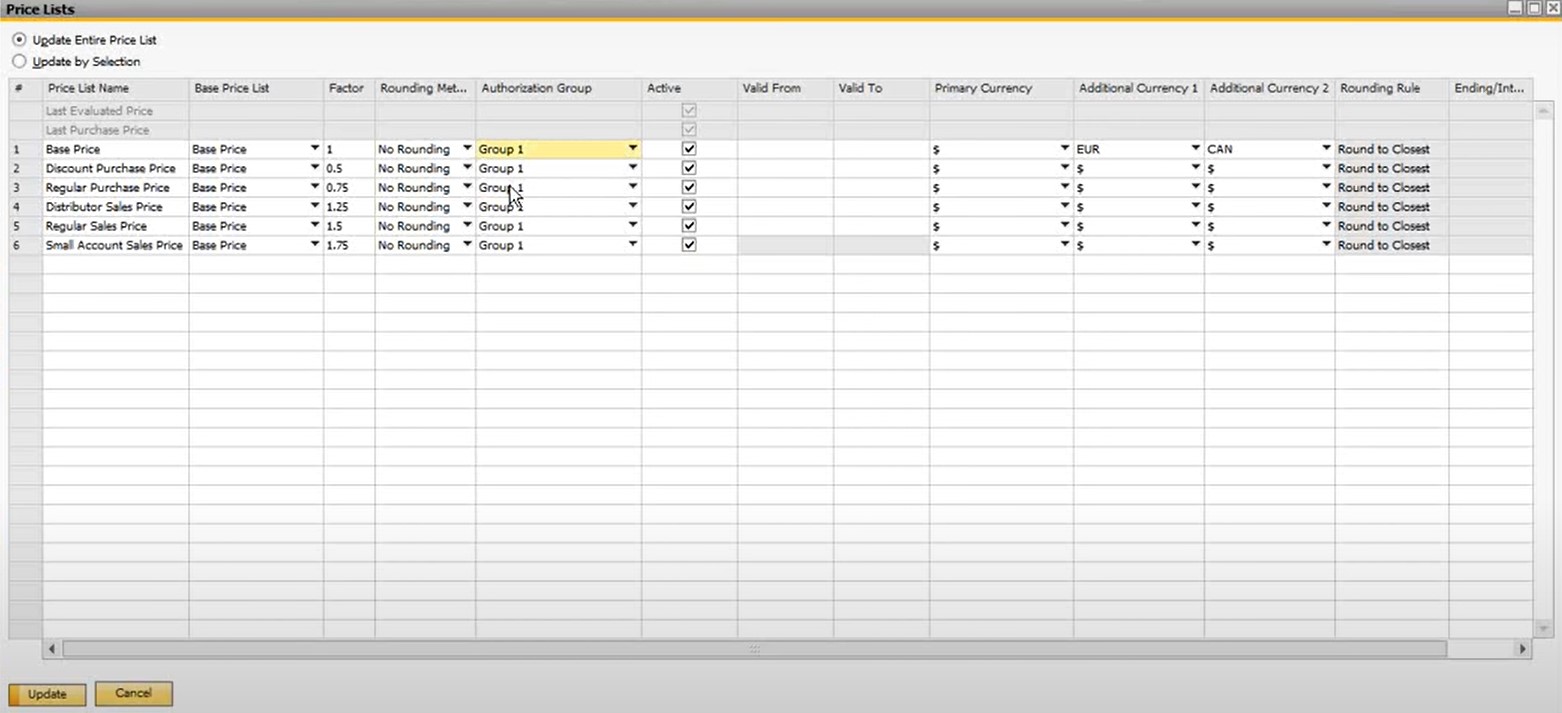
Besides, SAP Business One provides the ability to assign each price list to an authorization group. You can find more information in our article about the SAP Business One General Authorization to define which users can access which group. In a nutshell, SAP lets you prevent some users from modifying prices in your sales and purchasing document. However, you can set the Change Row Amount to No Authorization to override the restrictions.
As for the additional pricing options, SAP Business One offers special prices. Consequently, you can define detailed pricing and discount structures per business partner. The system offers the following options sorted from the highest (overrides other pricing schemes) to lowest priority:
- Special Prices – the most detailed way to determine special prices based on numerous parameters;
- Discount Groups – different discounts for items, item groups, item manufacturers;
- Period and Volume Discounts – discounts by date, quantity, and units of measure;
- Price Lists – the basic pricing option.
SAP Business One provides the ability to copy Special Prices and Discount Groups between business partners. Define your new pricing options for a business partner, press the Copy Discounts, define the target business partners to copy the discount to.
Watch this video for further information about SAP Business One Price Lists and Discounts:
How to integrate SAP Business One with external systems
Although SAP Business One is one of the most potent ERP systems on the market, it still has some drawbacks when it comes to integration with external systems. For instance, data synchronization between SAP B1 and e-commerce platforms is a questionable task. However, getting the missing functionality is possible with third-party connectors. You can easily find tools that enable SAP integrations with core e-commerce platforms, such as Magento 2 and Shopify. Don’t hesitate to contact us for further information on the SAP Business One integration with your business and check our SAP Business One Integration solution for Magento 2.
SAP Business One Integration FAQ
Below, you will find additional information about the SAP Business One Magento 2 integration.
How to connect SAP Business One to Magento 2?
You need a third-party solution for connecting SAP B1 to Magento 2, such as our SAP Business One Integration tool. The integrator provides you with the ability to connect your Magento 2 installation to SAP Business One, synchronizing data between the two platforms on the basis of multiple API connections.
How does the integration work?
The core principle behind the SAP Business One Integration tool is very straightforward. It creates a data flow between your Magento 2 website and SAP Business One, syncing the two systems with the help of multiple API connections. To simplify your daily chores, it leverages a cron scheduler to automated data transfers. Besides, a robust mapping interface is at your service. With its help, you can prevent issues caused by different data storage standards.
Is the Magento 2 SAP Business One integration connector an open-code solution?
Our SAP Business One Integration tool always was and always will be an open-code solution. It means that you can change it according to your business needs.
Does it offer real-time synchronization?
With the Magento 2 SAP Business One connector, you get an opportunity to transfers most data updates in real-time from one system to another. The exchange happens right after you edit an entity or apply an update to a master data record.
Can I manage Magento 2 data in the SAP Business One UI?
With our connector, you get the ability to manage products, orders, customers, categories, and other Magento 2 entities right in the interface of your SAP B1 installation. After that, the integrator transfers all the changes to your e-commerce website.
Which SAP entities can be synchronized with Magento 2?
The Magento 2 SAP Business One connector lets you transfer the following SAP Business One data: Item groups, Items, Price List, Period Discounts, Volume Discounts, Inventory Data, Discount Groups, Discount Groups, Customer Groups, Business Partners, Sales Orders, Deliveries, Business Partners, Business Partner Contacts. It works with all the core Magento 2 entities too.


