Magento 2 Installation Guide

In this post, we’ve gathered all the necessary information about Magento 2 installation. The new version of the platform has been finally released, so don’t hesitate to find out how to install the Magento 2 software. Below, we discuss different approaches to the Magento 2 installation from the use of the Setup Wizard to more complicated procedures based on Composer and the command line. To get more information about Magento 2 check our main Magento 2 Overview .
All Magento 2 features, rumours, and roadmap on Firebear

Table of contents
4 Types of Magento 2 Installation
Before starting our Magento 2 installation guide, we’d like to introduce you to 4 major approaches to this procedure. Below, you will find their descriptions as well as links to official guides. Magento 2 offers the ability to perform an easy installation and at the same time do everything to contribute code to its codebase. Of course, each approach has unique requirements, so let’s begin with the easiest one.
Easy installation on your own server does not require any complicated tricks with the command line. You only need some technical expertise as well as command line access to your Magento server. This Magento 2 installation consists of the following steps:
-
Download a compressed file with the Magento software.
-
Then, you should extracts it on your Magento server.
-
Now, install the software via the Setup Wizard. Alternatively, you can rely on the command line.
This approach to the Magento 2 installation is similar to the aforementioned one. The only difference here is in the usage of shared hosting. Get ready to find a hosting provider and perform a small technical expertise. You are alredy familiar with the installation steps:
-
Take a compressed file with the Magento software.
-
Extract it on the server.
-
Install the software via the Setup Wizard.
If you need a full control over all installed components of Magento 2, then this type of installation is for you. It is highly technical, provides access to your Magento server, and offers the ability to repackage Magento CE with other components. To install Magento 2 in such a way, do the following:
-
Creates a new Composer project with the list of components you want to use.
-
Update your package dependencies via the same tool. Use the composer create-project command to get the metapackage.
-
Now, you can install Magento 2 via the command line. The Setup Wizard can be utilized as well.
If you are a contributing developer who has a huge experience in using Composer and GitHub, then you might be interested in cloning the Magento 2 repo.
-
Clone the Magento 2 repository on GitHub.
-
Update package dependencies via Composer.
-
Installs the software. Use either the Setup Wizard or the command line.
Now, when you know 4 major approaches to Magento 2 installation, we can go further.
Magento 2 Installation Guide
Magento 2 System Requirements

This is the set of system requirements for Magento 2:
- Operating systems: Linux distributions (RHEL, Ubuntu, CentOS, Debian, etc)
- The latest stable version of Composer
- (don’t forget to enable mod_rewrite module)
- PHP: 5.4.x (x is 11 or above); 5.5.x
- PHP extensions: PDO/MySQL, mcrypt, mbstring, mhash, curl, simplexml, gd2, ImageMagick 6.3.7, soap
- SMTP server of MTA
There are some optional but also very important recommendations: or above (development environments only); PHPUnit 4.1 or above as a tool for command-line.
Composer and Magento repository
Composer and Magento

To install the Magento software, you now need a . It provides you with the ability to manage the system, extensions, and dependencies. The key features of Composer are:
- It enables you to reuse third-party libraries with no need to bundle them with source code;
- With Composer, you get a component-based architecture with a robust dependency management;
- The tool manages dependencies, as a result you get much less compatibility issues and conflicts between extensions;
- You also get versioned dependencies with Composer;
- And don’t forget about
- Last but not least is that Composer supports PHP Framework Interoperability standard.
Composer Installation
- Create a new and empty directory on a Magento server.
- Enter the following:
|
1 2 |
curl -sS https://getcomposer.org/installer | php mv composer.phar /usr/local/bin/composer |
There are also some additional installation options, you can find them in .
- Restart Apache: for Ubuntu use service apache2 restart ; for CentOS use: service httpd restart
Magento GitHub Repository Cloning

- It is extremely important to use secure shell (SSH): ; add a public key to GitHub.
- Copy the HTTPS clone URL or Magento GitHub repository SSH to the clipboard .
- Open in a browser.
- Click SSH or HTTPS (under the “Clone URL” field on the right side).
- Use “Copy to clipboard” button.
This is the example of HTTPS clone URL:
- Change the docroot directory of web server: for Ubuntu, it’s /var/www; for CentOS – /var/www/html.
- Use one of the following commands:
- For HTTPS: git clone https://github.com/magento/magento2.git
- For SSH: git clone git@github.com:magento/magento2.git
- Now the repository will be cloned on a server.
File System Permissions & Ownership
The recommend settings for permissions are:
- 700 permissions for all directories (drwx——). The owner gets the full control – the ability to read/write/execute; other users have no permissions.
- 600 permissions for all files (-rw——-). The owner is able to read and write, but nobody else gets the permissions.
Now, when the user of a web server owns the Magento 2 file system, you should use the following:
- Use cd magento2 to change the Magento directory.
- Use ps -ef | grep apache2 to find the web server user in Ubuntu; grep User /etc/httpd/conf/httpd.conf – in CentOS.
- Use chown -R [your web server user name] to set ownership: in CentOS – chown -R apache ; in Ubuntu – chown -R www-data .
- And finally you can set the permissions:
|
1 2 |
find . -type d -exec chmod 700 {} \; find . -type f -exec chmod 600 {} \; |
Installation Dependencies Update
Magento installation dependencies – Introduction
Magento relies on for the first time. It is an application developed to manage PHP dependencies. Before installing any Magento software, you must setup the Composer and perform the following:
- First of all you have to .
- Now you must to let the Composer to write files to the docroot of web server as the correct user.
- From both of the below directories, run the
|
1 2 |
<your Magento install dir> <your Magento install dir>/setup |
Keep in mind, that the main reason of failure is an incomplete or non-functional installation.
Switching to the Apache user
For both Ubuntu and CentOS avoid running Composer as the root user. And don’t forget, that the user of web server on CentOS is apache;on Ubuntu – www-data.
Ubuntu
- Enter su www-data ;
- In case you don’t know the user’s password and a dedicated prompt appears, continue with the next step;
- Use the following commands to enable the www-data user’s shell and to set a password:
|
1 2 |
sudo chsh -s /bin/bash www-data sudo passwd www-data |
- Run su www-data again and enter the password;
- To end the procedure, continue with ;
CentOS
- Run su – apache. If “This account is currently not available” error displays, continue with the next step;
- Use sudo chsh -s /bin/bash apache to give apache a valid shell account.
- Enter su – apache again – it should work now.
Running Composer to update dependencies
- Switch or log in as the web server user to the Magento server.
- Change to the installation directory of Magento 2 – cd /var/www/html/magento2
- Run composer install to update package dependencies.
Magento Software Installation With The Setup Wizard
Running the Setup Wizard
With the Setup Wizard, you can go back and forward through the pages of installation. You can’t skip pages, and you you have to enter all the required information before you can go to the next step. It is possible to run the installer again or return to a previous page to fix errors.
Getting started
- Open a web browser.
- Enter http://[Magento host or IP]/[path to Magento root]/setup in the location or address bar. For the Magento server’s IP address “192.0.2.10” and magento2 directory, you should enter: http://192.0.2.10/magento2/setup
- Click Agree and Set Up Magento.
- To complete the installation, continue with the following sections
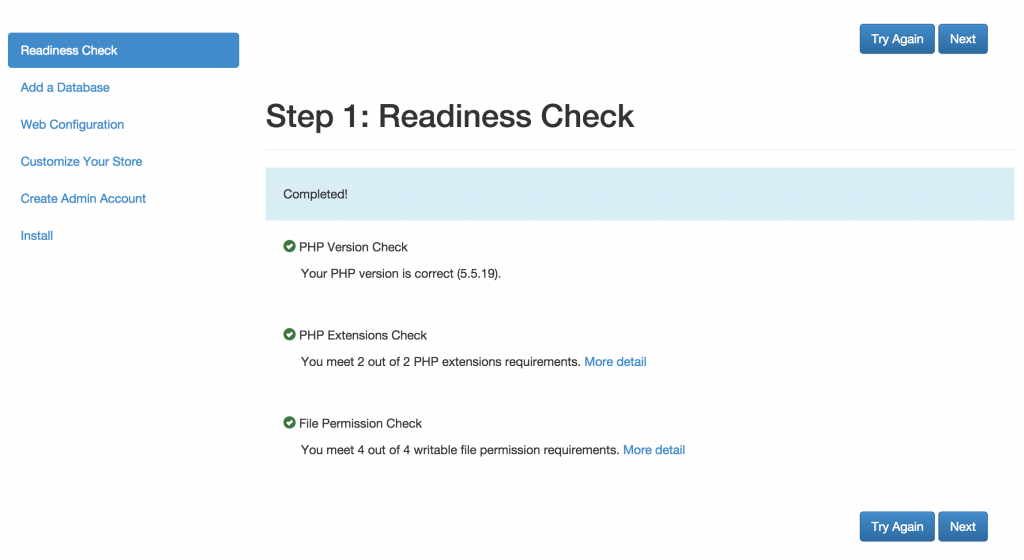
Step 1: Readiness Check
- Use Start Readiness Check option.
- Resolve all the problems if there are any before you go to the next step.
- Use More detail to see the additional information about each check.
- Click Next.
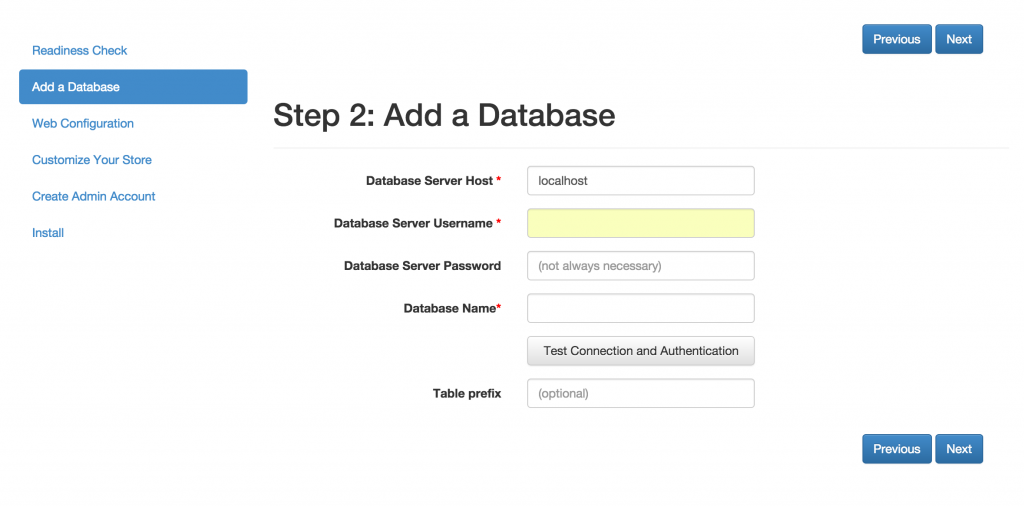
Step 2: Add a Database
| Item | Description |
| Database Server Host | Enter localhost for the web and database servers located on the same host. For the database server from a different host, use its fully qualified IP address or hostname. |
| Database Server Username | Enter the username of the instance owner of Magento database. |
| Database Server Password | Enter the user’s password, if any or leave the blank field if you didn’t configure any password. |
| Database Name | Enter the instance name of Magento database. |
| Table prefix | You should use this field only if you’re installing the Magento database tables in a database instance with already existing Magento tables.
To identify the Magento tables for this installation, use a prefix. |
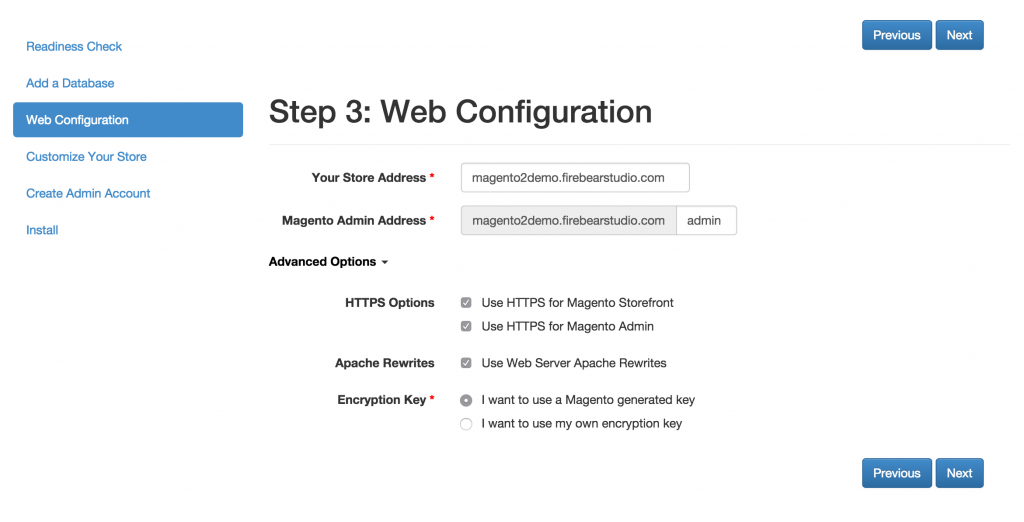
Step 3: Web Configuration
| Item | Description |
| Your Store Address | Enter the URL of your storefront. It should include scheme and trailing slash (http://www.example.com/). |
| Magento Admin Address | Enter the URL of your Magento Admin. |
Optionally, click Advanced Options and enter the following information:
| Item | Description |
| HTTPS Options | To enable the use of SSL in the indicated URL, select the checkbox. Do this only if your web server supports SSL. |
| Apache Rewrites | Select this check box only if you enabled server rewrites while installation. |
| Encryption Key | Magento can generate an encryption key. Use I want to use a Magento generated key option to receive it. If you have your own encryption key, you should use I want to use my own encryption key. |
Step 4: Customize Your Store
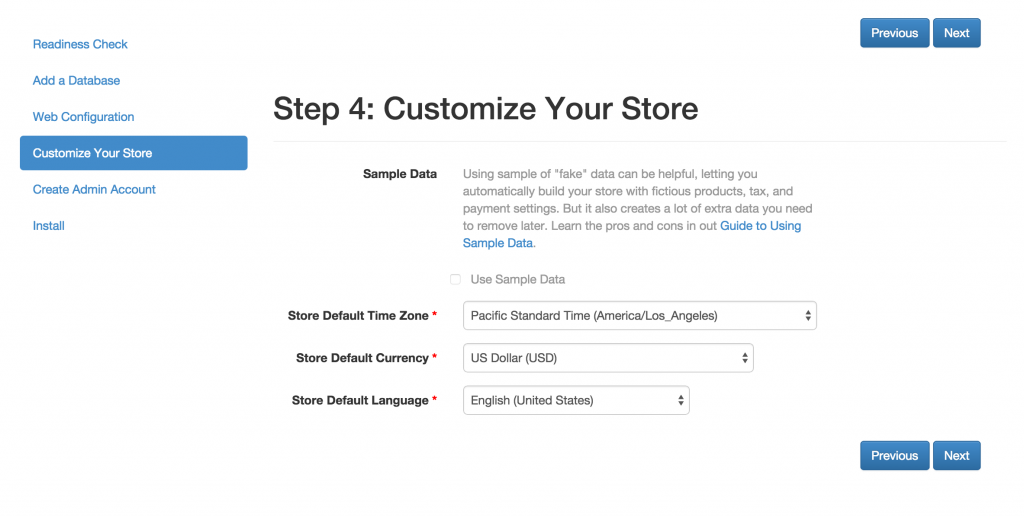
- Use Store Default Time Zone list to set the timezone of your store.
- Use Store Default Currency list to choose the default currency.
- Use Store Default Language list to choose the default language.
Step 5: Create Admin Account
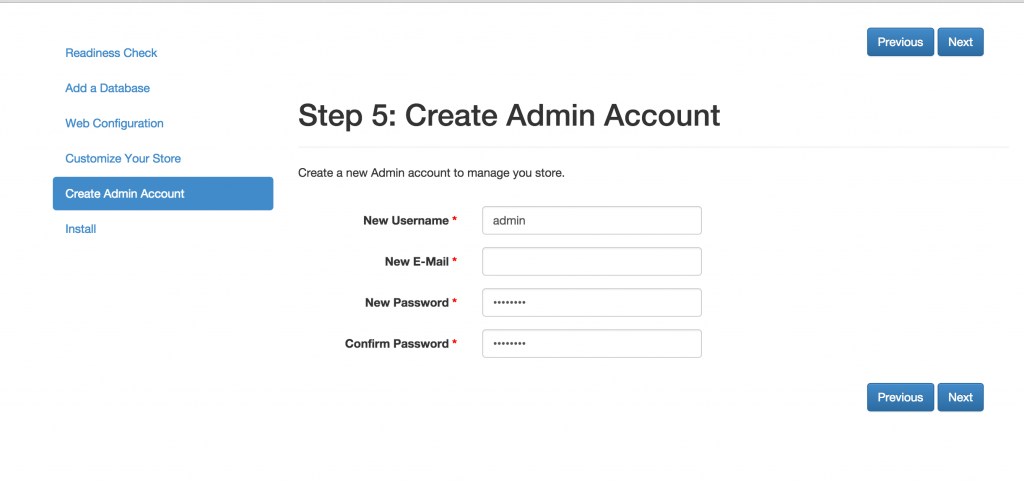
| Item | Description |
| New Username | Enter a username with which you will log in to the Admin of your Magento store. You will be an administrator and will be able to create other users and administrative users under this username. |
| New E-Mail | This is the field for e-mail address of Magento administrator. |
| New Password | The field for the password of administrator. |
| Confirm Password | Password confirmation field. |
Step 6: Install
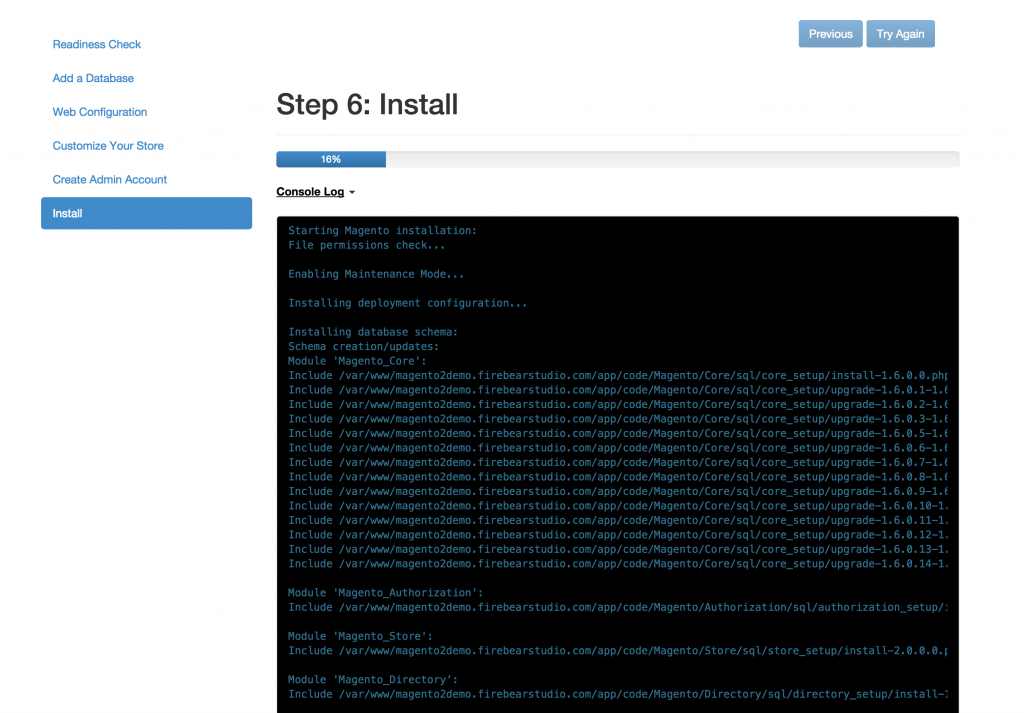
Click Install Now and you will get the following options:
- By clicking Console Log, you will be able to see installation progress and error details.
- By clicking Previous in the event of problems, you will be able to go back to fix incorrect entries.
- By clicking Try Again, you will be able to run the installation again.
If the installation was successful, you will see the message Success.
Viewing the installation log
The Setup Wizard creates install.log – a log file, which can be useful for the debugging or in the actions verification. To locate the log, you should:
- Use a text editor to open php.ini. If you don’t know where php.ini is located:
- Switch to or log in as or the .
- In the docroot of your web server, create .
- Use a web browser to access phpinfo.php.
- You can find the location of php.ini specified as Loaded Configuration File.
- Find sys_temp_dir. Its value determines the location of install.log. PHP uses that value as its default in a case when the value is commented out. Keep in mind, that a typical default value is /tmp, so the log is /tmp/install.log.
Magento Software Installation From The Command Line
First steps
- You should log in to the Magento server as the web server user or you can .
- Change cd <your Magento install dir>/setup: cd /var/www/magento2/setup for Ubuntu and cd /var/www/html/magento2/setup for CentOS.
- You can also use the following commands to find some values for required options: php -f index.php help language for Language; php -f index.php help timezone for Time zone and php -f index.php help currency for Currency.
Installing the Magento 2 software from the command line
from on .
The install command follows the next format:
|
1 |
php -f index.php install --[installation option name]=[installation option value] ... |
| Name | Value | Required? |
| base_url | Use Base URL to access your Magento Admin and storefront in the format http[s]://[host or ip]/[your Magento base dir]/. A scheme and a slash are required.
[your Magento base dir] is the docroot-relative path, where the Magento software will be installed. It can be magento2 or might be blank. Use http://localhost/[your Magento base dir]/ or http://127.0.0.1/[your Magento base dir]/ to access Magento on localhost. |
Yes |
| backend_frontname | This is the path to access the Magento Admin. It is is appended to Base URL. For the Base URL http://www.example.com and the Admin Pat admin, the Admin Panel’s URL would be ishttp://www.example.com/admin | Yes |
| db_host |
In addition, there is an option to specify the database server port in its host name: www.example.com:9000 |
Yes |
| db_name | This is the name of the Magento database instance where you are going to install the Magento database tables. | Yes |
| db_user | Magento database instance owner’s username. | Yes |
| db_pass | The password of Magento database instance owner. | No |
| db_prefix | Use it if you have more than one Magento instance running on a server with all tables in the same database. | No |
| admin_firstname | First name of Magento administrator user. | Yes |
| admin_lastname | Last name of Magento administrator user. | Yes |
| admin_email | E-mail address of Magento administrator user’s. | Yes |
| admin_username | Username of Magento administrator. | Yes |
| admin_password | Password of Magento administrator user. | Yes |
| language | Language code for the Admin and storefront. To view the list of language codes enter php -f index.php help language from the setup directory. | Yes |
| currency | Default currency – php -f index.php help currency from the setup directory.) | Yes |
| timezone | Default timezone – php -f index.php help timezone from the setup directory.) | Yes |
| use_secure | 1 enables the use of SSL in all URLs (your web server should supports SSL).
0 disables the use of SSL. |
No |
| base_secure_url | 1 – SSL is preferred in Magento URLs
0 – SSL is not used. |
No |
| use_secure_admin | 1 – SSL is used to access the Magento Admin.
0 – SSL is not used with the Admin. |
No |
| admin_use_security_key | 1 – Magento software uses a randomly generated key value to access different pages in the Admin and forms.
0 disables the feture. |
No |
| session_save | Use files to store session data in the file system; db.files – in the database. | No |
| key | Specify a key to encrypt data in the Magento database or Magento will generate its own. | No |
| cleanup_database | Specify this parameter without a value to drop database tables before Magento software installation, or the Magento database will be left intact. | No |
| db_init_statements | This is the advanced parameter for MySQL configuration. To set any values use this link – you will find all the necessary information there. | No |
| sales_order_increment_prefix | Set a string value, which will be used as a prefix for sales orders. As a result the payment processor will be provided with unique order number. | No |
Sample localhost installation
As a result of such installation, your Magento receives the following options:
- The software is be installed in the magento2 directory. Your storefront URL – ; Magento Admin – http://localhost/admin;
- The database and web server are on the same host.
- The database name, username and password are magento.
- The properties of Magento administratorincludes:
- Both first and last name are Magento User
- Username – admin, the password – iamtheadmin
- E-mail address – user@example.com
- The default language is U.S. English.
- The currency is U.S. dollars.
- The timezone is U.S. Central.
-
123456php -f index.php install --base_url=http://localhost/magento2/--backend_frontname=admin--db_host=localhost --db_name=magento --db_user=magento --db_pass=magento--admin_firstname=Magento --admin_lastname=User --admin_email=user@example.com--admin_username=admin --admin_password=iamtheadmin --language=en_US--currency=USD --timezone=America/Chicago
Enter this command as a single line.
Reinstalling the Magento software
- Delete and re-create the database instance (you can do it optionally).
- Log in to your server as a user, who has a permissions to modify files in the file system of Magento.
- Run the following commands:
|
1 2 3 4 5 |
cd <your Magento install dir> git pull composer install cd setup composer install |
- Repeat all the section about Magento installation from the command line.
Magento 2 sample data
from on .
Magento 2 sample data is available only if you edit composer.json. In order to do this, you have to:
- Log in to your server as a user with root privileges or as a web server user.
- Change to installation directory of your Magento.
- Use a text editor to open composer.json.
- Find a “repositories”: section. Add the following block without “repositories”: to the section. If there is no “repositories”: section, add the block before the “require”: section:
|
1 2 3 4 5 6 |
"repositories": [ { "type": "composer", "url": "http://repo.magento.com/" } ], |
- Add “magento/sample-data”: “0.42.0-beta1” and “magento/sample-data-media”: “0.42.0-beta1” to the “require”: section.
- Install the Magento software.
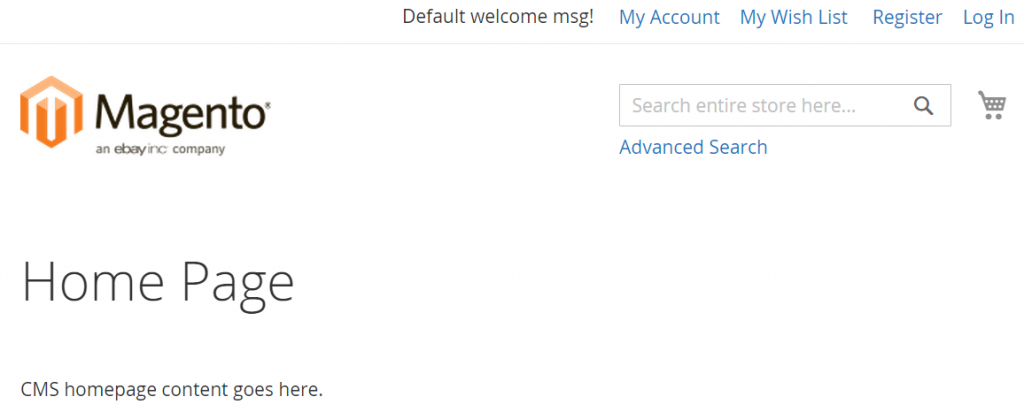
Magento 2 Setup Verification
Open a web browser and go to your storefront. If the browser displays the same storefront page, your installation was a success.
Verify the Magento 2 Admin
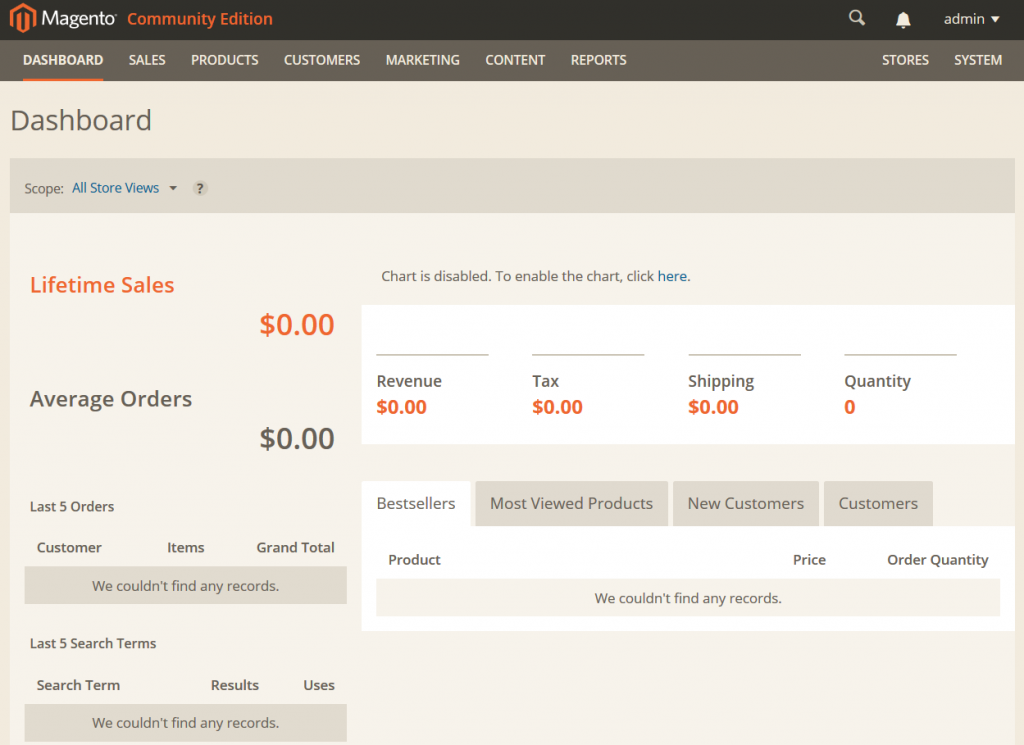
Use the same browser to open Magento 2 Admin, and log in as a Magento Administrator. If your Admin looks like a sample Magento 2 Admin page, then your installation was successfull.


