SAP Business One In-Depth Review: Financial Accounting
Now, when you are familiar with SAP Business One navigation, customization, and master data, it’s time to say a few words about its financial accounting opportunities. Although this part of the ERP system may seem way too complex to understand, we will examine it at its most elemental to enable you to understand the basics and start optimizing your daily workflow. Let’s take a look at SAP Business One financial accounting. The following material contains the overview of SAP B1 financial accounting, sheds light on how to set up financial accounting in SAP Business One, and explains how to maintain financial activities with the system’s tools.

Table of contents
- SAP Business One Financial Accounting Essentials
- How to Set Up SAP Business One Financial Accounting
- SAP Business One Financial Accounting Daily Procedures
- How to Maintain Records for SAP Business One Financial Accounting
- Period-End Procedures in SAP Business One
- Incoming and Outgoing Payments in SAP Business One
- SAP Business One Internal Reconciliation
- SAP Business One cost accounting
- SAP Business One budgeting
- SAP Business One cash flow
- SAP Business One financial accounting reports
- How to integrate SAP Business One with external systems
SAP Business One Financial Accounting Essentials
SAP Business One is among the most potent tools developed to manage your company’s finances effectively and with minimum effort. The platform not only delivers all the necessary instruments but also provides you with detailed analytics of the financial health of your enterprise. Also, note that SAP Business one incorporates Generally Accepted Accounting Principles to deliver the most powerful accounting mechanism.
Another essential benefit of the SAP Business One financial accounting is automation. The system is built on top of the following pillars:
- Real-time response and updates. SAP Business One updates your general ledger in real-time. This happens every time you add a transaction. This automation lets you save lots of time since the need to batch journal entries for later posting is eliminated. However, you still have this opportunity if your business model requires it.
- Automation. The ability to create journal entries automatically is the major productivity booster of SAP Business One. This automation not only saves the time necessary for the manual creation but also lets you avoid mistakes associated with manual data entry.
- Drill-down functionality. As we’ve already described in our article related to SAP Business One navigation, the system lets you extend the information available on a particular screen with the orange arrows. This navigation element is available all across the system: from the general ledger to transaction source documents. Thus, you get the ability to get more info about most on-page elements instantly.
- Templates. SAP Business One financial accounting tools let you automate redundant tasks via recurring postings based on templates. As a result, you not only save tons of time but also avoid posting mistakes.
- Data integrity. As we’ve just mentioned, SAP Business One does everything to prevent users from posting manual journal entries. Most routine processes become automated and follow predefined templates and algorithms. As a result, you can set up confidential accounts and maintain data integrity.
- Advanced expense management. The system of alerts lets you control and manage expenses more efficiently. SAP Business One informs you when expenses reach the specified budget threshold. Therefore, you always keep your finger on the pulse of your enterprise.
- Flexible reconciliation. Although SAP Business One financial mechanisms let you reconcile transactions automatically, you can still implement the manual system of controls. It’s up to you to decide whether to save time and get accurate reporting or be involved in financial management for 100%.
- Audit trail. With SAP Business One, you also get reliable audit trail mechanisms. They enable you to track changes to all data and documents. You get the information on the time they were applied. At the same time, the system shows who edited the information.
How to set up SAP Business One financial accounting
The SAP B1 careful implementation and user-faced design are the two key pillars that help you make the most of the finance and accounting management. Every part of the ERP application precisely tracks the way your business works, describing the smallest nuances. While most companies come to SAP Business One well-prepared – they have a well-established chart of accounts, customer databases, existing vendors, and recorded transactions – the ERP system offers enough tools to cope with even the most demanding financial situations. There are numerous solutions that let you migrate your business data into SAP Business One to get the most out of the platform and keep your business operating in full swing. Below, you can see the five-step process of setting up financial accounting in SAP Business One:
- Posting Periods. Usually, you start setting up your SAP Business One financial accounting by creating posting periods. Inform the system regarding how often it needs to report on accounting duties and financial results.
- Account Segments. Next, it is necessary to specify your account segments – specific business units or activities you’re going to track.
- Chart of Accounts. At this stage, you assign an account code to each account. Consider it a combination of your defined account segments. Your chart of accounts organizes these smaller units into higher-level categories.
- G/L Account Determinations. Finally, you can provide SAP B1 with the information on which accounts to use for journal entries created automatically. Thus, you optimize the processes that follow purchasing, sales, and inventory documents posting.
- Data Migration. Last but not least, you need to transfer the existing financial data into SAP Business One. Contact us to get help with this.
Note that these are just general guidelines. Any given implementation may require additional customizations or another order of steps. No matter how complicated your requirements are, SAP Business One will always follow the unique needs and circumstances of your company.
SAP Business One financial accounting terminology
Before going any further, we need to clear the terminology associated with SAP Business One financial accounting:
- An account is a formal record of a certain type, including asset, liability, equity, revenue, or expense. It shows its beginning balance, transactions (increases and decreases), and resulting ending balance.
- A control account is a record linked to a business partner. Every time you post a document to the business partner, the corresponding journal entry also covers the associated control account. SAP Business One uses one default A/R control account per customer and one default A/P control account per vendor. As an administrator, you can replace the control account in any document. Note that a control account contains the total A/R or A/P balance for all linked business partners. Since SAP B1 includes control accounts in the balance sheet report, their balance reflects the total balances for customers and vendors. Also, note that this part of the system is totally automated. Consequently, you cannot post journal entries to a control account manually.
- A clearing account is an account used to record postings temporarily. It helps to address issues associated with the time gap that occurs between accounting transactions and organizational task distribution.
- An active account is a record in the chart of accounts to which SAP Business One posts journal entries.
- Under account segmentation, we assume a bookkeeping method used to create account codes following the hierarchical business structure. SAP Business One financial accounting tools use the individual segments to correspond to different business units, including company, region, division, department, etc. Besides, the system incorporates different categories, including travel expense, product line, box office revenue, etc.
- A natural account segment is the beginning segment of an account code used to identify the account type. Itcan be a fixed asset, revenue, liability, expense, etc. SAP Business One uses numeric values for account codes only when using account segmentation. At the same time, account codes can be alphanumeric if account segmentation is not used.
- The chart of accounts is an index of the accounts in your general ledger.
- A general ledger (G/L) is the main accounting record of your business that incorporates double-entry bookkeeping. It means that your G/L contains the accounts for:
- assets,
- liabilities,
- profits,
- losses,
- income,
- expenditure items,
- funds,
- reserves.
- A journal entry is a record of a transaction that consists of such information as the transaction date, affected accounts, debit and credit, and description.
- Posting is a process when you record journal entries (both credits and debits) in your G/L Transaction in SAP Business One. Consider it a business activity that debits one G/L account while credits another.
How to Set Up SAP Business One Financial Accounting
Below, we describe how to set up financial accounting automation in SAP Business one. Note that proper financial and accounting functionality is the key to your daily efficiency as it provides SAP Business One automation. The ERP system will take care of numerous tasks eliminating time-consuming manual routine if your chart of accounts, posting periods, and account determination are configured correctly. Therefore, the initial setup of financial accounting in SAP Business One is vital for your business.
1. How to set up posting periods in SAP Business One
It is recommended to start setting up your SAP Business One financial accounting by establishing your posting periods. First of all, it is necessary to figure out whether your posting periods in monthly, weekly, or daily frames. Also, you should know whether your fiscal year corresponds to the calendar year or crosses it.
Bear in mind that you should specify the first posting period in SAP Business One at the stage of the company database creation. Setting up new posting periods is available under Administration/System Initialization/Posting Periods.
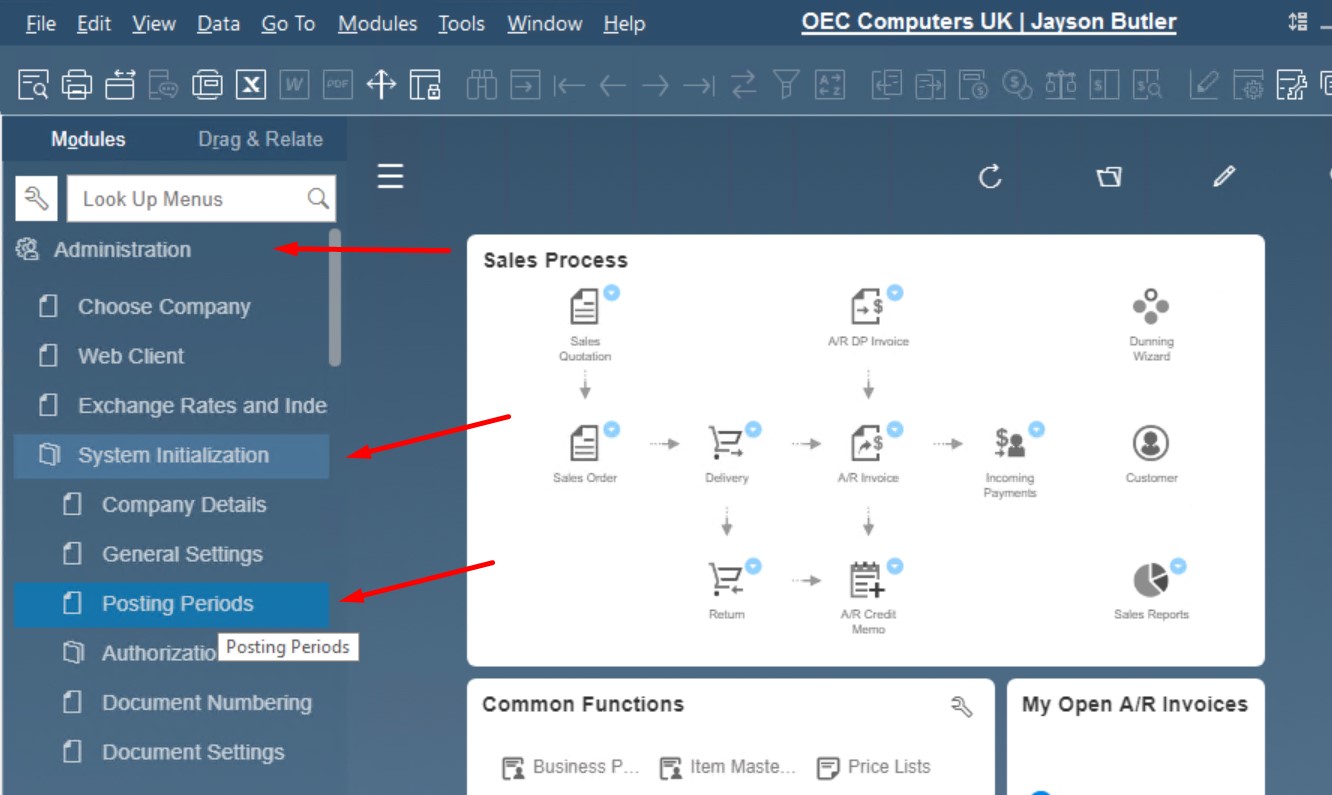
The corresponding window looks as follows:
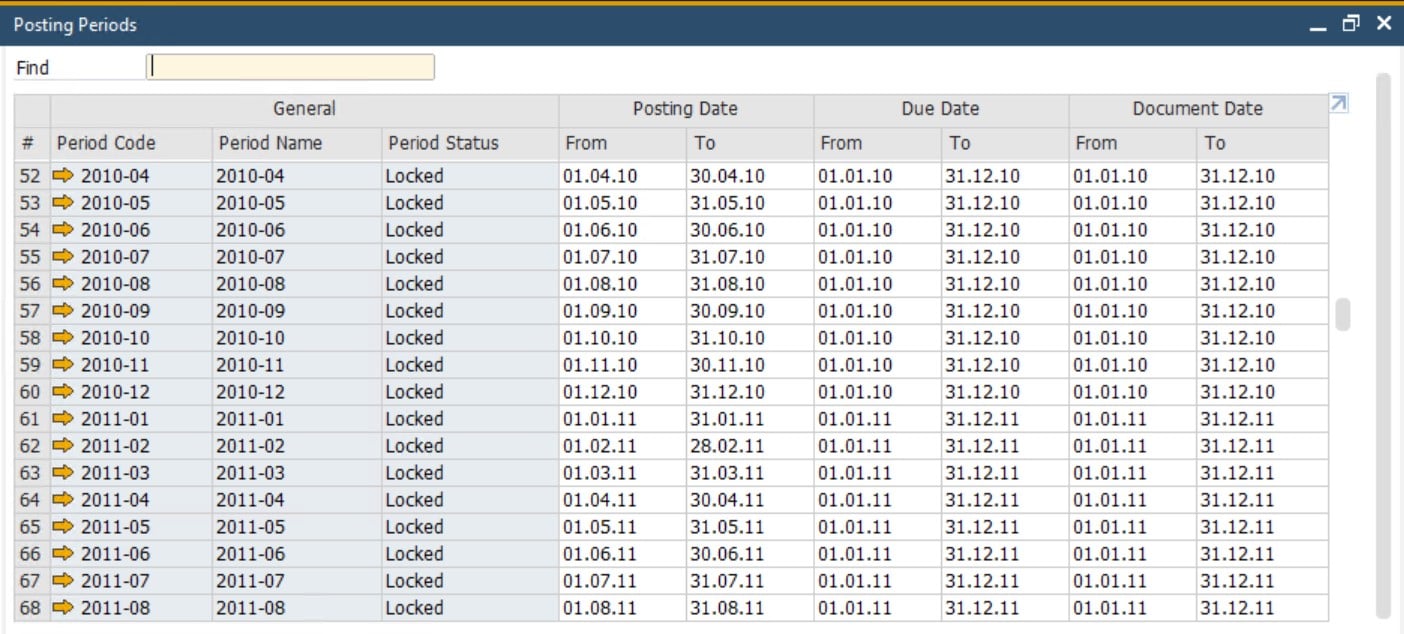
You can find several useful options below the grid:

SAP Business One enables you to edit generated periods as well as create new ones. Besides, it is possible to change the start of the fiscal year here.
As you can see, SAP Business One is very flexible in terms of periods and fiscal years.
SAP Business One posting period rules & restrictions
However, it is necessary to follow these rules when configuring SAP B1 posting periods:
- The first day of the month is the only possible beginning of the fiscal year.
- Posting periods should be created from the oldest and up. Therefore, it is recommended to consider the oldest data you would like to transfer to SAP Business One to determine the first period.
- It is prohibited to have overlapping posting periods.
- SAP Business One saves G/L account determination by period and copies it from the previous period to the next. Therefore, it is necessary to define your primary G/L accounts prior to creating additional posting periods.
- The transaction’s posting date is used to determine which posting period the transaction belongs to.
- It is impossible to remove posting periods from the system. However, you can edit them, changing the posting date ranges.
SAP Business One posting period statuses
Also, pay attention to the following five statuses associated with SAP Business One posting periods:
- Unlocked. A posting period achieves this status upon creation. It is the default status that enables you to post any transaction type.
- Unlocked Except Sales. If you are an authorized user, this status enables you to post all transaction types, except sales documents. Posting periods usually attain this status at the end of the month.
- Closing period. As an authorized user, you can post all transaction types if this status is active. If you are not authorized for this period status, you won’t be able to post any activity. The posting period setup screen allows for determining the time-frame after the period has expired to change the current period status to this one automatically. This status is often used at the end of the month or year.
- Locked. All users are prohibited to post activities to this period status.
- Archived. No transactions or documents can be posted. The data archive wizard assigns this status automatically.
Note that SAP Business One enables you to edit the period status and change it back and forth any time, except the Archived status.
You can see a period status in a grid with periods:
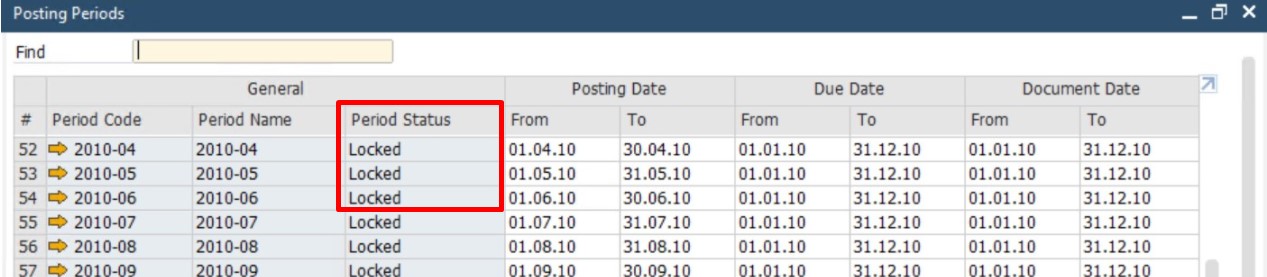
SAP Business One period status authorization
As we’ve just mentioned, it is possible to determine the authorized users which have access to different period statuses. The SAP Business One period status authorization is available under the Administration/System Initialization/Authorizations/General Authorizations. You can configure it as follows:
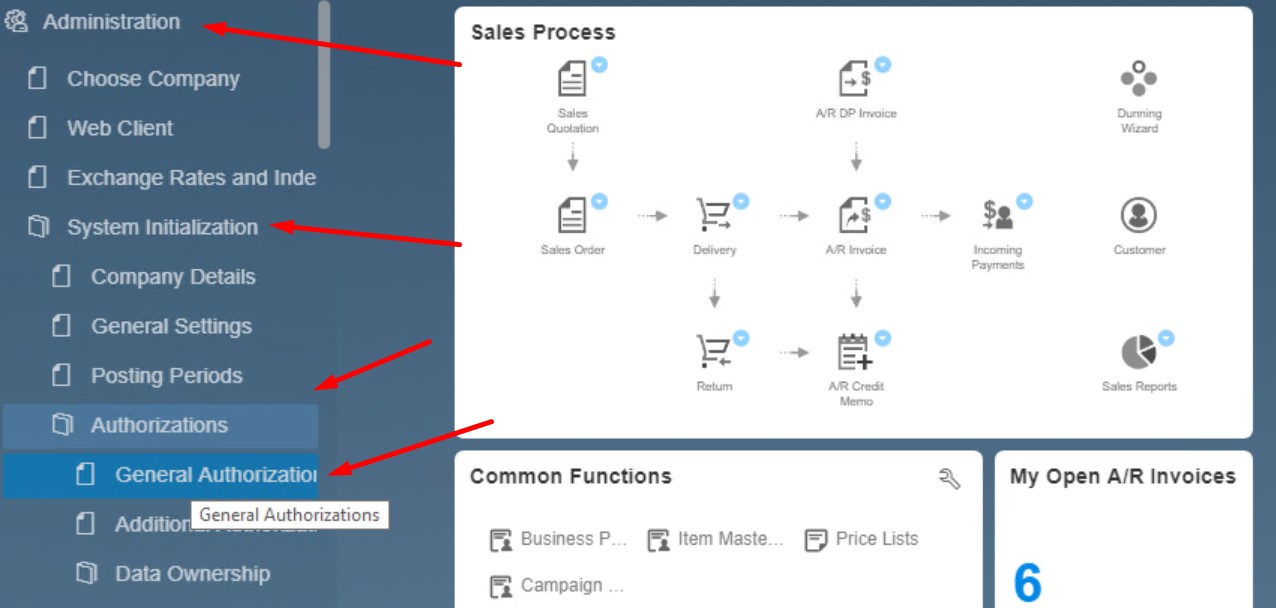
- Select the user;
- Expand the General module;
- Apply the SAP Business One period status authorization.
That’s it! Now you know how to set up posting periods in SAP Business One and associate particular system administrators with them.
2. How to define SAP Business One account segments
Now, let’s see how to create a segmented chart of accounts in SAP Business One. You can define the account segments you need apart from the ERP system. Next, specify them under Administration/Setup/Financials/Account Segmentation.
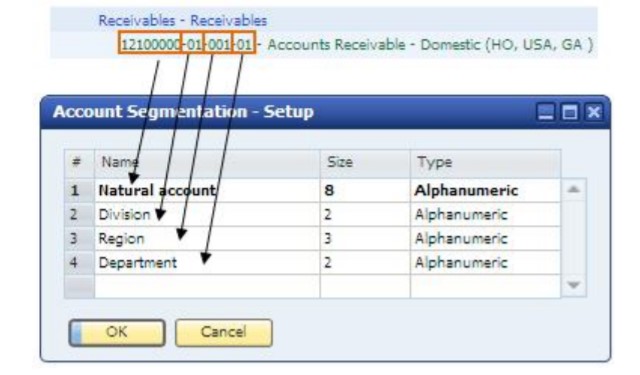
Note that SAP Business One requires at least one account segment. It should be the first, natural segment. However, it is not fixed or unchangeable. When you edit SAP B1 account segments, you can rename the first one or edit its length – just like in the case of other segments.
You can determine the length of your account segments following your business processes and financial reporting needs, to represent various segments of your enterprise, such as divisions, departments, branches, etc.
With SAP Business One, you get four default account segments. The maximum possible number determined in the ERP system is 10. The setup stage lets you change not only the size of any segment but also its name. Besides, it is possible to delete the entire segment, except the first, natural account segment.
You can delete SAP Business One account segments as follows:
- Right-click the last segment row.
- Choose Delete Row.
- Remove the unwanted segment.
Bear in mind that SAP Business One doesn’t let you delete the existing segments once the very first G/L account is created. Furthermore, it is impossible to change the length or the type of a segment at this stage.
After all your SAP Business One account segments are defined, you create the foundation for a fully qualified chart of accounts with a fully qualified account code that contains all account segments. Thus, different account codes share the same sections of characters, except the segment that represents the department. For example, a travel expense account code used by your company’s sales department differs from the travel expense account code used by your marketers by the segment associated with the department.
It is also worth mentioning that account segmentation is not mandatory in SAP Business One. The system offers flexibility, depending on your needs and the county localization.
3. How to create a chart of accounts in SAP Business One
Now, when you know how to determine posting periods and account segments in SAP Business One, you can create a chart of accounts. Since the chart of accounts organization follows GAAP (Generally Accepted Accounting Principles), SAP Business One offers separate drawers for accounts that represent assets, liabilities, revenues, expenses, equity, cost of sales, etc. They help to organize your accounts by level. As a result, you define a logical order that follows your financial accounting and reporting processes. Note that it is possible to rename the drawers so that greater flexibility is achieved.
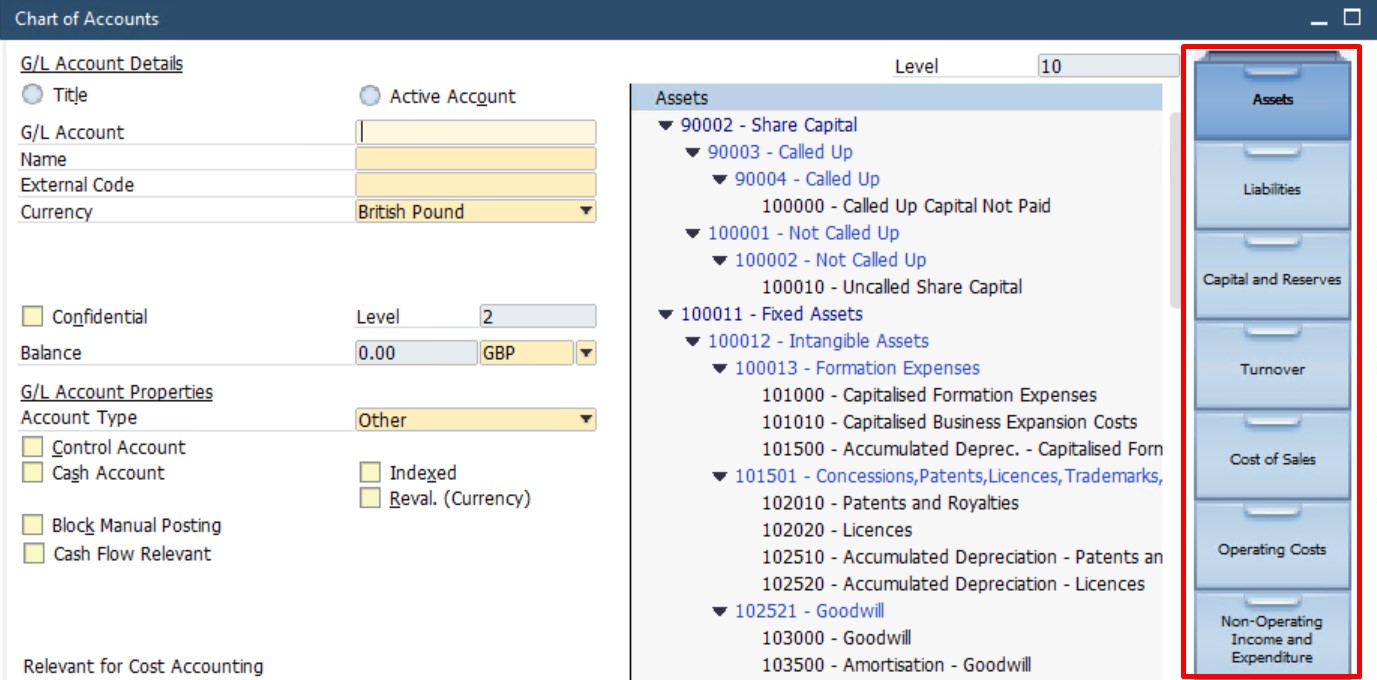
There is also an important reminder regarding the chart of accounts, which is an index of all G/L accounts of your business. SAP Business One equips every G/L account with an account code, description, and other properties. All these points are utilized to determine the functions of the G/L account. You can access your chart of accounts under Financials/Chart of Accounts.
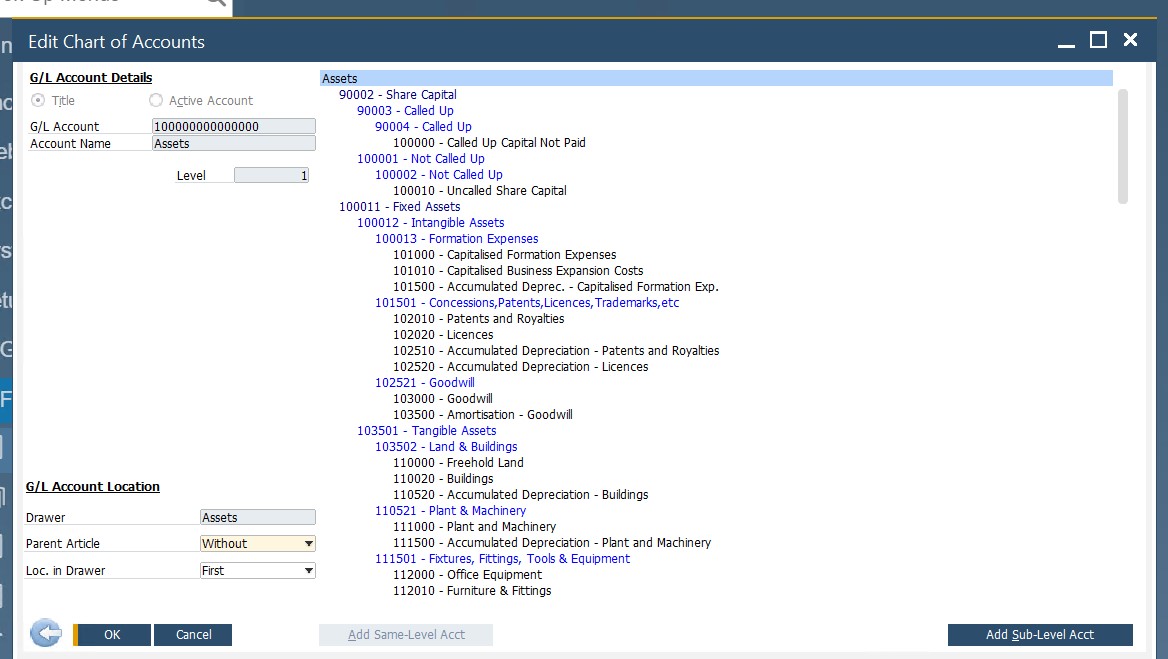
Let’s see what’s going on in the Chart of Accounts window. Here, SAP Business One enables you to characterize every G/L account in two ways. It may be either a title account or an active account. Next, you should specify its level.
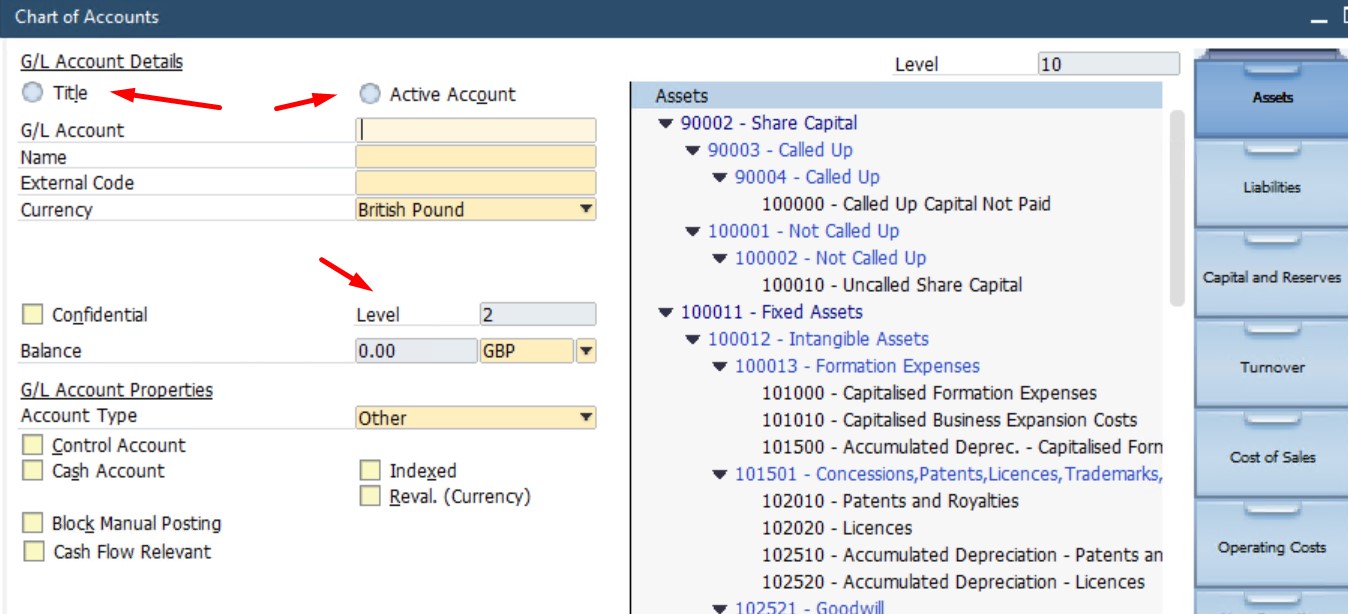
Note that only active accounts can be posted into SAP Business One. Therefore, it is recommended to gather all active accounts at the same level.
As for SAP B1 reports, the system uses the title account to summarize all the balances of each active account below it. Also, pay heed to the fact that the system doesn’t force you to use all levels. For instance, you can create 4 levels but have active accounts in two of them.
It is necessary to draw your attention to another SAP Business One specialty: it is impossible to delete an account with activities in it. The platform lets you deactivate it but not remove it from the system.
At the same time, you can achieve excellent flexibility while modifying the account codes. This procedure is at your service at any point in time.
You can add an account or a title in SAP Business One as follows:
- Click the drawer or title to add the new account under it.
- Choose Data/Add from the menu bar.
- Provide the complete account code, name, description, and other properties.
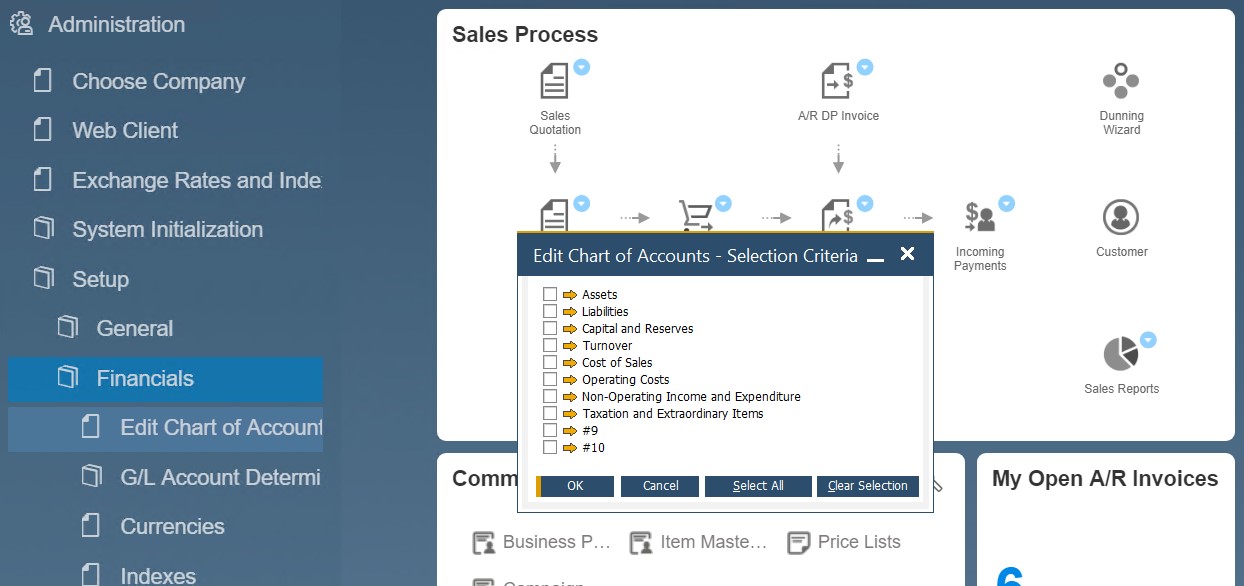
To rearrange your chart of accounts structure in SAP Business One, do the following manipulations:
- Go to Main Menu/Financials/Edit Chart of Accounts.
- Select accounts you want to edit and click Ok.
- Apply changes.
Alternatively, you can import your existing chart of accounts. You can provide it to SAP Business One as a text file via the Data Transfer Workbench tool. Don’t forget to determine the corresponding account segmentation setup codes prior to the import. Also, contact us to get help with importing the existing chart of accounts or other entities to SAP Business One.
4. How to set up multiple currencies in SAP Business One
If you operate globally, SAP Business One lets you set up multiple currencies. The ERP system lets you define G/L accounts and business partners in three different ways:
- local currency,
- specific foreign currency,
- All Currencies.
If you set up an account as All Currencies, SAP B1 lets you post documents and journal transactions to G/L accounts in any currency defined in SAP Business One. However, reports, reconciliations, and balances of G/L accounts and business partners are performed in the local currency.
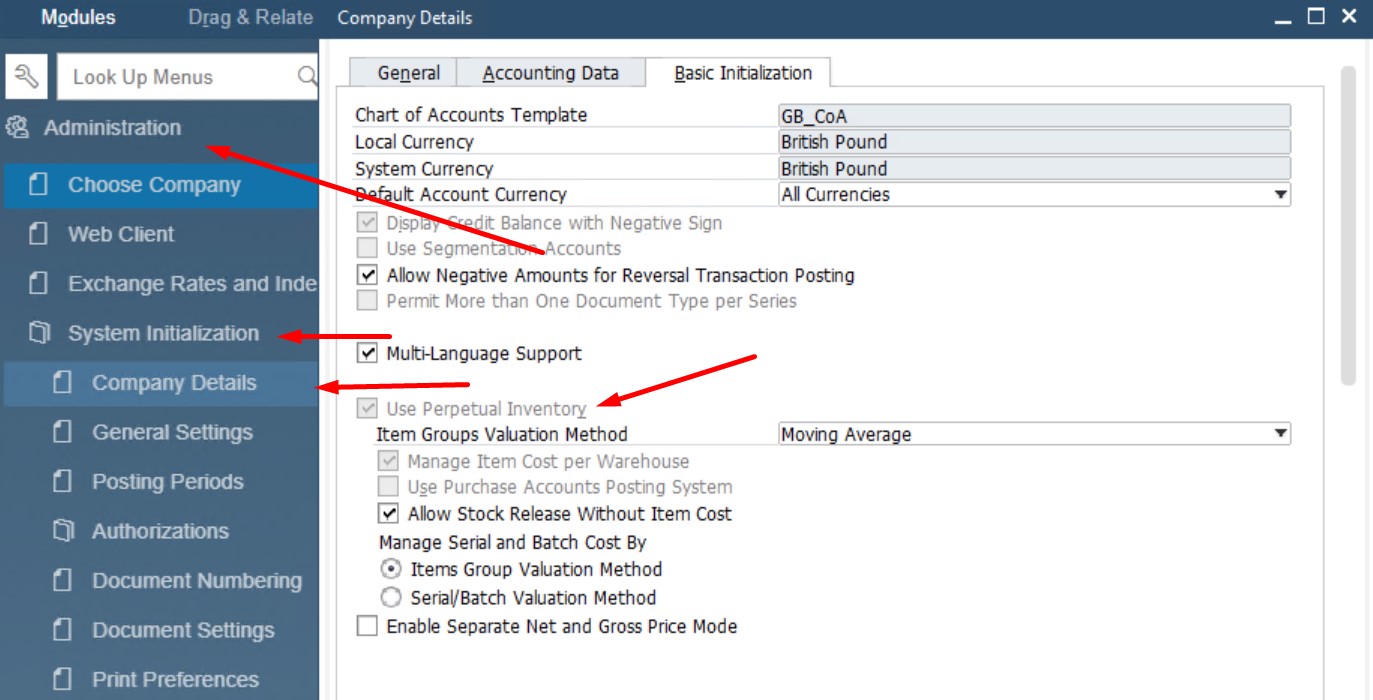
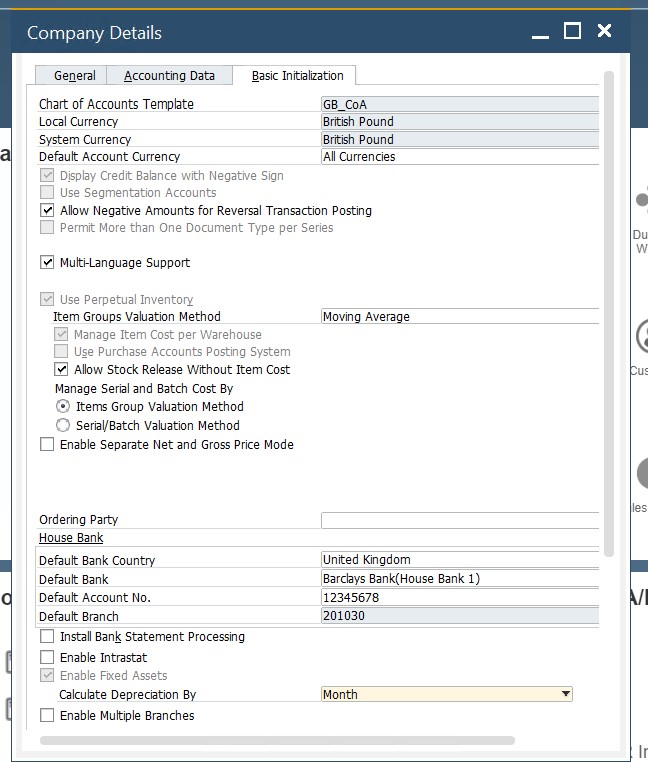
You can determine whether new G/L accounts are generated in local or all currencies under Administration/System Initialization/Company Details/Basic Initialization.
Note that there is a limitation that takes place when transactions have been posted: at this stage, you cannot change the account currency from All Currencies. However, it is always possible to switch to this option.
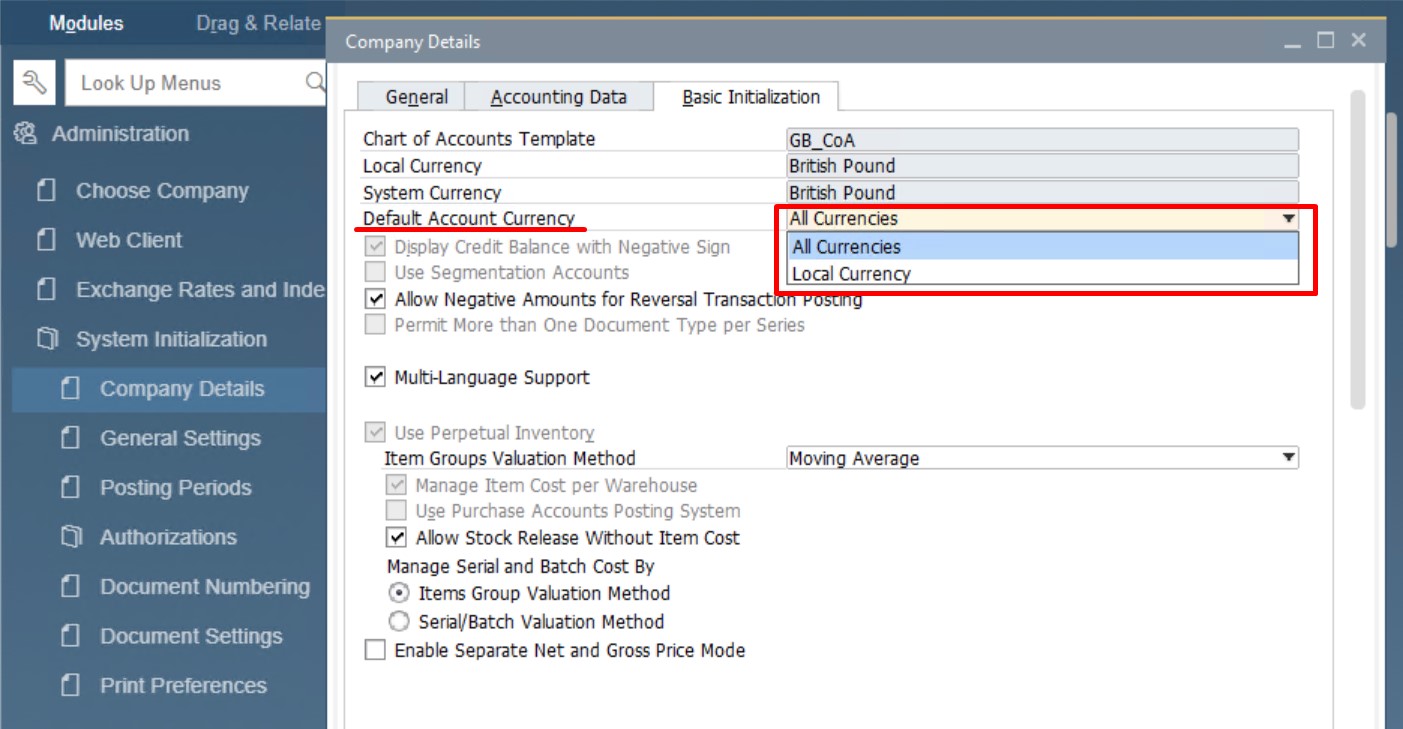
At the same time, SAP Business One lets you define an additional currency for maintaining accounts. The so-called System Currency can be used in reporting to a parent company located overseas. You can easily define the parent company’s local currency or show reports in it.
You can set up local and system currency in SAP Business One under Administration/System Initialization/Company Details/Basic Initialization (see image above).
To maintain a foreign currency in SAP Business One, you must manually define the exchange rates. You can do that as follows:
- Open your Administration module.
- Open the Exchange Rate table and provide the necessary information there.
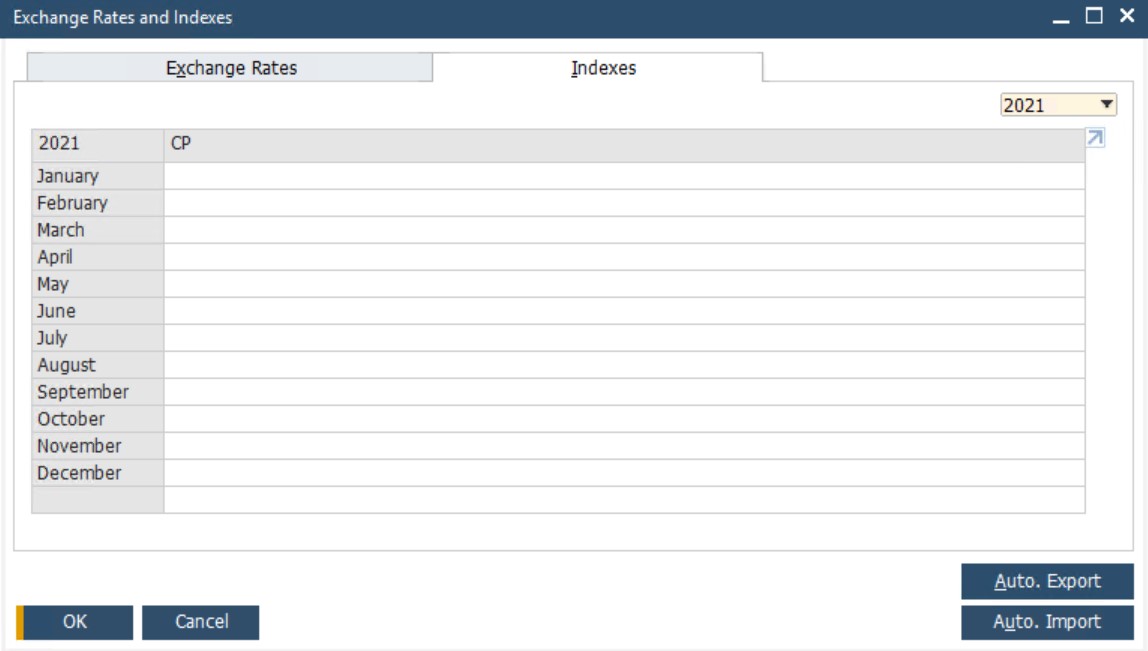
- Open the indexes table and provide the necessary information there.
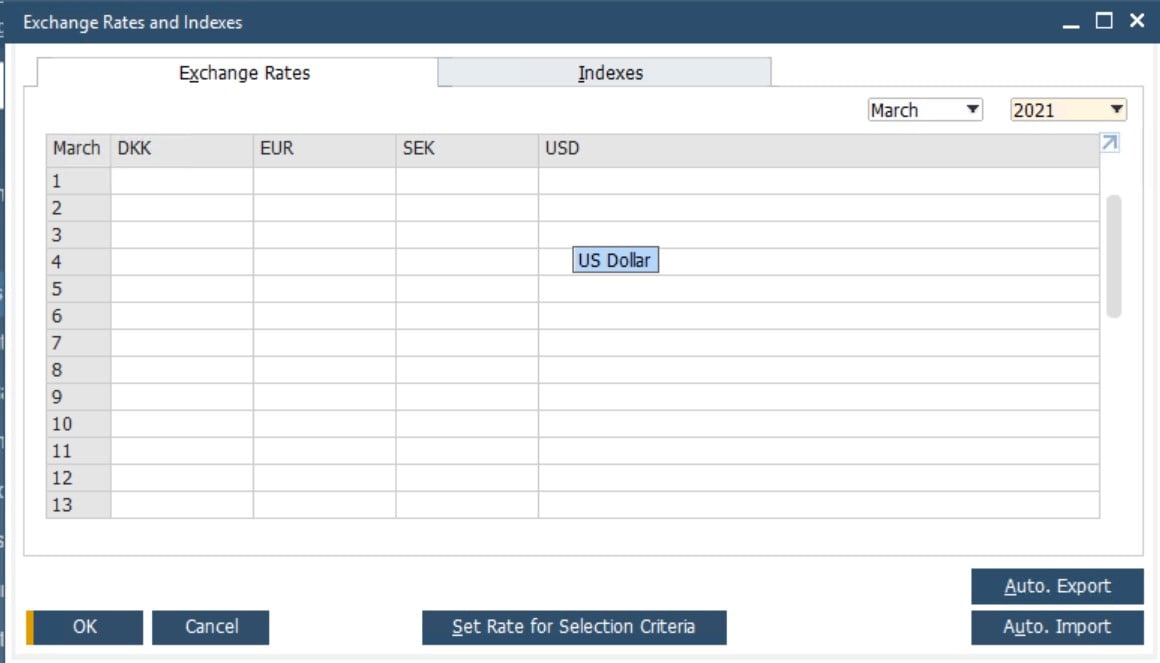
Note that if there is no rate available for the current date, the table displays automatically so that you can enter the exchange rate.
There are cases when SAP Business One posts exchange rate differences automatically. If you pay an invoice using a foreign currency and the payment rate varies from the invoice rate, the system posts the difference to the exchange rate difference account in your G/L account determination. It is recommended to run the Exchange Rate Differences utility to avoid issues by updating the additional exchange rate differences.
5. How to configure G/L account determination
The main goal of SAP Business One is to optimize your daily routine, automating numerous chores. And financial accounting management is not an exception. SAP Business One lets you create various journal entries automatically, especially when it comes to ones related to sales, purchasing, and inventory transactions. So, when a new invoice is created, the ERP system simultaneously creates the corresponding accounting entries. However, you need to configure G/L account determination to let the application know how to create those entries.
If you are not familiar with this process, G/L account determination is the process when you tell SAP Business One where to put accounting entries. Of course, you can take full advantage of the application’s automation only after providing SAP Business One with the correct data via the G/L Account Determination window.
You can find the SAP Business One G/L account determination screen under Administration/Setup/Financials/ G/L Account Determination. Don’t forget to ask your accountant to provide the final approval of your G/L account determination settings after applying changes.
Basic G/L account determination
When it comes to SAP Business One financial accounting, it is crucial to determine your G/L accounts accurately. Otherwise, you won’t be able to create journal entries automatically or the process won’t lead to the desired result.
Sales
Below, you can see the SAP Business One G/L account determination setup window. Note that it contains some mandatory accounts, such as the revenue account under the Sales tab. It is the default revenue account that sap Business One uses to create A/R invoices. However, you may specify another revenue account in item or warehouse master data. In this case, the default revenue account is overridden.
Purchasing
The Purchasing tab looks similarly:
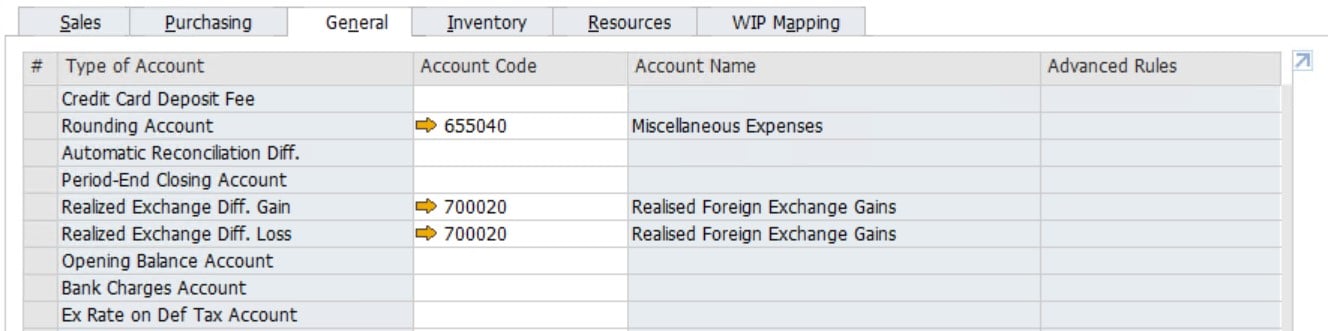
General
Next, you have the General tab with the following accounts:
Inventory
The inventory tab looks as follows:
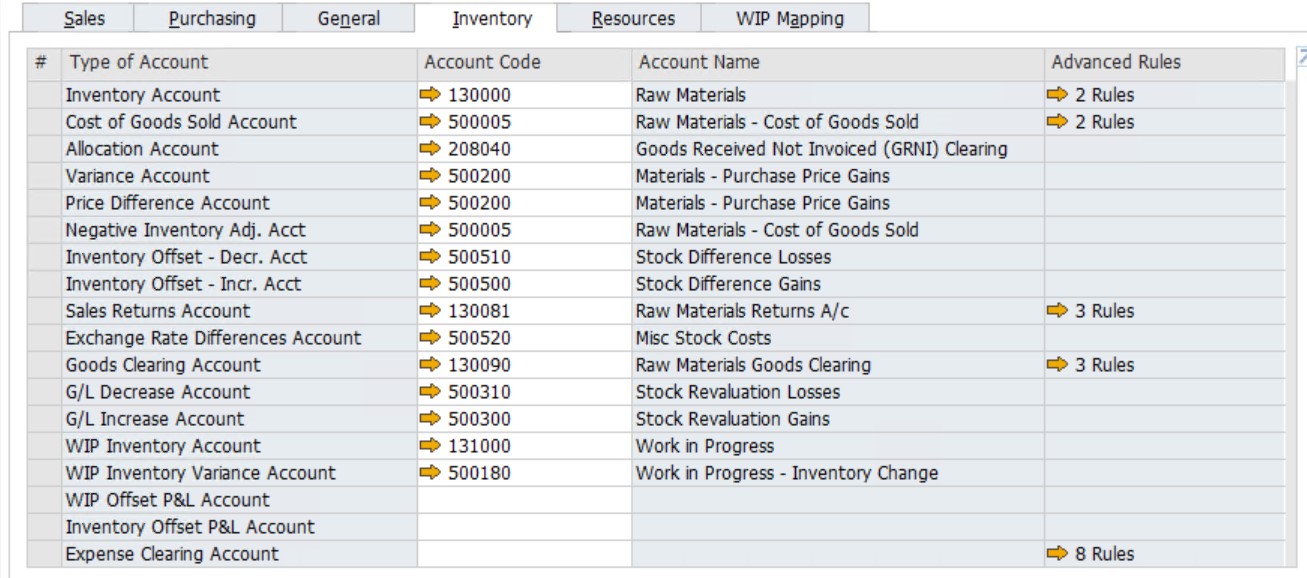
To activate the Inventory tab, you need to select the Use Perpetual Inventory checkbox on the Basic Initialization tab under Main Menu/Administration/System Initialization/Company Details.
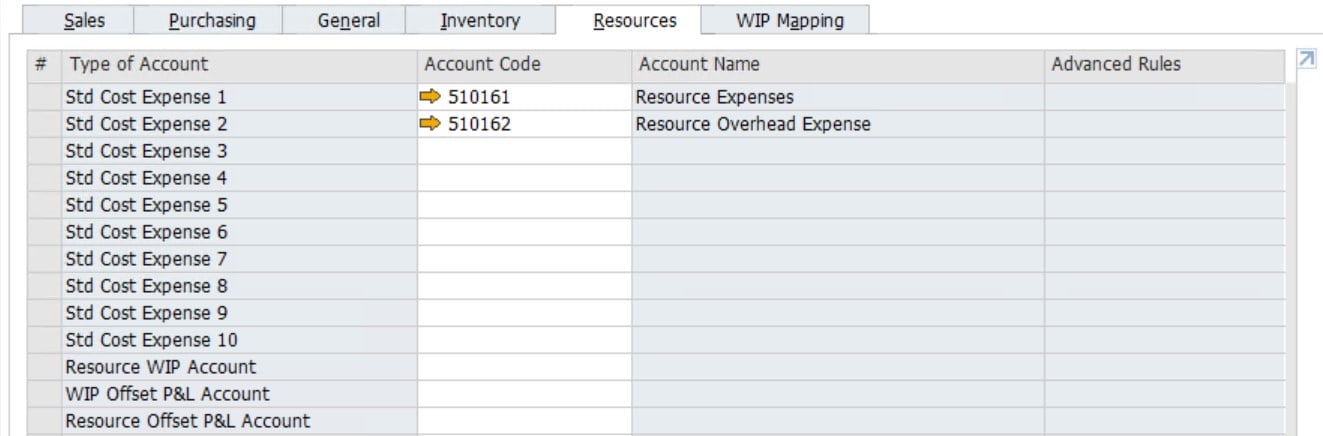
Resources
You will see the grid below after switching to the Resources tab:
WIP Mapping
The mapping facility allows you to map WIP accounts to each other, as well as set up a hierarchy of WIP accounts.

Advanced G/L account determination
Now, when you’ve defined the primary G/L accounts in SAP Business One, the ERP system lets you create a group of rules to establish more precise G/L account determination.
For instance, you sell an item related to the accessories group. The item is situated at warehouse 01. You need to configure posting to occur in a designated revenue account and COGS account. But selling the item from warehouse 02 triggers the use of another account.
Therefore, it is necessary to set the determination criteria for inventory and resources. Thus, you will identify which criteria SAP Business One should take into account. Note that the system lets you use up to 10 active criteria for determination.
After that, you can specify the rules to determine the appropriate accounts in SAP Business One. You can do that as follows:
- Go to the G/L account determination window.
- Press the Advanced button.
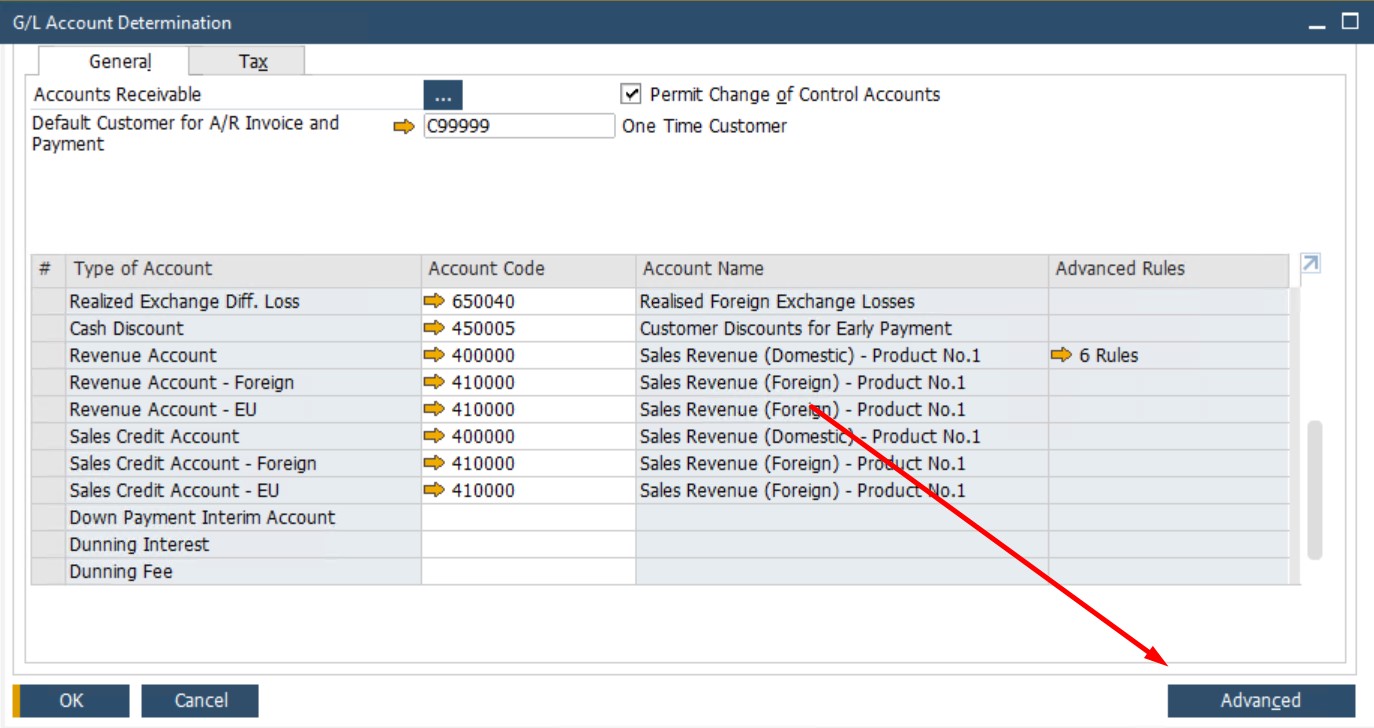
- Create rules.
Returning to our example, we can set up different revenues and COGS account following such parameters as item group and warehouse.

Pay heed to the fact that SAP Business One lets you create an unlimited number of rules based on different criteria. Every time a new transaction is posted, the system scans the list of rules and chooses the accounts once the rule is met. You can prioritize rules to avoid conflicts during the automated SAP Business One account posting.
Also, you can use the journal entry preview to ensure SAP B1 picks up the right accounts following the G/L account determination and rules. It is possible to preview the journal entry for every document before the system posts it. You can do that as follows:
- Find the document you want to preview.
- Right-click in the document window.
- Choose Journal Entry Preview.
SAP Business One lets you avoid ambiguity inG/L account determination. The ERP system creates journal entries with several rows connected to the respective rows in the marketing document for the same G/L account. As a result, you achieve more detailed reporting and better preview functionality.
SAP Business One multiple branches
Another huge SAP Business One advantage is associated with the ability to configure G/L account determination for multiple branches. You can activate the corresponding feature to maintain work across branches on one company database. If you run a company with several stores, this would be ideal for you. SAP Business one allows for using a single company database to manage all the connected stores as branches. While multiple data flows are centralized in a single database, you can manage the information related to an individual store separately.
The SAP Business One multiple branch functionality is associated with the following core features:
- Individual Approach. SAP B1 generates documents for specific branches using the master data assigned to them.
- Shared Database. At the same time, SAP Business One provides the ability to share common data and settings between all the branches. For instance, the system lets you use the same items, business partners, users, and document settings for all branches.
- Interconnected Branches. It is also possible to create purchasing documents from one branch using sales documents from another one.
- Flexible Reports. It is possible to run branch-specific reports. At the same time, you can compare reports for several branches.
- Access Levels. SAP Business One lets you create users assigned to a particular branch only. At the same time, it is possible to provide admins with the right to maintain all branches.
To enable SAP Business One multi branches, follow these steps:
- Go to the Company Details window (Administration/System Initialization);
- Open its Basic Initialization tab;
- Enable multiple branches;
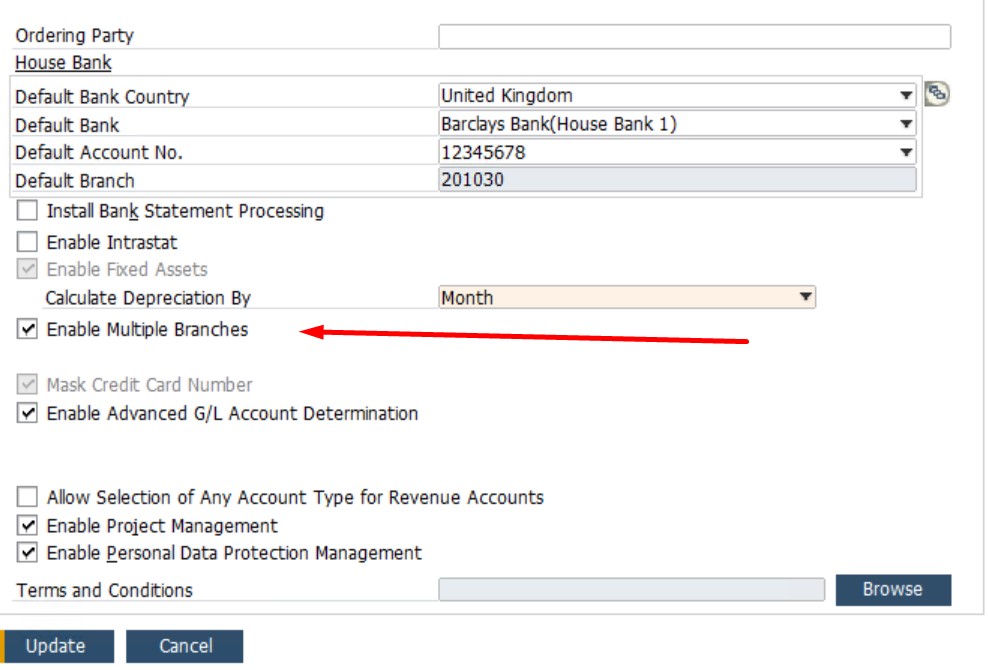
- Proceed to the Additional settings under Setup/Financials and apply changes there.
How to import existing financial accounting data to SAP Business One
Since importing the existing financial accounting data to SAP Business One is a complicated procedure that you should perform with the help of partners, we won’t spend your time on different nuances associated with this procedure. However, we can always help you with the transition. Contact us to get help with exporting financial accounting data to SAP Business One.
SAP Business One Financial Accounting Daily Procedures
We’ve just described how to have set up your chart of accounts and G/L account determination in SAP Business One. Now, you can start using the system for day-to-day activities, automating numerous processes. At the same time, it is ready for the various period- and year-end closing tasks.
How to post manual journal entries in SAP Business One
As we’ve already mentioned, SAP Business One automates the posting of most journal entries. As a result, sales, purchasing, payment, and inventory documents post transactions to the G/L in a fully automated manner. But what to do if you need to make journal entries in the G/L in SAP Business One manually? For instance, you may need to post depreciation, accrual, or correcting entries by yourself since they are not associated with SAP Business One modules.
Before going any further, we’d like to draw your attention to the fact that when you add a journal entry manually, SAP Business One records it immediately and prevents it from being deleted. You can only reverse the manual journal entry.
The Journal Entry window below lets you create journal entries manually:
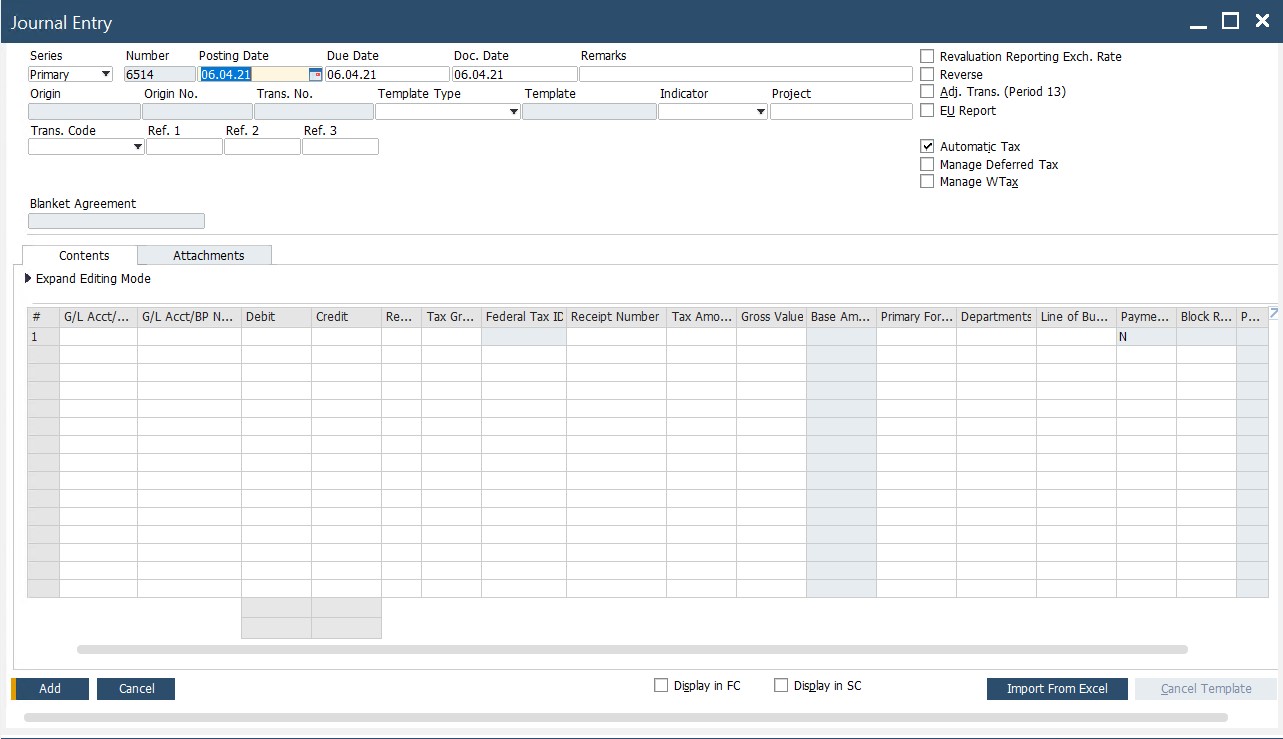
Its purpose is to help you record transactions that SAP B1 cannot initiate automatically. For instance, it can be a record of a finance charge to a customer account. Also, a service fee to a bank account is a frequent cause of a manual journal entry in Sap Business One.
You can create a manual journal entry in SAP Business One as follows:
- Go to the Main Menu of your SAP B1.
- Open its Financials section.
- Proceed to Journal Entry.
- The form from the image above displays.
Note that it is possible to display and create journal entries in expanded and reduced editing modes.
Check the Display FC box to enter amounts in foreign currencies. Note that the account should be defined as All Currencies. At the same time, it can be a specific foreign currency account.
Another important aspect is that you can copy and paste a large journal entry from an Excel sheet. Copy the rows from the latter and paste them into an SAP B1 journal entry window. However, the columns in Excel should match the columns in SAP Business One. Otherwise, the operation won’t be successful. Contact us to get help with exporting financial accounting data to SAP Business One.
Note that SAP Business One lets you display a list of G/L accounts from the G/L Acct/BP Code field. It is only necessary to press the Tab button on your keyboard:
Another useful feature enables you to use a journal entry to book an entry to a business partner code. SAP Business One allows for displaying a list of business partners instead of a list of G/L accounts. Simply press hit Control + Tab on your keyboard when in the G/L Acct/BP Name field:
We’ve already explored the potential of default settings in SAP Business One and manual journal entries are not an exception. You can specify default settings for them. For instance, the system enables you to choose whether to block the posing of an unbalanced journal entry in a foreign currency or not. You can configure default settings for manual journal entries in SAP Business One as follows:
- Go to Main Menu;
- Open the Administration section.
- Proceed to System Initialization.
- Find the Document Settings screen.
- Open the Per Document tab.
- Select Journal Entry from the dropdown list.
- Apply default settings.
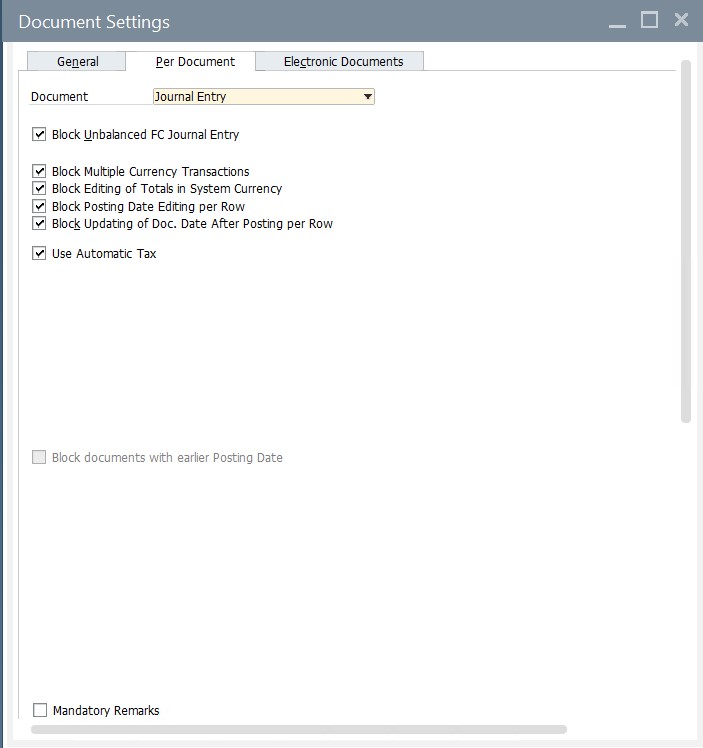
However, You can overwrite some of the defaults in the journal entry window. Use Form Settings to do that.
How to make recurring postings in SAP Business One
SAP Business One lets you automate transactions that recur monthly or weekly. It is not necessary that the transaction amounts should be the same each time. The ERP system doesn’t bind you to fixed percentages. However, such postings recur on the known dates and are usually made up of the same G/L accounts.
The purpose of using recurring journal entries is to cover various expenses, such as depreciation, payroll, office rent, equipment lease payments, and utility costs.
You can access recurring postings in SAP Business One under Main Menu/Financials/Recurring Postings.
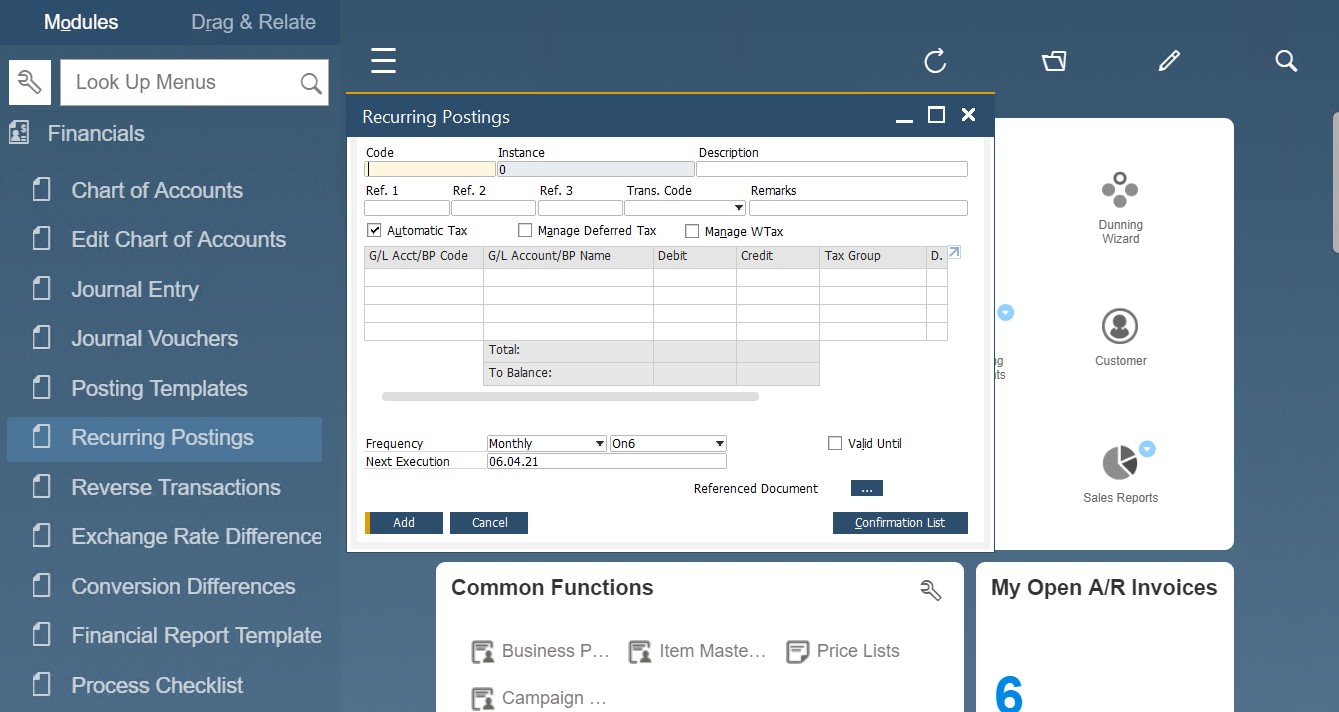
Note that it is necessary to specify all the accounts, business partners, and actual amounts to determine a recurring posting. You will determine the frequency and the expiration of the recurring posting in SAP B1.
Next, the system will duplicate the original posting on the specified date. You will be able to edit it or leave it as it is before the final version goes to the general ledger.
Alternatively, you can enable recurring postings in SAP Business One by setting the frequency to a template and then use it each time you create a manual journal entry.
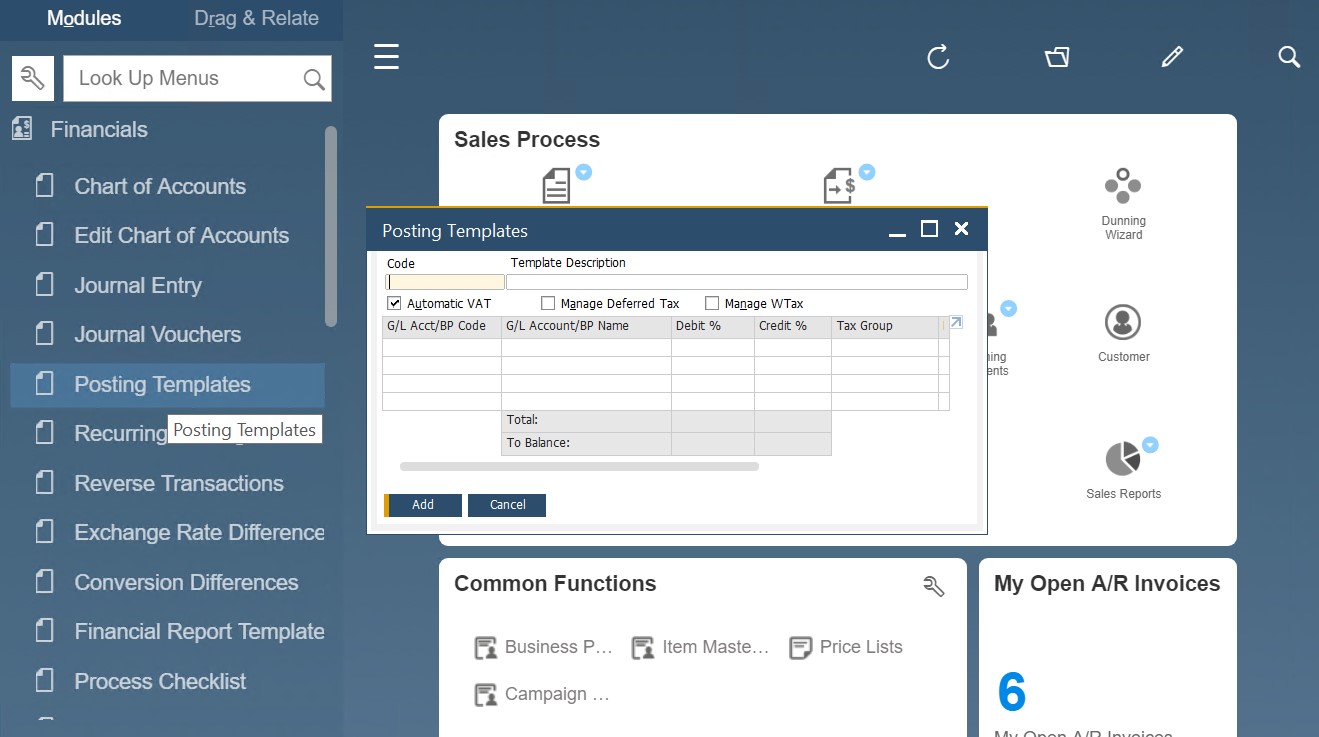
Recurring posting templates
SAP Business One introduces posting templates to help you streamline the posting of recurring journal entries with the actual amounts not known in advance. You define percentages instead of amounts and set the time when the posting should be captured. Next, when you enter an amount in one of the rows, SAP Business One allocates the amounts in the other rows according to the percentages from the template.
Use the posting template functionality of SAP Business One to allocate expenses, such as marketing costs, as a percentage over multiple departments. With this feature, you can take 100% of one account and allocate it to other accounts automatically, using fixed percentages.
Note that SAP Business One lets you avoid account selection for certain rows. You can add a description of the account type or business partner that should be specified there.
The SAP Business One posting template feature is available under Main Menu/Financials/Posting Templates.
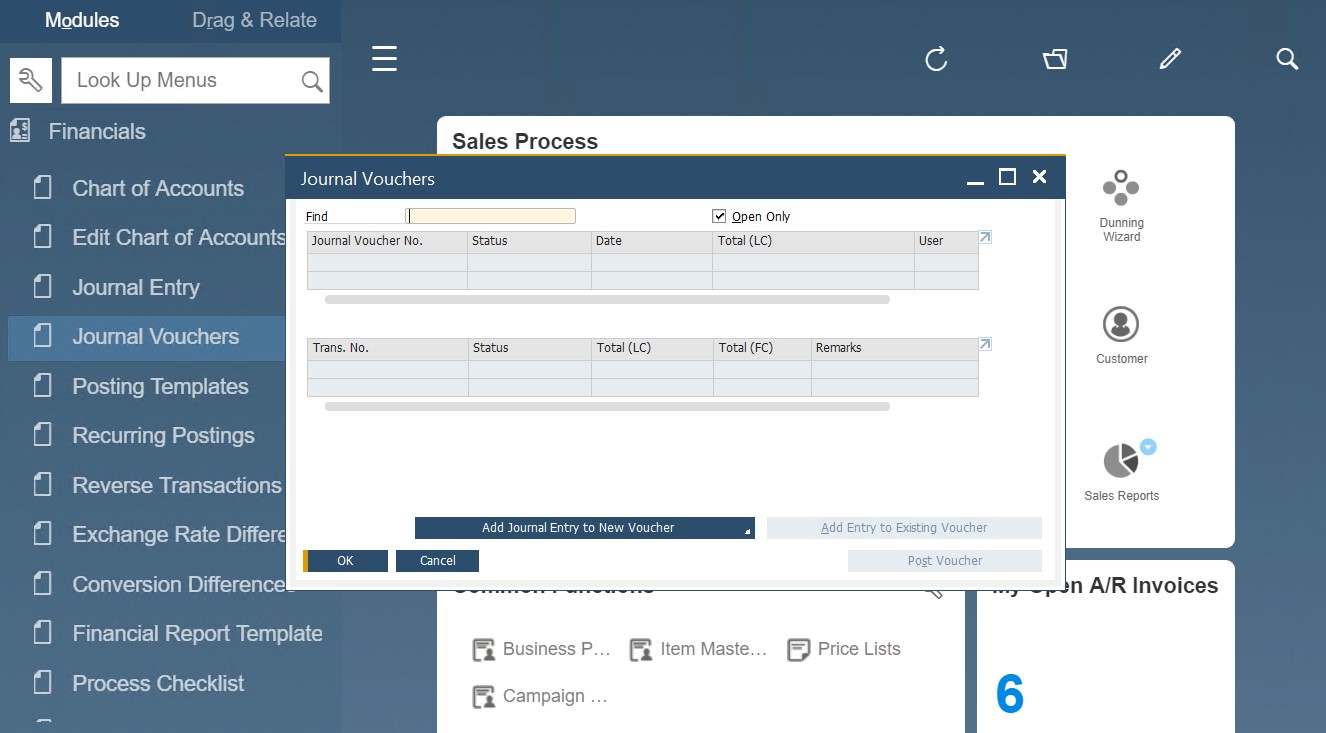
Journal Vouchers
SAP Business One introduces journal vouchers to help you review financial transactions in a batch before posting them. Prior to posting the entries as journal vouchers, the system enables you to edit, change, or delete them. But when should you use SAP Business One journal vouchers?
The feature is extremely useful for training new employees. You enable new workers to create journal vouchers that can be reviewed before posting. Thus, the risk of reversing the new employee’s journal entries is reduced since no incorrect journal entries are posted.
Besides, it is possible to use the SAP Business One journal vouchers to perform what-if analyses. Run the cash flow report with open journal vouchers. Thus, you will determine the effect of the postings before any new changes affect the system.
Also, note that SAP B1 lets you save even unbalanced journal vouchers. It is especially useful for huge volumes of work. You can save a very large journal entry as a voucher and come back to it later.
Note that, unlike other systems, SAP Business One utilizes a journal voucher for a batch of transactions. Since multiple journal entries are available in one voucher, all of them are posted together when you post the voucher to the general ledger.
You can create an SAP Business One journal voucher as follows:
- Go to Main Menu;
- Proceed to the Financials section;
- Open the Journal Vouchers screen.
How to Maintain Records for SAP Business One Financial Accounting
Maintaining records in SAP Business One covers numerous tasks, such as reversing transactions, working on G/L accounts, or editing 1099s. Below, we cover these three topics.
Reversing transactions in SAP B1
Follow these steps to reverse a transaction in SAP Business One:
- Locate a manual journal entry.
- Right-click it.
- Choose Cancel.
- Add a newly-opened journal entry with the amounts reversed.
Alternatively, SAP Business One lets you schedule a journal entry reversal. It is called automatic reversal of manual journal entries. It is recommended to plan the automation for the first day of the upcoming month. SAP B1 stores manual journal entries scheduled for
Reversal under Main Menu/Financials/Reverse Transactions. Use this feature to optimize month- and year-end closings.
SAP Business One offers the following reversal methods:
- Posting negative amounts on the same side;
- Posting a debit to reverse a credit;
- Posting a credit to reverse a debit.
You can determine the reversal method under Main Menu/Administration/System Initialization/Company Details/Basic Initialization.
Editing G/L accounts
When it comes to editing G/L accounts, SAP Business One also looks flexible. The system lets you use the Edit Chart of Accounts window to apply changes, rearrange groupings, and even create new accounts. You can find these and other options under Main Menu/Financials/Edit Chart of Accounts. Alternatively, SAP Business One lets you edit G/L accounts under Administration/Setup/Financials/Edit Chart of Accounts.
Select a record you want to edit:
You may also need to create codes for newly created accounts. Since it is a common financial accounting task, SAP Business One introduces the account code generator to optimize your daily routine. The tool enables you to assign codes to newly created account segments within just a few clicks. Also, it lets you insert a new G/L account to a number of different account segments in bulk. You can access the account code generator in SAP Business One under Financials/Account Code Generator.
Applying changes to 1099s
US vendors have a country-specific instrument in SAP Business One. If you deal with a 1099 form, the SAP Business One business partner master data offers A/P invoices and credit
memos with 1099 amounts for year-end reporting.
This instrument is quite flexible since you can edit 1099 documents if posting the wrong 1099 amount, form, or box. You can leverage SAP Business One 1099 editing as follows:
- Go to Main Menu;
- Open its Financials section;
- Proceed to 1099 Editing;
- Apply changes.
SAP B1 audit trail
Every time you apply changes to documents, master data records, or set up elements, SAP Business One creates an audit trail. You can view the changes under Tools/Change Log on the menu bar. The Change Log window displays not only the updated elements but also user, date, and time associated with a particular document or master data record:
- Click on the entry to see the changes.
- Press and hold CTRL to click on two or more lines, hit Show Differences (lower right of the Change Log window), and you will see what has been changed in each document iteration.
Besides, you can view the Access Log from the Tools menu, viewing users with their login information. The screen displays the following information:
- A user who logged into the system;
- A time when they did that;
- A time when they quit;
- Failed attempts to log in.
Period-End Procedures in SAP Business One
You have to do much of the financial accounting work at the end of each period. And SAP Business One lets you optimize all these efforts. The ERP system lets you examine transactions and apply correction in a variety of ways.
Period-end activities in SAP B1
You have to perform period-end activities at the end of the quarter. However, in some cases, they take place monthly, depending on the chosen financial accounting processes. In either case, you need to follow these steps to comply with the legislation:
- Double-check transactions. They should be posted properly for the period. Don’t forget about adjustments and accruals.
- Print various papers and documents:
- trial balance,
- vendor liabilities aging reports,
- customer receivables aging reports,
- inventory audit report,
- financial statements;
- Create a database backup and store it safely;
- Close the fiscal period.
Year-end activities in SAP B1
As for the year-end closing, it is a more considerable event that affects many SAP Business One aspects:
- It zeros all profit and loss account balances to the retained earnings account,
- Summarizes balance sheet accounts,
- Brings the balances forward as the beginning balances, etc.
Of course, these and other events don’t take place immediately. SAP Business One lets you keep the year open until you provide all the required adjusting entries.
A general year-end checklist looks as follows:
- Post all final transactions;
- Complete all the period-end procedures;
- Post final adjusting entries in the G/L is applicable;
- Close the last fiscal year period;
- Create a database backup;
- Print the following papers and documents:
- 1099s,
- a final detailed trial balance,
- financial statements;
- Prepare for the new fiscal year;
- Close the previous fiscal year.
Note that you can simplify your year-end closing activities during SAP Business One setup and implementation. Configure the system accordingly, and it will automate numerous processes. Therefore, it is recommended to configure the financial accounting part of the system with your implementation partner.
SAP Business One data archiving
SAP Business One offers the Data Archiving wizard to simplify your period-end procedures, archiving old data within just a few clicks. You reduce your database size and increase the software performance.
If your company database is more than two years old, you can optionally delete or archive old activities. Once the old transactions are removed, it is also possible to eliminate master data that is no longer necessary. As you might have already guessed, SAP Business One lets you archive only closed sequences of documents and master data. Let’s explore a tiny example to illustrate the core principle behind data archiving within the system.
- A sales quotation is transformed into a new order.
- The order is copied into two deliveries.
- The deliveries are moved into one A/R invoice.
- The invoice is fully paid.
You can see a closed cluster. All the transactions associated with the workflow are closed. Now, you can use data archiving to remove the corresponding documents.
However, if the invoice is partially paid, you keep the cluster open. Consequently, none of these transactions in the sequence can be removed. The entire platform’s nature when you build one document from another and post journal entries with the document prevents the deletion on open clusters. And it is vital for keeping the data integrity and consistency.
The SAP B1 Data Archive Wizard
You can find the Data Archive Wizard of SAP B1 under Administration/Utilities/Data Archive Wizard.
The solution introduces the following options:
- The simulation run. At this stage, you find out what data will be archived, what clusters are non-removable, and what are the expected results (removed transactions, new database size)
- The actual run. Now, you remove the appropriate transactions, reducing the database size. Don’t forget to create a backup before doing that.
- History. View previous runs if you need to find a particular transaction or cluster. You can search by date and transaction type.
Note that it is possible to archive periods that are 2 years or older, locked, and have a period-end closing process applied.
Also, bear in mind that while the wizard removes sales and purchasing documents, sales opportunities, activities, payments, and inventory revaluation, it does not work with master data. Therefore, you have to remove it manually.
Since the wizard removes journal entries from the system, SAP Business One requires keeping the account balances intact. Therefore, the ERP system generates consolidated journal entries, reflecting those balances.
Data archiving checklist
Keep this data archiving checklist in mind before running the data archive wizard:
- Run a simulation to find clusters that cannot be removed.
- Close them.
- Create a company database backup.
- Run the wizard.
Note that the data archive wizard generates a read-only database backup. However, you can restore it later. The backup contains all the data available before the deletion. You may need to restore it for audit purposes to view removed transactions.
Master Data Cleanup in SAP B1
Now, when all the closed clusters are archived, you can proceed to the master data cleanup. SAP Business One offers the Master Data Cleanup Wizard. You can find it under Administration/Utilities.
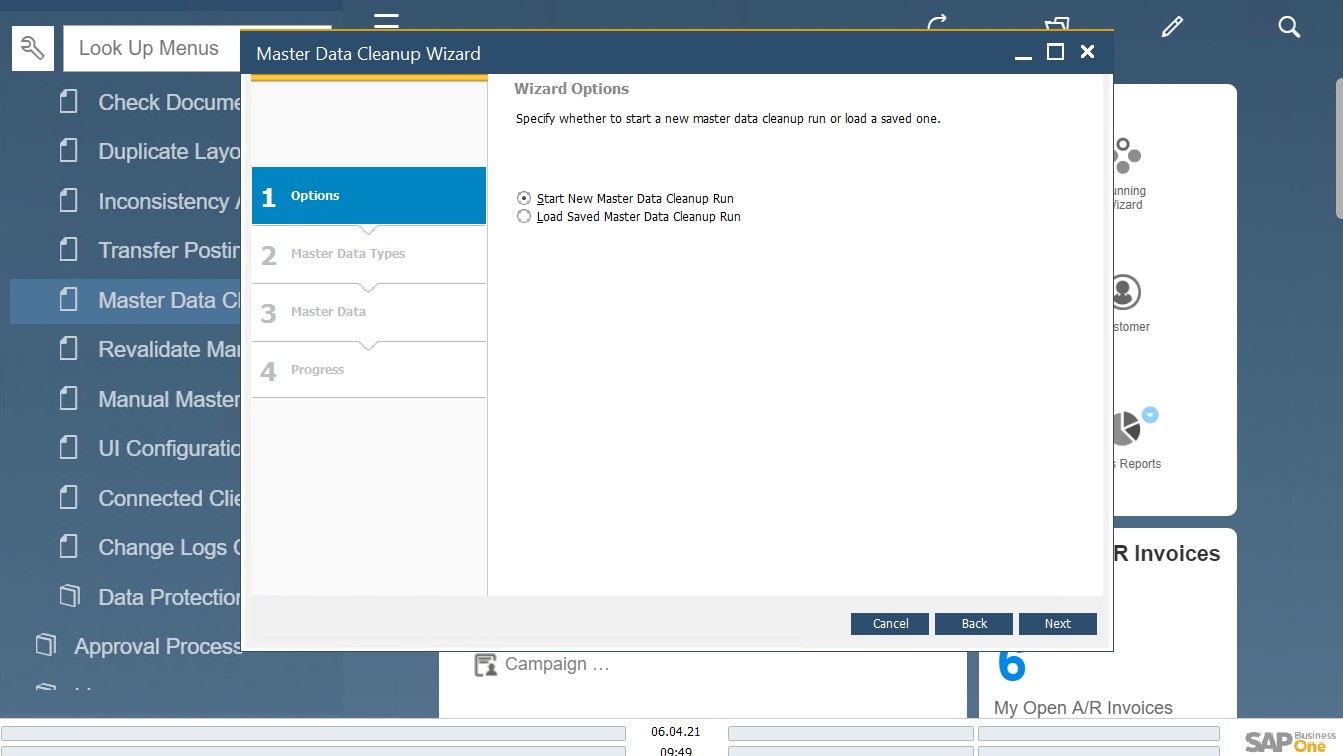
This software solution allows for deleting any master data that is no longer needed in bulk, including items, business partners, projects, G/L accounts, distribution rules, employees, tax codes, etc.
Incoming and Outgoing Payments in SAP Business One
The SAP Business One banking module is responsible for processing payments within the system. The following chapter of our SAP b1 exploration sheds light on the basic things necessary to get started. What’s the main point about processing payments in SAP Business One?
You should select a transaction that should be closed by the payment. The system lets you close the transaction either fully or partially. For those situations when there is no prior transaction to select, rely on the Payment on Account functionality of SAP Business One. Let’s look at other aspects of incoming and outgoing payments in the system.
SAP B1 Incoming Payments
SAP Business One introduces the following four ways to receive incoming payments:
- Cash;
- Checks;
- Credit cards;
- Bank transfers.
Although they may look completely different, SAP Business One applies the same principle while handling each type. It makes a payment against a specific A/R invoice or two or more A/R invoices to a customer.
How to create incoming payments for specific invoices in SAP B1
Follow these steps to create an incoming payment against specific invoices in SAP Business One:
- Open the Incoming Payments window situated under Banking/Incoming Payments.
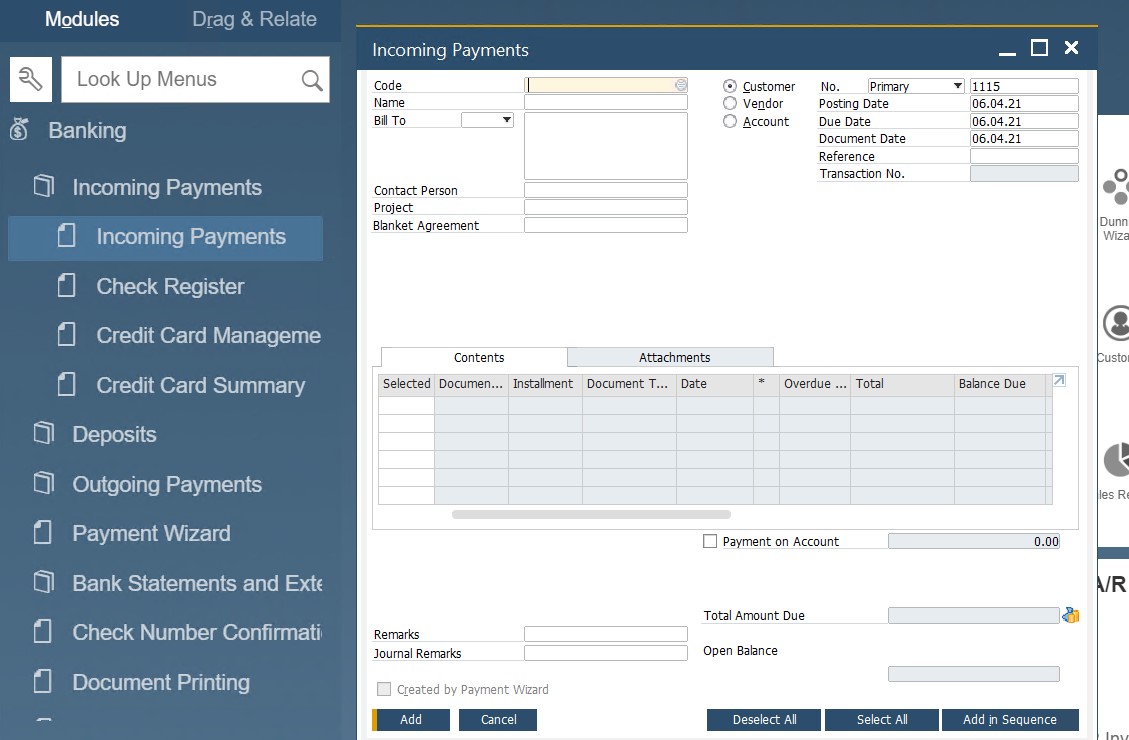
- Choose a customer by clicking on the selection list button situated to the right of the Code field.
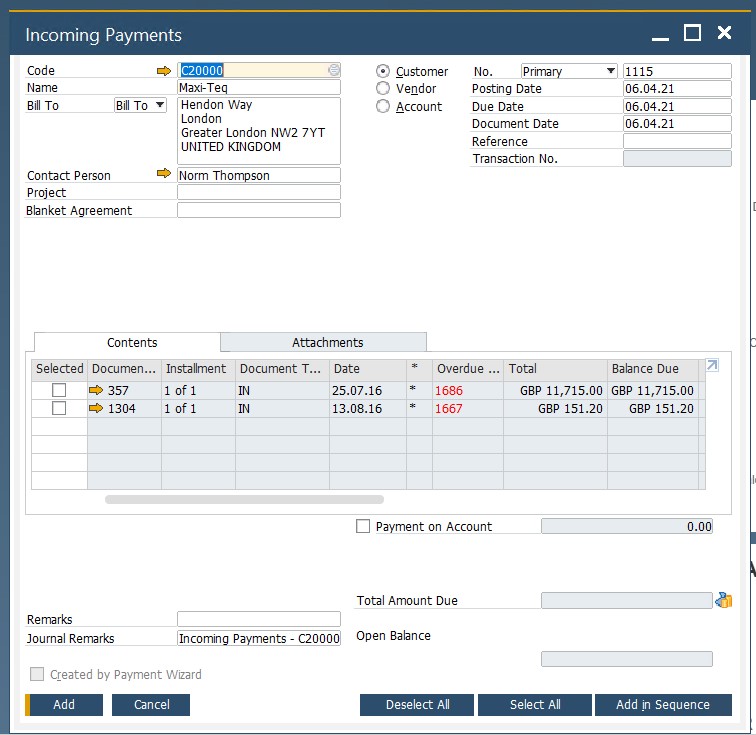
- Now, the Documents for Payment table displays. Here, you can see all the open invoices associated with the chosen customer.
- Choose the invoices to apply the payment to by checking its selection box situated next to the row number.
At this stage, SAP Business One displays the cumulative amount in the Total Amount Due field in the window footer. - If you want to do a partial payment, the system lets you edit the Total Payment amount field.
- Now, open the Payment Means window:
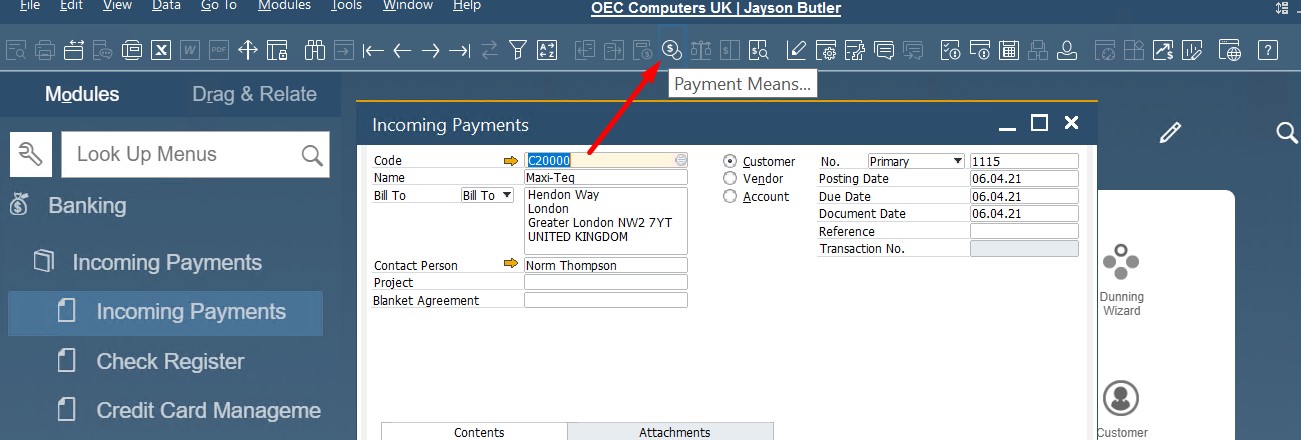
- Go to the SAP Business One toolbar;
- Select the payment means icon;
- Choose the desired payment means tab;
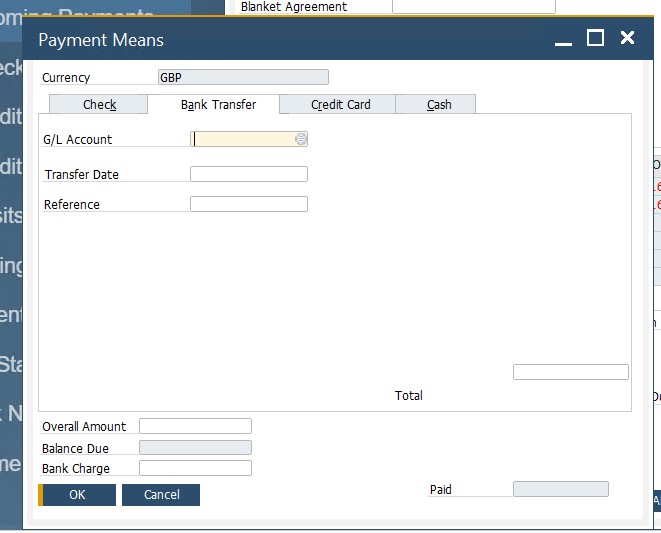
- Add details;
- Click OK – you will return to the Incoming Payments window.
- Hit the Add button to post the document.
Congratulations! You’ve just created a new incoming payment document. Its appearance in SAP Business One is followed by the following actions:
- Journal entries credit the customer’s accounts receivable control account. At the same time, the debit of the bank account or a clearing account takes place.
- SAP Business One applies the payment to the invoice.
- The system closes the paid invoice. Thus, it disappears from the Open Items List, Documents for Payment table, as well as the customer’s receivable aging report.
- In the case of a partial payment, the chosen invoice remains open for the further balance due amount.
- However, if you process a full payment, SAP Business One reconciles the invoice and the payment and closes them.
- Check, cash, and credit card payments are posted to a clearing account. You need to process a deposit document, moving the funds between your clearing and house bank accounts.
How to create incoming payments on account in SAP Business One
SAP Business One lets you accept incoming payments without any reference to a specific invoice. Usually, it happens for one-time POS purchases or other similar transactions. So, you can create incoming payments on account in SAP Business One as follows:
- Open the Incoming Payments window as shown below.
- Check the Payment on Account checkbox.
- Fill in the required information.
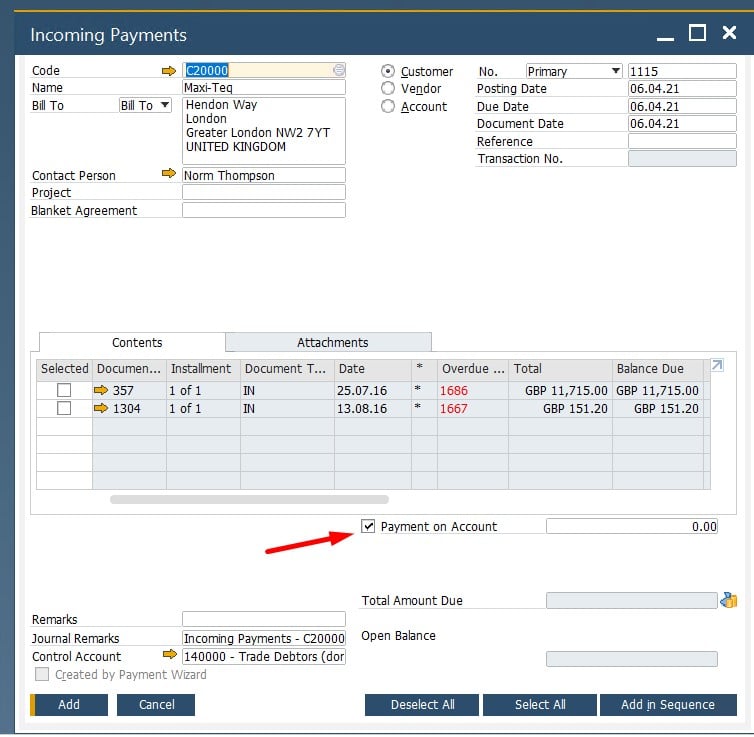
Once you post the incoming payment document, SAP Business One creates the corresponding journal entry.
SAP B1 Outgoing Payments
Outgoing payments in SAP Business One share lots of similarities with incoming payments. The same four ways of sending an outgoing payment are at your disposal: cash, checks, credit cards, and bank transfers. The following opportunities are associated with SAP Business One outgoing payments:
- Outgoing payments for business partners and accounts;
- Payment checks for various purposes, including ones associated with an employee;
- Outgoing payment document drafts;
- Payment check drafts;
- Check Register Report, etc.
What’s the main difference between incoming and outgoing payments from the perspective of SAP Business One?
It is necessary to define an account for the different payment means. Let’s explore a little example. You create an outgoing payment with cash. In this case, SAP requires selecting the outgoing cash account for your transaction. You can choose either your house bank account or a petty cash account.
Special scenarios for payment situations
SAP Business One lets you determine a maximum amount for over and underpayment situations. Let’s assume that your customers round the invoice amount. This may result in up to a $1 difference between the amounts specified in the invoice and the corresponding payment. However, you can control the gap. You can define the allowed over or underpayment maximum amount in SAP Business One as follows:
- Go to the Administration;
- Open the System Initialization screen;
- Proceed to the Document Settings;
- On the Per Document tab, select Incoming/Outgoing Payment;
- Apply changes and save your new configuration.
Now, you can process the payment with a difference within the amount defined as an under- or overpayment. SAP Business One will process it as a payment in full. It will make a posting to the business partner for the payment amount. As for the small difference, the ERP system posts it to a dedicated G/L account, defined in the G/L Account Determination.
It is also necessary to define cash discounts. Usually, it is a special discount given in the following two situations:
- When your buyer or partner pays before the invoice due date;
- When you provide your vendor with a payment ahead of time.
You can find the cash discount percentage in the invoice’s payment terms. SAP Business One automatically calculates the actual discount amount when you add the payment document and posts it to a dedicated G/L account. Consequently, you can modify the appropriate fields on the invoice row in the payment document to adjust the amount of a cash discount.
If you operate globally, you may also face various problems associated with exchange rate variances. Let’s assume that you close an invoice with a payment in a foreign currency. If the exchange rate varies between the payment and the invoice, SAP Business One calculates the exchange rate gain or loss amount, posting it to a corresponding G/L account.
Payment Wizard
SAP Business One Simplifies the creation and processes of both incoming and outgoing payments. The ERP system offers a payment wizard. With the help of this tool, you get the ability to create numerous outgoing payments in a batch, following all the requirements associated with the checks and bank transfers. At the same time, the platform lets you batch-process incoming payments by bank transfers.
The wizard creates all the payments following your selection criteria and payment methods. Therefore, it is necessary to prepare the relevant master data. Follow these steps to configure the SAP Business One payment wizard:
- 1. Create a payment method under Administration/Setup/Banking/Payment Method.

- 2. Specify default payment methods for customers and vendors under Administration/System Initialization/General Settings/BP tab.
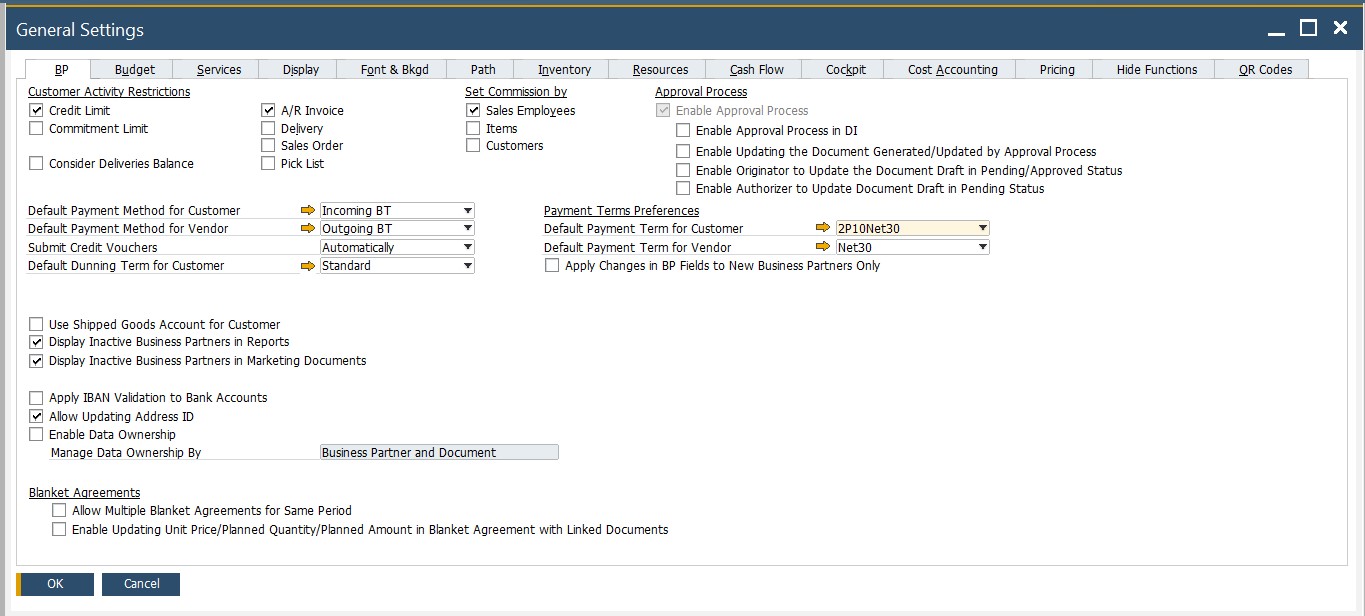
- Assign the new payment method to a business partner if it differs from the default method. You can do that in the Payment System tab of the Business Partner Master Data screen.
- Go to Administration/Setup/Banking/Payment Run Defaults to choose payment methods you want to add to the SAP Business One payment wizard.
After that, you need to specify who you want to pay, how, and when. All these steps take place right in the wizard. Follow these steps:
- Access Wizard. You can access the payment wizard under Banking/Payment Wizard.
- Payment Run. When the payment wizard is launched, choose whether to initiate a new payment rum or load a previously created one.
- General Parameters. Specify such parameters as payment posting date, payment type, and payment means for both incoming and outgoing payments.
- Business Partners. Now, you have to choose the customers and vendors to participate in the run. Note that the SAP Business One payment wizard excludes business partners with a zero balance from the list.
- Documents. At this stage, you should specify the maximum due date of open transactions to let the wizard include or exclude them in the run. Besides, it is possible to filter out the selection by posting date, amount, and system numbers.
- Payment Methods. The payment wizard displays active payment methods following the selected payment type. Select ones you want to include. Besides, you should specify the maximum balance for the entire run. Note that the system considers the G/L account balance linked to the payment method the default one.
- Recommendations. All the steps above affect transactions that appear at this stage. Choose ones you want to include. Now, you can edit the following parameters:
- the balance due to be paid,
- cash discount,
- the number of checks.
The Non-Included Transaction button displays transactions that are not part of the recommendation and describes why they were not included.
- Save Options. At this stage, you can execute the run, save the recommendation, or save the selection criteria.
- Printing. Now, the wizard lets you print various documents and reports, including payment forms, non-included transactions, outgoing checks, summary reports, etc.
Bear in mind that the SAP Business One payment wizard includes all transaction types. It displays all open Invoices, Journal Entries, Payments on Account, and Credits. However, there is an opportunity to disable a particular invoice or journal entry from being paid. You need to activate the Payment Block checkbox. The latter is available either in the journal entry (the business partner row) or in the invoice window (the Accounting tab).
To block a business partner, go to the Payment System tab of the business partner master data screen and select the Payment Block checkbox.
How to print checks in SAP Business One
Although the setup for printing checks in SAPBusiness One requires help from an implementation partner, we’d like to focus on several basic details of this process. Firstly, you need a correct printer loaded with the check forms.
Once properly set up, printing checks is reduced to just a few clicks. You choose your house bank, verify the check number, and print. That’s it!
After performing the printing successfully, you need to confirm the assigned check numbers. Note that additional corrections are still possible at this stage.
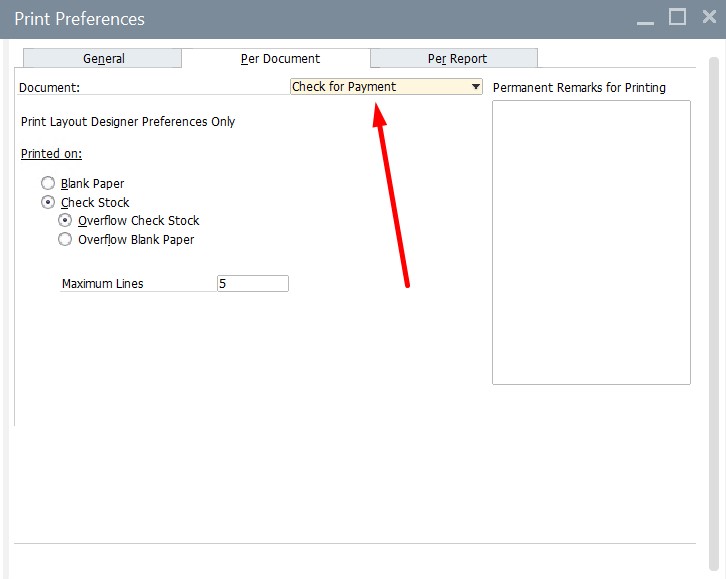
SAP Business One offers the following three preferences to print checks:
- Blank Paper. Use this option if you don’t use a pre-printed check stock.
- Overflow Check Stock. This preference acts as follows. If the check stub overflows to the next page, the prenumbered check stock is used for all pages. Numbers used for overflow are voided.
- Overflow Blank Paper. In this case, the first page of the check gets to the regular pre-numbered check stock, while overflow pages get to blank checks with non-pre-numbered pages. Note that the system pauses to ask you to replace the check stock after the first check page is printed.
You can define check printing preferences in SAP Business One under Administration/System Initialization/Print Preferences/Per Document/Checks for Payments.
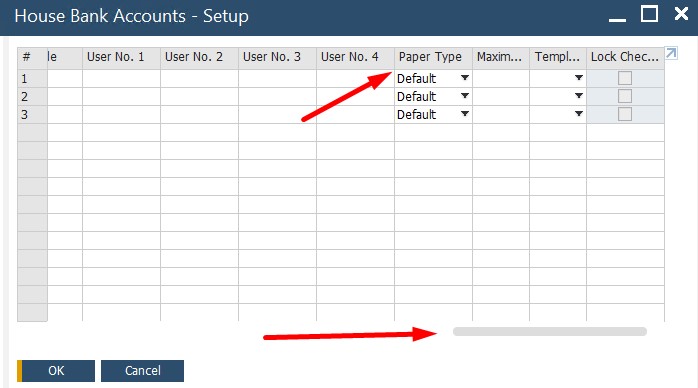
It is also possible to override the company default printing method while defining your house banks under Administration/Setup/Banking/House Bank Accounts/Paper Type.
SAP Business One lets you leverage the Check Register Report to run an audit trail of all check numbers. You can find the feature under Banking/Banking Reports/Check Register Report.
SAP Business One Internal Reconciliation
Although SAP Business One initiates internal reconciliation in the background, automatically processing documents, you can conduct it manually.
The process is crucial for every business since it matches debits and credits in the same G/L account: invoice with a payment, a payment with a deposit, etc. As a result, the system closes all invoices after they are paid and you can finish numerous processes.
Every time you apply a payment to an invoice or perform an action that creates a posting in the general ledger, an internal reconciliation occurs. However, there are situations when you have to initiate it manually:
- You create a payment on account – the invoice is generated after the payment;
- Rounding or over/underpayments occurs;
- A business partner is simultaneously your customer and vendor;
- Corrections to previously reconciled transactions are required.
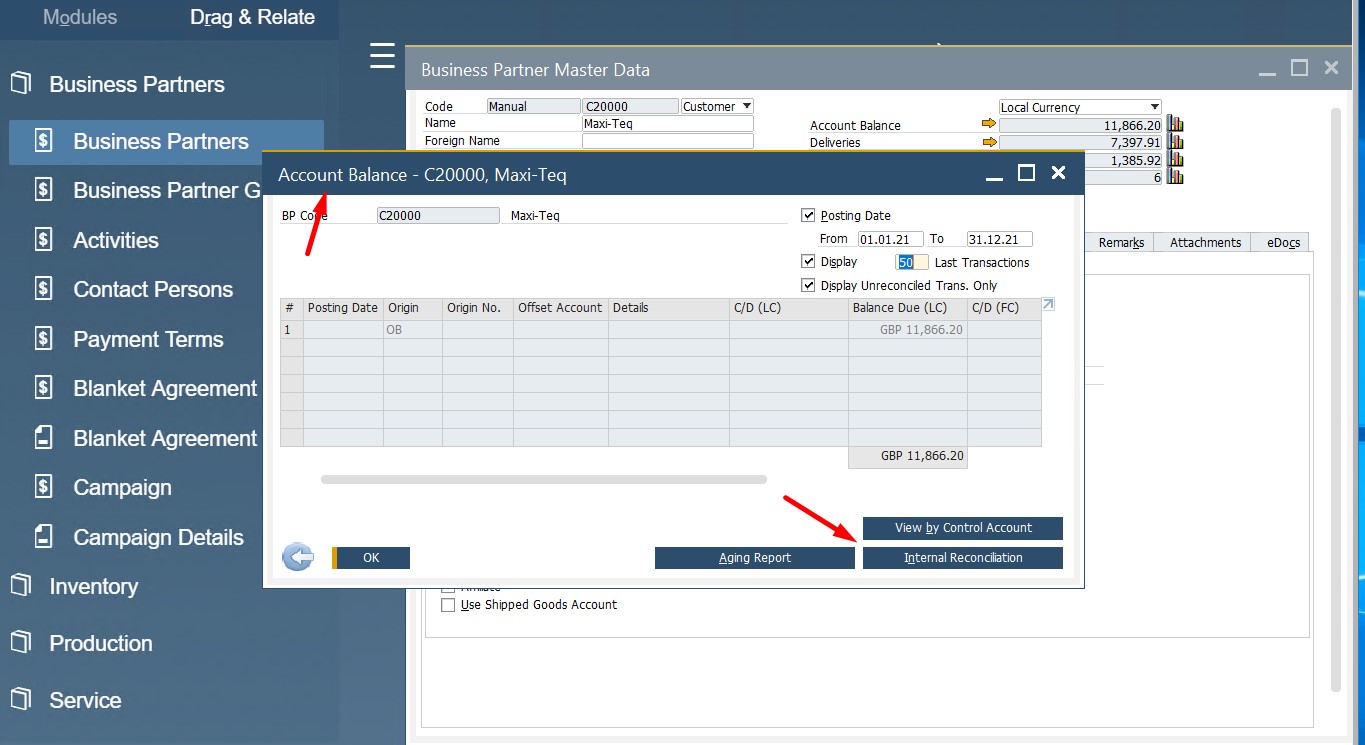
So, how to internally reconcile a G/L account in SAP Business One? You can do that under Financials/Internal Reconciliations/Reconciliation. You need to choose the corresponding account there.
If you need to initiate an internal reconciliation for a business partner, visit Business Partners/Internal Reconciliation/Reconciliation. You need to choose a business partner and hit the Reconcile button.
Note that for customers that are also vendors, you need to check the Multi BP’s box, selecting both master records.
Also, pay heed to the fact that it is possible to access business partner internal reconciliation from the business partner account balance. You will find the Internal Reconciliation button there.
As for the reconciliation trail, you can access it by right-clicking on any document window and choosing Applied Transactions. The newly opened window displays all the transactions reconciled with the current document.
SAP Business One cost accounting
SAP Business One introduces cost accounting to help you track the cost centers of your business, including departments, divisions, and various geographies. The system considers all these nodes separate entities.
As a business owner, you get the ability to determine both spendings and revenues for various business purposes. At the same time, you reduce the number of general ledger accounts. It works as follows:
- Let’s assume that you have numerous departments with individual revenue accounts.
- SAP Business One cost accounting lets you maintain only a general account.
- Its total is divided between the cost centers through reporting.
Under cost centers we assume company units or divisions performing specific business functions, such as manufacturing a product or providing a service.
You can enable and configure SAP Business One’s cost accounting functionality under Main Menu/Financials/Cost Accounting/Cost Centers. Here, the system empowers you to create cost centers for almost any purpose.
How to use dimensions to create cost center groups in SAP B1
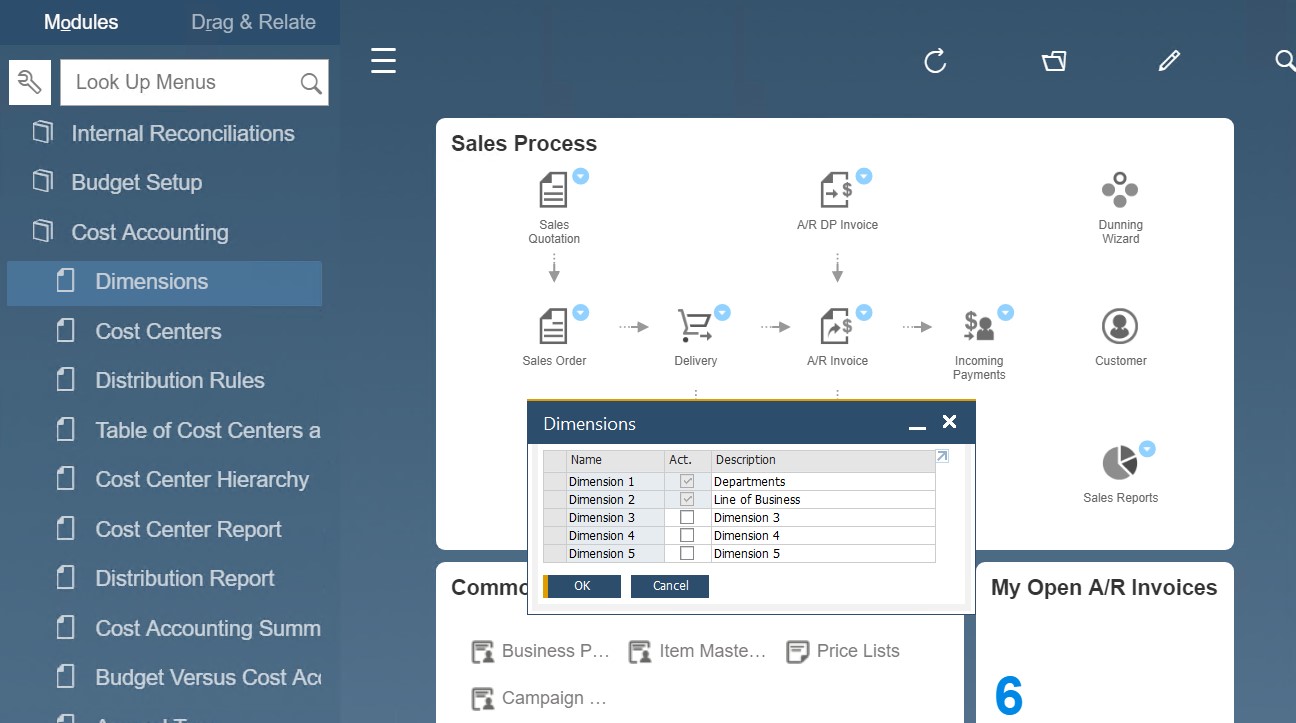
SAP Business One offers dimensions allowing you to group cost centers together. Consequently, you get the ability to present data in different ways in cost accounting reports. However, the feature is optional. If you want to use dimensions to create cost center groups in SAP Business One, activate the multi-dimensions option as follows:
- Go to the General Settings section of your main menu.
- Enable the Dimensions feature on the Cost Accounting tab.
- Specify up to five dimensions under Financials/Cost Accounting/Dimensions.
That’s it! Note that it is recommended to disable the feature for a simple company structure. Besides, it won’t be useful if you maintain a separate account for each area.
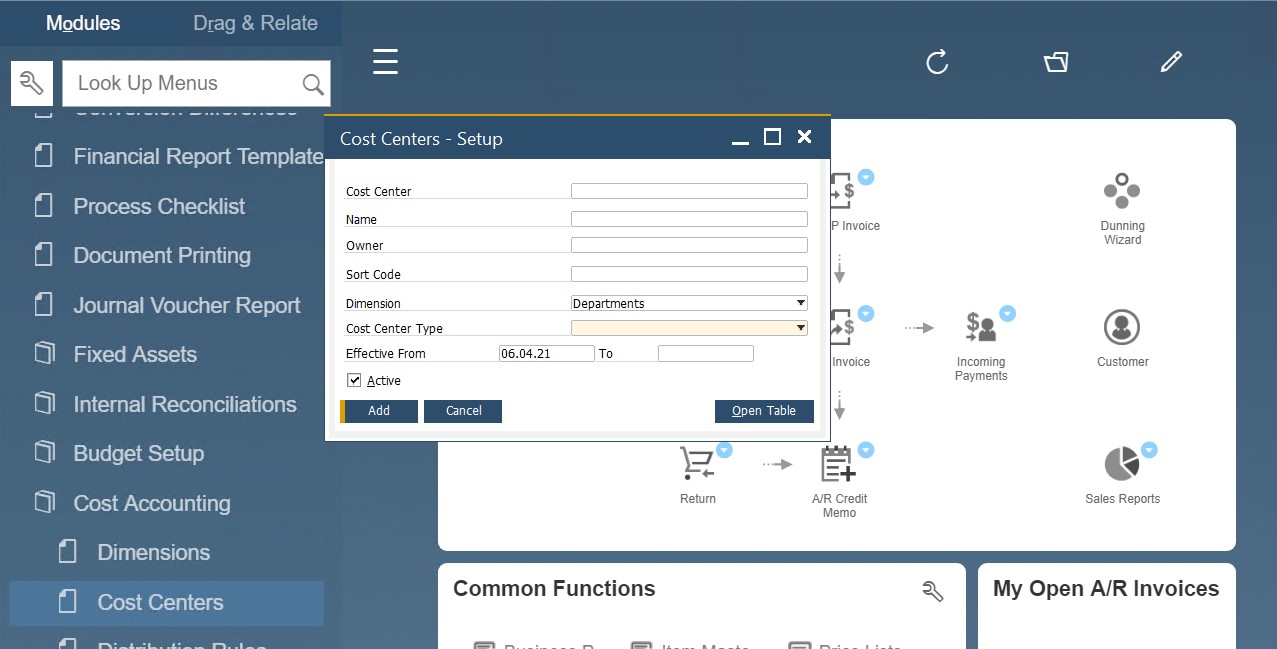
Now, you have to determine what company locations/departments should be considered SAP B1 cost centers:
- Assign a cost center to a dimension;
- Set validity date;
- Enable the cost center;
- Repeat these actions for the remaining dimensions.
After a new cost center is up and running, SAP Business One creates a distribution rule, marking it as a direct allocation with 100% of the amount.
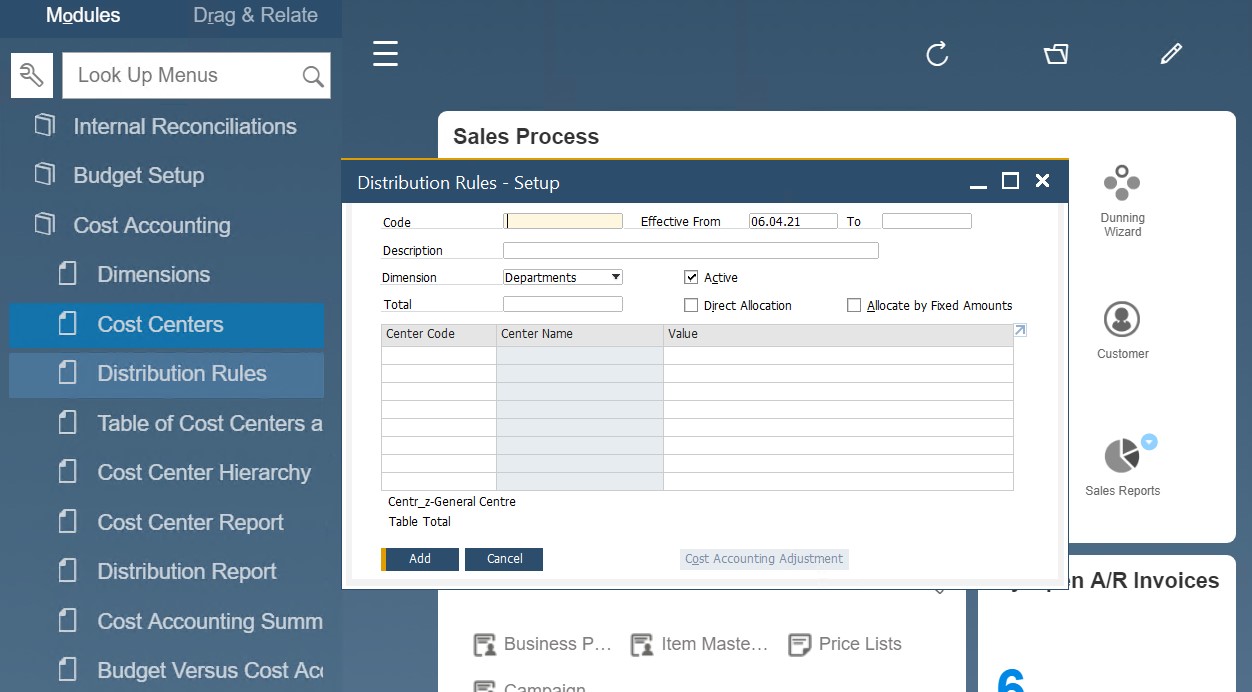
SAP Business One distribution rules
With the help of distribution rules, SAP Business One allocates direct and indirect costs and revenues between cost centers. Thus, a distribution rule gathers data on the number of costs or revenues that should be allocated to each individual cost center.
When you create a distribution rule while setting up a cost center, it is considered a direct allocation. As for indirect costs (e.g., rent), you should specify the amount of the total rented space utilized by a specific cost center. Also, SAP B1 lets you allocate costs per the number of employees associated with a cost center. It should be a percentage of the total headcount in the company.
Let’s assume a situation when you have the total rented floor space of 1k square feet divided between two stores. While the first one uses 600 square feet, the second store utilizes the remaining 400. SAP Business One enables you to distribute the costs incurred by rent and professional cleaning services proportionately between the two stores based on this information.
What should you do when the ratio between the cost centers changes?
You can create a schedule. SAP B1 lets you use the Effective From date to determine several instances of the same distribution rule, maintaining the historical allocation of revenues and expenses. You can also leverage the functionality to add or remove cost centers from the distribution.
SAP Business One lets you configure the cost accounting distribution rules under Financials/Cost Accounting/Distribution Rules of the main menu.
How to assign distribution rules
SAP Business One allows for assigning distribution rules to transactions throughout sales and purchasing documents, manual journal entries,etc. It is possible to take a default distribution rule and assign it to a specific expense account. You can do that as follows:
- Open the chart of accounts;

- Locate the account;
- Choose Dimension;
- Specify the corresponding distribution rule.
Note that there is only one field where you can specify a distribution rule if dimensions are disabled.
How to use distribution rules in transactions
SAP BusinessOne offers a relatively simple mechanism for using the distribution rules and cost centers in transactions. Every time you assign a rule to the account, the former appears in the invoice or journal entry.
To select the distribution rule for each dimension, you need to apply the following changes under Administration/System Initialization/General Settings/Cost Accounting:
- Display the distribution rule via unified or separate columns;
- Choose behavior for transactions without distribution rules: prompt a warning or disable posting.
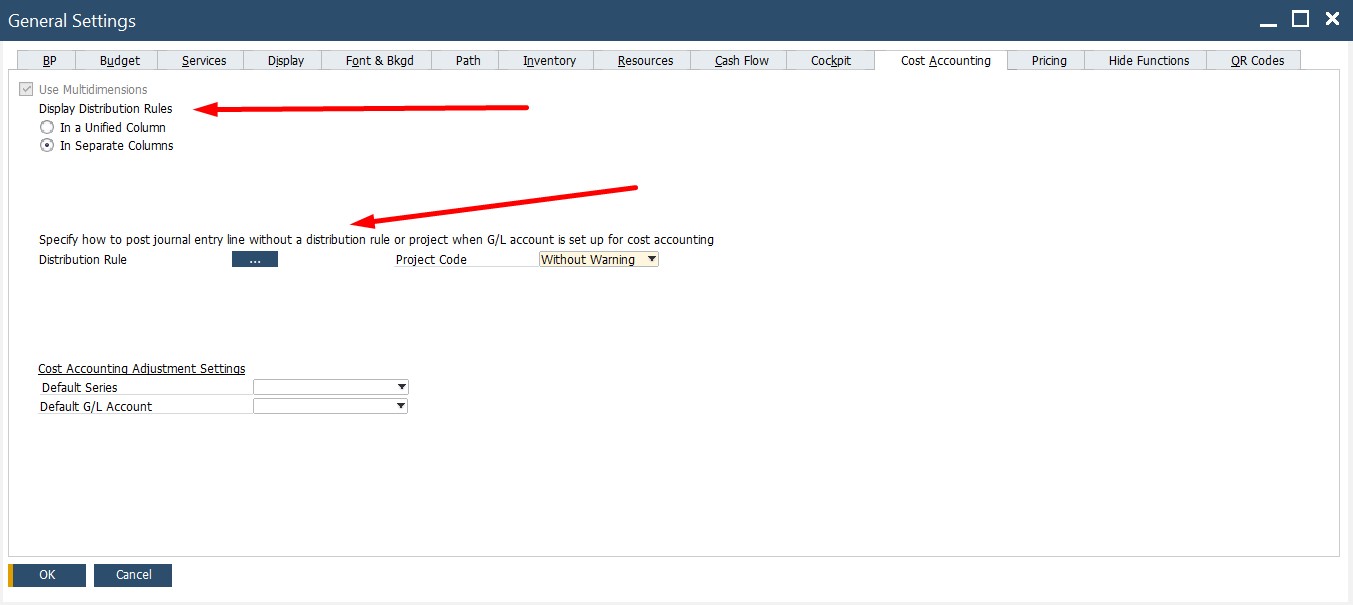
For distribution rules in separate columns, dimensions appear as columns. You have to select a distribution rule per dimension from the document window.
Cost Accounting Reports
We’ve finally got to the final purpose of SAP Business One cost accounting – reports. Due to this feature, the system lets you analyze your business regarding profitability and efficiency per company division. The following reports are at your service:
- Table of Cost Centers and Distribution Rules. Here, you can see your cost centers and distribution rules ordered by dimensions. Effective dates and total amounts are displayed too.
- Distribution Report. This report is designed to display transactions posted to your distribution rules per G/L Accounts. You can view budget amounts here.
- Cost Accounting Summary Report. This report differs from the one above by displaying data from the cost center perspective – not by distribution rules.
- Budget Versus Cost Accounting Report. This report is designed to compare your actual amounts versus budget amounts per G/L Account.
- Cost Accounting Reconciliation Report. This report is designed to compare your profit and loss amounts from the perspective of legal requirements vs. management reporting needs. It displays cost accounting postings to a certain G/L account. The information is displayed as accruals spread across a period of time.
Note that the report requires additional configurations, including the configuration of additional G/L accounts and accrual types.
SAP Business One lets you use the custom cost center hierarchy to run the Cost Center and Cost Center Summary reports. Thus, you can create a report structure that follows your business requirements. To present data grouped in various ways, you can create a template per dimension with up to 3 levels. The system even lets you add text lines and formulas.
SAP Business One budgeting
SAP Business One delivers numerous budget functions developed to help you track corporate expenses and revenues. For instance, an encumbrance function blocks additional transactions when the budget is exceeded. Besides, the system automatically calculates budget amounts following a series of specified distribution methods. For instance, new budget amounts can be based on a previous year’s budget. The system lets you mark them up by a certain factor if additional expenses or revenues are expected. It is possible to distribute the markup either incrementally or equally to all accounts. You need to specify a method that suits your business model to automate the process.
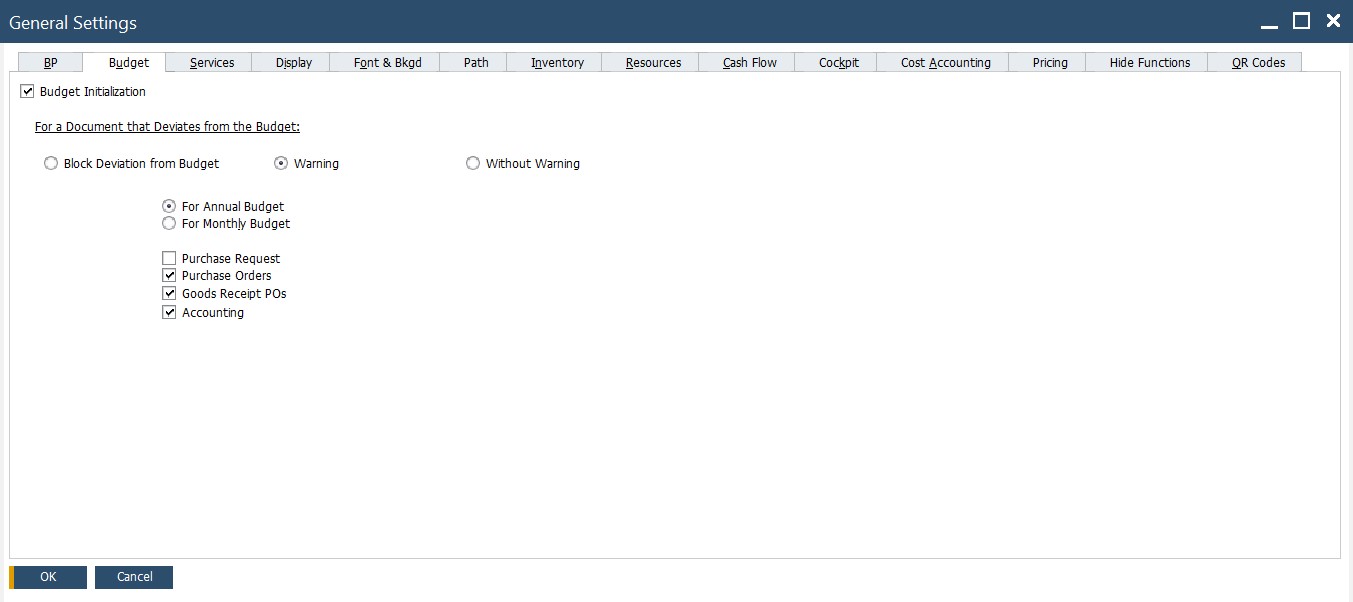
The feature works as follows:
- You choose an account and define a budget limit for it.
- SAP Business One checks the debit side of the account.
- If the budget is exceeded, one of the following actions takes place:
- The system issues a warning;
- The system blocks the action.
You can start configuring your budget under Administration/System Initialization/General Settings/Budget tab.
Other configuration options are available under Main Menu/Financials/Budget Setup.
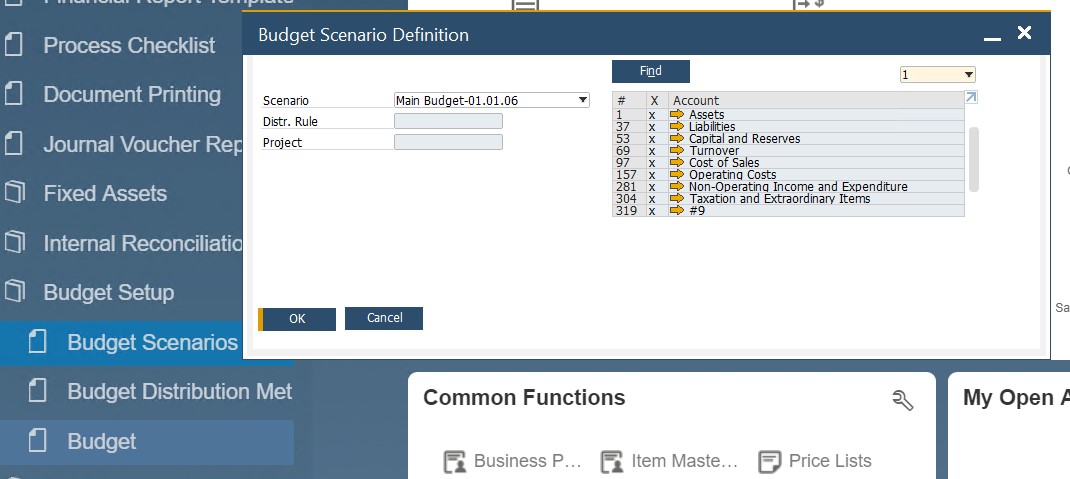
Budget scenarios
SAP Business One uses budget scenarios for the following three purposes: planning, tracking, and reporting. The system incorporates them to help you analyze the financial position of your division, department, or the entire company. You define specific conditions and determine the fiscal period to apply them.
However, setting up a new company initiates the main budget scenario. As a result, SAP B1 performs all the checks for budget deviation following it. At the same time, the system empowers you to use the main budget scenario to create other scenarios. Note that deleting the main budget scenario is impossible.
It is also worth mentioning that creating a new posting period is always associated with the main budget. You have to define it, to be able to specify the period.
As for SAP Business One budget reports, they are available under Main Menu/Financials/Financial Reports/Budget Reports.
The system requires you to choose a scenario to compare your selected period with. Consequently, the insights inform how your budget may be affected by increasing or decreasing the budget amount.
You can define the monthly budget amount in SAP Business One under Main Menu/Financials/Budget Setup/Budget.
You need to specify the debit amount for expenses. Also, provide information on the amount of credit for revenues.
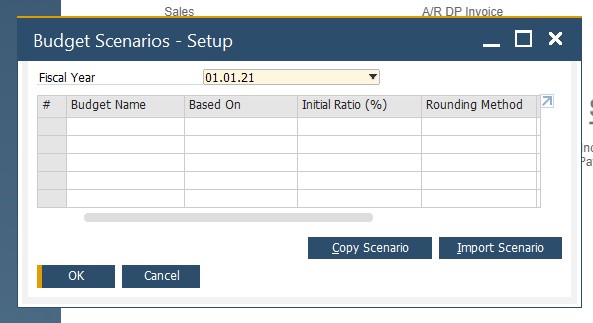
As for budget scenarios, they are available under Main Menu/Financials/Budget Setup/Budget Scenarios.
Budget distribution methods
SAP Business One delivers the following three budget distribution methods:
- Equal. The entire budget amount is divided equally among the months of the year.
- Ascending Order. Use this method to increase your budget expenses over the year. It distributes the budget amount in ascending order.
- Descending Order. Use this method to decrease your budget expenses over the year. It is opposite to the one above.
SAP Business One lets you set up the budget amount under Main Menu/Financials/Budget Setup/Budget. It is possible to specify a budget distribution method per G/L account. Once the debit or credit amount is specified, double-click the row number. It will let you modify the budget amount by calendar months.
It is possible to set up new budget distribution methods under Main Menu/Financials/Budget Setup/Budget Distribution Methods.
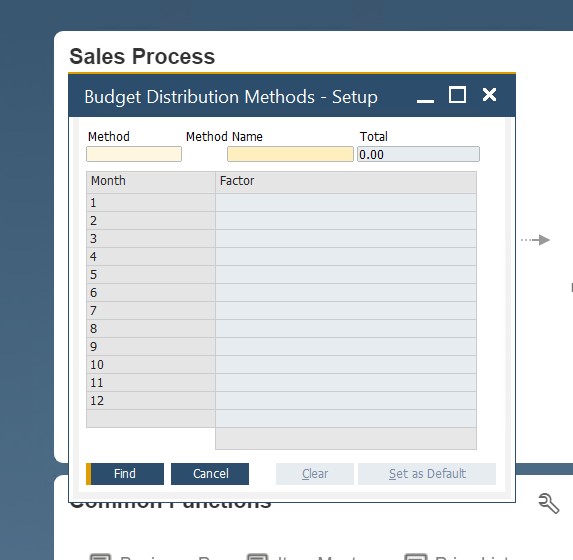
Note that even in the case of an annual budget, SAP distributes the amount between the months to apply the budget alerts calculation.
SAP Business One cash flow
SAP Business One delivers in-depth insights into your cash flow situation so that you can easily plan ahead. The system lets you always stay proactive about incoming and outgoing funds, predicting times when you may stay low on cash flow. As a result, you are informed about the time when it is necessary to reduce expenses or avoid large purchases.
At the same time, SAP Business One may predict times when more money is available. Thus, you get a better understanding of when to invest, expanding your business.
Numerous cashflow reports are available in SAP Business One. They incorporate your existing accounting entries and non-accounting documents, such as drafts and journal vouchers.
SAP Business One cashflow reports are available under Financials/Financial Reports/Financials.
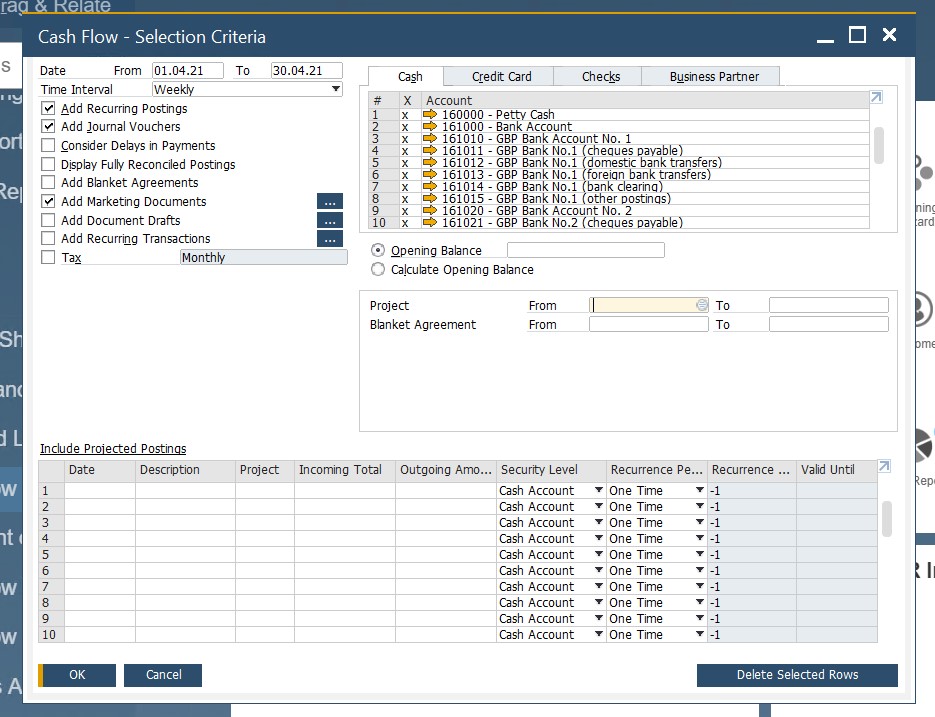
Cash flow forecast
To visualize your cash flow forecast, SAP Business One offers a tool that gathers all transactions in the database and presents them in a timeline. The cash flow forecast tool delivers exceptional flexibility. You can customize the certainty level by:
- Choosing which transactions to include;
- Specifying which opening balances to add;
- Adjusting the current timeline;
- Viewing additional information due to the drill-down functionality;
Figure 3-21 shows the cash flow forecast looking 6 months ahead. The blue bars represent incoming amounts from debits to cash accounts, A/R invoices, incoming payments, and more. The green bar represents outgoing amounts from credits to the cash account, A/P transactions, and outgoing payments, and more.
SAP Business One lets you expand the Configuration area situated at the report’s top. The section empowers you to edit some forecast settings, including measures to include and the certainty level. The latter represents the priority for receiving or spending money. Consider incoming payments of level 1 security since they are money in your bank. On the other hand, sales orders are in level 7 or 8 since they may or may not get paid. Although SAP Business One provides defaults for each certainty level, you can customize them following your business needs.
SAP Business One financial accounting reports
With SAP Business One, you get a suite of financial and control reports, available under Main Menu/Financials/Financial Reports:
- Customer Receivables Aging. This report contains receivables that are current and past due, divided into several periods. Besides, it provides information regarding receivables aging in aggregate as well as detail for each customer. SAP Business One lets you access and print customer statements here. You can reach the report under Accounting/Aging or on the Business Partners Reports menu.
- Vendor Liabilities Aging Report. This report displays the amount owed to each vendor as well as current and past due. You can find the report under Accounting/Aging.
- Balance Sheet Report. It is a summary of your business financial position. The report contains the value of the company’s assets, total liabilities, and owner’s equity. It displays a relative percentage of each account of the total. You can find the report under Financials.
- Trial Balance Report. It displays beginning and ending balances for a particular period as well as corresponding debits and credits. SAP B1 lets you include all customers and vendors in this report. You can find it under Financials.
- Profit & Loss Statement Report. It shows your business income. You can find the report under Financials.
- Cash Flow Report. In this case, you deal with the cash flow forecast. It incorporates open A/R and A/P along with cash accounts. You can find the report under Financials.
- Document Journal Report. Here, you can view journal entries created either manually or automatically. The report is available under the Accounting section.
- Transaction Journal Report. It displays posted journal entries separated by journal entry numbers. You can use a drill-down to see more information on each particular transaction. The report is available under the Accounting section.
- Inventory Audit Report. All items listed in the inventory are available in this report. Besides, you can find details of every posted transaction related to the item as well as the remaining on-hand quantity costs You can find the report under Inventory/Inventory Reports.
- Check Register Report. All checks are shown here. The report provides information on the related account code, vendor ID, status, payment amount, printing details, etc. You can find it under Banking/Outgoing Payments.
Besides, SAP Business One lets you create custom reports that follow your business needs.
How to integrate SAP Business One with external systems
SAP Business One introduces native data import/export features but they don’t satisfy all possible business demands. When it comes to integrations that take place beyond the ecosystem, the ERP platform lacks instruments that deliver seamless data transfers. Therefore, it is necessary to use third-party tools to cover the existing gap.
Here at Firebear, we offer numerous instruments that enable SAP Business One integrations with core e-commerce platforms. For example, connectors for Magento 2 and Shopify. Are under your disposal. And you can easily move financial data to and from your SAP B1. Contact us to get more information on the SAP Business One integration with your business.
Also, check our SAP Business One Integration solution for Magento 2:
Related posts
 Magento Inventory Management: A Complete Guide to Stock Optimization and Efficiency
 A Comprehensive Guide to Shopify ERP Integration: Definition, Benefits, Methods, Challenges & Solutions
 Magento AI Extensions to Unlock Smarter Search, Support & Content Creation
 Shopify Inventory Management: A Comprehensive Guide to Tracking and Optimizing Your Stock
 How to Block Customers on Shopify: A Complete Guide to Protect Your Store
 How to Delete Products from Shopify: Step-by-Step Guide
 How to Import Customers & Customer Addresses to Magento 2: Complete Tutorial, CSV Samples & Tips
 AI Revolution in Shopify Imports: Smarter, Faster, Better