
Control for CloudFlare® Magento 2 Extension Manual
Below, we’d like to draw your attention to our Control for CloudFlare® Magento 2 extension, but why did we decided to create the module? The answer is quite simple: the default version of the ecommerce platform does not provide all the necessary features out-of-the-box, so it requires some vital enhancements. That’s why we’ve made a decision to add the most convenient CloudFlare® integration to the list of addons available in the ecosystem. Unfortunately, the feature is not presented neither in Magento 1.x nor in Magento 2.x, but we have all appropriate modules in our portfolio, and in the following post you will find the most comprehensive description of how the Control for CloudFlare® Magento 2 extension works. But let’s describe the importance of CloudFlare® first.
Download / Buy Control for CloudFlare® Magento 2 Extension | Control for CloudFlare® Magento Extension

Table of contents
CloudFlare® Features
CloudFlare® is a US based company that provides CDN services worldwide. The company’s content delivery network is among the most popular third party solutions that not only speed up ecommerce websites, but also add extra layers of protection as well as significantly improve availability of both mobile apps and websites. These are top five components of the CloudFlare® ecosystem:
- CDN that helps you distribute content around the world, making it closer to visitors, as a result the speed of your Magento 2 storefront is dramatically increased.
- Optimization for ad servers and third party widgets, so web pages that contain the aforementioned elements load snappy on both desktop and mobile devices.
- Security elements that protect your Magento 2 website from outer threats. The feature is entirely based on Website Application Firewall (WAF) and DDoS Protection.
- Analytics features that help you dive deep into the way your ecommerce system works within the CDN and let you understand who are your customers.
- DNS – the fastest and the most reliable! Being powerful, global, secure, and always available, it makes CloudFlare® the best CDN for your Magento 2 website.
As you can see, CloudFlare’s CDN reduces various problems as well as helps to prevent you from lots of headaches related to your Magento 2 website. With 24 data centers around the globe, the system caches static files at edge nodes automatically, consequently your store files are available for every visitor from a server located nearby. As for the dynamic content, it is delivered from a web server as well. The Anycast technology is utilized to route each visitor to the nearest data center, so your Magento 2 website loads two times faster regardless of visitor’s location, and you can save up to 60% of bandwidth without any bills for bandwidth usage!
So if you integrate your Magento 2 website with CloudFlare®, you achieve the following goals:
- Magento 2 cache is built automatically on the basis of traffic and objects from your site;
- static resources (JS, CSS, images, etc) are cached;
- dynamic content is automatically served;
- CloudFlare’s CDN subdomain can be accessed manually;
- interaction with CloudFlare via becomes much easier;
- Magento 2 storefront is always online even when a server went down;
- surge in traffic is absorbed;
- IPv6 networks are supported;
- page rendering slow down is reduced by Rocket Loader;
- multiple JavaScript files are combined into a single request;
- asynchronous resource loading leads to faster rendering of HTML;
- each browser gets individual approach;
- Aggressive GZIP essentially reduces the size of all resources, delivering them compressed even through lazy firewalls;
- system blocks DOS attacks, SQL injections, cross site scripting, comment spam, email harvesting, and excessive bot crawling. You can choose among 5 security options: “Essentially off”, “Low”, “Medium”, “High”, and “I’m under attack!”;
- threat reports are available;
- extended analytics data is available in real time;
- Railgun™ makes the connection between the origin server and the CloudFlare network as fast as possible;
- original visitors IPs can be restored;
- better SSL can be implemented.
All these features look stunning, but why should you use the Control for CloudFlare® Magento 2 module? Below, we shed light on core features of our extension. Now, when you understand why thousands of Magento merchants give their preferences to CloudFlare®, we can start the description of our tool.
Extension Features
Because the extension completely transfers all core CloudFlare® features to the Magento 2 admin, you can manage your CloudFlare® account right in the Magento 2 backend which is extremely convenient. All settings are available within a single interface, so you don’t have to waste your time switching between several accounts. Below, we describe Control for CloudFlare® Magento 2 extension features:
- Security profile. This option lets you switch between security profiles. As mentioned above, there are 5 options available: Off, Low, Medium, High, and Under Attack.
- Caching level. Due to the availability of this option in the Magento 2 backend, the extension enables you to change CloudFlare® cache behaviour. You can choose between Aggressive and Basic types of behaviour.
- Development Mode. And with the help of the Development Mode option, you can turn on/off the appropriate mode, so all the changes become visible on the site.
- Purge cache. In this case, our Magento 2 module lets you clean CloudFlare® cache right from the Magento 2 backend.
- Purge single file cache / URL. This option provides the ability to clean CloudFlare® cache for a single file or URL.
- Automatic IPv6. This one is designed to enable/disable IPv6 support from your MAgento 2 admin.
- Auto Minify. Minification management lets you change the type of resource minification as well as rapidly remove unnecessary characters from HTML, CSS, and JS.
- Rocket Loader™. This option lets you turn on/off aforementioned Rocket Loader.
- Snapshot update. With the help of this feature, you can easily create a snapshot of your site that will be utilized to challenge pages.
- Manage IP lists. Here, you can what list (black or white) to add IP addresses to. Besides, it is possible to remove them from all lists here.
- IP list. That’s a place where our Control for CloudFlare® Magento 2 module shows the list of IP addresses for last 24 hours. All visitors’ addresses are grouped into three categories: regular, crawler, threat.
- Statistics. All CloudFlare® data related to your store is gathered here. You can find out such information as page views, the number of unique visitors, as well as requests and bandwidth saved by CloudFlare®.
- Real visitor IP. All real IP addresses provided by CloudFlare® in your Magento 2 backend.
These are only core features of the Control for CloudFlare® Magento 2 extension, but you can find its full description below in the Manual section. Before we proceed, let’s some important preparations required for the integration of CloudFlare® and Magento 2.
Installation and Preparations
Installation
- Backup your web directory and Magento 2 store database;
- Download Control for CloudFlare® installation package;
- Copy files to /app/code/Firebear/CloudFlare/ folder (create it if not exist!)
- Navigate to your store root folder in the SSH console of your server:
cd path_to_the_store_root_folder
run:
|
1 |
php -f bin/magento module:enable Firebear_CloudFlare |
|
1 |
composer require firebearstudio/cloudflare |
then:
|
1 |
php -f bin/magento setup:upgrade |
and:
|
1 |
php -f bin/magento setup:static-content:deploy |
- Flush store cache; log out from the backend and log in again.
|
1 |
php -f bin/magento cache:clean |
Preparations
Please note that before using the Control for CloudFlare® Magento 2 module, you should run several preparation steps. First of all, it is necessary to set up CloudFlare® for the Magento domain. The whole procedure is fully described here: . If you are not using the CloudFlare® solution yet, and give it a go.
Now, you should add your CloudFlare® API key to the Magento 2 admin. To get the API identifier, perform the following actions:
- First of all, go to the CloudFlare® website and login to your CloudFlare® account.
- Visit ““.
- Find the “API Key” section and hit the “View API Key” button.
Note that the API from your personal account will never work instead of the Hosting API.For further details, visit this page: .
The extension’s section aimed at a CloudFlare® API key is described below in Extension Configuration & Settings: API Access details.
Manual
Now, let’s look at three core groups of CloudFlare® settings available in the Magento 2 admin.
Extension Configuration & Settings
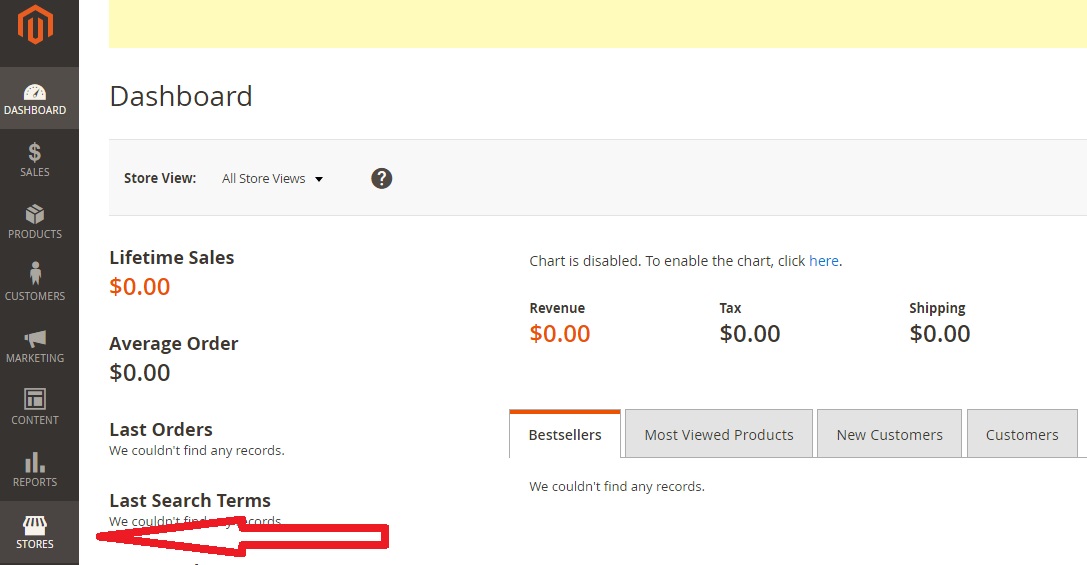
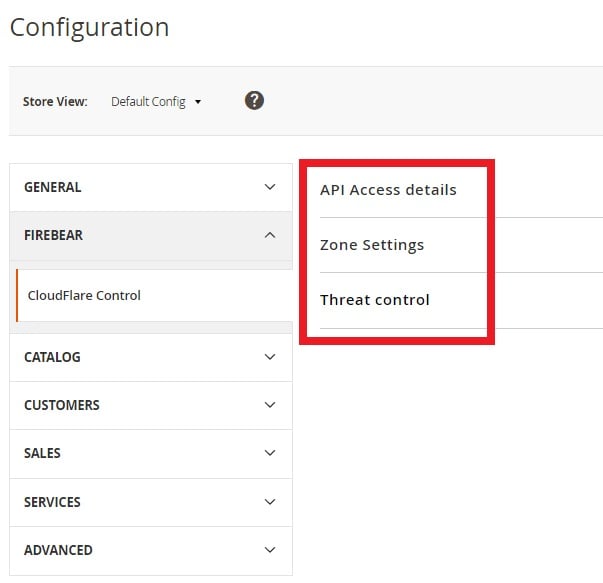
All Control for CloudFlare® Magento 2 extension configurations and settings are available under Stores -> Configuration -> Firebear -> CloudFlare.
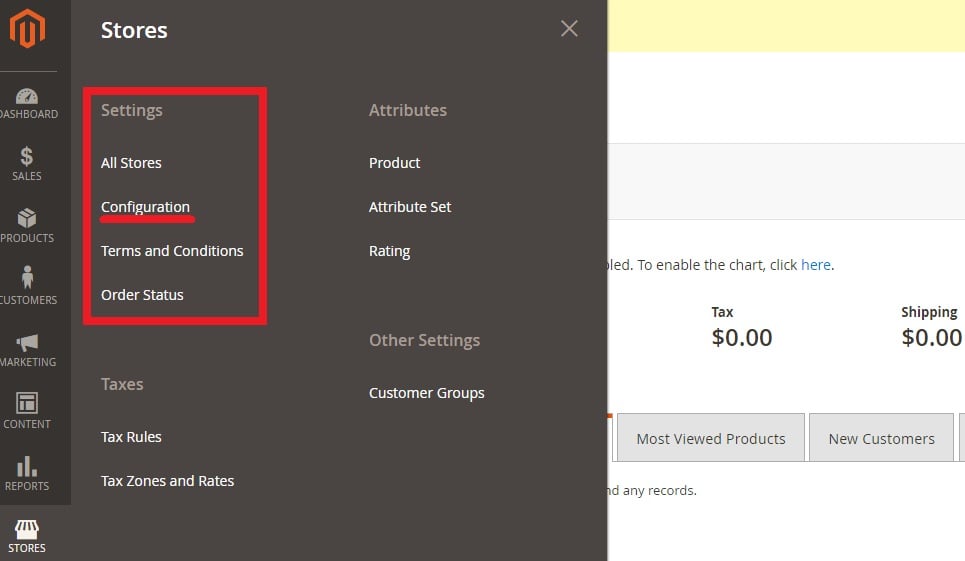
Choose the Stores option from the right vertical menu.
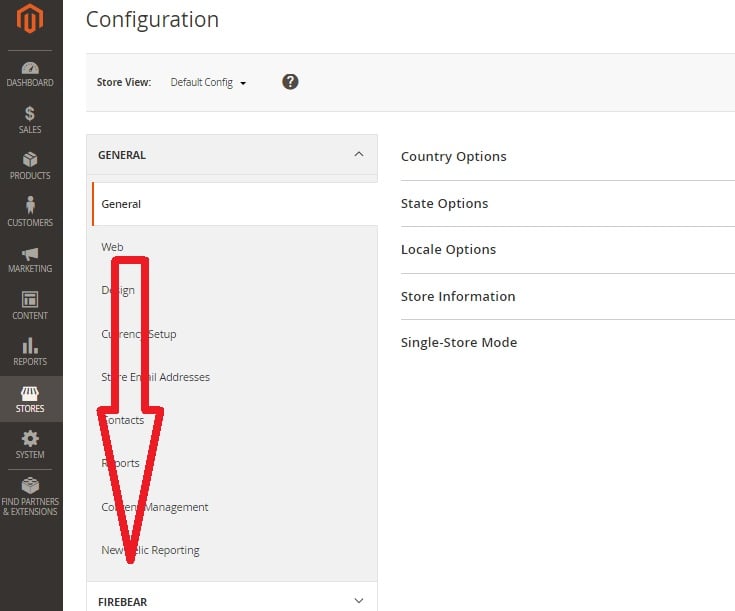
Then, go to the Configuration option available in Settings (top left group).
Next, find the FIREBEAR tab (it is situated under the GENERAL tab) and choose CloudFlare Control.
The CloudFlare control screen is divided into 3 sections: API Access details; Zone Settings; and Threat control.
API Access details
In API Access details you should enter your email address (it should be associated with your CloudFlare account) into the E-Mail field; specify the aforementioned API key in the API Key field; and leave your domain name. Next, click the “Check & load current settings” to integrate your CloudFlare® account with the Magento 2 admin.
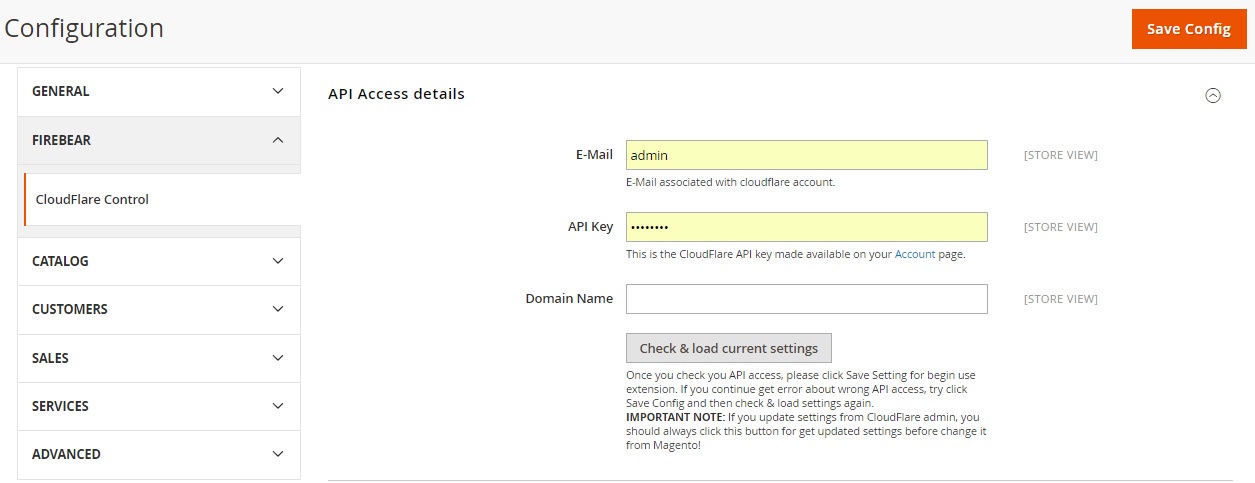
Once you’ve checked your API access, click Save Setting to activate the extension. If you continue getting errors about wrong API access, try to click Save Config and then check & load settings once again.
IMPORTANT NOTE: If you update settings from your CloudFlare® admin, always click the same button to update everything before performing any changes from the Magento 2 backend!
Zone Settings
The Zone Settings section provides you with the ability to adjust your overall security and performance profiles. After performing any changes here, always click the Save Config button, which is available in the right upper corner! Below, we describe each option available in the section.
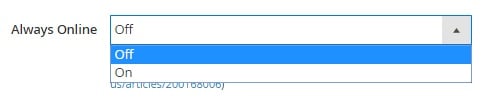
Always Online. If you enable this option, your Magento 2 website will be available even when the server is offline. CloudFlare® will serve all necessary files from cache. Note that it only keeps a limited version of your site in this situation. A message at the top of the page informs visitors that they are in offline browsing mode.
Browser Cache TTL. This option lets you choose a period of time for CloudFlare-cached resources to be remain on visitors’ computers. Control for CloudFlare® Magento 2 provides the ability to choose between 30 seconds and 1 year. Note that a high value decreases load times for visitors who already were on your ecommerce storefront.

Browser Check. Turn this option on, and you will prevent problems caused by abuse bots, crawlers, and visitors. The system will look for HTTP headers abused most commonly by spammers, denying access to your page.

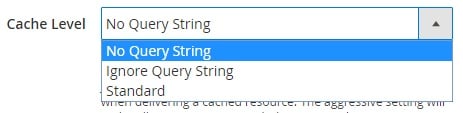
Cache Level lets you set CloudFlare’s CDN to cache static content. You can choose among three options:
- No Query String – the system delivers resources from cache in case there is no query string;
- Ignore Query String – the same resource is delivered to everyone independent of the query string;
- Standard – this one is the most aggressive option. It is designed to deliver a different resource each time a new change to the query string occurs.
It is also necessary to mention that CloudFlare does not cache HTML content, so it is recommended to create an appropriate Page Rule for static HTML content.
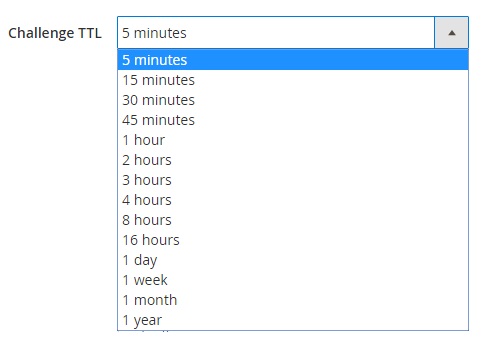
Challenge TTL. This option lets you specify time a visitor can stay on your website after successfully completing a CAPTCHA or another challenge. The Control for CloudFlare® Magento 2 extension lets you choose several options between 5 minutes and 1 year. It is recommended not to set this interval less than 15 minutes.
Development Mode. Enable the Development Mode to make changes to your Magento 2 website. As a result, you will bypass CloudFlare’s accelerated cache as well as slow your ecommerce store down. Use the option for making changes to cacheable content – you will see them right away. Note that the development mode automatically turns off after 3 hours.

Email Obfuscation. Protect your online storefront from email harvesters and bots by enabling this option: it hides email addresses from bots, keeping them visible to normal visitors.

Enable Error Pages. In case you enable this option, CloudFlare® proxies customer error pages on both 502 and 504 errors on origin server, so the default CloudFlare error page is no longer shown. Note that the feature does not work with 522 errors.

Enable Query String Sort. If you enable this option, CloudFlare® treats files with the same query strings as the same file. The query strings order does not matter. The feature is limited to Enterprise Zones.

Hotlink Protection. This is a very useful option, because it helps you prevent other websites from sucking up your bandwidth by creating pages that utilize images hosted on your Magento 2 store. Note that the feature lets people download and view images from your pages, but prevents websites to steal them.

IP Geolocation. By turning on IP Geolocation you enable CloudFlare to geolocate visitors to your website, consequently the system is able to pass the country code to you. The feature works for both IPv4 and IPv6 addresses.

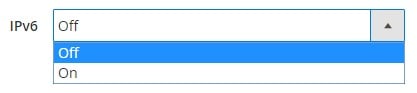
IPv6. This one enables IPv6 on all CloudFlare enabled subdomains. Note that in your DNS settings they are marked by an orange cloud.
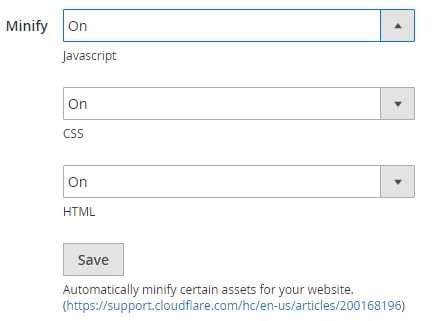
Minify. Under this subsection, you are able to turn on automated JavaScript, CSS, and HTML minification. Don’t forget to hit Save.
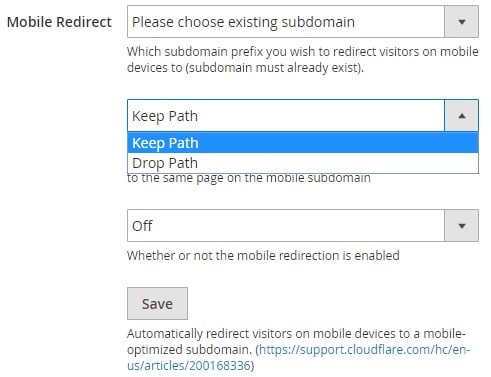
Mobile Redirect. As for the Mobile Redirect options, they let you redirect mobile visitors to a mobile-optimized sub-domain. You choose an existing sub-domain (here, you should specify sub-domain prefix to redirect mobile visitors to). Note that the sub-domain must already exist. Then, you should choose between two options: Keep Path or Drop Path. The first option lets you keep the current page path and redirect to the mobile sub-domain URL root. The second one provides the ability to drop it. Next, you can enable/disable the feature. Don’t forget to save changes.
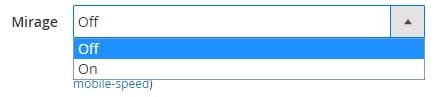
Mirage. This feature makes the life of your mobile customers easier. By turning it on, you improve user experience on small devices by activating the delivery of smaller images for devices with smaller screens; and enabling “lazy load”, so the images are loaded only when they appear in the viewport.
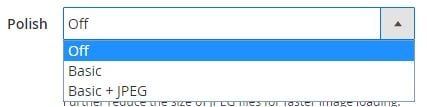
Polish. When enabled, it strips metadata and compresses images, consequently, you increase page speed. There are two options available: Basic and Basic + JPEG. In case of Basic (Lossless), the system reduces the size of PNG, JPEG, and GIF files without any impact on visual quality. If you choose Basic + JPEG (Lossy), CloudFlare® will reduce the size of JPEG files even more. Larger JPEGs will be converted to progressive images: a lower-resolution images are loaded first, and only then their higher-resolution versions. Note that this approach is not recommended for hi-res photography websites.
Prefetch Preload. If you activate this feature, CloudFlare prefetches URLs included in the response headers. Note that the functionality is limited to Enterprise Zones.

Response Buffering. With the help of this option, you can seamlessly enables or disables responses buffering from the proxied server right in your Magento 2 admin. Note that the whole payload can be buffered in order to deliver it at once to the client. The default configuration of the proxied server enables it streaming directly, so it is not buffered by CloudFlare. The feature is limited to Enterprise Zones only.

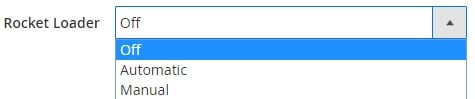
Rocket Loader. We’ve already mentioned Rocket Loader several times, so it’s time to describe the feature. Being a general-purpose asynchronous JavaScript loader, it is coupled with a virtual browser. As a result, Rocket Loader can safely run any JS code after window.onload. Consequently, by turning Rocket Loader on, you improve a web page’s window.onload time. Note that it speeds up only pages with JavaScript. Control for CloudFlare® for Magento 2 lets you choose Automatic Mode, so no configuration is required after turning it on. Alternatively, you can choose Manual Mode and specify a particular script to be executed. Don’t forget to add the “data-cfasync=’true'” attribute to the script tag. As a result, while passing through CloudFlare, Rocket Loader will be enabled for that particular script. As for other JavaScript, it will be executed without CloudFlare® interacting with the script.
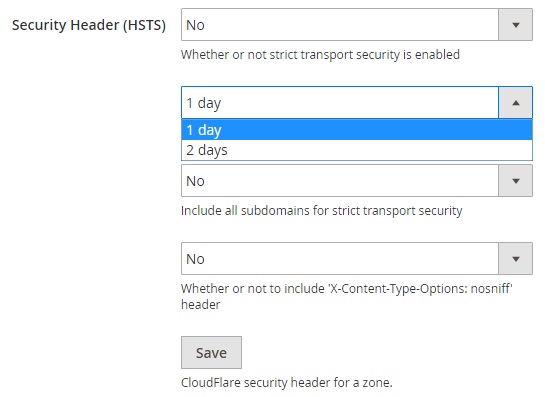
Security Header (HSTS). HSTS options consists of 4 fields. First, you should specify whether strict transport security is enabled or not. Then, it is necessary to set maximum age of the strict transport security. Native settings require to use seconds, but our module provides you with the ability to choose between 1 and 2 days. Next, you should decide whether you want to include all subdomains for strict transport security or not. The last field lets you choose whether to include ‘X-Content-Type-Options: nosniff’ header or not. Don’t forget to hit the Save button.
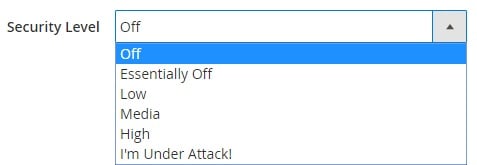
Security Level. Above, we’ve mentioned that CloudFlare® offers 5 levels of security. And you can choose what level to use right here. Set a security profile for your Magento 2 website, and the system will automatically adjust each of the security settings. Alternatively, you can use a custom profile to adjust each setting manually.
Server Side Exclude. This feature lets you hide sensitive content from suspicious visitors, while ordinary visitors can still see it. By enabling the option, you wrap the content with CloudFlare SSE tags. As a result, you can hide your phone number or email address. Note that SSE works only with HTML, so for enabled HTML minification, you won’t see any SSE tags in your HTML source, but SSE will still function.

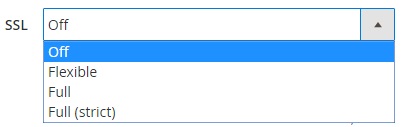
SSL. SSL options let you control both whether your visitors can browse your Magento 2 website over a secure connection and how CloudFlare connects to your origin web server. As for available settings, you can turn off the feature (the least secure approach); choose “Flexible” if your web server cannot accept HTTPS connections; choose “Full” for a self-signed SSL certificate; and “Full (strict)” for a valid SSL certificate (the most secure option).
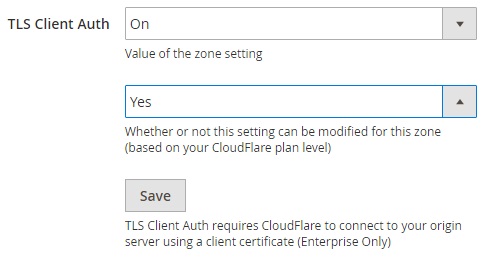
TLS Client Auth. This is an Enterprise Only feature that requires CloudFlare to connect to your origin server via a client certificate. You can turn it on/off as well as disable/enable modification for the zone on the basis of your CloudFlare plan. Don’t forget to save changes here.
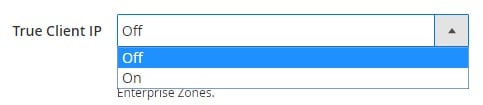
True Client IP. Due to this feature, you allow customer to use True Client IP – the Akamai feature – in the headers the system sends to the origin. Note that the functionality is limited to Enterprise Zones.
TLS 1.2. Here, you can turn on the Crypto TLS 1.2 feature. Note that it prevents the usage of previous versions and is limited to Enterprise and Business Zones only.

Web Application Firewall (WAF). This feature is also mentioned above. Our Control for CloudFlare® Magento 2 extension lets you enable it right in the Magento 2 admin. If you are not familiar with WAF, note that it examines HTTP requests to your website, inspecting both GET and POST requests. The feature is designed to filter out illegitimate traffic from all your visitors. When the CloudFlare WAF sees suspicious user behavior, it challenge the web visitor with a CAPTCHA. In case of a failed challenge, all users actions are stopped. As a result all illegitimate traffic is blocked before reaching your origin web server.

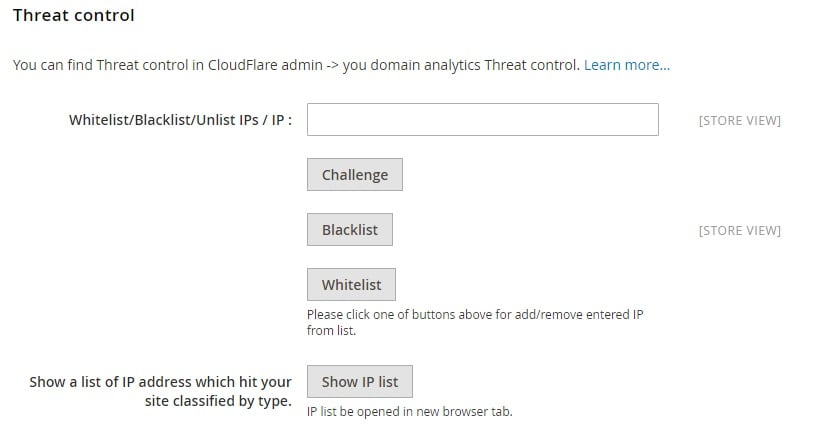
Threat control
You can find full Threat control in your CloudFlare admin. As for Control for CloudFlare®, it enables you to specify Whitelist/Blacklist/Unlist IPs. Enter the IP and hit an appropriate button (Challenge, Blacklist, or Whitelist) to add/remove entered IP to/from the list. The button below shows a list of IP address which hit your site. All addresses are classified by type and shown in a new browser tab.
Cache Management
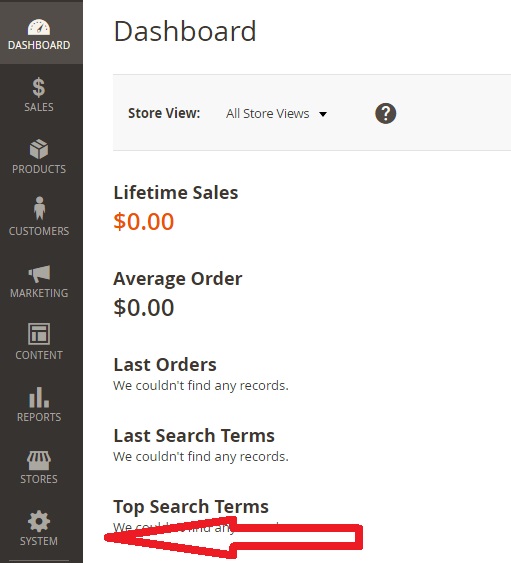
Our Control for CloudFlare® Magento 2 extension adds dedicated buttons to flush CloudFlare cache and individual file’s cache on the Magento 2 cache control page. New buttons are available under System -> Cache Management.
Choose System settings from the vertical menu on the left.
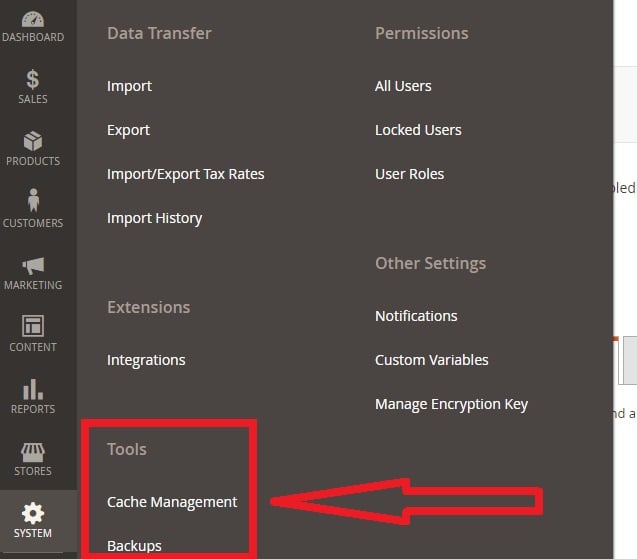
Under the Tools section, find Cache Management options.
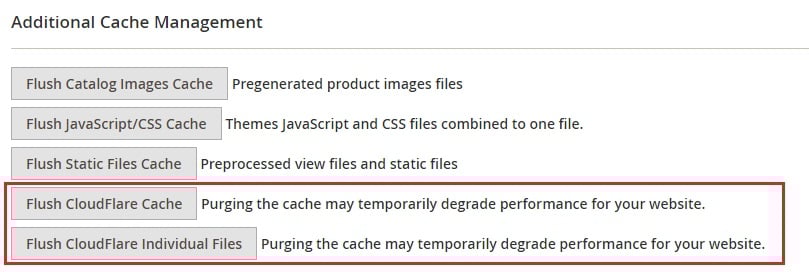
On the Cache Management screen, scroll down to the bottom of the page.

In the Additional Cache Management section, you can see the following CloudFlare buttons: Flush CloudFlare Cache and Flush CloudFlare Individual Files.
Hit the Flush CloudFlare Cache button and you will see the following window:

The extension lets you purge up to 30 files at a time. Please note that it is necessary to choose a domain to purge everything.
Now, we’d like to draw your attention to the Purge Individual Files features. Hit the appropriate button, and you will get the following window:
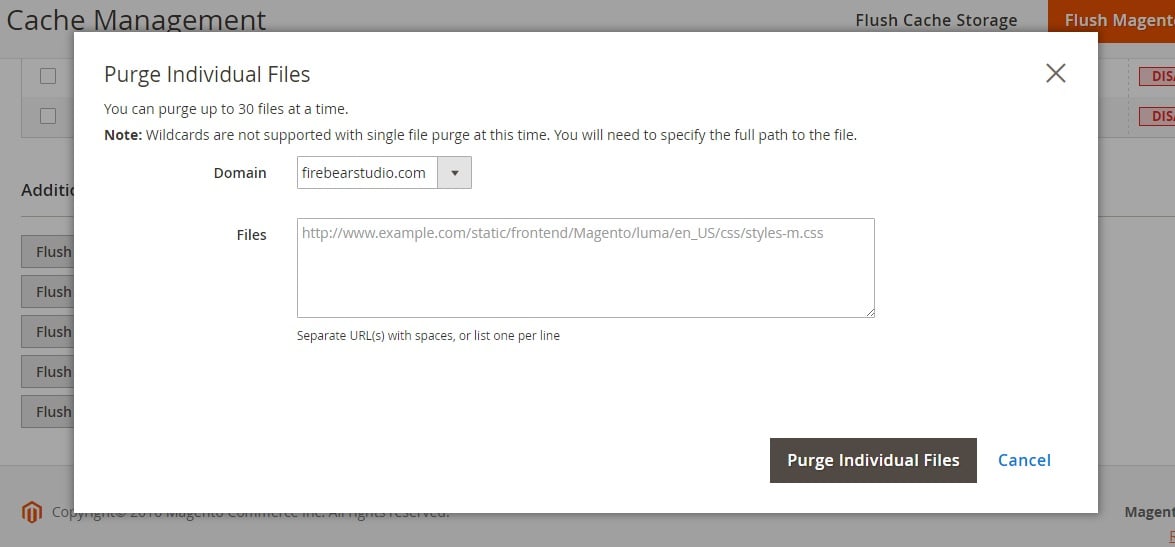
The system also lets you purge up to 30 files. You can choose a domain and specify exact files. It is possible to separate URLs with spaces; alternatively, you can list one URL per line.
CloudFlare Analytics
The last section of our manual is related to CloudFlare Analytics. You can find the appropriate screen under Reports -> CloudFlare Analytics:
- Hit the Reports button from the left vertical menu.
- In the third column, you can see the CloudFlare section with only one option available: Analytics.
- Hit the Analytics option.

All CloudFlare stats are divided into 4 groups: Requests, Bandwidth, Unique Visitors, and Threats.

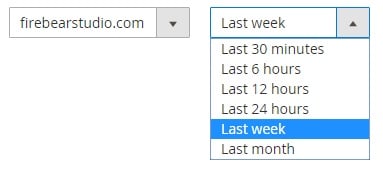
All stats can describe various periods: last 30 minutes, hour, 6, 12, 24 hours, week, month. Besides, you can switch between all your websites.
Requests tab
On the Requests tab, there is a diagram that illustrates both cached and uncached requests.
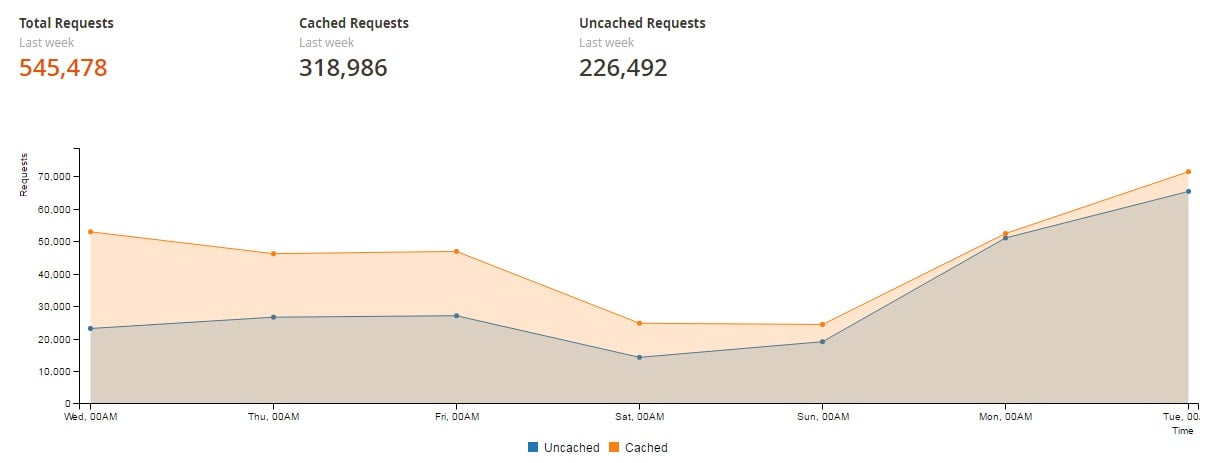
Above the diagram, you can see total number of requests for the chosen period of time, as well as cached and uncached requests.
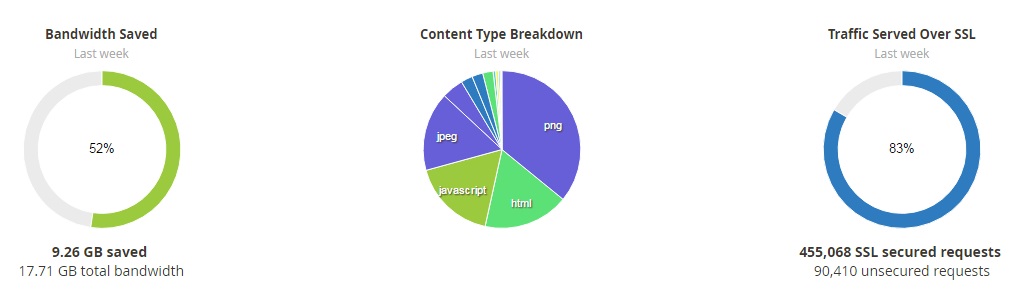
Below the diagram, there are three sections that appear on other tabs. The first section includes three pie diagrams that show saved bandwidth, content type breakdown, and traffic served over SSL.
The next section contains information about the total number of stopped threats, types of threats mitigated, and total page views.

The last section consists of three tables: Top Threat Origins; Top Traffic Origins; and Top Crawlers/Bots.

Bandwidth Tab
And this is how the Bandwidth tab looks like:
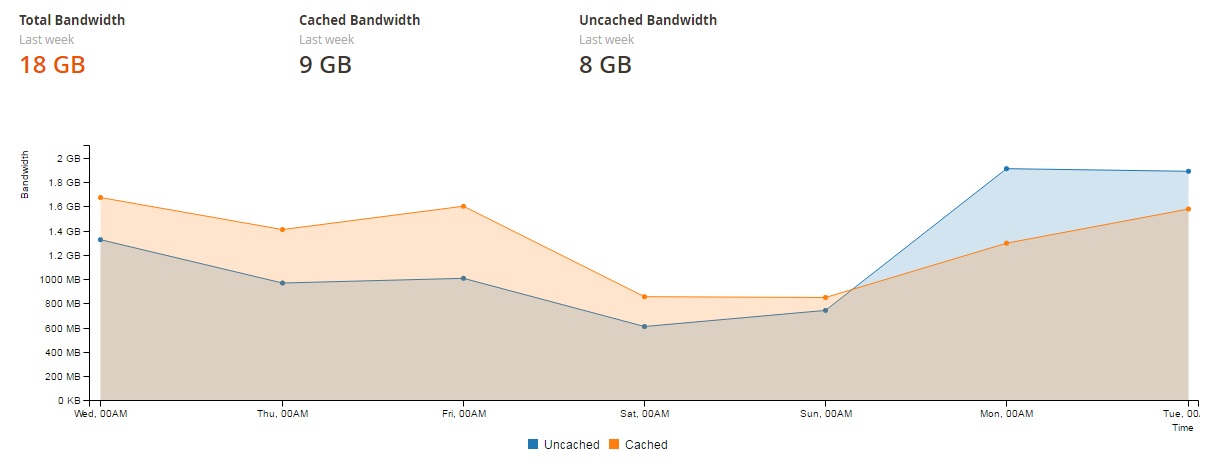
There is a diagram with both cached and uncached bandwidth, as well as data on total, cached, and uncached bandwidth for the specified period of time.
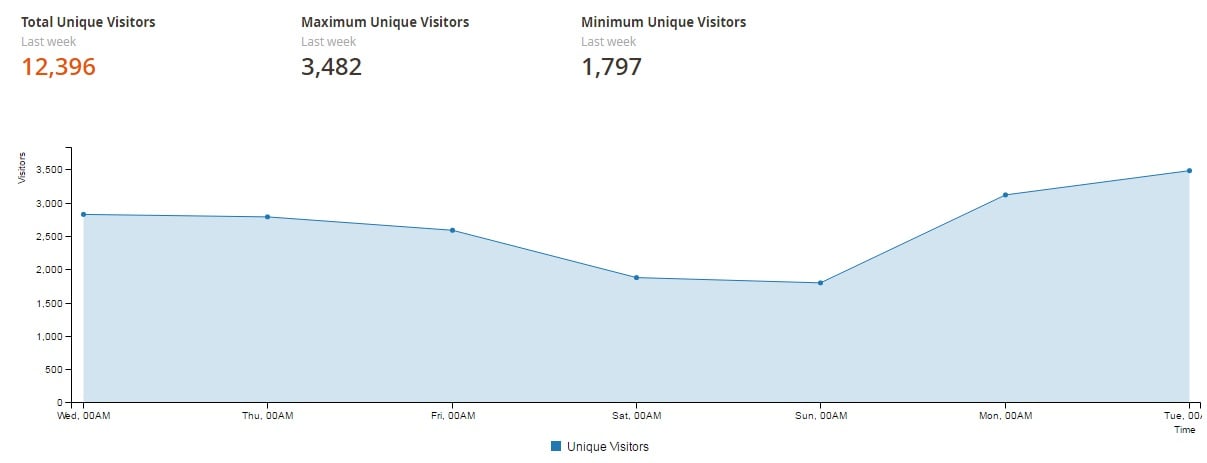
Unique Visitors Tab
On the Unique Visitors tab, you can see the total number of unique visitors as well as their maximum and minimum number for the specified period of time.
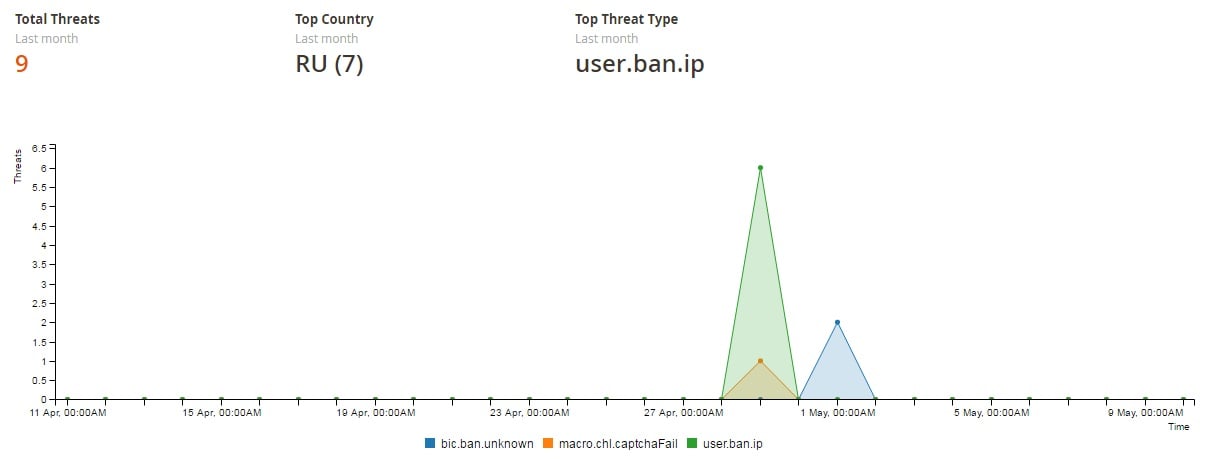
Threats Tab
As for the Threats tab, it illustrates the total number of threats, top country from where threats come from, and top threat types. The diagram shows when each threat occurred.
Final Words
This is how the module works. We hope our Control for CloudFlare® Magento 2 Extension Manual was helpful, but if you have any questions, feel free to ask us in comments – we are always here willing to help you.
For further information, consultation, or to request individual new features use our contact form! We provide professional installation services for our Magento 2 extensions – get your extension work right after the purchase!