
How to import and export updates within Magento 2. Consecutive Export
Saving time is a priority when we deal with database updates. The most beneficial solution in the situation is to find an adequate method and tool that will reduce the number of backend actions and prevent errors and duplication.
In this guide, we will explore which processes can be used within Magento 2 to add new data to the one previously transferred without running countless imports and exports or recreating a whole new database.

Table of contents
Consecutive Export
The native Magento 2 functionality does not possess any means for extracting exclusively new data from the database. You can export one of the supported entities out of products, customers and addresses, advanced pricing, customer finances, and stock sources. Such export means you receive a file with all the data related to an entity based on the filters applied.
If you add a single unit to the selected entity, e.g., a product, you won’t get the product in the final data table until you run a full entity export anew. It is troublesome to search for a particular element through multiple CSV files with thousands of lines within, but this is the limitation Magento 2 export comes with.
However, it is possible to expand the export possibilities with the Magento 2 Improved Import and Export extension. Aside from enhanced native features, the module introduces a bunch of tools for advanced data management focused on increasing workflow user-friendliness. Consecutive export is one of the innovations here.
Consecutive export allows for extracting data that has been added to the database after the last export run for the selected entity. The list of supported entities enriches the diversity of the native export by far. Unique entities become available for transfer with the B2B add-on.
|
|
The export result file contains only the new entity data, from a single unit to a maximum number specified in the format you choose (see the ‘Export Job Configuration’ chapter for the details). Thus, you’ll be able to get a hold of your store updates and use the data for further analysis or transfers.
The feature can be enabled in a click during the standard export setting with Improved Import and Export.
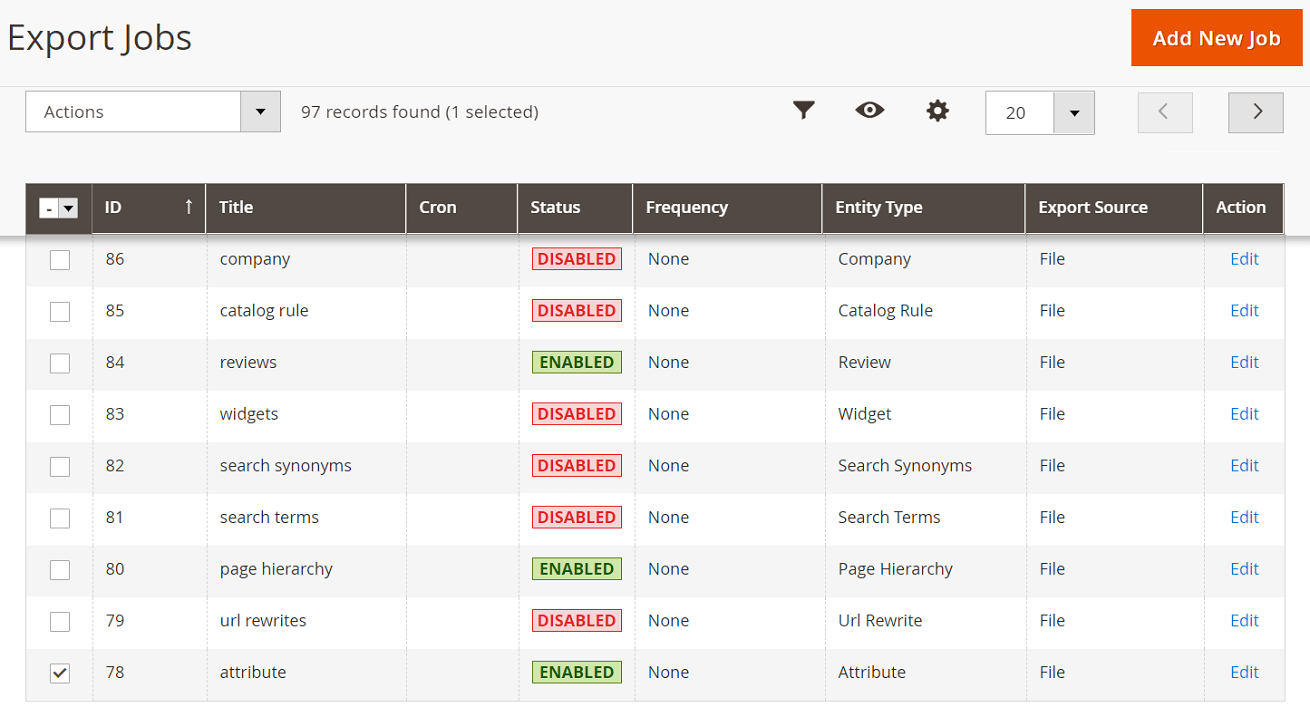
Export Job Configuration
The grid for Improved export rules – jobs – can be found at System > Improved Import/Export > Export Jobs. The dynamic grid nature provides users with the ability to edit crucial information without visiting the backend rule page. Here, you can manage all the existing jobs and create new ones.
General Settings
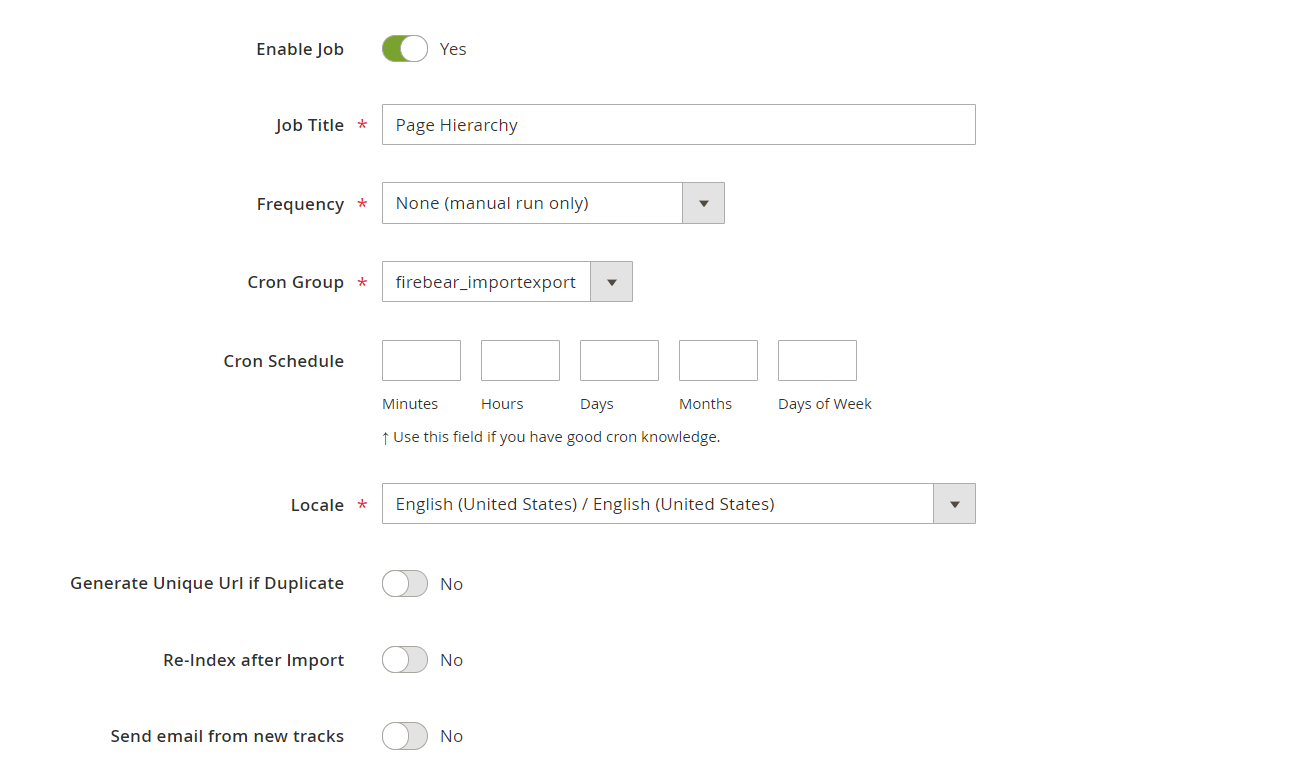
Any job configuration with Magento 2 Improved Import and Export starts with general settings. In the section, you can enable or disable the job, give it a title, select locale, and schedule automatic export.
The module performs automatic extractions using cron. Once you set the preferable time or period for an export run, you get the results without any additional involvement at all (don’t forget to keep the job enabled for the feature). To help you manage multiple automated jobs we’ve added cron groups available for assigning to.
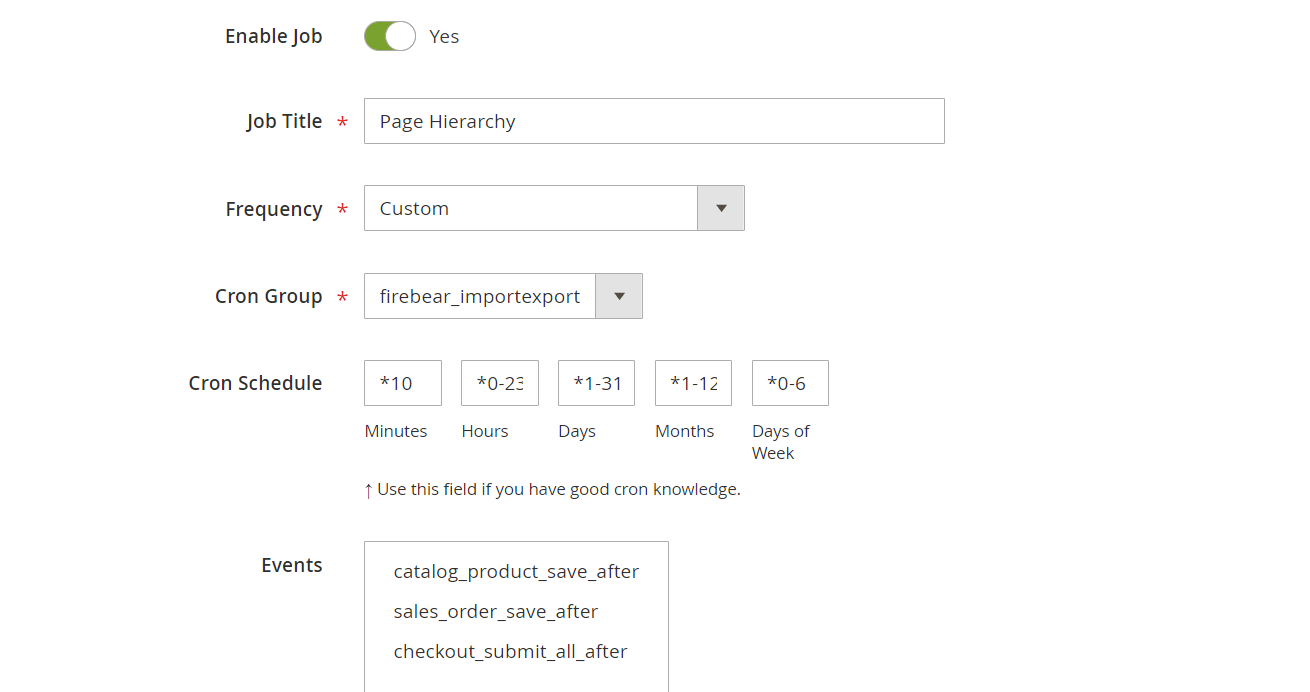
Another option for running automatic export is upon triggering a specific Magento 2 event. Currently, the Improved Import and Export extension supports the following scenarios:
- catalog_product_save_after – export is run after a product is saved in the catalog;
- sales_order_save_after – export is run after an order is saved to the database;
- checkout_submit_all_after – export is run after the order is submitted at checkout.
Export Settings
You can define the entity for export in the export setting section. The configuration steps will slightly differ for some selected types.
Also, this is the segment where you enable the consecutive export. It’s as easy as to change a tumbler position. The ‘Last Entity Id’ field can be found below the button. The numeric value here shows the last item that was processed during the previous export. Thus, you can compare the tables and make sure no data is lost.

Export Behavior and Source
You are free to specify the file format for the exported data during the setting of export behavior. In addition to the CSV format standard for Magento 2, we introduce the XML, ODS, XLSX options. File separators, field enclosure, and speed limits to data processing (use the last option based on your system performance statistics) can also be configured.

The Improved Export functionality can retrieve data from the File, FTP, SFTP sources. For your comfort, we’ve implemented the date format identifier, so that you’ll be able to organize multiple export files and tag each job run.
Mapping and Filters
To avoid overloads in your export files, you can filter data based on the entity attributes.
If you need export for moving store data to another system foreign to Magento 2, you can map attributes right in the export job and receive the final file with modified values.
Update Import
When it comes to importing new data, Magento 2 offers a solution. You can manually add a table with the updates and run another import or set up a scheduled import. The method allows getting some control over the process. You are able to choose whether to add or replace the existing entity attributes, and even delete whole entities and implement new data.
Keep in mind that the native scheduled import retrieves data only from a local server or remote FTP. The import start is based on the store locale settings, so make sure to decide on the most suitable time having explored the possible differences beforehand.
Database updating with Improved Import and Export follows a similar logic but adds flexibility in configuring each run. You administrate the import behavior with the add/update, only add, only update, replace, delete options. New data import can be performed both manually and automatically.
You can schedule cron for any import job. Set-up once, the job will trigger cron update implementation requiring no time and efforts spent from the admin side. Cron usage becomes extra advantageous if you look at the variety of import sources supported by the module (see the full list below). Whether you connect via API or provide a link to Google Sheets, all the changes made in the original file will be transferred upon running the job. During the manual import, the feature also helps reduce time and avoid re-uploads.
Import Job Configuration
Follow System > Improved Import/Export > Import Jobs to create a new job or modify the existing one. Within a particular job page, you’ll find the following settings.
General Settings
Here, you decide whether to make the job active. Name, locale, cron groups, and cron schedule info can be specified in the corresponding entries of the section.
Cron configuration works in the same manner as with the improved export. You define the frequency of the updates, enable the job, and get the results without delays or interruptions.
Import Settings
The entity for import is selected in the import settings section. The module supports the maximum of Magento 2 entities (the full list can be found in the ‘Consecutive Export’ chapter).
Import with Improved Import and Export allows applying massive actions to entity attributes. You can remove related images and websites association, disable products existing in the database before the import, or clear the values for all the attributes involved.
Import Behavior
Configure export behavior to decide how the import data will be implemented in your database. You can also modify value separators and validation strategy settings or stick to the default options.

Import Source
Improved Import and Export supports various file formats to provide variety in data transfers. You can import data in:
- CSV;
- XML;
- XLXS;
- ODS;
- Json;
- ZIP/TAR.
As for the import sources, the extension gives the ability to select from multiple options.
- REST/SOAP API;
- FTP/SFTP;
- Dropbox;
- Google Sheets;
- URL;
- File Upload.
Thus, you can proceed with the method most suitable for your import purposes and transfer the data table in the format that you find comfortable to manage.
Mapping
The same as with the improved export, improved import allows the implementation of elements from various systems and platforms. Thanks to the mapping functionality, you are able to apply massive modifications to the new data.
If you don’t have time or desire to involve in mapping manually, replace the current table content with default values upon selecting the corresponding option. The feature helps avoid errors during import even if you have no skills in working with Magento 2 entities.
Magento 2 import and export Guide List