
Manual for Free Magento 1 to Magento 2 migration add-on for Improved Import and Export extension (
![]()
Free Magento 1 to Magento 2 migration add-on helps to move data from Magento 1 store to Magento 2, or from one Magento 2 instance to another. With the add-on you connect together databases of two stores, choose which entity you want to migrate, and hit ‘Run’ button.
THE ADD-ON IS NO LONGER SUPPORTED
The latest version NOW SUPPORTS MIGRATION FROM MAGENTO 2 TO MAGENTO 2 in addition to M1>M2.

Table of contents
Installation
NOTE: you need to install Improved Import and Export extension prior to installing any add-ons.
To install the add-on follow these steps
- Log into your FireBear account and proceed to My Extensions Download section.
- Download Free Magento 1 to Magento 2 migration add-on package.
- Extract the contents of the Free Magento 1 to Magento 2 migration add-on package to your Magento 2 root folder to app/code/Firebear folder.
- Navigate to your store root folder in the SSH console of your server:
1cd path_to_the_store_root_folder - Enable the add-on by running:
1php bin/magento module:enable Firebear_PlatformM1 - Upgrade database
1php bin/magento setup:upgrade —keep-generated
Configuration
The add-on configuration is all about specifying the credentials of the source store in the administrator panel. To access configuration section navigate to Stores > Configuration > Firebear Studio > Import/Export.

At the configuration section, expand Source Database section to see required credentials, they include:
- Host – the IP address of the source store server, where the database is located. (NOTE: you need to enable remote access to the database source, and use the host of the remote access. . If you are using hosting solution, contact the support team)
- Username – your account login to the source store server.
- Password – your account password to the source store server.
- Database Name – name of the source database that the add-on will use to transfer the data.
After filling all the fields above you are done with the add-on configuration and can proceed to the data migration.
NOTE
The data base of the target store MUST BE EMPTY. In other words, you need to make sure you don’t have any products, customers, categories, or other entities at the target store. This limitation comes from the fact that Magento uses IDs to check the entities integrity.
Migrating to a store with the populated database may result in errors or not all data being migrated.
Order of the entity migration
All entities in Magento 2 are interconnected. That’s why when migrating the data one must remember the native Magento 2 logic of how products and other entities behave.
Here is a couple of examples:
- Products in Magento 2 must belong to a category and cannot exist without certain attributes. That’s why you cannot migrate right away. You need to have prepared the basis for them.
- First you need to import categories, then product attributes, and only after this, you can proceed with the products import.
- Orders in Magento 2 are placed by customers and include products. That’s why before migrating orders you need to have migrated customers and products.
And before products again: categories and attributes.
Firebear development team strongly suggests you refer to the below list of the entity migration order:
- First, migrate product categories.
- Then, product attributes.
- After, products.
- Customers.
- Quotes.
- Orders.
- Invoices.
- Credit memos.
Make sure to stick to this migration order to avoid any issues.
Payment methods
Migration of Orders will also require the same payment methods available at the target Magento 2 instance. If you migrate the order and payment method reference will not be available such order may cause issues and won’t open from the administrator panel.
If for some reason particular payment method is not available for your Magento 2 – you need to create it manually and set it to:
checkout=false
By doing so, you will enable the orders with this payment method in the Magento 2 backend and will perform a successful order migration.
Running migrating from Magento 2 administrator panel
Free Magento 1 to Magento 2 migration add-on features the possibility to migrate all the necessary data directly from the Magento 2 backend without using command line or any programming knowledge.
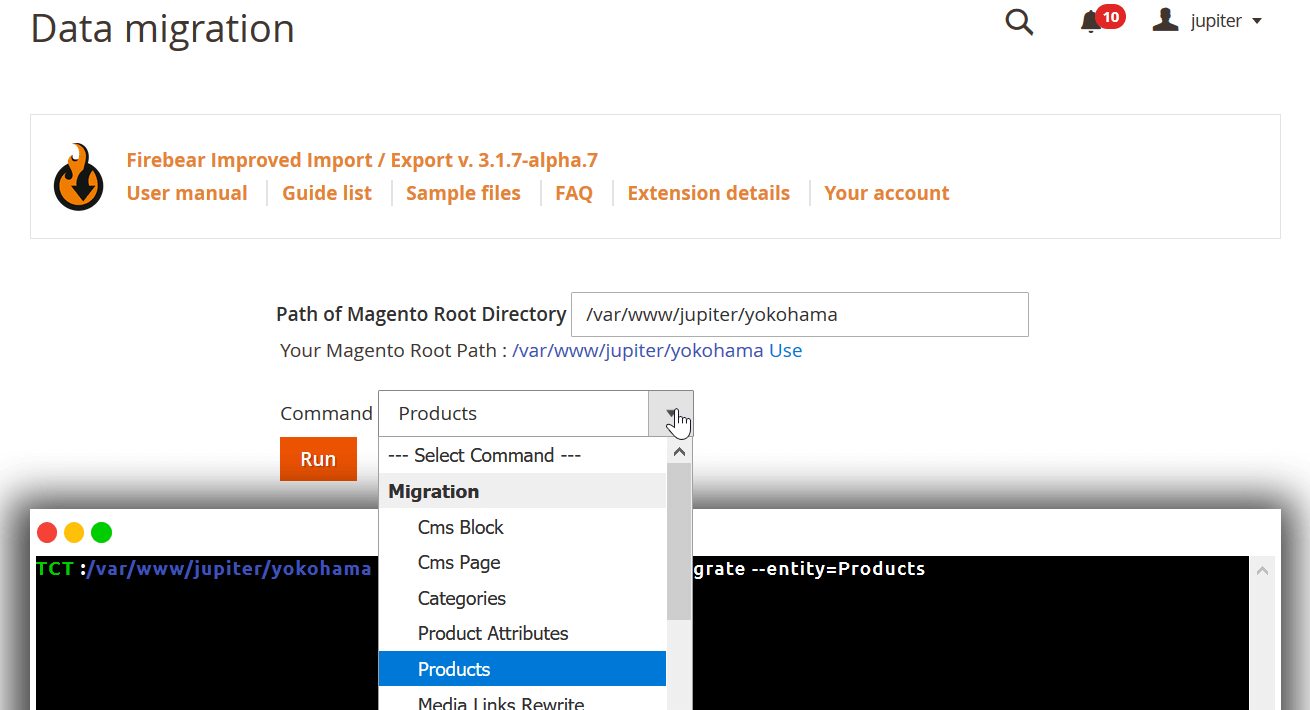
The add-on’s migration interface can be accessed from System > Improved Import/Export > Data Migration.
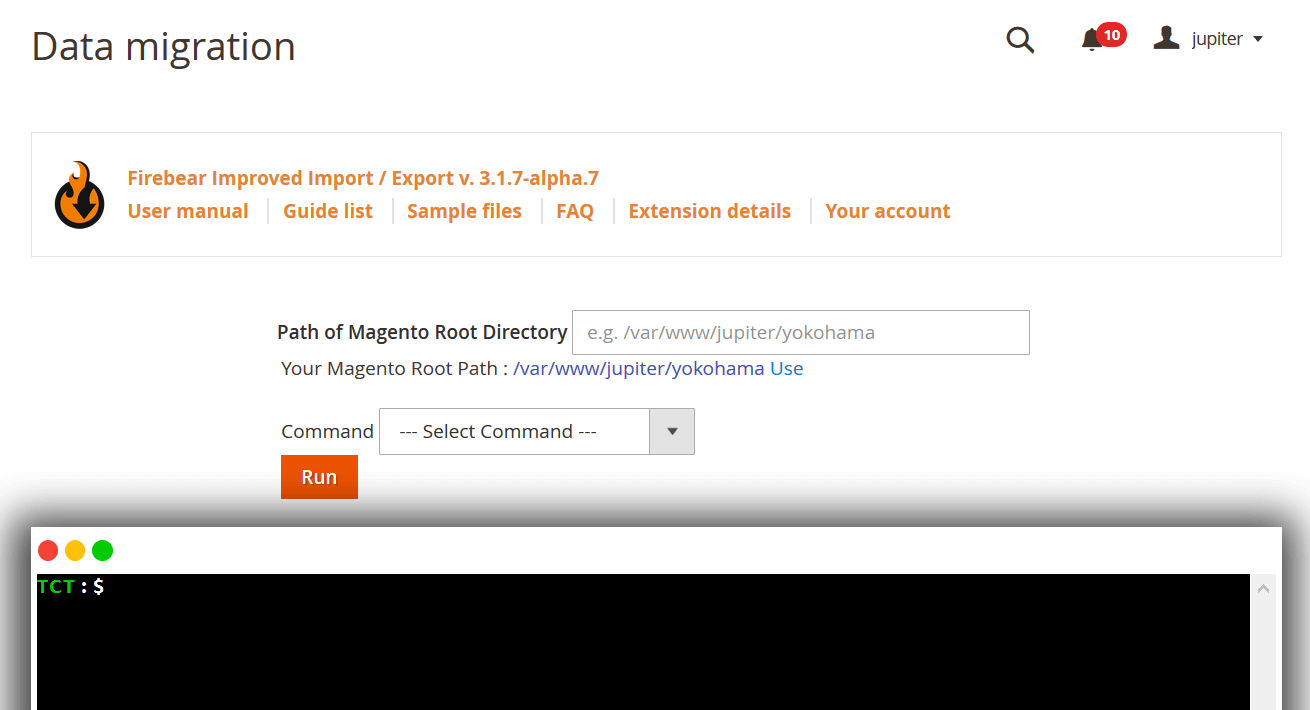
The interface features the following elements:
- Path to Magento Root Directory – here you need to specify the path to the folder at your server, where the target Magento 2 instance is installed. The add-on automatically detects the installation folder of the current store, however, if you have multiple Magento 2 instances installed – you may want to use another path.
- Command – in this dropdown menu you select the entity you want to migrate. The add-on allows migrating every entity separately, unlike native migration tool that attempts to migrate the whole store at once.
- Run – when you specified and double-checked the path to the store and selected the entity you want to import – you hit ‘Run’ button.
In the improvised command line above you will see all the executed commands and the status of the migration.
Running M1 to M2 migration from command line
If you are migrating huge chunks of data you may prefer to use server command line and run migration manually. Magento 2 administrator panel may not be an option due to additional load on the system and architecture peculiarities.
With Free Magento 1 to Magento 2 migration add-on you have the possibility to also perform migration via command line. So the general rule is:
- Migration of a small amount of a single entity – use Magneto 2 administrator panel.
- Migration of huge amounts of data (several hundreds of Mbs of data) – use command line.
The commands for manual migration can be found below:
| Entity to migrate | Command to run | ||
| Categories |
|
||
| Product Attributes |
|
||
| Products |
|
||
| Product media – images and videos |
|
||
| Inventory – product stock |
|
||
| CMS blocks (static blocks) |
|
||
| CMS pages (static pages) |
|
||
| Customers with addresses |
|
||
| Email templates |
|
||
| URL rewrites |
|
||
| Store administrator accounts |
|
||
| Quotes for orders |
|
||
| Orders |
|
||
| Product reviews |
|
||
| Product ratings |
|
||
| Invoices |
|
||
| Credit Memos |
|
||
| Catalog price rules |
|
||
| Customer groups |
|
||
| Taxes |
|
||
| Order taxes aggregated |
|
||
| Cart Price Rules / Sales Rules |
|
||
| Customer wishlists |
|
||
| Order shipping data |
|
||
| Newsletter subscribers |
|
||
| Core config data migration |
|
||
| Sales combined: quotes, orders, invoices, credit memos, shipments |
|
||
| Gift Cards – Magento Enterprise only |
|
Running M2 to M2 migration from command line
The command list for Magento 2 to Magento 2 migration:
| Entity to migrate | Command to run | ||
| Categories |
|
||
| Product attributes |
|
||
| Products |
|
||
| Inventory – product stock |
|
||
| Customers |
|
||
| Wish Lists |
|
||
| Quotes |
|
||
| Orders |
|
||
| Invoices |
|
||
| Shipments |
|
||
| Credit memos |
|
||
| URL rewrites |
|
||
| URL rewrites for Magento 2 Commerce/Cloud/Enterprise |
|
Running migration from particular date
The latest version of the add-on allows to migrate the data from a particular date. For example, if you want to migrate the data you have only added since Spring 2019, you can do this. To migrate the data from a particular date, after the command including desired entity type add:
|
1 |
--migrate_from_date="YYYY-MM-DD HH:mm:ss" |
The date format used is the native Magento 2 date format you can look in your database. For example, if you want to migrate products that have been added to the store starting from January 2019, you need to run:
|
1 |
bin/magento firebear:migrate --entity=Products --migrate_from_date="2019-01-01" |
That’s it. Now you can migrate the data from the particular date using Free Migration Add-on of Improved Import & Export extension.
Custom logic. Developer section
Custom methods can be implemented in the di.xml file of the add-on.
|
1 2 3 |
<virtualType name="Firebear\ImportExport\Model\Migration\[ENTITY]" type="Firebear\ImportExport\Model\Migration\Job\General"> ... </virtualType> |
Add source and destination tables:
|
1 2 |
<argument name="sourceTable" xsi:type="string">[SOURCE_TABLE]</argument> <argument name="destinationTable" xsi:type="string">[DESTINATION_TABLE]</argument> |
Specify columns you want to fetch from the source:
|
1 2 3 4 5 |
<argument name="sourceFields" xsi:type="array"> <item name="[FIELD_1]" xsi:type="string">[FIELD_1]</item> <item name="[FIELD_2]" xsi:type="string">[FIELD_2]</item> <item name="[ADDITIONAL_FIELDS]" xsi:type="string">[ADDITIONAL_FIELDS]</item> </argument> |
Specify columns you want to insert into the destination:
|
1 2 3 4 5 |
<argument name="destinationFields" xsi:type="array"> <item name="[FIELD_1]" xsi:type="string">[FIELD_1]</item> <item name="[FIELD_2]" xsi:type="string">[FIELD_2]</item> <item name="[FIELD_3]" xsi:type="string">[FIELD_3]</item> </argument> |
Specify mapping between columns:
|
1 2 3 4 5 |
<argument name="fieldMapping" xsi:type="array"> <item name="[FIELD_1]" xsi:type="string">[FIELD_1]</item> <item name="[FIELD_2]" xsi:type="string">[FIELD_2]</item> ... </argument> |
To apply filter on the source data:
|
1 2 3 4 |
<argument name="sourceFilters" xsi:type="array"> <item name="[FIELD_1]" xsi:type="string">[ARBITARY_SQL_WHERE_EXPRESSION]</item> <item name="[FIELD_2]" xsi:type="object">[FILTER_CLASS_NAME]</item> </argument> |
To apply field job:
|
1 2 3 4 5 6 |
<argument name="fieldJobs" xsi:type="array"> <item name="[FIELD_1]" xsi:type="object">[JOB_CLASS_NAME]</item> <item name="[FIELD_2]" xsi:type="object">[JOB_CLASS_NAME]</item> <item name="[FIELD_3]" xsi:type="string">[SOME_CONSTANT_VALUE_OR_SOMETHING_ELSE]</item> </argument> ``` |
To apply pre job:
|
1 2 3 4 |
``` <argument name="preJobs" xsi:type="array"> <item name="[DESCRIPTIVE_NAME]" xsi:type="object">[PRE_JOB_CLASS_NAME]</item> </argument> |
To apply post job:
|
1 2 3 |
<argument name="postJobs" xsi:type="array"> <item name="[DESCRIPTIVE_NAME]" xsi:type="object">[POST_JOB_CLASS_NAME]</item> </argument> |
Filters
Use filters if you want to limit amount of data fetched from the source table. You have two options:
1. Use plain SQL directly in the configuration:
|
1 2 3 |
<argument name="sourceFilters" xsi:type="array"> <item name="value" xsi:type="string">value IS NOT NULL</item> </argument> |
2. Encapsulate your logic in separate filter class to be reused in multiple tables:
|
1 2 3 |
<argument name="sourceFilters" xsi:type="array"> <item name="store_id" xsi:type="string">Firebear\ImportExport\Model\Migration\FilterJobs\StoreId</item> </argument> |
Implement \Firebear\ImportExport\Model\Migration\FilterJobs\FilterJobsInterface to create filters for your needs.
Current filters:
* \Firebear\ImportExport\Model\Migration\FilterJobs\StoreId – filter the data by existing store ids.
* \Firebear\ImportExport\Model\Migration\FilterJobs\WebsiteId – filter the data by existing website ids.
* \Firebear\ImportExport\Model\Migration\FilterJobs\AttributeId – filter the data by existing entity attribute ids:
|
1 2 3 4 5 6 7 8 9 10 11 12 13 |
<virtualType name="Firebear\ImportExport\Model\Migration\FilterJobs\CategoryAttributeId" type="Firebear\ImportExport\Model\Migration\FilterJobs\AttributeId"> <arguments> <argument name="sourceEntityTypeId" xsi:type="string">3</argument> <argument name="attributeCodes" xsi:type="array"> <item name="name" xsi:type="string">name</item> <item name="description" xsi:type="string">description</item> <item name="meta_title" xsi:type="string">meta_title</item> <item name="meta_keywords" xsi:type="string">meta_keywords</item> <item name="meta_description" xsi:type="string">meta_description</item> <item name="meta_canonical" xsi:type="string">meta_canonical</item> </argument> </arguments> </virtualType> |
This filter will automatically fetch attribute ids for the specified entity type and attribute codes and then insert corresponding condition into the source data fetch query.
* \Firebear\ImportExport\Model\Migration\Filter\Exists – filter the data by values in another table:
|
1 2 3 4 5 6 7 |
<virtualType name="Firebear\ImportExport\Model\Migration\FilterJobs\ProductOptionIdExists" type="Firebear\ImportExport\Model\Migration\FilterJobs\Exists"> <arguments> <argument name="table" xsi:type="string">eav_attribute_option</argument> <argument name="field" xsi:type="string">option_id</argument> </arguments> </virtualType> ``` |
This filter will fetch option_id values from eav_attribute_option table and filter attached field by those values.
Field processors
Use field processors if you need to transform the data from the source in some way.
Typical example would be store_id field. As we have different store ids in each system we have to transform store_id from the source to the corresponding store_id in the destination.
Implement \Firebear\ImportExport\Model\Migration\Field\JobInterface to create field processors for your needs.
Current field processors:
* \Firebear\ImportExport\Model\Migration\Field\Job\ConvertToJson – convert serialized value to json representation.
* \Firebear\ImportExport\Model\Migration\Field\Job\CopyValue – copy value from another field in the source:
|
1 2 3 4 5 |
<virtualType name="Firebear\ImportExport\Model\Migration\Field\Job\CopySomeOtherField" type="Firebear\ImportExport\Model\Migration\Field\Job\CopyValue"> <arguments> <argument name="field" xsi:type="string">my_field_name</argument> </arguments> </virtualType> |
* \Firebear\ImportExport\Model\Migration\Field\Job\SetValue – set specific value for the field:
|
1 2 3 4 5 6 |
``` <virtualType name="Firebear\ImportExport\Model\Migration\Field\Job\SetDefaultAttributeSet" type="Firebear\ImportExport\Model\Migration\Field\Job\SetValue"> <arguments> <argument name="value" xsi:type="string">4</argument> </arguments> </virtualType> |
* \Firebear\ImportExport\Model\Migration\Field\Job\SetAttributeId – special case of SetValue, set value to the attribute id of the given attribute code.
* \Firebear\ImportExport\Model\Migration\Field\Job\MapValue – set value according to the mapping specified in the configuration:
|
1 2 3 4 5 6 7 8 9 10 |
<virtualType name="Firebear\ImportExport\Model\Migration\Field\Job\MapSomething" type="Firebear\ImportExport\Model\Migration\Field\Job\MapValue"> <arguments> <argument name="mapping" xsi:type="array"> <item name="from_1" xsi:type="string">to_1</item> <item name="from_2" xsi:type="string">to_2</item> </argument> <argument name="allowEmpty" xsi:type="boolean">true</argument> </arguments> </virtualType> ``` |
Use allowEmpty parameter to specify how processor should handle empty source values.
* \Firebear\ImportExport\Model\Migration\Field\Job\MapStoreId – special case of MapValue processor, used to transform store id according to the store id mapping.
* \Firebear\ImportExport\Model\Migration\Field\Job\MapWebsiteId – special case of MapValue processor, used to transform website id according to the website id mapping.
* \Firebear\ImportExport\Model\Migration\Field\Job\MapAttributeId – map attribute ids in the source to the attribute ids in the destination:
|
1 2 3 4 5 6 7 8 9 10 11 12 13 14 15 16 |
<virtualType name="Firebear\ImportExport\Model\Migration\Field\Job\MapCategoryAttributeId" type="Firebear\ImportExport\Model\Migration\Field\Job\MapAttributeId"> <arguments> <argument name="sourceEntityTypeId" xsi:type="string">3</argument> <argument name="destinationEntityTypeId" xsi:type="string">3</argument> <argument name="attributeCodeMapping" xsi:type="array"> <item name="name" xsi:type="string">name</item> <item name="description" xsi:type="string">description</item> <item name="meta_title" xsi:type="string">meta_title</item> <item name="meta_keywords" xsi:type="string">meta_keywords</item> <item name="meta_description" xsi:type="string">meta_description</item> <item name="meta_robots" xsi:type="string">meta_robots</item> <item name="meta_canonical" xsi:type="string">meta_canonical</item> </argument> </arguments> </virtualType> ``` |
This filter will automatically map attribute ids for the specified entity type and attribute codes.
* \Firebear\ImportExport\Model\Migration\Field\Job\MapFromTable – map values based on the data from another table:
|
1 2 3 4 5 6 7 |
<virtualType name="Firebear\ImportExport\Model\Migration\Field\Job\MapFromMediaGallery" type="Firebear\ImportExport\Model\Migration\Field\Job\MapFromTable"> <arguments> <argument name="table" xsi:type="string">catalog_product_entity_media_gallery</argument> <argument name="keyField" xsi:type="string">value_id</argument> <argument name="dataField" xsi:type="string">entity_id</argument> </arguments> </virtualType> |
* \Firebear\ImportExport\Model\Migration\Field\Job\Replace – replace content with a regular expression:
|
1 2 3 4 5 6 7 8 9 10 11 |
<virtualType name="Firebear\ImportExport\Model\Migration\Field\Job\ReplaceCmsContent" type="Firebear\ImportExport\Model\Migration\Field\Job\Replace"> <arguments> <argument name="replacements" xsi:type="array"> <item name="cms_block" xsi:type="array"> <item name="pattern" xsi:type="string">/{{block type="cms\/block" block_id="(.*?)".*?}}/i</item> <item name="replacement" xsi:type="string">{{block class="Magento\Cms\Block\Block" block_id="$1"}}</item> </item> </argument> </arguments> </virtualType> ``` |
This filter will replace Magento 1 block insert notation with Magento 2 format.
Pre jobs
Use pre jobs if you need to do something before the start of migration of the table. For example to truncate table or prepare additional data.
Implement \Firebear\PlatformM1\Api\PreJobInterface to create post processors for your needs.
Current pre job
* \Firebear\ImportExport\Model\Migration\PreJob\Truncate – use to truncate table:
|
1 2 3 4 5 6 |
<virtualType name="Firebear\ImportExport\Model\Migration\PreJob\TruncateCatalogProductCategory" type="Firebear\ImportExport\Model\Migration\PreJob\Truncate"> <arguments> <argument name="table" xsi:type="string">catalog_product_category</argument> </arguments> </virtualType> ``` |
Post Job
Use post processors if you need to do something after the migration for the table has been completed.
For example if you need to do some data cleanup or fix something in related tables.
Implement \Firebear\PlatformM1\Api\PostJobInterface to create post processors for your needs.
Grouping
You can group several jobs to be executed at once. Example:
|
1 2 3 4 5 6 7 8 9 10 11 |
``` <virtualType name="Firebear\ImportExport\Model\Migration\Categories" type="Firebear\ImportExport\Model\Migration\Job\Unite"> <arguments> <argument name="processors" xsi:type="array"> <item name="catalog_category_entity" xsi:type="object">Firebear\ImportExport\Model\Migration\CatalogCategoryEntity</item> <item name="catalog_category_entity_varchar" xsi:type="object">Firebear\ImportExport\Model\Migration\CatalogCategoryEntityVarchar</item> ... </argument> </arguments> </virtualType> ``` |
That way if you run the migration for Categories entity code if will run all child migrations one by one.
Add new product attribute to migration
To include new attribute into data migration do the following:
* Adjust product attribute id filter Firebear\ImportExport\Model\Migration\Filter\ProductAttributeId to include data for your attribute in the source data fetch:
|
1 2 3 4 5 6 7 8 9 10 11 12 13 14 |
``` <virtualType name="Firebear\ImportExport\Model\Migration\Filter\ProductAttributeId" type="Firebear\ImportExport\Model\Migration\Filter\AttributeId"> <arguments> <argument name="sourceEntityTypeId" xsi:type="string">4</argument> <argument name="attributeCodes" xsi:type="array"> <item name="attribute1" xsi:type="string">attribute1</item> ... <!-- Add you attribute here --> <item name="SOURCE_ATTRIBUTE_CODE" xsi:type="string">SOURCE_ATTRIBUTE_CODE</item> ... </argument> </arguments> </virtualType> ``` |
This way data for your attribute will be fetched from the source database.
* Adjust product attribute id processor Firebear\ImportExport\Model\Migration\Field\Job\MapProductAttributeId and add you attribute to the mapping:
|
1 2 3 4 5 6 7 8 9 10 11 12 13 |
<virtualType name="Firebear\ImportExport\Model\Migration\Field\Job\MapProductAttributeId" type="Firebear\ImportExport\Model\Migration\Field\Job\MapAttributeId"> <arguments> <argument name="sourceEntityTypeId" xsi:type="string">4</argument> <argument name="destinationEntityTypeId" xsi:type="string">4</argument> <argument name="attributeCodeMapping" xsi:type="array"> <item name="attribute1" xsi:type="string">attribute1</item> ... <!-- Add you attribute here --> <item name="SOURCE_ATTRIBUTE_CODE" xsi:type="string">DESTINATION_ATTRIBUTE_CODE</item> ... </argument> </arguments> </virtualType> |
This way product attribute id processor would be able to map old attribute id from the source database to the new attribute id in the destination database.
* Clean cache and run the following commands to migrate data for your attribute (attribute options, etc.) and attribute values for the products.:
|
1 2 3 |
bin/magento firebear:migrate --entity=ProductAttributes bin/magento firebear:migrate --entity=Products ``` |
Troubleshooting
Before contacting FireBear support team explore this chapter to see if some of the solutions can help you with the issues you face.
Note that there must be the outdated version of the add-on at Magento Marketplace, make sure to ask the team to upgrade the extension.
All changes you need to apply only to PlatformM1/etc/di.xml file
Whenever you change di.xml file, di compile command is mandatory for execution
ISSUE 1:
SQLSTATE[42S02]: Base table or view not found: 1146 Table ‘databasename.sequence_catalog_category’ doesn’t exist
Solution:
The issue appears when you migrate to Magento 2 Open Source. Please find the following code (‘sequence’) in di.xml and comment it.
|
1 2 3 |
<argument name="postJobs" xsi:type="array"> <!--<item name="sequence" xsi:type="object">Firebear\ImportExport\Model\Migration\PostJob\CategorySequence</item>--> </argument> |
If you have similar issues with other entities, make sure to resolve them the same way by commenting sequence post jobs.
ISSUE 2:
|
1 2 3 4 5 6 |
bin/magento firebear:migrate --entity=ProductAttributes catalog_eav_attribute 90/90 [============================] 100% < 1 sec eav_attribute 90/90 [============================] 100% < 1 sec eav_attribute_label 25/25 [============================] 100% < 1 sec eav_attribute_option 115/115 [============================] 100% < 1 sec eav_attribute_option_value 0/0 [->--------------------------] 0% < 1 sec |
eav_attribute_option_value table did not import any data
Solution:
Find option_id in field jobs of the virtual type and comment it:
|
1 2 3 4 5 6 |
<virtualType name="Firebear\ImportExport\Model\Migration\ProductEavAttributeOption" type="Firebear\ImportExport\Model\Migration\Job\General"> .... <argument name="fieldJobs" xsi:type="array"> <!-- <item name="option_id" xsi:type="object">Firebear\ImportExport\Model\Migration\Field\Job\AddIncrementToOptionId</item> --> <<== Comment this line <item name="attribute_id" xsi:type="object">Firebear\ImportExport\Model\Migration\Field\Job\MapProductAttributeId</item> </argument> |
ISSUE 3:
SQLSTATE[42S02]: Base table or view not found: 1146 Table ‘databasename.catalog_product_entity_media_gallery_value_to_entity’ doesn’t exist
Solution:
|
1 |
<virtualType name="Firebear\ImportExport\Model\Migration\ProductTablesMediaGalleryValueToEntityImage" type="Firebear\ImportExport\Model\Migration\Job\General"> |
change to:
|
1 |
<virtualType name="Firebear\ImportExport\Model\Migration\ProductTablesMediaGalleryValueToEntityImageM2" type="Firebear\ImportExport\Model\Migration\Job\General"> |
Add suffix M2 at the end in the second virtual type at the line around 10266.
ISSUE 4
Where to add custom product attributes?
Solution:
Find the following code:
|
1 2 3 4 5 6 7 8 9 10 11 |
<!-- Map product attribute ids --> <virtualType name="Firebear\ImportExport\Model\Migration\Field\Job\MapProductAttributeId" type="Firebear\ImportExport\Model\Migration\Field\Job\MapAttributeId"> <arguments> <argument name="sourceEntityTypeId" xsi:type="string">4</argument> <argument name="destinationEntityTypeId" xsi:type="string">4</argument> <argument name="attributeCodeMapping" xsi:type="array"> <item name="name" xsi:type="string">name</item> <item name="description" xsi:type="string">description</item> <item name="short_description" xsi:type="string">short_description</item> <item name="sku" xsi:type="string">sku</item> <item name="price" xsi:type="string">price</item> |
Add your custom product attributes at this end in this item list.
Also, use the following:
|
1 2 3 4 5 6 7 8 |
<virtualType name="Firebear\ImportExport\Model\Migration\FilterJobs\ProductAttributeId" type="Firebear\ImportExport\Model\Migration\FilterJobs\AttributeId"> <arguments> <argument name="sourceEntityTypeId" xsi:type="string">4</argument> <argument name="attributeCodes" xsi:type="array"> <item name="name" xsi:type="string">name</item> <item name="description" xsi:type="string">description</item> <item name="short_description" xsi:type="string">short_description</item> <item name="sku" xsi:type="string">sku</item> |
Add your custom product attributes at this end in this item list.
Note that di.xml must have a different name depending on the Magento 2 edition you use.
E.g., di_CE.xml – for Magento 2 Open Source
di_EE.xml – for Magento 2 Commerce
During migration from the Open Source edition to the Commerce edition make sure to replace all the entity_id attributes in the table with row_id.
Also make sure to apply the same changes in Field/Job.
E.g.,
|
1 |
<item name="entity_id" xsi:type="object">Firebear\ImportExport\Model\Migration\Field\Job\CopyEntityId</item> |
change to:
|
1 |
<item name="row_id" xsi:type="object">Firebear\ImportExport\Model\Migration\Field\Job\CopyEntityId</item> |
Also, note that this topic is often discussed on forums and in various materials across the entire web. For instance, you can check this Guide to explore an alternative view on the process.